CentOS 7.x及以上mysql安装和配置
在安装MySQL之前需要先将服务器的3306端口打开
-
下载MySQL源安装包:
wget http://dev.mysql.com/get/mysql57-community-release-el7-8.noarch.rpm -
安装MySQL源:
yum localinstall mysql57-community-release-el7-8.noarch.rpm -
安装MySQL:
yum install mysql-community-server -
设置开机启动MySQL服务:
systemctl enable mysqld# CentOS7.x以上的版本,程序控制指令 systemctl enable 程序名 - 开机自启动程序/服务 systemctl start 程序名 - 启动程序/服务 systemctl stop 程序名 - 关闭程序/服务 systemctl restart 程序名 - 重启程序/服务 systemctl disable 程序名 - 禁用程序/服务 注意: 这儿的程序名一般需要在你安装的程序的原名的基础上加d # CentOS7.x一下的版本,不能用systemctl来控制,需要直接使用mysql去调用相关指令(因为一般不会向低版本发展,所以可以不用管,如果需要可以查资料,网上很多) -
启动MySQL服务:
systemctl start mysqld -
设置MySQL登录密码
这个过程比较麻烦,请严格按照以下步骤完成!
第一步: 执行
systemctl stop mysqld关闭mysql服务第二步: 使用vim打开mysql配置文件
\etc\my.cnf,并且在末尾添加两行代码然后保存退出validate_password=off skip-grant-tables
第三步:执行
systemctl start mysqld开启mysql服务第四步:在shell中执行
mysql -u root -p设置密码(注意密码设置好以后要记住),并且按以下提示输入内容[root ~]# mysql -u root -p (需要输入的指令) Enter password: (这个地方自己设置密码,输入的时候不会有显示提示) Welcome to the MySQL monitor. Commands end with ; or \g. Your MySQL connection id is 10 Server version: 5.7.28 MySQL Community Server (GPL) Copyright (c) 2000, 2019, Oracle and/or its affiliates. All rights reserved. Oracle is a registered trademark of Oracle Corporation and/or its affiliates. Other names may be trademarks of their respective owners. Type 'help;' or '\h' for help. Type '\c' to clear the current input statement. mysql> update mysql.user set authentication_string=password("yuting123456") where user="root"; (设置连接密码,将yuting123456设置为自己的密码就行,最好和上面的密码保持一致,否则容易混乱) Query OK, 1 row affected, 1 warning (0.00 sec) Rows matched: 1 Changed: 1 Warnings: 1 mysql> flush privileges; (刷新权限) Query OK, 0 rows affected (0.00 sec) mysql> quit; (退出mysql指令模式) Bye第五步:执行
systemctl stop mysqld关闭mysql服务,然后重新打开mysql配置文件,注释或者删除之前添加的skip-grant-tables,保存退出后再执行systemctl start mysqld开启mysql服务
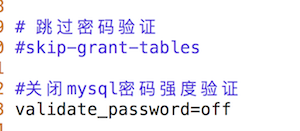
# 这个过程比较麻烦,请严格按照以下步骤完成! 第一步: 执行 'systemctl stop mysqld' 关闭mysql服务 第二步: 使用vim打开mysql配置文件 '\etc\my.cnf',并且在末尾添加两行代码(注意:只需要复制引号中的内容)然 后保存退出: 'validate_password=off #关闭mysql密码强度验证' 'skip-grant-tables #跳过密码验证' 第三步:执行 'systemctl start mysqld' 开启mysql服务 第四步:在shell中执行以'mysql -u root -p'设置密码(注意:密码设置好以后要记住) -
设置mysql能够远程访问
执行mysql -u root -p登录mysql添加远程连接权限。登录的密码就是之前设置的密码[root ~]# mysql -u root -p (需要输入的指令) Enter password: (输入密码) Welcome to the MySQL monitor. Commands end with ; or \g. Your MySQL connection id is 6 Server version: 5.7.28 MySQL Community Server (GPL) Copyright (c) 2000, 2019, Oracle and/or its affiliates. All rights reserved. Oracle is a registered trademark of Oracle Corporation and/or its affiliates. Other names may be trademarks of their respective owners. Type 'help;' or '\h' for help. Type '\c' to clear the current input statement. mysql> grant all privileges on *.* to 'root'@'%' identified by 'yuting123456' with grant option; (让所有的ip地址的设备都可以通过root账号并且密码是yuting123456进行连接;这个地方可以将%换成指定的某一个ip地址,%表示所有的ip; 如果出错执行: ALTER USER USER() IDENTIFIED BY '自己的密码';) Query OK, 0 rows affected, 1 warning (0.00 sec) mysql> flush privileges; (刷新权限) Query OK, 0 rows affected (0.00 sec) -
终于结束啦!!!
如果设置密码的时候失败,可以尝试通过执行 SET PASSWORD = PASSWORD(‘写你的新密码‘);来进行设置。
原创声明,如需转载请标明出处~
