anaconda
anaconda负责安装系统向导,默认为GUI界面,如果我们使用ks自动应答安装的话建议使用TUI界面来安装
在安装启动界面我们可以按esc键来自己手动指定安装启动选项
anaconda选项:
1)linux askmethod 在稍后的安装中手动选择安装源
本地光盘、硬盘、NFS、FTP、HTTP
2)linux dd 加载驱动盘
3)linux ks=xxx 指定安装ks文件
- DVD drive: ks=cdrom:/PATH/TO/KICKSTART_FILE
- Hard drive: ks=hd:device:/directory/KICKSTART_FILE
- HTTP server: ks=http://host:port/path/to/KICKSTART_FILE
- FTP server: ks=ftp://host:port/path/to/KICKSTART_FILE
- HTTPS server: ks=https://host:port/path/to/KICKSTART_FILE
- NFS server:ks=nfs:host:/path/to/KICKSTART_FILE
4)linux nonet 不启用网络
5)linux noprobe 不装载其他的硬件设备
6)linux rescue 进入救援模式
7)linux 正常安装
8)local 从硬盘启动
9)linux text 以字符界面安装
10)linux ip={DHCP | 192.168.0.1} netmask=255.255.255.0 gateway=192.168.0.1 dns=114.114.114.114 ks=http://192.168.0.1/ks.cfg 设置IP并从网络获取ks文件
11)linux ip={DHCP | 192.168.0.1} netmask=255.255.255.0 gateway=192.168.0.1 dns=114.114.114.114 repo=http://192.168.0.1 设置IP地址并指定从repo源安装
- ip=IPADDR
- netmask=MASK
- gateway=GW
- dns=DNS_SERVER_IP
- ifname=NAME:MAC_ADDR
12)linux vnc vncpassword="PASSWORD" 使用vnc调用安装界面
在光盘下的isolinux/文件夹为anaconda的工作目录文件存放位置

# ls -1 isolinux/
boot.cat  模拟mbr文件
boot.msg
grub.conf grub的配置文件
initrd.img  ramdisk文件
isolinux.bin  grub的第二阶段
isolinux.cfg  配置文件(启动菜单定制文件)
memtest  内存测试文件
splash.jpg  背景图片
TRANS.TBL
vesamenu.c32  光盘启动的图形界面菜单风格
vmlinuz  内核文件
启动菜单的配置文件isolinux/isolinux.cfg
# cat isolinux/isolinux.cfg
default vesamenu.c32 提供图形菜单风格
#prompt 1
timeout 600 菜单选择超时时间

display boot.msg

menu background splash.jpg  背景图片
menu title Welcome to CentOS 6.9!  菜单上方提示信息
menu color border 0 #ffffffff #00000000
menu color sel 7 #ffffffff #ff000000
menu color title 0 #ffffffff #00000000
menu color tabmsg 0 #ffffffff #00000000
menu color unsel 0 #ffffffff #00000000
menu color hotsel 0 #ff000000 #ffffffff
menu color hotkey 7 #ffffffff #ff000000
menu color scrollbar 0 #ffffffff #00000000

label linux  一条菜单
  menu label ^Install or upgrade an existing system
  menu default 默认选择
  kernel vmlinuz
  append initrd=initrd.img  向内核传递参数
anaconda工作过程
Anaconda安装系统分成三个阶段:
1、安装前配置阶段
- 安装过程使用的语言
- 键盘类型
- 安装目标存储设备
- 设定主机名
- 配置网络接口
- 时区
- 管理员密码
- 设定分区方式及MBR的安装位置
- 创建一个普通用户
- 选定要安装的程序包
2、安装阶段
- 在目标磁盘创建分区,执行格式化操作等
- 将选定的程序包安装至目标位置
- 安装bootloader和initramfs
3、图形模式首次启动
- iptables
- selinux
- core dump
kickstart自动应答文件
kickstart为anaconda安装系统过程中自动应答已配置好的选项,实现无人值守安装系统。
ks文件格式:三部分
命令段:
---必须指定---
- keyboard
- lang
- timezone
- rootpw
- authconfig --enableshadow
- bootloader --location=mbr --password=******
- driverdisk 指定驱动盘
- firewall --enable --ssh,--disabled
- firstboot --disbaled
- halt 完成后关机
- reboot 完成后重启
- text|graphical(default) 文本|图像
- key --skip 跳过安装号码,适用于rhel版本
---可选命令---
- clearpart --all,--linux,--none(default) --initlabel(初始化分区标记)
- autopart 自动分区
- ignoredisk --drives=drive1,drive2忽略硬盘
- autostep 跳过可选项,付默认值
- part or partition /boot --fstype ext4 --size=200
软件包选择段:%package
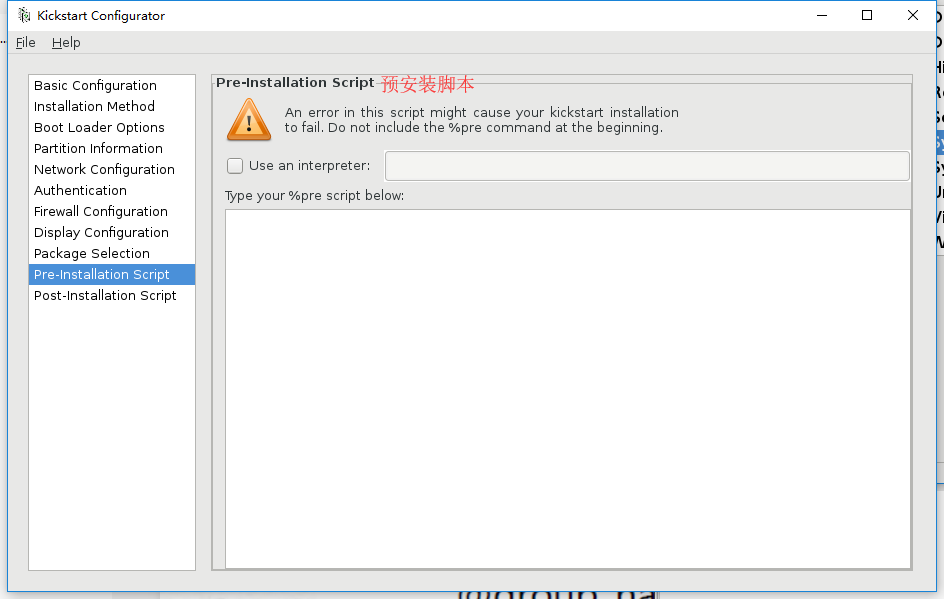
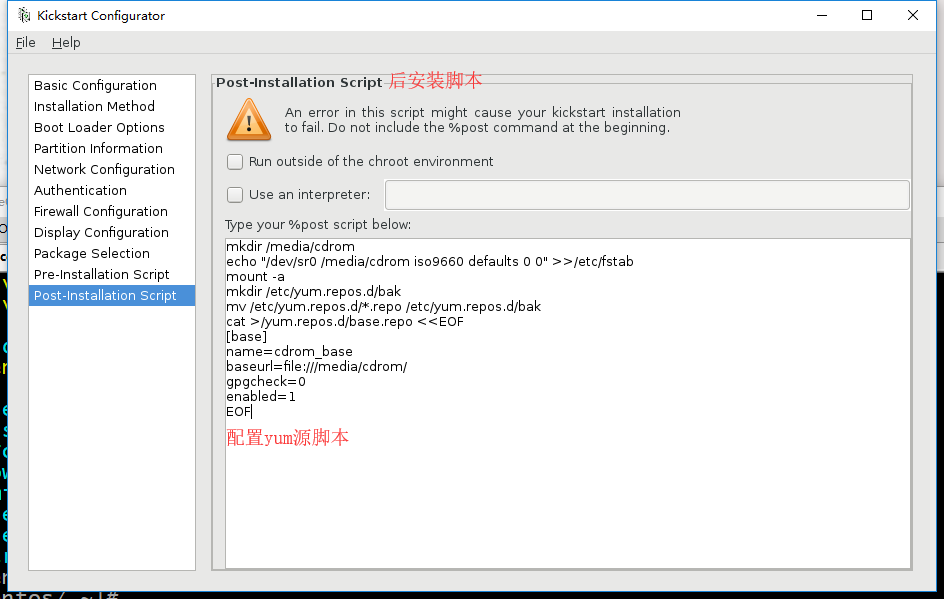
脚本段:
预安装脚本%pre
后安装脚本%post
我们了解了ks文件的格式之后来创建一个ks文件吧,创建的方式有俩种,我们可以直接参考 /root/anaconda-ks.cfg 来编辑,然后使用ksvalidator命令来检查是否有语法错误,但是这样不是很方便;第二种方法就是使用system-config-kickstart 图形界面工具生成ks文件。
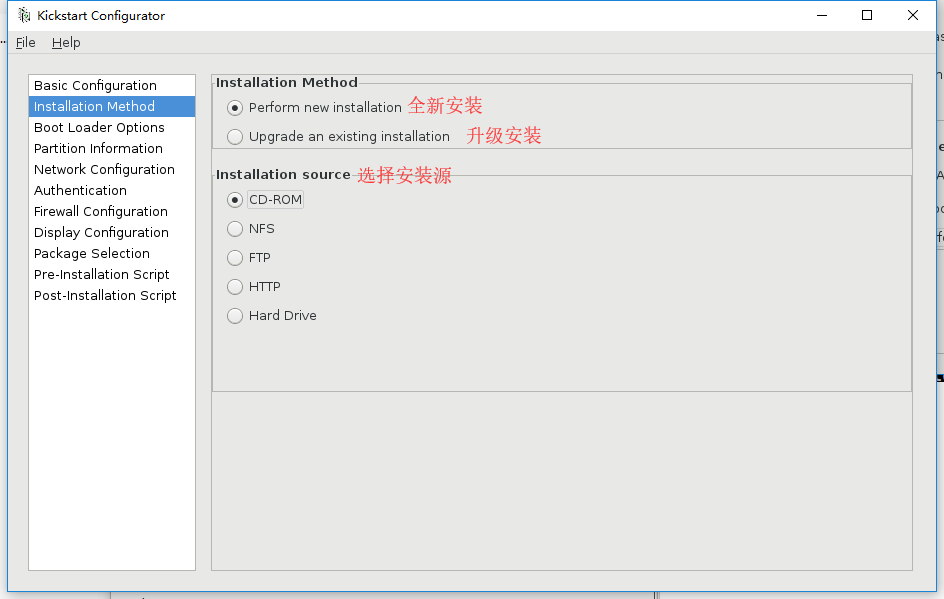
使用 system-config-kickstart 来创建ks文件(CentOS7.x)
1、配置yum源、安装软件并启动,需要安装图形界面
root@centos7 ~]# cat /etc/yum.repos.d/cdrom.repo
[development]  #为了让system-config-kickstart读取软件包
name=cdrom_base
baseurl=file:///media/cdrom/
gpgcheck=0
enabled=1
[root@centos7 ~]# yum install system-config-kickstart
[root@centos7 ~]# system-config-kickstart &
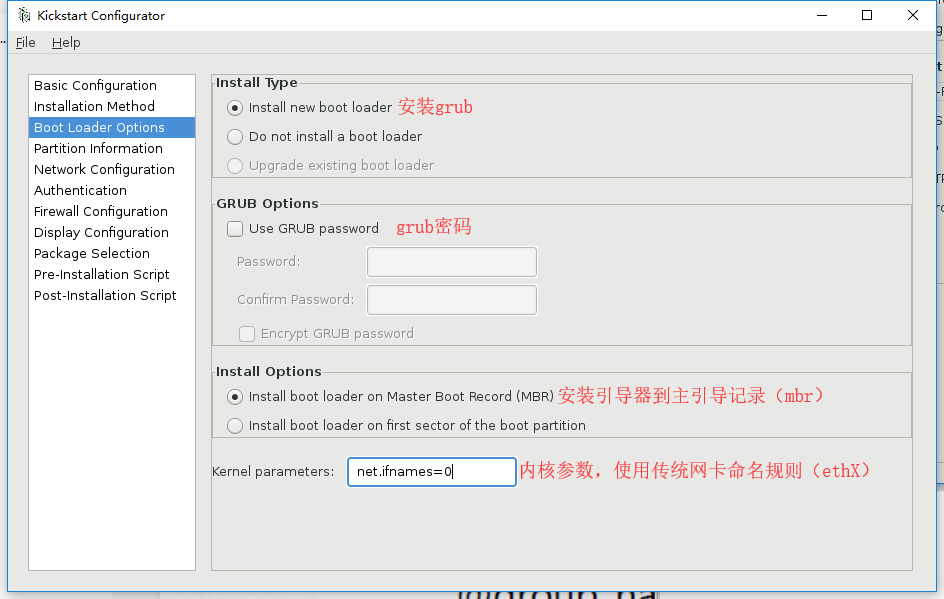
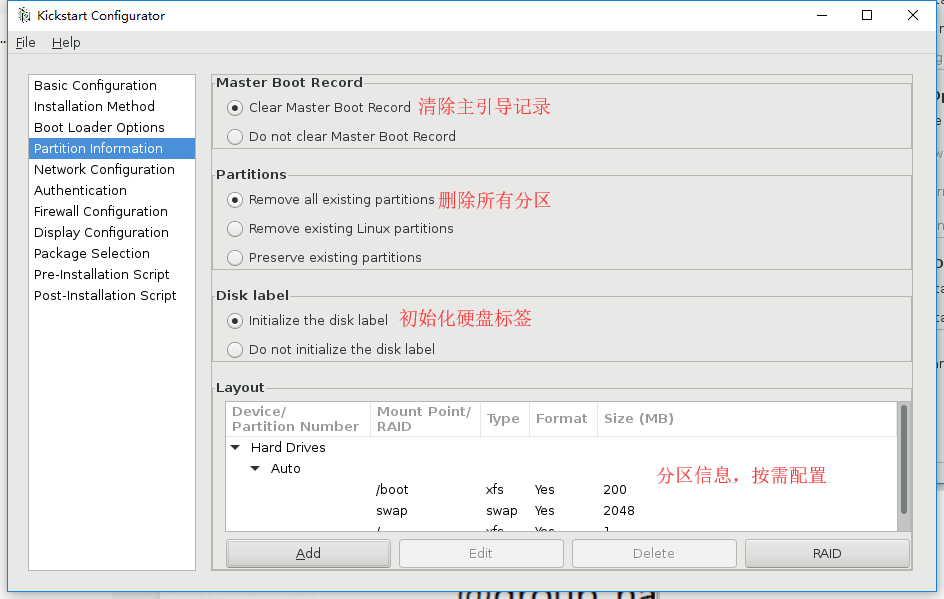
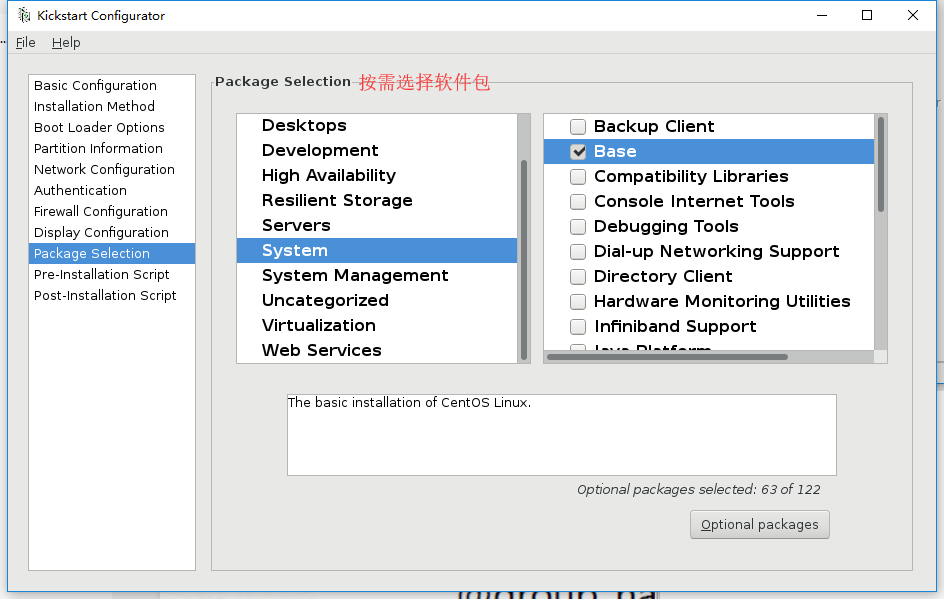
2、按需配置


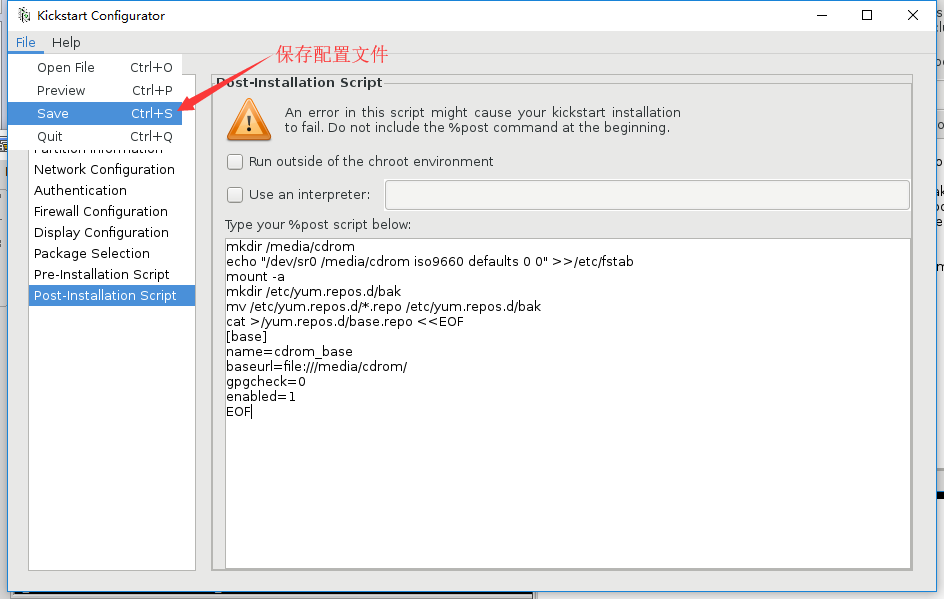
ks.cfg配置文件,以上步骤生成
[root@centos7 data]# cat ks.cfg
#platform=x86, AMD64, or Intel EM64T
#version=DEVEL
# Install OS instead of upgrade
install
# Keyboard layouts
keyboard 'us'
# Root password
rootpw --iscrypted $1$.4cA9H18$yFklftvKKTJ78OmWBqAPz1
# System language
lang en_US
# System authorization information
auth  --useshadow  --passalgo=sha512
# Use CDROM installation media
cdrom
# Use text mode install
text #文本文件安装
# SELinux configuration
selinux --disabled
# Do not configure the X Window System
skipx

# Firewall configuration
firewall --disabled
# Network information
network  --bootproto=static --device=eth0 --gateway=192.168.0.1 --ip=192.168.0.222 --nameserver=114.114.114.114 --netmask=255.255.255.0
# Reboot after installation
reboot
# System timezone
timezone Asia/Shanghai #时区
# System bootloader configuration
bootloader --append="net.ifnames=0" --location=mbr
# Clear the Master Boot Record
zerombr
# Partition clearing information
clearpart --all --initlabel
# Disk partitioning information
part /boot --fstype="xfs" --size=200
part swap --fstype="swap" --size=2048
part / --fstype="xfs" --grow --size=1 #表示根分区使用剩余全部空间

%packages
@^minimal
@core
@base

%end
ks文件中LVM逻辑卷分区格式
part /boot --fstype xfs --size=200 --ondisk=sda
part pv.2 --size=0 --grow --ondisk=sda
volgroup myvg --pesize=4096 pv.2
logvol / --fstype xfs --name=lv_root --vgname=myvg --size=10240 --grow
logvol swap --fstype swap --name=lv_swap --vgname=myvg --size=1024 --grow --maxsize=2048
ks文件中使用系统自动分区格式
# Partition clearing information
clearpart --all --initlabel
autopartc
制作自动应答光盘
我们现在已经有一个ks文件了,接下来需要把ks文件加入到光盘文件中来实现自动安装
1、准备安装文件
[root@centos7 ~]# mkdir -p /data/myiso
[root@centos7 ~]# cp -r /media/cdrom/ /data/myiso/
[root@centos7 ~]# cp /data/ks_7_mini.cfg /data/myiso/cdrom/ksdir/
2、编辑配置文件
[root@centos7 ~]# vim /data/myiso/cdrom/isolinux/isolinux.cfg #增加一个label
label linux
  menu label ^Ks_Install CentOS 7_mini
  kernel vmlinuz
  append initrd=initrd.img text ks=cdrom:/ksdir/ks_7_mini.cfg
3、制作ISO文件
[root@centos7 ~]# mkisofs -R -J -T -v --no-emul-boot --boot-load-size 4 --boot-info-table -V "CentOS_7.5_x86_64" -b isolinux/isolinux.bin -c isolinux/boot.cat -o /data/CentOS-7.5-x86_64.iso /data/myiso/cdrom
mkisofs命令
- -o 指定映像文件的名称
- -b 指定在制作可开机光盘时所需的开机映像文件
- -c 制作可开机光盘时,会将开机映像文件中的 no-eltorito-catalog 全部内容作成一个文件
- -no-emul-boot 非模拟模式启动
- -boot-load-size 4 设置载入部分的数量
- -boot-info-table 在启动的图像中现实信息
- -R 或 -rock 使用 Rock RidgeExtensions
- -J 或 -joliet 使用 Joliet 格式的目录与文件名称
- -v 或 -verbose 执行时显示详细的信息
- -T 或 -translation-table 建立文件名的转换表,适用于不支持 Rock RidgeExtensions 的系统上
PXE安装系统
Preboot Excution Environment 预启动执行环境,Intel公司研发,基于Client/Server的网络模式,支持远程主机通过网络从远端服务器下载映像,并由此支持通过网络启动操作系统,PXE可以引导和安装Windows,linux等多种操作系统。
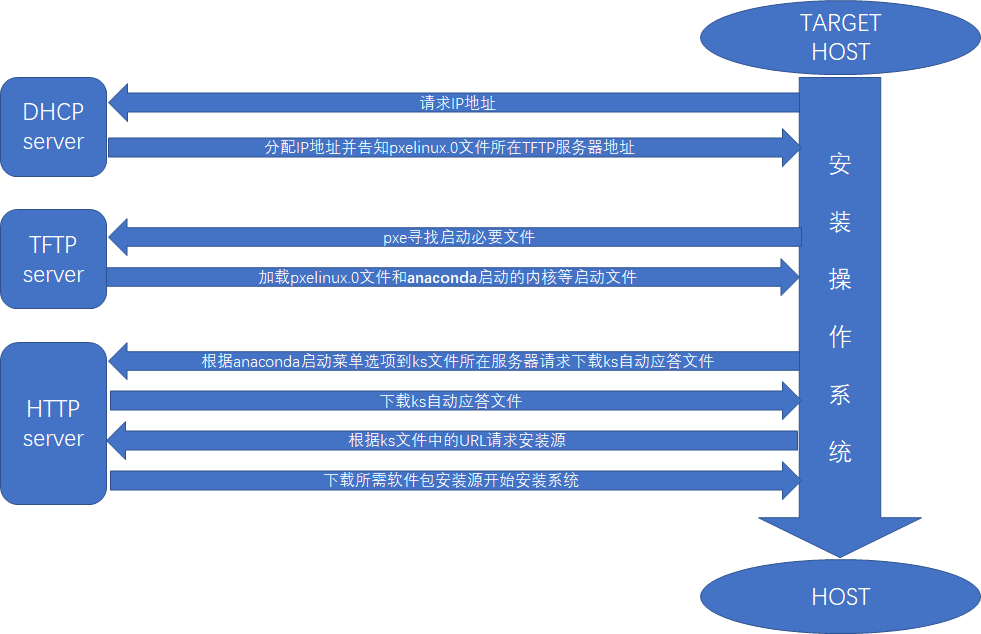
pxe工作原理
- Client向PXE Server上的DHCP发送IP地址请求消息,DHCP检测Client是否合法(主要是检测Client的网卡MAC地址),如果合法则返回Client的IP地址,同时将启动文件pxelinux.0的位置信息一并传送给Client
- Client向PXE Server上的TFTP发送获取pxelinux.0请求消息,TFTP接收到消息之后再向Client发送pxelinux.0大小信息,试探Client是否满意,当TFTP收到Client发回的同意大小信息之后,正式向Client发送pxelinux.0
- Client执行接收到的pxelinux.0文件
- Client向TFTP Server发送针对本机的配置信息文件(在TFTP 服务的pxelinux.cfg目录下),TFTP将配置文件发回Client,继而Client根据配置文件执行后续操作。
- Client向TFTP发送Linux内核请求信息,TFTP接收到消息之后将内核文件发送给Client
- Client向TFTP发送根文件请求信息,TFTP接收到消息之后返回Linux根文件系统
- Client启动Linux内核
- Client下载安装源文件,读取自动化安装脚本
示例:配置pxe服务器端,支持CentOS6和CentOS7的安装(pxe+dhcpd+tftp-server+httpd)
准备环境:CentOS6.9,静态IP(必须):192.168.0.6,CentOS6.9和CentOS7.5的ISO镜像
关闭防火墙和selinux
[root@centos6 ~]# yum install -y dhcp tftp-server httpd syslinux
[root@centos6 ~]# mkdir /media/centos{6,7}
[root@centos6 ~]# mount -r /dev/sr0 /media/centos6/
[root@centos6 ~]# mount -r /dev/sr1 /media/centos7/
1)配置dhcp
[root@centos6 ~]# vim /etc/dhcp/dhcpd.conf
log-facility local7; #记录日志级别
subnet 192.168.0.0 netmask 255.255.255.0 {   #分配子网,和自己主机一个网段
  range 192.168.0.100 192.168.0.254; #地址池
  option domain-name-servers 114.114.114.114; #DNS
  option domain-name "pxe.test.org"; #搜索域
  option routers 192.168.0.1; #路由网关
  default-lease-time 600; #默认租约时间
  max-lease-time 7200; #最大租约时间
  next-server 192.168.0.6; #*指向tftp服务器地址,此处指向本机
  filename "pxelinux.0"; #pxe文件名,系统默认为pxelinux.0
}
[root@centos6 ~]# service dhcpd start #启动dhcp服务
[root@centos6 ~]# chkconfig dhcpd on #加入开机启动
2)配置tftp-server
[root@centos6 ~]# chkconfig tftp on
[root@centos6 ~]# service xinetd start
3)准备启动文件
[root@centos6 ~]# cd /var/lib/tftpboot/
[root@centos6 tftpboot]# mkdir centos{6,7}
[root@centos6 tftpboot]# mkdir pxelinux.cfg/
[root@centos6 tftpboot]# cp /media/centos6/isolinux/{initrd.img,vmlinuz} centos6/
[root@centos6 tftpboot]# cp /media/centos7/isolinux/{initrd.img,vmlinuz} centos7/
[root@centos6 tftpboot]# cp /media/centos6/isolinux/{boot.msg,splash.jpg,vesamenu.c32} .
[root@centos6 tftpboot]# cp /usr/share/syslinux/pxelinux.0 .
[root@centos6 tftpboot]# install -m 644 /media/centos6/isolinux/isolinux.cfg pxelinux.cfg/default
[root@centos6 tftpboot]# vim pxelinux.cfg/default
default vesamenu.c32
timeout 60
display boot.msg
menu background splash.jpg
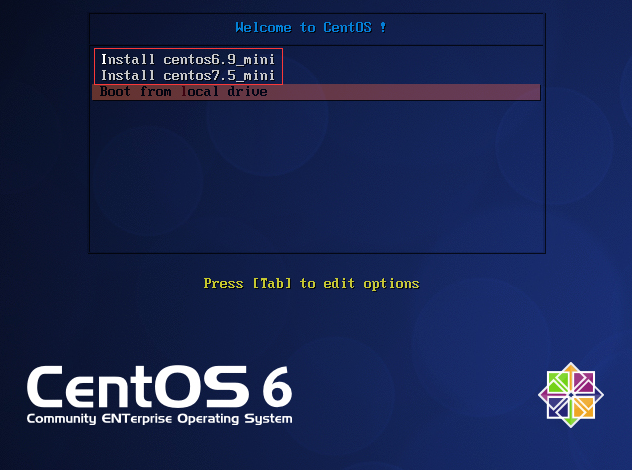
menu title Welcome to CentOS !
label linux
menu label ^Install centos6.9_mini
kernel centos6/vmlinuz
append initrd=centos6/initrd.img ks=http://192.168.0.6/ksdir/ks6_mini.cfg
label linux
menu label ^Install centos7.5_mini
kernel centos7/vmlinuz
append initrd=centos7/initrd.img ks=http://192.168.0.6/ksdir/ks7_mini.cfg
label local
menu default
menu label Boot from ^local drive
localboot 0xffff
[root@centos6 tftpboot]# tree
.
├── boot.msg
├── centos6
│   ├── initrd.img
│   └── vmlinuz
├── centos7
│   ├── initrd.img
│   └── vmlinuz
├── pxelinux.0
├── pxelinux.cfg
│   └── default
├── splash.jpg
└── vesamenu.c32
4)准备安装源
[root@centos6 ~]# mkdir -p /var/www/html/centos/{6,7}
[root@centos6 ~]# mount -r /dev/sr0 /var/www/html/centos/6/
[root@centos6 ~]# mount -r /dev/sr1 /var/www/html/centos/7/
[root@centos6 ~]# mkdir -p /var/www/html/ksdir/
[root@centos6 ~]# cp ks6_mini.cfg ks7-mini.cfg /var/www/html/ksdir/
[root@centos6 ~]# service httpd start
[root@centos6 ~]# chkconfig httpd on
5)检查并测试
[root@centos6 ~]# netstat -tnul  #查看以下端口是否都监听
tcp        0      0 :::80                       :::*                        LISTEN
udp        0      0 0.0.0.0:67                  0.0.0.0:*
udp        0      0 0.0.0.0:69                  0.0.0.0:*
ks文件示例
#platform=x86, AMD64, or Intel EM64T
#version=DEVEL
# Firewall configuration
firewall --disabled
# Install OS instead of upgrade
install
# Use network installation
url --url="http://192.168.0.10/centos/6/"
# Root password
rootpw --iscrypted $1$sQ90pp9b$TI8EEelvqSLdsrjDoPwrN/
# System authorization information
auth  --useshadow  --passalgo=sha512
# Use text mode install
text
# System keyboard
keyboard us
# System language
lang en_US
# SELinux configuration
selinux --disabled
# Do not configure the X Window System
skipx
# Installation logging level
logging --level=info
# Reboot after installation
reboot
# System timezone
timezone  Asia/Shanghai
# Network information
network  --bootproto=dhcp --device=eth0 --onboot=on
# System bootloader configuration
bootloader --location=mbr
# Clear the Master Boot Record
zerombr
# Partition clearing information
clearpart --all --initlabel
# Disk partitioning information
autopart

%packages
@core
%end