目录

1.AOP
1.1AOP介绍
1.1.1 什么是AOP
在软件业,AOP为Aspect Oriented Programming的缩写,意为:面向切面编程,通过预编译方式和运行期动态代理实现程序功能的统一维护的一种技术。AOP是OOP(面向对象编程)的延续,是软件开发中的一个热点,也是Spring框架中的一个重要内容,是函数式编程的一种衍生范型。利用AOP可以对业务逻辑的各个部分进行隔离,从而使得业务逻辑各部分之间的耦合度降低,提高程序的可重用性,同时提高了开发的效率。
- AOP采取横向抽取机制,取代了传统纵向继承体系重复性代码(这句话可以这么理解:要给目标方法前后添加事务,可以用传统的继承方法,但是需要给每个方法都添加重复性的事务代码)

- 经典应用:事务管理、性能监视、安全检查、缓存 、日志等
- Spring AOP使用纯Java实现,不需要专门的编译过程和类加载器,在运行期通过代理方式向目标类织入增强代码
- AspectJ是一个基于Java语言的AOP框架,Spring2.0开始,Spring AOP引入对Aspect的支持,AspectJ扩展了Java语言,提供了一个专门的编译器,在编译时提供横向代码的织入
1.1.2 AOP实现原理
aop底层采用代理机制进行实现
- 接口+实现类的情况:采用 jdk 的动态代理Proxy
- 只有实现类的情况:采用 cglib字节码增强方式
1.1.3 AOP术语(掌握)
- target(目标类):需要被代理的类。例如:UserService
- Joinpoint(连接点):所谓连接点是指那些可能被拦截到的方法。例如:所有的方法
- PointCut(切入点):已经被增强的连接点。例如:addUser()
- advice(通知/增强) :增强代码。例如:after、before
- Weaving(织入):是指把增强advice应用到目标对象target来创建新的代理对象proxy的过程。
- proxy(代理类)
- Aspect(切面):是切入点pointcut和通知advice的结合。
一个切入点和一个通知,组成成一个特殊的面。
下面举个例子:我们有一个UserService的类,其中有一些方法,如addUser(), updateUser(), deleteUser(),我们现在需要在每个方法的前后进行事物的处理,执行目标方法前开启事物,执行目标方法后提交事务,我们将上面的术语用下图来表示。

1.2 手动方式配置
1.2.1 JDK动态代理
JDK动态代理 是对“装饰者”设计模式(有多少方法要全部实现)的简化。使用前提:必须有接口。需要创建以下几个类:
- 1.目标类:接口 + 实现类
- 2.切面类:用于存放通知的类 MyAspect
- 3.工厂类:编写工厂生成代理
- 4.测试
举例:
目标类:
public class UserServiceImpl implements UserService {

	@Override
	public void addUser() {
		System.out.println("a_proxy.a_jdk addUser");
	}

	@Override
	public void updateUser() {
		System.out.println("a_proxy.a_jdk updateUser");
	}

	@Override
	public void deleteUser() {
		System.out.println("a_proxy.a_jdk deleteUser");
	}

}
切面类:
public class MyAspect {
	public void before(){
		System.out.println("开启事务");

	}

	public void after(){
		System.out.println("提交事务");
	}

}
工厂类(生成代理):
public class MyBeanFactory {
	public static UserService createService(){
		//1.目标类
		final UserService userService = new UserServiceImpl();
		//2.切面类
		final MyAspect myAspect = new MyAspect();
		//3.代理类
		UserService proxyService = (UserService) Proxy.newProxyInstance(
				MyBeanFactory.class.getClassLoader(),
				userService.getClass().getInterfaces(),
				new InvocationHandler() {

					@Override
					public Object invoke(Object proxy, Method method, Object[] args)
							throws Throwable {
							myAspect.before();
							Object obj = method.invoke(userService, args);
							myAspect.after();
							return obj;
					}
				});

		return proxyService;
	}

}
对代理类的解释:
/* 3 代理类:将目标类(切入点)和 切面类(通知) 结合 --> 切面
* Proxy.newProxyInstance
* 参数1:loader ,类加载器,动态代理类 运行时创建,任何类都需要类加载器将其加载到内存。
* 一般情况:当前类.class.getClassLoader();
* 或者 目标类实例.getClass().getClassLoader();
* 参数2:Class[] interfaces 代理类需要实现的所有接口
* 方式1:目标类实例.getClass().getInterfaces() ;注意:只能获得自己接口,不能获得父元素接口
* 方式2:new Class[]{UserService.class}
* 例如:jdbc 驱动 --> DriverManager 获得接口 Connection
* 参数3:InvocationHandler 处理类,接口,必须进行实现类,一般采用匿名内部
* 提供 invoke 方法,代理类的每一个方法执行时,都将调用一次invoke
* 参数31:Object proxy :代理对象
* 参数32:Method method : 代理对象当前执行的方法的描述对象(反射)
* 执行方法名:method.getName()
* 执行方法:method.invoke(对象,实际参数)
* 参数33:Object[] args :方法实际参数
*
*/
测试类:
public class TestJDK {
	@Test
	public void demo(){
		UserService userService = MyBeanFactory.createService();
		userService.addUser();
		userService.updateUser();
		userService.deleteUser();
	}

}
1.2.2 CGLIB字节码增强
cglib字节码增强适用于没有接口,只有实现类的情况
采用字节码增强框架 cglib,在运行时创建目标类的子类,从而对目标类进行增强。
导包
因为框架是第三方的东西,所以我们需要导入包。有两种方式:
自己导包(了解):
核心:hibernate-distribution-3.6.10.Final\lib\bytecode\cglib\cglib-2.2.jar
依赖:struts-2.3.15.3\apps\struts2-blank\WEB-INF\lib\asm-3.3.jar
spring-core..jar 已经整合以上两个内容:spring-core-3.2.0.RELEASE.jar

工厂类 (目标类与动态代理相同,只是去掉接口)
public class MyBeanFactory {
	public static UserServiceImpl createService(){
		//1.目标类
		final UserServiceImpl userServiceImpl = new UserServiceImpl();
		//2.切面类
		final MyAspect myAspect = new MyAspect();
		//3.代理类 ,采用cglib,底层创建目标类的子类

		//3.1核心类
		Enhancer enhancer = new Enhancer();
		//3.2确定父类
		enhancer.setSuperclass(userServiceImpl.getClass());

		/* 3.3 设置回调函数 , MethodInterceptor接口 等效 jdk InvocationHandler接口
		 * 	intercept() 等效 jdk  invoke()
		 * 		参数1、参数2、参数3:以invoke一样
		 * 		参数4:methodProxy 方法的代理
		 */
		enhancer.setCallback(new MethodInterceptor() {

			@Override
			public Object intercept(Object proxy, Method method, Object[] args,
					MethodProxy methodProxy) throws Throwable {
				myAspect.before();
				method.invoke(userServiceImpl, args);
				// * 执行代理类的父类 ,执行目标类 (目标类和代理类 父子关系)
				methodProxy.invokeSuper(proxy, args);
				myAspect.after();
				return null;
			}
		});

		//3.4创建代理
		UserServiceImpl proxyService = (UserServiceImpl) enhancer.create();
		return proxyService;
	}
}
jdk的动态代理和cglib的代理的真实值的比较


1.3 AOP联盟通知类型
AOP联盟给Spring的AOP编程制定了许多规范。AOP联盟为通知Advice定义了org.aopalliance.aop.Advice
Spring按照通知Advice在目标类方法的连接点位置,可以分为5类
• 前置通知 org.springframework.aop.MethodBeforeAdvice
• 在目标方法执行前实施增强
• 后置通知 org.springframework.aop.AfterReturningAdvice
• 在目标方法执行后实施增强
• 环绕通知 org.aopalliance.intercept.MethodInterceptor
• 在目标方法执行前后实施增强
• 异常抛出通知 org.springframework.aop.ThrowsAdvice
• 在方法抛出异常后实施增强
• 引介通知 org.springframework.aop.IntroductionInterceptor(不讲,用的很少)
• 在目标类中添加一些新的方法和属性

1.4 Spring编写代理:半自动
之前都是我们手动地创建代理对象,半自动的方式可以理解为:让Spring创建代理对象,我们从Spring容器中手动的获取代理对象
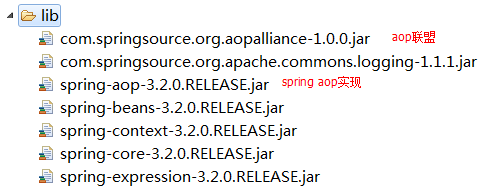
导入jar包:【核心:4+1(四个核心一个依赖);aop:aop联盟(规范);spring-aop(实现)】
目标类
package com.syc.b_factory_bean;

public class UserServiceImpl implements UserService {

	@Override
	public void addUser() {
		System.out.println("b_factory_bean addUser");
	}

	@Override
	public void updateUser() {
		System.out.println("b_factory_bean updateUser");
	}

	@Override
	public void deleteUser() {
		System.out.println("b_factory_bean deleteUser");
	}

}
切面类 切面类中采用环绕通知,要手动执行目标方法
package com.syc.b_factory_bean;

import org.aopalliance.intercept.MethodInterceptor;
import org.aopalliance.intercept.MethodInvocation;


/*
 * 因为要用spring的aop,所以要用规范。切面类中确定通知,需要实现不同的接口,接口就是规范,用于确定不同的方法
 * 采用环绕通知(环绕通知必须手动地执行目标方法)
 */
public class MyAspect implements MethodInterceptor{

	@Override
	public Object invoke(MethodInvocation mi) throws Throwable {
		System.out.println("前方法");
		//手动执行目标方法
		Object obj = mi.proceed();
		System.out.println("后方法");
		return obj;
	}

}
Spring配置
<?xml version="1.0" encoding="UTF-8"?>
<beans xmlns="http://www.springframework.org/schema/beans"
       xmlns:xsi="http://www.w3.org/2001/XMLSchema-instance"
       xsi:schemaLocation="http://www.springframework.org/schema/beans
       	                   http://www.springframework.org/schema/beans/spring-beans.xsd">


	<!--1.创建目标类  -->
	<bean id="userServiceId" class="com.syc.b_factory_bean.UserServiceImpl"></bean>

	<!--2.创建切面类  -->
	<bean id="myAspectId" class="com.syc.b_factory_bean.MyAspect"></bean>

	<!--3.创建代理类
		*使用工厂bean FactoryBean,底层调用getObject,返回特殊bean
		*ProxyFactoryBean 用于创建代理工厂bean,用于生成特殊代理对象
		*interfaces确定接口们,通过<array>可以设置多个值,只有一个值时,直接用value=""
		*target目标类
		*interceptorNames通知,切面类的名称,类型为String[],只有一个值直接用value=""
          <property name="optimize" value="true"></property>强制使用cglib
          底层机制
		如果目标类有接口,采用jdk动态代理
		如果没有接口,采用cglib 字节码增强
		如果声明 optimize = true ,无论是否有接口,都采用cglib
	  -->
	<bean id="proxyServiceId" class="org.springframework.aop.framework.ProxyFactoryBean">
		<property name="interfaces" value="com.syc.b_factory_bean.UserService"></property>
		<property name="target" ref="userServiceId"></property>
		<property name="interceptorNames" value="myAspectId"></property>
	</bean>

</beans>
测试类
package com.syc.b_factory_bean;

import org.junit.Test;
import org.springframework.context.ApplicationContext;
import org.springframework.context.support.ClassPathXmlApplicationContext;

public class TestFactoryBean {
	@Test
	public void demo(){
		String xmlPath = "com/syc/b_factory_bean/beans.xml";
		ApplicationContext applicationContext = new ClassPathXmlApplicationContext(xmlPath);
		//获取代理类
		UserService userService = (UserService) applicationContext.getBean("proxyServiceId");
		userService.addUser();
		userService.updateUser();
		userService.deleteUser();
	}

}

该方法是半自动的,原因是我们声明式地去拿代理了,并且配置了很多信息。
1.5 Spring aop编程 全自动【掌握】
全自动编程中从spring容器中获得目标类,而不是代理类,如果配置了aop,spring将自动生成代理
要确定目标类,使用aspectj切入点表达式
1.5.1 导入jar包
spring-framework-3.0.2.RELEASE-dependencies\org.aspectj\com.springsource.org.aspectj.weaver\1.6.8.RELEASE

1.5.2 添加命名空间
打开文档,找到2.7部分的aop schema
spring/spring-framework-3.2.0.RELEASE-dist/spring-framework-3.2.0.RELEASE/docs/spring-framework-reference/html/xsd-config.html

1.5.3 Spring配置
<?xml version="1.0" encoding="UTF-8"?>
<beans xmlns="http://www.springframework.org/schema/beans"
       xmlns:xsi="http://www.w3.org/2001/XMLSchema-instance"
       xmlns:aop="http://www.springframework.org/schema/aop"
       xsi:schemaLocation="http://www.springframework.org/schema/beans
       	                   http://www.springframework.org/schema/beans/spring-beans.xsd
       	                   http://www.springframework.org/schema/aop
       	                   http://www.springframework.org/schema/aop/spring-aop.xsd">


	<!--1.创建目标类  -->
	<bean id="userServiceId" class="com.syc.c_spring_aop.UserServiceImpl"></bean>

	<!--2.创建切面类  -->
	<bean id="myAspectId" class="com.syc.c_spring_aop.MyAspect"></bean>

	<!--3.aop编程
		*3.1导入命名空间
		*3.2 使用<aop:config>进行配置
			 proxy-target-class="true" 声明式使用cglib代理
			 <aop:pointcut>切入点,从目标对象获得具体的方法
		 	 <aop:advisor>特殊的切面,只有一个通知和一个切入点
				advice-ref通知的引用
				pointcut-ref切入点的引用
		*3.3切入点表达式
			execution(* com.syc.c_spring_aop.*.*(..))
			选择方法 返回值任意   包        类名任意 方法名任意  参数任意
	 -->
	<aop:config>
		<aop:pointcut expression="execution(* com.syc.c_spring_aop.*.*(..))" id="myPointCut"/>
		<aop:advisor advice-ref="myAspectId" pointcut-ref="myPointCut"/>
	</aop:config>

</beans>
1.5.4 测试类
package com.syc.c_spring_aop;

import org.junit.Test;
import org.springframework.context.ApplicationContext;
import org.springframework.context.support.ClassPathXmlApplicationContext;

public class TestSpringAOP {
	@Test
	public void demo(){
		String xmlPath = "com/syc/c_spring_aop/beans.xml";
		ApplicationContext applicationContext = new ClassPathXmlApplicationContext(xmlPath);
		//获取目标类
		UserService userService = (UserService) applicationContext.getBean("userServiceId");
		userService.addUser();
		userService.updateUser();
		userService.deleteUser();
	}

}

2 AspectJ
2.1 介绍
- AspectJ是一个基于Java语言的AOP框架
- Spring2.0以后新增了对AspectJ切点表达式支持
- @AspectJ 是AspectJ1.5新增功能,通过JDK5注解技术,允许直接在Bean类中定义切面
- 新版本Spring框架,建议使用AspectJ方式来开发AOP
- 主要用途:自定义开发
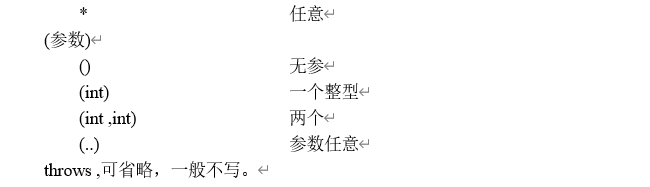
2.2 切入点表达式【掌握】
execution()用于描述方法

例如:
1.execution(* com.syc.crm.*.service..*.*(..))
返回值任意,com.syc.crm下的任意子包下的service包及子包,拿到所有的接口与实现类,实现类名任意,方法名任意,参数任意
<aop:pointcut expression="execution(...) || execution(...)" id="myPointCut"/> 匹配两个表达式
2.within:匹配包或子包中的方法(了解)
within(com.syc.aop..*)
3.this:匹配实现接口的代理对象中的方法(了解)
this(com.syc.aop.user.UserDAO)
4.target:匹配实现接口的目标对象中的方法(了解)
target(com.syc.aop.user.UserDAO)
5.args:匹配参数格式符合标准的方法(了解)
args(int,int)
6.bean(id) 对指定的bean所有的方法(了解)
bean('userServiceId')
2.3 AspectJ通知类型
- aop联盟定义通知类型,具有特性接口,必须实现,从而确定方法名称。
- aspectj 通知类型,只定义类型名称,以及方法格式。
个数:6种,知道5种,掌握1种。(还有一个引介通知不要求了解,declareParents)
before:前置通知(应用:各种校验)
在方法执行前执行,如果通知抛出异常,阻止方法运行
afterReturning:后置通知(应用:常规数据处理)
方法正常返回后执行,如果方法中抛出异常,通知无法执行
必须在方法执行后才执行,所以可以获得方法的返回值。
around:环绕通知(应用:十分强大,可以做任何事情)
方法执行前后分别执行,可以阻止方法的执行
必须手动执行目标方法
afterThrowing:抛出异常通知(应用:包装异常信息)
方法抛出异常后执行,如果方法没有抛出异常,无法执行
after:最终通知(应用:清理现场)
方法执行完毕后执行,无论方法中是否出现异常 - 五种通知类型对应try/catch块如下

在jar包中对应的类:

看AfterThrowingAdvice源码:

AfterAdvice源码:

2.4 基于XML
基于xml的aspectj需要以下内容
1.目标类:接口 + 实现
2.切面类:编写多个通知,采用aspectj 通知名称任意(方法名任意)
3.aop编程,将通知应用到目标类
4.测试
目标类直接采用上述的接口+实现类
前置通知
public class MyAspect{
	public void myBefore(JoinPoint joinPoint){
		System.out.println("前置通知:"+joinPoint.getSignature().getName());
	}
}
<?xml version="1.0" encoding="UTF-8"?>
<beans xmlns="http://www.springframework.org/schema/beans"
xmlns:xsi="http://www.w3.org/2001/XMLSchema-instance"
xmlns:aop="http://www.springframework.org/schema/aop"
xsi:schemaLocation="http://www.springframework.org/schema/beans
http://www.springframework.org/schema/beans/spring-beans.xsd
http://www.springframework.org/schema/aop
http://www.springframework.org/schema/aop/spring-aop.xsd">
<!--1.创建目标类 -->
<bean id="userServiceId" class="com.syc.d_aspect.a_xml.UserServiceImpl"></bean>
<!--2.创建切面类 -->
<bean id="myAspectId" class="com.syc.d_aspect.a_xml.MyAspect"></bean>
<!--3.aop编程
<aop:aspect>声明切面
ref切面类引用
<aop:pointcut> 声明一个切入点,所有的通知都可以使用。
expression 切入点表达式
id 名称,用于其它通知引用
-->
<aop:config>
<aop:aspect ref="myAspectId">
<aop:pointcut expression="execution(* com.syc.d_aspect.a_xml.UserServiceImpl.*(..))" id="myPointCut"/>
<!-- 3.1 前置通知
<aop:before method="" pointcut="" pointcut-ref=""/>
method : 通知,及方法名
pointcut :切入点表达式,此表达式只能当前通知使用。
pointcut-ref : 切入点引用,可以与其他通知共享切入点。
通知方法格式:public void myBefore(JoinPoint joinPoint){
参数1:org.aspectj.lang.JoinPoint 用于描述连接点(目标方法),获得目标方法名等
例如:<aop:before method="myBefore" pointcut-ref="myPointCut"/>
-->
<aop:before method="myBefore" pointcut-ref="myPointCut"/>
</aop:aspect>
</aop:config>
</beans>
后置通知
在后置通知中可以获得方法的返回值
我们测试,修改updateUser有返回值
@Override
public String updateUser() {
	System.out.println("d_aspect.a_xml updateUser");
	return "hello aop aspectj afterReturning";
}
public class MyAspect{
public void myBefore(JoinPoint joinPoint){
System.out.println("前置通知:"+joinPoint.getSignature().getName());
}
//后置通知可以获得方法的返回值
public void myAfterReturning(JoinPoint joinPoint, Object ret){
System.out.println("后置通知--->" + ret);
}
}<!-- 3.2后置通知 ,目标方法后执行,获得返回值
<aop:after-returning method="" pointcut-ref="" returning=""/>
returning 通知方法第二个参数的名称
通知方法格式:public void myAfterReturning(JoinPoint joinPoint,Object ret){
参数1:连接点描述
参数2:类型Object,参数名 returning="ret" 配置的
例如:
<aop:after-returning method="myAfterReturning" pointcut-ref="myPointCut" returning="ret" />
-->
<aop:after-returning method="myAfterReturning" pointcut-ref="myPointCut" returning="ret"/>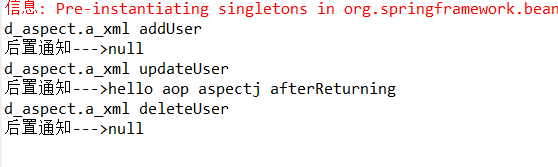
环绕通知
环绕通知必须有返回值,返回值为Object
	//环绕通知
	public Object myAround(ProceedingJoinPoint joinPoint) throws Throwable{
		System.out.println("前方法");
		//手动执行目标方法
		Object obj = joinPoint.proceed();
		System.out.println("后方法");
		return obj;

	}
<!-- 3.3 环绕通知
<aop:around method="" pointcut-ref=""/>
通知方法格式:public Object myAround(ProceedingJoinPoint joinPoint) throws Throwable{
返回值类型:Object
方法名:任意
参数:org.aspectj.lang.ProceedingJoinPoint
抛出异常
执行目标方法:Object obj = joinPoint.proceed();
例如:
<aop:around method="myAround" pointcut-ref="myPointCut"/>
-->
<aop:around method="myAround" pointcut-ref="myPointCut"/>
抛出异常通知
//抛出异常通知
public void myAfterThrowing(JoinPoint joinPoint, Throwable e){
	System.out.println("抛出异常"+e.getMessage());
}
<!-- 3.4 抛出异常
<aop:after-throwing method="" pointcut-ref="" throwing=""/>
throwing :通知方法的第二个参数名称
通知方法格式:public void myAfterThrowing(JoinPoint joinPoint,Throwable e){
参数1:连接点描述对象
参数2:获得异常信息,类型Throwable ,参数名由throwing="e" 配置
例如:
<aop:after-throwing method="myAfterThrowing" pointcut-ref="myPointCut" throwing="e"/>
-->
<aop:after-throwing method="myAfterThrowing" pointcut-ref="myPointCut" throwing="e"/> @Override
public String updateUser() {
System.out.println("d_aspect.a_xml updateUser");
int i = 1/0;
return "hello aop aspectj afterReturning";
}
最终通知
public void myAfter(JoinPoint joinPoint){
	System.out.println("最终通知");
}
<aop:after method="myAfter" pointcut-ref="myPointCut"/>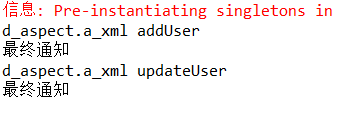
2.5 基于注解
2.5.1 替换bean
1.使用注解 @Service("userServiceId") 和 @Component替换两个bean
<!--1.创建目标类  -->
<bean id="userServiceId" class="com.syc.d_aspect.a_xml.UserServiceImpl"></bean>
<!--2.创建切面类  -->
<bean id="myAspectId" class="com.syc.d_aspect.a_xml.MyAspect"></bean>
2.5.2 替换aop
2.使用注解 @Aspect替换切面<aop:aspect ref="myAspectId">

3.使用注解 @Before("execution(* com.syc.d_aspect.b_anno.UserServiceImpl.*(..))")替换前置通知

4.spring配置文件添加aspectj自动代理

替换后置通知
替换公共切入点
<aop:pointcut expression="execution(* com.syc.d_aspect.b_anno.UserServiceImpl.*(..))" id="myPointCut"/>
替换后置通知
<aop:after-returning method="myAfterReturning" pointcut-ref="myPointCut" returning="ret" />
替换环绕通知
<aop:around method="myAround" pointcut-ref="myPointCut"/>
替换抛出异常通知
<aop:after-throwing method="myAfterThrowing" pointcut-ref="myPointCut" throwing="e"/>
替换最终通知
<aop:after method="myAfter" pointcut-ref="myPointCut"/>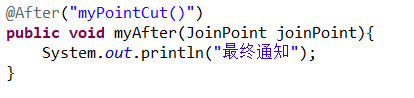
2.5.3 切面类
package com.syc.d_aspect.b_anno;

import org.aopalliance.intercept.MethodInterceptor;
import org.aopalliance.intercept.MethodInvocation;
import org.aspectj.lang.JoinPoint;
import org.aspectj.lang.ProceedingJoinPoint;
import org.aspectj.lang.annotation.After;
import org.aspectj.lang.annotation.AfterReturning;
import org.aspectj.lang.annotation.AfterThrowing;
import org.aspectj.lang.annotation.Around;
import org.aspectj.lang.annotation.Aspect;
import org.aspectj.lang.annotation.Before;
import org.aspectj.lang.annotation.Pointcut;
import org.springframework.stereotype.Component;


/**
 * 切面类,有多个方法
 */
@Component
@Aspect
public class MyAspect{
	//切入点当前有效
	//@Before("execution(* com.syc.d_aspect.b_anno.UserServiceImpl.*(..))")
	public void myBefore(JoinPoint joinPoint){
		System.out.println("前置通知:"+joinPoint.getSignature().getName());
	}

	//声明公共切入点
	@Pointcut("execution(* com.syc.d_aspect.b_anno.UserServiceImpl.*(..))")
	private void myPointCut(){

	}
	//后置通知可以获得方法的返回值
	//@AfterReturning(value="myPointCut()", returning="ret")
	public void myAfterReturning(JoinPoint joinPoint, Object ret){
		System.out.println("后置通知--->" + ret);
	}

	//环绕通知
	//@Around(value="myPointCut()")
	public Object myAround(ProceedingJoinPoint joinPoint) throws Throwable{
		System.out.println("前方法");
		//手动执行目标方法
		Object obj = joinPoint.proceed();
		System.out.println("后方法");
		return obj;
	}
	//抛出异常通知
	//@AfterThrowing(value="myPointCut()", throwing="e")
	public void myAfterThrowing(JoinPoint joinPoint, Throwable e){
		System.out.println("抛出异常"+e.getMessage());
	}
	//最终通知
	@After("myPointCut()")
	public void myAfter(JoinPoint joinPoint){
		System.out.println("最终通知");
	}

}
2.5.4 spring配置
<?xml version="1.0" encoding="UTF-8"?>
<beans xmlns="http://www.springframework.org/schema/beans"
       xmlns:xsi="http://www.w3.org/2001/XMLSchema-instance"
       xmlns:aop="http://www.springframework.org/schema/aop"
       xmlns:context="http://www.springframework.org/schema/context"
       xsi:schemaLocation="http://www.springframework.org/schema/beans
       	                   http://www.springframework.org/schema/beans/spring-beans.xsd
       	                   http://www.springframework.org/schema/aop
       	                   http://www.springframework.org/schema/aop/spring-aop.xsd
       	                   http://www.springframework.org/schema/context
       					   http://www.springframework.org/schema/context/spring-context.xsd">

<context:component-scan base-package="com.syc.d_aspect.b_anno"></context:component-scan>
<aop:aspectj-autoproxy></aop:aspectj-autoproxy>

</beans>
2.5.5 aop注解总结
@Aspect声明切面,修饰切面类,从而获得通知
通知:
- @Before 前置
- @AfterReturning 后置
- @Around 环绕
- @AfterThrowing 抛出异常
- @After 最终
切面:
- @PointCut 修饰方法private void xxx(){},之后通过"方法名()"从而获得方法的引用
3 JdbcTemplate
- spring 提供用于操作JDBC工具类,类似:DBUtils。
- 依赖 连接池DataSource (数据源)
3.1 环境搭建
3.1.1 创建表
create database spring_day02;
use spring_day02;
create table t_user(
id int primary key auto_increment,
username varchar(50),
password varchar(32)
);
insert into t_user (username, password) values ('jack','1234');
insert into t_user (username, password) values ('rose','5678');
3.1.2 导入jar包
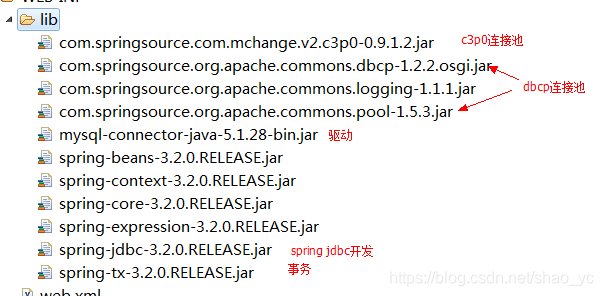
3.1.3 Javabean
package com.syc.a_domain;

public class User {
	private Integer id;
	private String username;
	private String password;
	public Integer getId() {
		return id;
	}
	public void setId(Integer id) {
		this.id = id;
	}
	public String getUsername() {
		return username;
	}
	public void setUsername(String username) {
		this.username = username;
	}
	public String getPassword() {
		return password;
	}
	public void setPassword(String password) {
		this.password = password;
	}
}
3.2 使用api(了解)
通过JdbcTemplate进行数据的更新等操作
package com.syc.b_api;

import java.util.Map;

import org.apache.commons.dbcp.BasicDataSource;
import org.springframework.jdbc.core.JdbcTemplate;

public class TestApi {
	public static void main(String[] args) {
		//1.创建连接池(数据源)dbcp
		BasicDataSource dataSource = new BasicDataSource();
		//基本4项
		dataSource.setDriverClassName("com.mysql.jdbc.Driver");
		dataSource.setUrl("jdbc:mysql://localhost:3306/spring_day02");
		dataSource.setUsername("root");
		dataSource.setPassword("123456");

		//2.创建模板
		JdbcTemplate jdbcTemplate = new JdbcTemplate();
		jdbcTemplate.setDataSource(dataSource);

		//3.通过api操作
		jdbcTemplate.update("insert into t_user (username, password) values (?,?)", "Tom","998");
	}
}
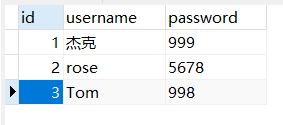
3.3 配置DBCP
先看测试文件
测试文件中传入要修改的用户和密码,然后直接调用update()方法。
package com.syc.c_dbcp;

import org.junit.Test;
import org.springframework.context.ApplicationContext;
import org.springframework.context.support.ClassPathXmlApplicationContext;

import com.syc.a_domain.User;

public class TestDBCP {
	@Test
	public void demo01(){
		User user = new User();
		user.setId(1);
		user.setUsername("杰克");
		user.setPassword("999");
		String xmlPath = "com/syc/c_dbcp/beans.xml";
		ApplicationContext applicationContext = new ClassPathXmlApplicationContext(xmlPath);

		UserDao userDao = (UserDao) applicationContext.getBean("userDaoId");
		userDao.update(user);
	}

}
Spring配置
<?xml version="1.0" encoding="UTF-8"?>
<beans xmlns="http://www.springframework.org/schema/beans"
       xmlns:xsi="http://www.w3.org/2001/XMLSchema-instance"
       xmlns:aop="http://www.springframework.org/schema/aop"
       xmlns:context="http://www.springframework.org/schema/context"
       xsi:schemaLocation="http://www.springframework.org/schema/beans
       	                   http://www.springframework.org/schema/beans/spring-beans.xsd
       	                   http://www.springframework.org/schema/aop
       	                   http://www.springframework.org/schema/aop/spring-aop.xsd
       	                   http://www.springframework.org/schema/context
       					   http://www.springframework.org/schema/context/spring-context.xsd">
	<!-- 创建数据源 -->
	<bean id="dataSourceId" class="org.apache.commons.dbcp.BasicDataSource">
		<property name="driverClassName" value="com.mysql.jdbc.Driver"></property>
		<property name="url" value="jdbc:mysql://localhost:3306/spring_day02"></property>
		<property name="username" value="root"></property>
		<property name="password" value="123456"></property>
	</bean>

	<!-- 创建模板,需要注入数据源 -->
	<bean id="jdbcTemplateId" class="org.springframework.jdbc.core.JdbcTemplate">
		<property name="dataSource" ref="dataSourceId"></property>
	</bean>

	<!-- 配置Dao -->
	<bean id="userDaoId" class="com.syc.c_dbcp.UserDao">
		<property name="jdbcTemplate" ref="jdbcTemplateId"></property>
	</bean>
</beans>
UserDao
package com.syc.c_dbcp;

import org.springframework.jdbc.core.JdbcTemplate;
import com.syc.a_domain.User;

public class UserDao {

	private JdbcTemplate jdbcTemplate;
	public void setJdbcTemplate(JdbcTemplate jdbcTemplate) {
		this.jdbcTemplate = jdbcTemplate;
	}

	public void update(User user){
		String sql = "update t_user set username = ?, password = ? where id = ?";
		Object[] args = {user.getUsername(),user.getPassword(),user.getId()};
		jdbcTemplate.update(sql, args);
	}

}
3.4 配置C3P0
	<bean id="dataSourceId" class="com.mchange.v2.c3p0.ComboPooledDataSource">
		<property name="driverClass" value="com.mysql.jdbc.Driver"></property>
		<property name="jdbcUrl" value="jdbc:mysql://localhost:3306/spring_day02"></property>
		<property name="user" value="root"></property>
		<property name="password" value="123456"></property>
	</bean>
只要在数据源上进行修改即可,不用对其他配置进行修改
3.5 使用JdbcDaoSupport
若每次在dao里面都要我们自己定义JdbcTemplate显得十分麻烦,所以我们直接继承JdbcTemplate

spring配置,无需自己自动模板:

3.6 Properties
3.6.1 properties文件
jdbc.driverClass=com.mysql.jdbc.Driver
jdbc.jdbcUrl=jdbc:mysql://localhost:3306/spring_day02
jdbc.user=root
jdbc.password=123456
3.6.2 Spring配置
	<!-- 加载配置文件
		"classpath:"前缀表示src下
		在配置文件之后通过${key}获得内容
	 -->
	 <context:property-placeholder location="classpath:com/syc/f_properties/jdbcInfo.properties"/>
	<!-- 创建数据源 -->
	<bean id="dataSourceId" class="com.mchange.v2.c3p0.ComboPooledDataSource">
		<property name="driverClass" value="${jdbc.driverClass}"></property>
		<property name="jdbcUrl" value="${jdbc.jdbcUrl}"></property>
		<property name="user" value="${jdbc.user}"></property>
		<property name="password" value="${jdbc.password}"></property>
	</bean>
3.7 JdbcTemplate API
- jdbcTemplate中查询所有数据的API:

- 查询单个对象的API:

- 查询满足条件的数据的API:

