导读
在上篇文章中,我们介绍了仿射变换,我们只需要通过一个两行三列的变换矩阵M就能够对图像实现平移、缩放、翻转、旋转操作。我们发现这些变换其实都属于平面变换,如果我们想要进行空间变换呢?

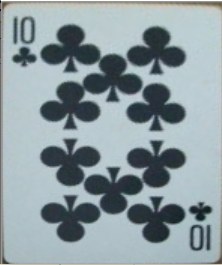
将上图的扑克牌单独提取出来,如下图所示
这时候我们应该如何来实现这个功能呢?这个其实就涉及到了图像的一个空间变换,就需要用到我们所说的透视变换了。
透视变换
透视变换(Perspective Transformation)是指利用透视中心、像点、目标点三点共线的条件,按透视旋转定律使承影面(透视面)绕迹线(透视轴)旋转某一角度,破坏原有的投影光线束,仍能保持承影面上投影几何图形不变的变换。简而言之,就是将一个平面通过一个投影矩阵投影到指定平面上。

原理解析
透视变换通用的变换公式:


通过上面的8个方程,我们可以解出8个参数求出透视变换矩阵,最后我们通过opencv的warpPerspective方法利用透视变换矩阵来实现透视变换,接下来我们通过结合一个实例来具体运用一下。
透视变换实例讲解
这里我们主要通过opencv来实现上面介绍的那个功能
读取图像
#读取图像
img = cv2.imread("poker.jpeg")
#将原图转为灰度图
gray_img = cv2.cvtColor(img,cv2.COLOR_BGR2GRAY)
Canny边缘检测
Canny函数参数解析:
image:输入图像数组
threshold1:最低的阈值
threshold2:最高的阈值
edges:输出的边缘图像,单通道8位图像
apertureSize:Sobel算子的大小
L2gradient:表示一个布尔值,如果为真,则使用更精确的L2范数进行计算,否则使用L1范数
#Canny边缘检测
canny_img = cv2.Canny(gray_img,100,150,3)
#显示边缘检测后的图像
cv2.imshow("canny_img",canny_img)
cv2.waitKey(0)
霍夫直线检测
HoughLinesP函数参数解析:
image:经过Canny边缘检测后的输出图像
rho:极坐标的半径r以像素值为单位的分辨率,一般使用1像素
theta:极坐标的极角θ \thetaθ以弧度为单位的分辨率,一般使用1度
threshold:检测一条直线所需最少的曲线交点
lines:存储检测到的直线,包含直线的起点和终点坐标
minLineLength:组成一条直线的最少点的数量,点数量不足的直线将被抛弃
maxLineGap:在一条直线上的点的最大距离
def draw_line(img,lines):
    # 绘制直线
    for line_points in lines:
        cv2.line(img,(line_points[0][0],line_points[0][1]),(line_points[0][2],line_points[0][3]),
                 (0,255,0),2,8,0)
    cv2.imshow("line_img", img)
    cv2.waitKey(0)
# #Hough直线检测
lines = cv2.HoughLinesP(canny_img,1,np.pi/180,70,minLineLength=30,maxLineGap=10)
#基于边缘检测的图像来检测直线
draw_line(img,lines)
计算顶点坐标
通过直线两个端点的坐标来计算直线的交点坐标,找出扑克牌的四个顶点位置
#计算四条直线的交点作为顶点坐标
def computer_intersect_point(lines):
    def get_line_k_b(line_point):
        """计算直线的斜率和截距
        :param line_point: 直线的坐标点
        :return:
        """
        #获取直线的两点坐标
        x1,y1,x2,y2 = line_point[0]
        #计算直线的斜率和截距
        k = (y1 - y2)/(x1 - x2)
        b = y2 - x2 * (y1 - y2)/(x1 - x2)
        return k,b
    #用来存放直线的交点坐标
    line_intersect = []
    for i in range(len(lines)):
        k1,b1 = get_line_k_b(lines[i])
        for j in range(i+1,len(lines)):
            k2,b2 = get_line_k_b(lines[j])
            #计算交点坐标
            x = (b2 - b1) / (k1 - k2)
            y = k1 * (b2 - b1)/(k1 -k2) + b1
            if x > 0 and y > 0:
                line_intersect.append((int(np.round(x)),int(np.round(y))))
    return line_intersect
def draw_point(img,points):
    for position in points:
        cv2.circle(img,position,5,(0,0,255),-1)
    cv2.imshow("draw_point",img)
    cv2.waitKey(0)
#计算直线的交点坐标
line_intersect = computer_intersect_point(lines)
#绘制交点坐标的位置
draw_point(img,line_intersect)
对顶点坐标进行排序
在计算透视变换矩阵之前我们需要对元素图像的坐标与变换后图像的坐标一一对应,按照左->上->右->下的顺序
def order_point(points):
    """对交点坐标进行排序
    :param points:
    :return:
    """
    points_array = np.array(points)
    #对x的大小进行排序
    x_sort = np.argsort(points_array[:,0])
    #对y的大小进行排序
    y_sort = np.argsort(points_array[:,1])
    #获取最左边的顶点坐标
    left_point = points_array[x_sort[0]]
    #获取最右边的顶点坐标
    right_point = points_array[x_sort[-1]]
    #获取最上边的顶点坐标
    top_point = points_array[y_sort[0]]
    #获取最下边的顶点坐标
    bottom_point = points_array[y_sort[-1]]
    return np.array([left_point,top_point,right_point,bottom_point],dtype=np.float32)
def target_vertax_point(clockwise_point):
    #计算顶点的宽度(取最大宽度)
    w1 = np.linalg.norm(clockwise_point[0]-clockwise_point[1])
    w2 = np.linalg.norm(clockwise_point[2]-clockwise_point[3])
    w = w1 if w1 > w2 else w2
    #计算顶点的高度(取最大高度)
    h1 = np.linalg.norm(clockwise_point[1]-clockwise_point[2])
    h2 = np.linalg.norm(clockwise_point[3]-clockwise_point[0])
    h = h1 if h1 > h2 else h2
    #将宽和高转换为整数
    w = int(round(w))
    h = int(round(h))
    #计算变换后目标的顶点坐标
    top_left = [0,0]
    top_right = [w,0]
    bottom_right = [w,h]
    bottom_left = [0,h]
    return np.array([top_left,top_right,bottom_right,bottom_left],dtype=np.float32)
#对原始图像的交点坐标进行排序
clockwise_point = order_point(line_intersect)
#获取变换后坐标的位置
target_clockwise_point = target_vertax_point(clockwise_point)
计算变换矩阵进行透视变换
#计算变换矩阵
matrix = cv2.getPerspectiveTransform(clockwise_point,target_clockwise_point)
print(matrix)
#计算透视变换后的图片
perspective_img = cv2.warpPerspective(img,matrix,(target_clockwise_point[2][0],target_clockwise_point[2][1]))
cv2.imshow("perspective_img",perspective_img)
cv2.waitKey(0)
[[ 1.34133640e+00 -8.01200936e-01 -2.49362538e+01]
[ 7.10053715e-01 1.67369804e+00 -1.62145838e+02]
[ 2.49859580e-04 3.44969838e-03 1.00000000e+00]]