使用ajax发送数据的步骤
1.创建ajax引擎对象–所有操作都是通过引擎对象
2.绑定监听–监听服务器是否已经返回相应数据
3.绑定地址
4.发送请求
5.接受相应数据
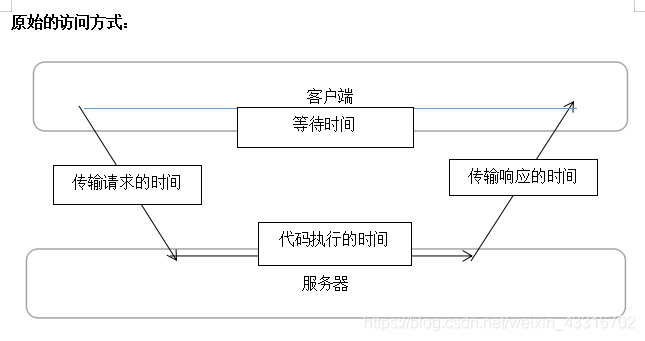
原始访问方式与ajax异步访问方式的区别
 案例实现:
案例实现:
案例一:ajax异步访问服务器
前端jsp部分:
//javascript
<script type="text/javascript">
    //异步访问服务器
    function fn1() {
        //1.创建ajax引擎对象--所有操作都是通过引擎对象
        var xmlHttp = new XMLHttpRequest();
        //2.绑定监听--监听服务器是否已经返回相应数据
        xmlHttp.onreadystatechange = function (){
            if (xmlHttp.readyState==4&&xmlHttp.status==200){
                //5.接受相应数据
                var res = xmlHttp.responseText;
                document.getElementById("span1").innerHTML =res;
                //alert(res);
            }
        }
        //3.绑定地址
        xmlHttp.open("GET","${pageContext.request.contextPath}/ajaxServlet",true);
        //4.发送请求
        xmlHttp.send();
    }
</script>

//jsp
<div class="div1">
    <input type="button" value="异步访问服务器" onclick="fn1()">
    <span id="span1">此处会产生随机数</span>
</div>
服务器端部分:
protected void doPost(HttpServletRequest request, HttpServletResponse response) throws ServletException, IOException {
        request.setCharacterEncoding("utf-8");
        response.setCharacterEncoding("utf-8");
        //response.getWriter().write("张三来啦");
       response.getWriter().write("服务器产生随机数:"+(int) (Math.random()*100));
    }
点击按钮后结果:

案例二:ajax同步访问服务器
同步与异步访问代码方面只有js发生部分变化
前端jsp部分:
//javascript
<script type="text/javascript">
    //异步访问服务器
    function fn2() {
        //1.创建ajax引擎对象--所有操作都是通过引擎对象
        var xmlHttp = new XMLHttpRequest();
        //2.绑定监听--监听服务器是否已经返回相应数据
        xmlHttp.onreadystatechange = function (){
            if (xmlHttp.readyState==4&&xmlHttp.status==200){
                //5.接受相应数据
                var res = xmlHttp.responseText;
                document.getElementById("span2").innerHTML =res;
                //alert(res);
            }
        }
        //3.绑定地址
        xmlHttp.open("GET","${pageContext.request.contextPath}/ajaxServlet",false);//同步是false,异步为true
        //4.发送请求
        xmlHttp.send();
    }
</script>

//jsp
<div class="div1">
    <input type="button" value="同步访问服务器" onclick="fn2()">
    <span id="span2">此处会产生随机数</span>
</div>
点击按钮运行结果:

案例三:ajax异步与同步访问的区别
设计一个测试按钮,点击后跳出信息,然后将服务器端设计成等待3秒钟后再运行。
ajax异步访问访问过程中,若点击该测试按钮,则该正常跳出信息,但ajax同步访问过程中,若点击该测试按钮,则无法跳出信息,只能等待过程完成后才可点击运行。
服务器端部分代码:
 protected void doPost(HttpServletRequest request, HttpServletResponse response) throws ServletException, IOException {
        request.setCharacterEncoding("utf-8");
        response.setCharacterEncoding("utf-8");
        //response.getWriter().write("张三来啦");
        //点击后三秒钟响应
        try {
            Thread.sleep(3000);
        }catch (InterruptedException e){
            e.printStackTrace();
        }
       response.getWriter().write("服务器产生随机数:"+(int) (Math.random()*100));
 }
案例四:POST请求访问服务器端
前端js部分:
//javascript
<script type="text/javascript">
//POST提交访问服务器
    function fn3() {
        //1.创建ajax引擎对象--所有操作都是通过引擎对象
        var xmlHttp = new XMLHttpRequest();
        //2.绑定监听--监听服务器是否已经返回相应数据
        xmlHttp.onreadystatechange = function (){
            if (xmlHttp.readyState==4&&xmlHttp.status==200){
                //5.接受相应数据
                var res = xmlHttp.responseText;
                document.getElementById("span3").innerHTML = res;
                //alert(res);
            }
        }
        //3.绑定地址
        xmlHttp.open("POST","${pageContext.request.contextPath}/ajaxServlet",false);
        //4.发送请求
        xmlHttp.setRequestHeader("Content-type","application/x-www-form-urlencoded");
        xmlHttp.send("name=POST请求1");
    }
</script>

//jsp
<div class="div1">
    <input type="button" value="POST提交服务器" onclick="fn3()">
    <span id="span3">POST提交信息</span>
</div>
服务器端:
protected void doPost(HttpServletRequest request, HttpServletResponse response) throws ServletException, IOException {
        request.setCharacterEncoding("utf-8");
        response.setCharacterEncoding("utf-8");
        String message = request.getParameter("name");
        response.getWriter().write("POST提交的信息:"+message);
    }
点击后运行结果:

谢谢阅读!
