提供者发送结果
我们先来回顾一下提供者服务是如何接收消息的,下面是调用链:
NettyHandler
	-->NettyServer
    	-->MultiMessageHandler
    		-->HeartbeatHandler
    			-->AllChannelHandler
        			-->DecodeHandler
        				-->HeaderExchangeHandler
- NettyHandler:负责接收请求数据。
- MultiMessageHandler:处理多数据包。
- HeartbeatHandler:处理心跳类型数据。
- AllChannelHandler:线程派发Handler。
- DecodeHandler:解码器。
- HeaderExchangeHandler:处理单向请求和双向请求。
进入HeaderExchangeHandler的received()方法:
@Override
public void received(Channel channel, Object message) throws RemotingException {
	//......省略部分代码
    ExchangeChannel exchangeChannel =
    	HeaderExchangeChannel.getOrAddChannel(channel);//@1
    if (request.isTwoWay()) {//@2
        Response response = handleRequest(exchangeChannel, request);
        channel.send(response);
    } else {
        handler.received(exchangeChannel, request.getData());//@3
    }
}
代码@1:获取HeaderExchangeChannel实例,赋值给exchangeChannel。
代码@2:通过请求对象判断是否是双向请求,如果是双向请求则调用handleRequest()方法获取响应对象Response,接着执行channel.send(response)将结果发送给消费者服务,channel实例类型是NettyChannel。
代码@3:处理单向请求情况,没有返回值。
进入NettyChannel的send()方法:
@Override
public void send(Object message, boolean sent) throws RemotingException {
	//......省略部分代码
    super.send(message, sent);
	ChannelFuture future = channel.write(message);
}
通过Netty的Channel将数据发送出去。
消费者接收结果
消费者服务接收数据和提供者服务接收基本上流程是一样的,只是对于提供者服务来说接收到的数据包类型是Request,而消费者服务收到的数据包类型是Response。区别的处理在HeaderExchangeHandler,进入该类的received()方法:
public void received(Channel channel, Object message) throws RemotingException {
    channel.setAttribute(KEY_READ_TIMESTAMP, System.currentTimeMillis());
    ExchangeChannel exchangeChannel = HeaderExchangeChannel.getOrAddChannel(channel);
    try {
        if (message instanceof Request) { //@1
            //......
        } else if (message instanceof Response) { //@2
            handleResponse(channel, (Response) message);
        } else if (message instanceof String) { //@3
            //......
        } else {
            handler.received(exchangeChannel, message);
        }
    } finally {
        HeaderExchangeChannel.removeChannelIfDisconnected(channel);
    }
}
代码@1:处理数据包类型是Request的情况。
代码@2:处理数据包类型是Response的情况。
代码@3:处理数据包类型是Sring的情况。
进入handleResponse()方法:
static void handleResponse(Channel channel, Response response) throws RemotingException {
    if (response != null && !response.isHeartbeat()) {
        DefaultFuture.received(channel, response);
    }
}
直接执行静态方法DefaultFuture.received(),进入received()方法:
public static void received(Channel channel, Response response) {
    try {
        DefaultFuture future = FUTURES.remove(response.getId()); //@1
        if (future != null) {
            future.doReceived(response); //@2
        } else {
            logger.warn("The timeout response finally returned at "
                    + (new SimpleDateFormat("yyyy-MM-dd HH:mm:ss.SSS").format(new Date()))
                    + ", response " + response
                    + (channel == null ? "" : ", channel: " + channel.getLocalAddress()
                    + " -> " + channel.getRemoteAddress()));
        }
    } finally {
        CHANNELS.remove(response.getId());
    }
}
代码@1:在消费者服务发送请求时,会创建Request实例,构造方法会分配一个全局ID,该值会在提供者服务中取出,并设值给Response对象,返回给消费者服务。
FUTURES是一个静态集合,保存了请求ID和DefaultFuture实例对象之间的映射关系。
private static final Map<Long, DefaultFuture> FUTURES = new ConcurrentHashMap<Long, DefaultFuture>();
还记得DefaultFuture实例是怎么创建的吗?在HeaderExchangeChannel的request()方法中创建了DefaultFuture实例:
public ResponseFuture request(Object request, int timeout) throws RemotingException {
    if (closed) {
        throw new RemotingException(this.getLocalAddress(), null, "Failed to send request " + request + ", cause: The channel " + this + " is closed!");
    }
    // create request.
    Request req = new Request();
    req.setVersion("2.0.0");
    req.setTwoWay(true);
    req.setData(request);
    DefaultFuture future = new DefaultFuture(channel, req, timeout);
    try {
        channel.send(req);
    } catch (RemotingException e) {
        future.cancel();
        throw e;
    }
    return future;
}
代码@2:执行future.doReceived(response)方法:
private void doReceived(Response res) {
    lock.lock();
    try {
        response = res;
        if (done != null) {
            done.signal();
        }
    } finally {
        lock.unlock();
    }
    if (callback != null) {
        invokeCallback(callback);
    }
}
该方法使用了3个成员变量:lock、response、done
private final Lock lock = new ReentrantLock();
private final Condition done = lock.newCondition();
private volatile Response response;
利用Java并发编程的API,通过lock锁住当前线程,然后赋值给response,最后执行done.signal()通知等待线程,最后释放锁。
这块内容是Dubbo实现异步变同步的关键代码之一,我们知道Dubbo是基于Netty来实现网络通信的,Netty是一个NIO非阻塞的网络框架,但是Dubbo框架默认使用了同步机制,消费者服务发起请求时线程是会被阻塞的,等待结果的返回或者阻塞超时,这其实是因为Dubbo在消费者服务发送数据之后会锁住该线程,我们来看下DubboInvoker的相关代码:
@Override
protected Result doInvoke(final Invocation invocation) throws Throwable {
	//......省略部分代码
    RpcInvocation inv = (RpcInvocation) invocation;
    if (isOneway) { //异步单向
        boolean isSent = getUrl().getMethodParameter(methodName, Constants.SENT_KEY, false);
        currentClient.send(inv, isSent);
        RpcContext.getContext().setFuture(null);
        return new RpcResult();
    } else if (isAsync) {//异步双向
        ResponseFuture future = currentClient.request(inv, timeout);
        RpcContext.getContext().setFuture(new FutureAdapter<Object>(future));
        return new RpcResult();
    } else {//同步
        RpcContext.getContext().setFuture(null);
        return (Result) currentClient.request(inv, timeout).get();
    }

}
最后一行代码currentClient.request(inv, timeout).get()可以拆分成两部分内容:
DefaultFuture future = currentClient.request(inv, timeout); //@1
future.get(); //@2
代码@1:从上面的代码我们已经知道DefaultFuture是在HeaderExchangeChannel的request()方法被创建的,也就是说在发送数据前已经构造了返回对象,所以此时DefaultFuture对象里面的成员变量response是空值。
代码@2:执行future.get()方法锁住当前线程,阻塞等待唤醒:
@Override
public Object get(int timeout) throws RemotingException {
    if (timeout <= 0) {
        timeout = Constants.DEFAULT_TIMEOUT;
    }
    if (!isDone()) {
        long start = System.currentTimeMillis();
        lock.lock();
        try {
            while (!isDone()) {//@1
                done.await(timeout, TimeUnit.MILLISECONDS);//@2
                if (isDone() || System.currentTimeMillis() - start > timeout) {
                    break;
                }
            }
        } catch (InterruptedException e) {
            throw new RuntimeException(e);
        } finally {
            lock.unlock();
        }
        if (!isDone()) {//@3
            throw new TimeoutException(sent > 0, channel, getTimeoutMessage(false));
        }
    }
    return returnFromResponse();//@4
}
代码@1:执行isDone()检测是否已经收到响应结果。
@Override
public boolean isDone() {
    return response != null;
}
代码@2:通过Condition变量done,阻塞当前消费者请求线程等待结果返回,等待的超时时间,默认一秒。
代码@3:当执行到这一步时有两种可能,一种是线程被唤醒,也就是接收到了响应,一种情况就是等待超时,这里通过再次检测response对象,当为空时表明是等待超时,接着抛出超时异常TimeoutException。
代码@4:执行returnFromResponse()对response对象进一步处理。
private Object returnFromResponse() throws RemotingException {
    Response res = response;
    if (res == null) {
        throw new IllegalStateException("response cannot be null");
    }
    if (res.getStatus() == Response.OK) {
        return res.getResult();
    }
    if (res.getStatus() == Response.CLIENT_TIMEOUT || res.getStatus() == Response.SERVER_TIMEOUT) {
        throw new TimeoutException(res.getStatus() == Response.SERVER_TIMEOUT, channel, res.getErrorMessage());
    }
    throw new RemotingException(channel, res.getErrorMessage());
}
现在我们知道了Dubbo框架是如何将异步请求变成同步的,那么在多线程并发请求的情况下,如何保证Request和Response对象的映射就变成了关键,否则接收到响应结果之后将不知道该唤醒哪一个请求线程,来看下下面这个请求响应映射关系图:
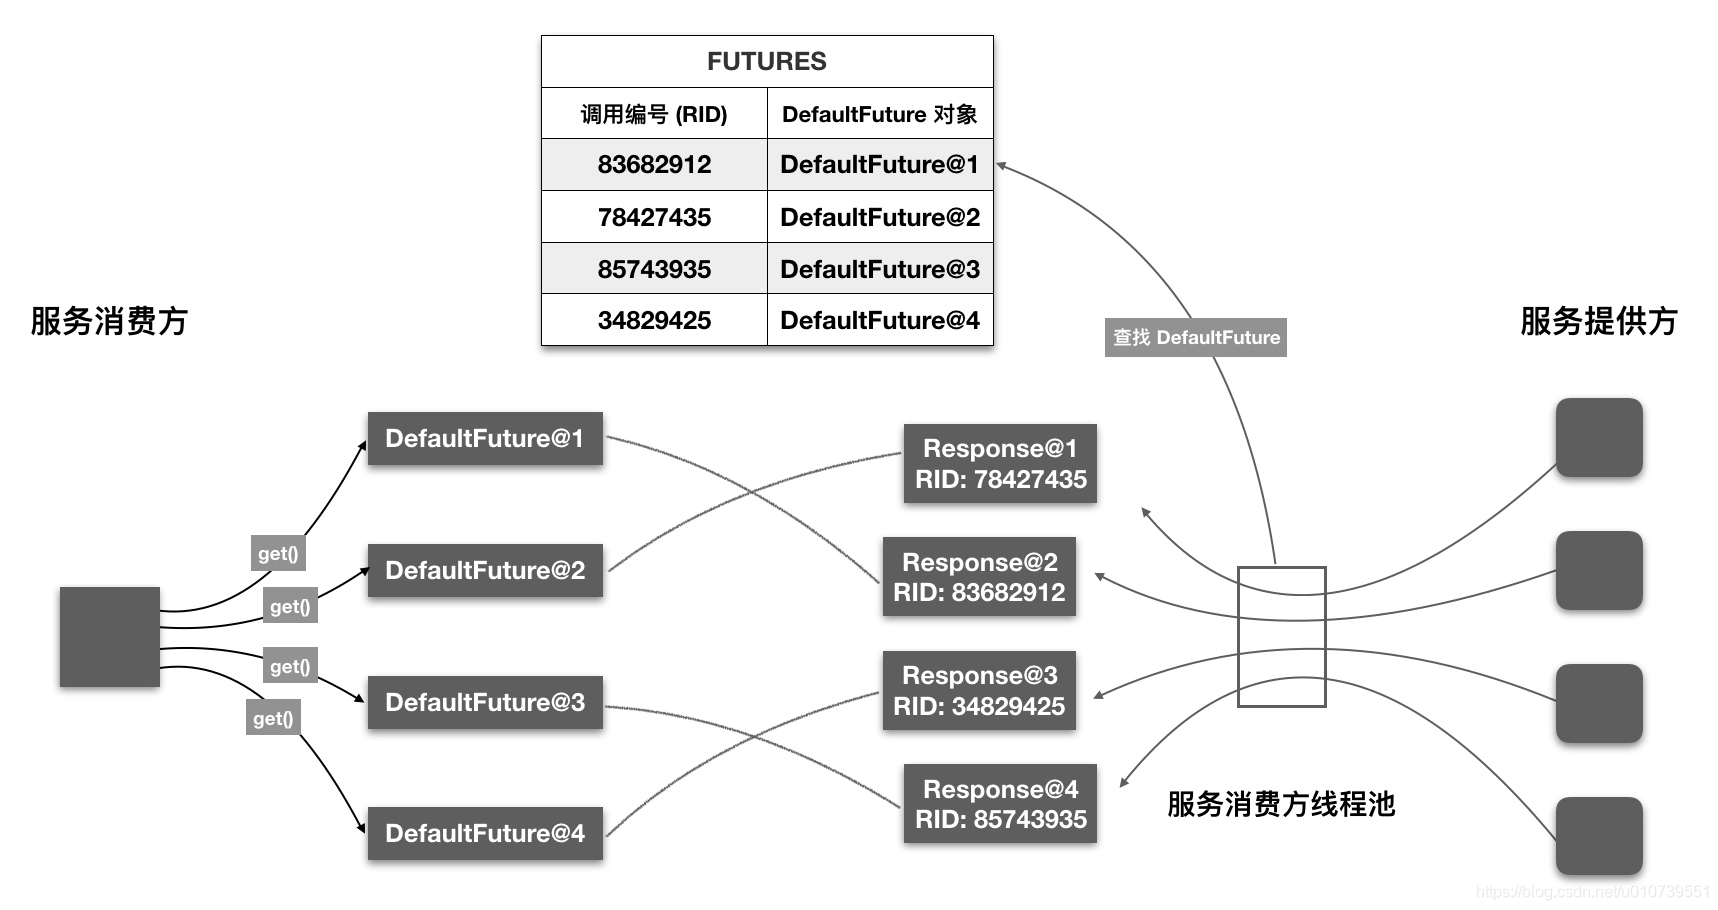
1、消费者服务发送请求,构造请求对象,并且为其分配一个全局ID,接着构建DefaultFuture对象返回。
2、消费者服务将请求ID和DefaultFuture映射关系存储到静态集合FUTURES。
3、消费者服务发送消息之后获取到DefaultFuture对象,通过它执行get()方法,阻塞锁住当前线程。
4、提供者服务响应结果Response对象将请求全局ID回传给消费者服务。
5、消费者服务通过该全局ID从集合FUTURES拿到对应DefaultFuture对象,执行doReceived()方法赋值Response并唤醒请求线程。
6、消费者服务请求线程被唤醒,拿到Response响应对象,将结果返回。
请求方式
Dubbo框架一共提供了三种请求方式:
- 单向请求
- 异步请求
- 同步请求
@Override
protected Result doInvoke(final Invocation invocation) throws Throwable {
	//......省略部分代码
    RpcInvocation inv = (RpcInvocation) invocation;
    //是否异步
    boolean isAsync = RpcUtils.isAsync(getUrl(), invocation);
    //是否单向
    boolean isOneway = RpcUtils.isOneway(getUrl(), invocation);
    int timeout = getUrl().getMethodParameter(methodName, Constants.TIMEOUT_KEY, Constants.DEFAULT_TIMEOUT);
    if (isOneway) {//单向请求 @1
        boolean isSent = getUrl().getMethodParameter(methodName, Constants.SENT_KEY, false);
        currentClient.send(inv, isSent);
        RpcContext.getContext().setFuture(null);
        return new RpcResult();
    } else if (isAsync) {//异步请求 @2
        ResponseFuture future = currentClient.request(inv, timeout);
        RpcContext.getContext().setFuture(new FutureAdapter<Object>(future));
        return new RpcResult();
    } else {//同步请求(异步变同步)
        RpcContext.getContext().setFuture(null);
        return (Result) currentClient.request(inv, timeout).get();
    }
}
前面我们已经介绍过同步请求,现在我们来使用一下单向请求和异步请求:
单向请求:单向请求将不处理返回值,可以通过下面方式配置:
<dubbo:reference id="userService" interface="com.luke.dubbo.api.service.UserService">
		<dubbo:method name="getUserAddressList" return="false"></dubbo:method>
</dubbo:reference>
这样配置之后代码将执行代码@1流程,执行currentClient.send(inv, isSent)发送请求,不处理结果,上下文将future置为null。如果接口方法的返回值不为void的情况下将返回null值。
异步请求:异步请求可以通过下面方式配置:
<dubbo:reference id="userService" interface="com.luke.dubbo.api.service.UserService">
	<dubbo:method name="getUserAddressList" async="true"></dubbo:method>
</dubbo:reference>
 userService.getUserAddressList(i+"");
 Future<Object> future = RpcContext.getContext().getFuture();
 if(future.isDone()){
   //处理结果
 }
配置异步请求之后意味着结果返回结果为空,可以通过ThreadLocal上下文获取future,异步判断是否已经收到响应结果。
private static final ThreadLocal<RpcContext> LOCAL = new ThreadLocal<RpcContext>() {
    @Override
    protected RpcContext initialValue() {
        return new RpcContext();
    }
};
配置了异步请求将执行代码@2:
ResponseFuture future = currentClient.request(inv, timeout);
RpcContext.getContext().setFuture(new FutureAdapter<Object>(future));
return new RpcResult();
可以看到执行消息发送currentClient.request()之后,将future存储到ThreadLocal上下文,等待后面结果Response返回之后再赋值给future,接着直接构造一个空对象RpcResult返回。
关注公众号了解更多原创博文

