功夫小子之帮助场景和选关功能的实现
转载请注明出处:http://blog.csdn.net/suool/article/details/46661231
本节课的视频教程地址是:
第五课在此
如果本教程有帮助到您,希望您能点击进去观看一下,而且现在注册成为极客学院的会员,即日起至7月1日,极客学院的 VIP 课程 30 天免费体验,想学编程的小伙伴速来,只针对新用户:http://e.jikexueyuan.com/invite/index.html?ZnJvbV9jb2RlPVkxblJUZSZ1bmFtZT1TdW9vTCZjaGFubmVsPWludml0ZV8xMDB3X3NoYXJlYnV0dG9uX2RpcmVjdDE= 而且验证手机号码和邮箱号码会赠送三天的会员时间,手机端首次也可以领取五天的会员时间哦(即使是购买年会员目前也仅仅是年费260),成为极客学院学习会员可以无限制的下载和观看所有的学院网站的视频,谢谢您的支持!
本节课主要内容是两项:
- 游戏帮助功能场景的实现
- 游戏选关功能场景的实现
首先是第一部分:
游戏帮助功能场景的实现
帮助功能场景是前面课程主开始菜单场景的一个附属场景,首先看下其效果图:

通过观察本效果图可以看出,这个界面的重难点在于实现这个滚动中文字幕公告效果。
中文乱码问题解决
所以,我们首先需要解决的问题是中文显示乱码的问题,其次是实现滚动的字幕效果。
关于解决中文乱码问题,这个已经有一堆的文章介绍,我这里就简单的提一下。解决方法有三种:
- 源码文件保存为utf-8格式
- 编写编码转换代码,手动转换中文
- 读取配置文件
关于第一种方法:可以部分解决该问题,但是显示依然有问题,结尾字符显示有可能乱码,而且不能解析转义字符。不推荐第一种,但是将源码文件保存为UTF-8的格式确实推荐,因为VS的调试的时候编码GBK会出现一些异常情况,关于转换格式请参考我的CSDN的自动转换文章:http://blog.csdn.net/suool/article/details/44604219
utf-8转换工具
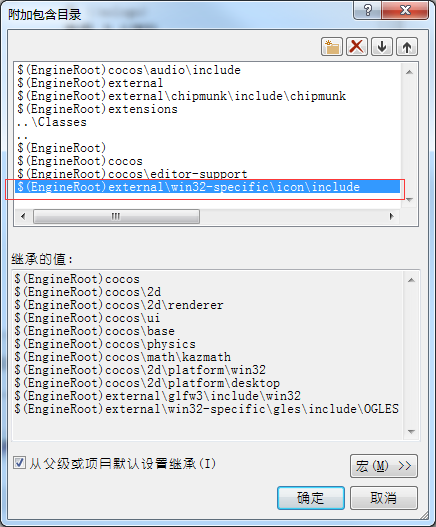
第二个手动编写转码代码,这个需要用到第三方库,这里我使用的是在Windows平台下已经提供的Iconv编码处理库。通过在项目中添加对应的转换工具类即可,使用该库需要添加如下包含目录:
代码如下:
IconvString.h
/*!
 * \file IconvString.h
 * \date 2015/05/30 9:05
 *
 * \author SuooL
 * Contact: [email protected]
 *
 * \brief 字符编码
 *
 * TODO: long description
 *
 * \note
*/

#ifndef __ICONVSTRING_H__
#define __ICONVSTRING_H__

int convert(char *from_charset, char *to_charset, char *inbuf, size_t inlen, char *outbuf, size_t outlen);

int gbk2utf8(char *inbuf, size_t inlen, char *outbuf, size_t outlen);

#endif
cpp实现文件:
#include <string>
#include "IconvString.h"
#include "iconv.h"

#if (CC_TARGET_PLATFORM == CC_PLATFORM_WIN32)
// 编译链接的时候指定静态库
#pragma comment(lib,"libiconv.lib")
#endif

int convert(char *from_charset, char *to_charset, char *inbuf, size_t inlen, char *outbuf, size_t outlen)
{
    iconv_t iconvH;
    iconvH = iconv_open(to_charset, from_charset);
    if (!iconvH) return NULL;
    memset(outbuf, 0, outlen);

#if(CC_TARGET_PLATFORM == CC_PLATFORM_WIN32)
    const char *temp = inbuf;
    const char **pin = &temp;
    char **pout = &outbuf;
    if (!iconv(iconvH, pin, &inlen, pout, &outlen))
    {
        iconv_close(iconvH);
        return NULL;
    }
#else
    if (!iconv(iconvH, &inbuf, &inlen, &outbuf, &outlen))
    {
        iconv_close(iconvH);
        return NULL;
    }
#endif
    iconv_close(iconvH);
    return NULL;
}

int gbk2utf8(char *inbuf, size_t inlen, char *outbuf, size_t outlen)
{
    return convert("gb2312", "utf-8", inbuf, inlen, outbuf, outlen);
}
使用的方法就是:
比如在图籍界面中有中文的Lable标签,那么其实现方式如下:
// 怪物图鉴
char *inBuf = "木\n桩\n怪";
size_t inLen = strlen(inBuf);
size_t outLen = inLen << 1;
char *outBuf = (char *)malloc(outLen);
gbk2utf8(inBuf, inLen, outBuf, outLen);
······ // 使用在此
free(outBuf); // 记得释放内存
这个实现的结果是很不错的,但是不合适的地方在于,移植游戏的时候在Android平台没有内置这个Iconv库,所以就需要我们手动下载该库的源码,然后编译,这个过程比较复杂,导致我们的工作量增加,所以不建议使用。
对于第三种方式则是最为推荐的方式。
对于读取配置文件的方式来说实现了编码和界面的分离,使得国际化更为方便。这里我以读取XML文件为例讲讲如何使用这个方法。
首先我们需要一个XML的解析类,这里我使用的XML格式是Android编程中的XML格式如下所示:

因此需要解析的是name标签及其内容。
以下是解析的代码:
XmlParser.h
/*!
 * \file XmlParser.h
 * \date 2015/05/30 11:21
 *
 * \author SuooL
 * Contact: [email protected]
 *
 * \brief
 *
 * TODO: long description
 *
 * \note
*/
#ifndef __XMLParser_H__
#define __XMLParser_H__

#pragma once

#include <string>
#include "cocos2d.h"

class XMLParser : public cocos2d::Ref, public cocos2d::SAXDelegator
{
public:
    // 解析指定的xml文件
    static XMLParser* parseWithFile(const char *xmlFileName);

    static XMLParser* parseWithString(const char *content);

    XMLParser();
    virtual ~XMLParser();

    // 从本地xml文件读取
    bool initWithFile(const char *xmlFileName);
    // 从字符中读取,可用于读取网络中的xml数据
    bool initWithString(const char *content);

    // 对应xml标签开始,如:<string name="app_name">
    virtual void startElement(void *ctx, const char *name, const char **atts);

    // 对应xml标签结束,如:</string>
    virtual void endElement(void *ctx, const char *name);

    // 对应xml标签文本
    virtual void textHandler(void *ctx, const char *s, int len);

    // 获取对应标签的字符串
    cocos2d::String* getString(const char *key);

private:
    cocos2d::CCDictionary *m_pDictionary;
    std::string m_key;

    std::string startXMLElement;
    std::string endXMLElement;

};

#endif
以下是实现代码:XMLParser.cpp
/*!
 * \class XMLParser.cpp
 *
 * \ingroup GroupName
 *
 * \brief
 *
 * TODO: long description
 *
 * \note
 *
 * \author SuooL
 *
 * \version 1.0
 *
 * \date 五月 2015
 *
 * Contact: [email protected]
 *
 */

#include "XMLParser.h"
#include "cocos2d.h"

using namespace std;
using namespace cocos2d;

//字符ascii码
// 空格
const static int SPACE = 32;
// 换行
const static int NEXTLINE = 10;
// tab 横向制表符
const static int TAB = 9;

string replace(string source, string pattern, string dstPattern)
{
    string result;
    string::size_type pos;

    int lenSource = source.length();
    int i = 0;

    for (i = 0; i < lenSource; ++i)
    {
        pos = source.find(pattern, i);
        if (string::npos == pos)
            break;

        if (pos < lenSource)
        {
            string s = source.substr(i, pos - i);
            result += s;
            result += dstPattern;
            i = pos + pattern.length() - 1;
        }
    }
    result += source.substr(i);
    return result;
}

XMLParser* XMLParser::parseWithFile(const char *xmlFileName)
{
    XMLParser *pXMLParser = new XMLParser();
    if (pXMLParser->initWithFile(xmlFileName))
    {
        pXMLParser->autorelease();
        return pXMLParser;
    }
    CC_SAFE_DELETE(pXMLParser);
    return NULL;
}

bool XMLParser::initWithFile(const char *xmlFileName)
{
    m_pDictionary = new CCDictionary();
    SAXParser _parser;
    _parser.setDelegator(this);
    //获取文件全路径
    string fullPath = FileUtils::getInstance()->fullPathForFilename(xmlFileName);
    CCLog("xml parser full path : %s", fullPath.c_str());

    return _parser.parse(fullPath);
}

XMLParser* XMLParser::parseWithString(const char *content)
{
    XMLParser *pXMLParser = new XMLParser();
    if (pXMLParser->initWithString(content))
    {
        pXMLParser->autorelease();
        return pXMLParser;
    }
    CC_SAFE_DELETE(pXMLParser);
    return NULL;
}

bool XMLParser::initWithString(const char *content)
{
    m_pDictionary = new CCDictionary();
    SAXParser _parse;
    _parse.setDelegator(this);
    return _parse.parse(content, strlen(content));
}

//开始一个节点
// 比如 <string name="muzhuang">木\n桩\n怪</string>
//name    为     :string
//atts[0] 为属性   : name
//atts[1] 为值        : app_name
//atts[2] 以此类推
void XMLParser::startElement(void *ctx, const char *name, const char **atts)
{
    this->startXMLElement = (char *)name;
    CCLog("start=%s", startXMLElement.c_str());//name

    if (this->startXMLElement == "string")
    {
        while (atts && *atts)
        {
            CCLog("attrs0=%s", atts[0]);    //atts[0] : name
            CCLog("attrs1=%s", atts[1]);    //atts[1] : app_name

            const char *attsKey = *atts;
            if (0 == strcmp(attsKey, "name"))
            {
                ++atts;
                const char *attsValue = *atts;
                m_key = attsValue;          //key
                break;
            }
            ++atts;
        }

    }

}

void XMLParser::endElement(void *ctx, const char *name)
{
    this->endXMLElement = (char *)name;
    CCLog("end=%s", endXMLElement.c_str());
}

void XMLParser::textHandler(void *ctx, const char *s, int len)
{
    string value((char *)s, 0, len);

    //是否全是非正常字符
    bool noValue = true;
    for (int i = 0; i < len; ++i)
    {
        if (s[i] != SPACE && s[i] != NEXTLINE && s[i] != TAB)
        {
            noValue = false;
            break;
        }
    }
    if (noValue) return;
    string result = replace(value, string("\\n"), string("\n"));
    CCString *pString = CCString::create(result);
    CCLog("key=%s value=%s", m_key.c_str(), pString->getCString());
    this->m_pDictionary->setObject(pString, this->m_key);
}

String* XMLParser::getString(const char *key)
{
    string strKey(key);
    return (String *)this->m_pDictionary->objectForKey(strKey);
}

XMLParser::XMLParser()
{
}

XMLParser::~XMLParser()
{
    CC_SAFE_DELETE(this->m_pDictionary);
}
具体的使用方式如下(依然是图籍界面的示例):
XMLParser *pXmlParser = XMLParser::parseWithFile("tujiLayer.xml");
String *mz = pXmlParser->getString("muzhuang");
m_pMZLabel = LabelTTF::create(mz->getCString(), "", 30); // 注意此处的getCString()
这就完美解决了中文的显示乱码问题,当然解析XML配置文件Cocos有提供内置的解析工具,比如TinyXML,参考此处官网文档:Cocos2d-x xml解析 http://www.cocos.com/doc/article/index?type=cocos2d-x&url=/doc/cocos-docs-master/manual/framework/native/v3/xml-parse/zh.md
字幕滚动效果的实现
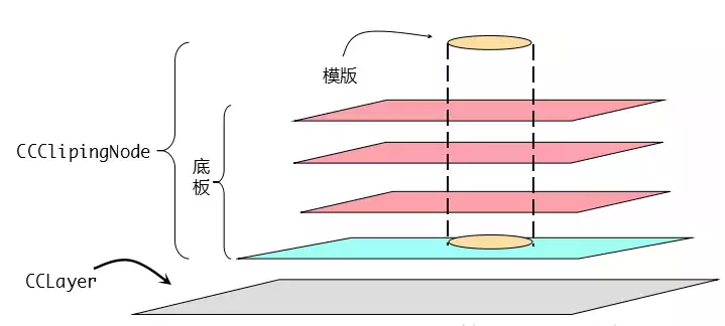
下面就是如何实现滚动的中文字幕效果。这个效果可以使用Cocos2d提供的一个工具类ClippingNode裁剪节点类。关于这个类的简单说明如下:
- ClippingNode是利用模板遮罩来完成对Node区域裁剪的技术,主要是根据一个模板(Stencil)切割图片的节点,生成任何形状的节点显示
- 首先它是一个节点,继承于Node,所以它可以像普通节点一样放入Layer,Scene,Node中,其次作为节点,它就可以用作容器,承载其他节点和精灵,即是底板,如果想要对一个节点进行裁剪,那需要给出裁剪的部分,这个裁剪区域即是模版。
重点的API函数,源码显示如下:
class CC_DLL ClippingNode : public Node
{
public:
    /** Creates and initializes a clipping node without a stencil.
    创建裁剪节点
     */
    static ClippingNode* create();

    /** Creates and initializes a clipping node with an other node as its stencil.
     The stencil node will be retained.
     创建节点的同时指定模板
     */
    static ClippingNode* create(Node *stencil);

    /** The Node to use as a stencil to do the clipping.
     The stencil node will be retained.
     This default to nil.
     */
    Node* getStencil() const;
    void setStencil(Node *stencil); // 设置模板

    /** The alpha threshold.
     The content is drawn only where the stencil have pixel with alpha greater than the alphaThreshold.
     Should be a float between 0 and 1.
     This default to 1 (so alpha test is disabled).
     */
    GLfloat getAlphaThreshold() const;
    void setAlphaThreshold(GLfloat alphaThreshold); // 设置Alpha阈值,默认是1

    /** Inverted. If this is set to true,
     the stencil is inverted, so the content is drawn where the stencil is NOT drawn.
     This default to false.
     */
    bool isInverted() const;
    void setInverted(bool inverted); // 设置显示区域,默认显示模板遮罩区域
....详细参见源码关于此节点的更多使用方法参见该文章:http://shahdza.blog.51cto.com/2410787/1561937
下面就是帮助场景的实现代码:
/*!
 * \file HelpLayer.h
 * \date 2015/05/30 15:43
 *
 * \author SuooL
 * Contact: [email protected]
 *
 * \brief  帮助关于界面
 *
 * TODO: long description
 *
 * \note
*/

#ifndef __HelpLayer__H__
#define __HelpLayer__H__

#include "cocos2d.h"
#include "extensions/cocos-ext.h"

USING_NS_CC;
USING_NS_CC_EXT;

class HelpLayer : public Layer {
public:
    static Scene* createScene();
    virtual bool init();
    CREATE_FUNC(HelpLayer);

private:
    LabelTTF* text;
    void scrollback();
};

#endif
cpp文件
/*!
 * \class HelpLayer
 *
 * \ingroup GroupName
 *
 * \brief  帮助关于界面
 *
 * TODO: long description
 *
 * \note
 *
 * \author SuooL
 *
 * \version 1.0
 *
 * \date 五月 2015
 *
 * Contact: [email protected]
 *
 */

#include "HelpLayer.h"
#include "StartLayer.h"
#include "GlobalDefine.h"
#include "cocos2d.h"
#include "XMLParser.h"
#include "extensions/cocos-ext.h"

USING_NS_CC;
USING_NS_CC_EXT;

Scene* HelpLayer::createScene()
{
    Scene* scene = Scene::create();
    HelpLayer* helpLayer = HelpLayer::create();

    scene->addChild(helpLayer);

    return scene;
}

bool HelpLayer::init()
{
    if (!Layer::init())
    {
        return false;
    }
    auto bgSprite = Sprite::create("Help.png");
    bgSprite->setPosition(WINSIZE.width / 2, WINSIZE.height / 2);
    this->addChild(bgSprite);

    auto closeItem = MenuItemSprite::create(
        Sprite::createWithSpriteFrame(SpriteFrameCache::getInstance()->getSpriteFrameByName("GalleryOffNormal.png")),
        Sprite::createWithSpriteFrame(SpriteFrameCache::getInstance()->getSpriteFrameByName("GalleryOffSelected.png")),
        [&](Ref * ref){
        PLAYEFFECT;
        //弹出场景
        Director::getInstance()->replaceScene(StartLayer::createScene()); });
    // 关闭按钮
    closeItem->setPosition(WINSIZE.width / 2 + 580, WINSIZE.height / 2 + 320);
    auto menu = Menu::create(closeItem, NULL);
    menu->setPosition(Point::ZERO);
    this->addChild(menu);

    auto titleSp = Sprite::create("TitleLogo.png");
    titleSp->setPosition(WINSIZE.width / 2 + 200, WINSIZE.height / 2);
    this->addChild(titleSp);

    // 创建文字Label
    XMLParser *pXmlParser = XMLParser::parseWithFile("tujiLayer.xml");
    String *label = pXmlParser->getString("label_help");
    text = LabelTTF::create(label->getCString(), "", 23);
    text->setColor(ccc3(0, 255, 255));
    text->setTag(15);
    text->setPosition(250, 100);

    // 绘制裁剪区域
    DrawNode* area = DrawNode::create();
    Point point[4] = { Point(50, 100), Point(500, 100), Point(500, 450), Point(50, 450) };
    area->drawPolygon(point, 4, ccc4f(255, 255, 255, 255), 0, ccc4f(255, 255, 255, 255));

    // 创建遮罩层
    ClippingNode* m_pClipArea = ClippingNode::create();
    m_pClipArea->setInverted(false);
    m_pClipArea->setStencil(area);
    m_pClipArea->addChild(text);
    this->addChild(m_pClipArea);

    MoveBy* moveact = CCMoveBy::create(5.0f, Point(0, 400)); //10秒向上移动400
    CallFunc* callFunc = CallFunc::create(this, callfunc_selector(HelpLayer::scrollback));
    // 创建连续动作
    ActionInterval* attackact = Sequence::create(moveact, callFunc, NULL);

    text->runAction(RepeatForever::create(attackact));


    return true;
}

void HelpLayer::scrollback()
{
    text->setPosition(250, 100);
}
选关功能场景的实现
这一部分的实现主要使用了一个自定义的选关控件,实现了这样的效果:
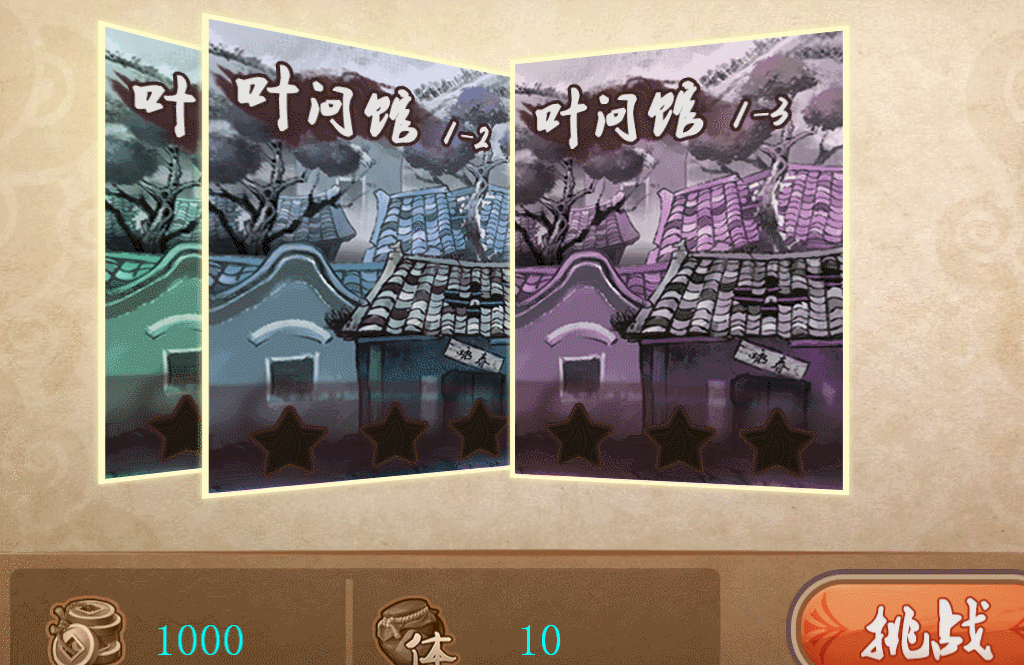
这个控件的实现效果我参考了这篇博文作者的思路,http://blog.csdn.net/ccy0815ccy/article/details/43924895
具体的使用方法和实现思路可以参考他的代码,我这里做了一点改动。这个界面重点就是这个效果控件的使用,下面是我的代码:
/*!
 * \file GateMapLayer.h
 * \date 2015/05/31 20:09
 *
 * \author SuooL
 * Contact: [email protected]
 *
 * \brief 选关功能场景
 *
 * TODO: long description
 *
 * \note
*/

#ifndef __GateMapLayer__H__
#define __GateMapLayer__H__

#include "cocos2d.h"
USING_NS_CC;

class SelectGate;

class GateMapLayer : cocos2d::Layer
{
public:
    static Scene* createScene();
    virtual bool init();
    CREATE_FUNC(GateMapLayer);

    Sprite *bgPic;
    Sprite *closeBtn;
    Sprite *tips;
    LabelTTF * coin;
    LabelTTF * energy;

    SelectGate* selectGateMenu; // 当前处于中间的被选的关卡

    void gateOneCallBack(Ref* pSender);
    void gateTwoCallBack(Ref* pSender);
    void gateThreeCallBack(Ref* pSender);

    void closeFunc(Ref* pSender);
    void challengeFunc(Ref* pSender);

};
#endif
cpp文件如下:
/*!
* \class GateMapLayer
*
* \ingroup GroupName
*
* \brief  选关功能场景
*
* TODO: long description
*
* \note
*
* \author SuooL
*
* \version 1.0
*
* \date 五月 2015
*
* Contact: [email protected]
*
*/

#include "cocos2d.h"
#include "SimpleAudioEngine.h"
#include "GateMapLayer.h"
#include "GlobalDefine.h"
#include "GlobalData.h"
#include "StartLayer.h"
#include "SelectGate.h"
#include "GameLayer.h"
#include "HelloWorldScene.h"

USING_NS_CC;
using namespace CocosDenshion;

Scene* GateMapLayer::createScene()
{
    auto scene = Scene::create();
    auto layer = GateMapLayer::create();
    scene->addChild(layer);
    return scene;
}

bool GateMapLayer::init()
{
    if (! Layer::init())
    {
        return false;
    }

    if (getBoolFromXML(MUSIC_KEY))
    {
        float music = getFloatFromXML(MUSICVOL)*100.0f;
        aduioEngine->setBackgroundMusicVolume(getFloatFromXML(MUSICVOL));
        if (SimpleAudioEngine::getInstance()->isBackgroundMusicPlaying())
        {
            aduioEngine->pauseBackgroundMusic();
            aduioEngine->playBackgroundMusic("Sound/gateMap.wav", true);
        }
        else
            aduioEngine->playBackgroundMusic("Sound/gateMap.wav", true);
    }
    else
        aduioEngine->pauseBackgroundMusic();

    Size visibleSize = Director::getInstance()->getVisibleSize();
    Point origin = Director::getInstance()->getVisibleOrigin();

    SpriteFrameCache::getInstance()->addSpriteFramesWithFile("pnglist/gateMap.plist");

    bgPic = Sprite::createWithSpriteFrame(SpriteFrameCache::getInstance()->getSpriteFrameByName("GateMapBG.png"));
    bgPic->setPosition(WINSIZE.width / 2.0, WINSIZE.height / 2);
    this->addChild(bgPic);

    auto closeItem = MenuItemSprite::create(
        Sprite::createWithSpriteFrame(SpriteFrameCache::getInstance()->getSpriteFrameByName("CloseNormal.png")),
        Sprite::createWithSpriteFrame(SpriteFrameCache::getInstance()->getSpriteFrameByName("CloseSelected.png")),
        CC_CALLBACK_1(GateMapLayer::closeFunc, this)); // 退出

    auto challengeItem = MenuItemSprite::create(
        Sprite::createWithSpriteFrame(SpriteFrameCache::getInstance()->getSpriteFrameByName("tiaozhanNormal.png")),
        Sprite::createWithSpriteFrame(SpriteFrameCache::getInstance()->getSpriteFrameByName("tiaozhanSelected.png")),
        CC_CALLBACK_1(GateMapLayer::challengeFunc, this)); // 挑战

    closeItem->setPosition(WINSIZE.width - 47, WINSIZE.height - 44);
    challengeItem->setPosition(WINSIZE.width - 253, 7 * WINSIZE.height / 72);
    auto menu = Menu::create(closeItem, challengeItem, NULL);
    menu->setPosition(Point::ZERO);
    this->addChild(menu);

    auto gateOneItem = MenuItemSprite::create(
        Sprite::createWithSpriteFrame(SpriteFrameCache::getInstance()->getSpriteFrameByName("Gate_1.png")),
        Sprite::createWithSpriteFrame(SpriteFrameCache::getInstance()->getSpriteFrameByName("Gate_1.png")),
        CC_CALLBACK_1(GateMapLayer::gateOneCallBack, this)); // 退出

    auto gateTwoItem = MenuItemSprite::create(
        Sprite::createWithSpriteFrame(SpriteFrameCache::getInstance()->getSpriteFrameByName("Gate_2.png")),
        Sprite::createWithSpriteFrame(SpriteFrameCache::getInstance()->getSpriteFrameByName("Gate_2.png")),
        CC_CALLBACK_1(GateMapLayer::gateTwoCallBack, this)); // 退出

    auto gateThreeItem = MenuItemSprite::create(
        Sprite::createWithSpriteFrame(SpriteFrameCache::getInstance()->getSpriteFrameByName("Gate_3.png")),
        Sprite::createWithSpriteFrame(SpriteFrameCache::getInstance()->getSpriteFrameByName("Gate_3.png")),
        CC_CALLBACK_1(GateMapLayer::gateThreeCallBack, this)); // 退出

    selectGateMenu = SelectGate::create();
    selectGateMenu->addMenuItem(gateOneItem);
    selectGateMenu->addMenuItem(gateTwoItem);
    selectGateMenu->addMenuItem(gateThreeItem);
    selectGateMenu->setPosition(visibleSize.width / 2, visibleSize.height / 2 + 74);
    this->addChild(selectGateMenu, 2);

    auto m_pMoneyLabel = LabelTTF::create("1000", "", 45);
    m_pMoneyLabel->setColor(ccc3(0, 255, 255));
    m_pMoneyLabel->setPosition(300, 60);

    auto m_pEnergyLabel = LabelTTF::create("10", "", 45);
    m_pEnergyLabel->setColor(ccc3(0, 255, 255));
    m_pEnergyLabel->setPosition(640, 60);

    this->addChild(m_pMoneyLabel);
    this->addChild(m_pEnergyLabel);

    return true;
}

// a selector callback
void GateMapLayer::gateOneCallBack(cocos2d::Ref* pSender)
{
    PLAYEFFECT;
    setIntToXML(GAMELEVEL_KEY, 1);
    setIntToXML(SELECTGATE, 1);
    UserDefault::getInstance()->flush();
    m_iSelectGate = 1;
    log("First gate select!");
    Director::getInstance()->replaceScene(GameLayer::createScene());
}
void GateMapLayer::gateTwoCallBack(cocos2d::Ref* pSender)
{
    PLAYEFFECT;
    log("Second gate select!");
    if (getBoolFromXML(GATEONE, false))
    {
        setIntToXML(GAMELEVEL_KEY, 2);
        setIntToXML(SELECTGATE, 2);
        UserDefault::getInstance()->flush();
        m_iSelectGate = 2;
        Director::getInstance()->replaceScene(HelloWorld::createScene());

    }
}
void GateMapLayer::gateThreeCallBack(cocos2d::Ref* pSender)
{
    PLAYEFFECT;
    log("Third gate select!");
    if (getBoolFromXML(GATETWO, false))
    {
        setIntToXML(GAMELEVEL_KEY, 3);
        setIntToXML(SELECTGATE, 3);
        UserDefault::getInstance()->flush();
        m_iSelectGate = 3;
        Director::getInstance()->replaceScene(HelloWorld::createScene());
    }
    else
    {
        //Label * label = Label::cr("");
    }
}

void GateMapLayer::closeFunc(Ref* pSender)
{
    PLAYEFFECT;
    Director::getInstance()->replaceScene(StartLayer::createScene());
}
void GateMapLayer::challengeFunc(Ref* pSender)
{
    PLAYEFFECT;
    selectGateMenu->getCurrentItem()->activate(); // 手动激活该项目
//  m_iSelectGate = 1;
//  Director::getInstance()->replaceScene(GameLayer::createScene());
}
这就是本节课的主要内容。
结束语
转载请注明出处:http://blog.csdn.net/suool/article/details/46661231
在本课程中我们学习了cocos2d-x项目的帮助功能场景和选关功能场景的实现。你应当掌握了以下内容:
- 中文乱码问题的解决方法
- 裁剪节点ClippingNode的原理和用法
- 自定义控件的创建和使用过程
下节课我们将学习游戏项目中的核心功能场景的分析与实现的分析与实现 。
转载请注明出处:http://blog.csdn.net/suool/article/details/46661231
本节课的视频教程地址是:
第五课在此
如果本教程有帮助到您,希望您能点击进去观看一下,而且现在注册成为极客学院的会员,即日起至7月1日,极客学院的 VIP 课程 30 天免费体验,想学编程的小伙伴速来,只针对新用户:http://e.jikexueyuan.com/invite/index.html?ZnJvbV9jb2RlPVkxblJUZSZ1bmFtZT1TdW9vTCZjaGFubmVsPWludml0ZV8xMDB3X3NoYXJlYnV0dG9uX2RpcmVjdDE= 而且验证手机号码和邮箱号码会赠送三天的会员时间,手机端首次也可以领取五天的会员时间哦(即使是购买年会员目前也仅仅是年费260),成为极客学院学习会员可以无限制的下载和观看所有的学院网站的视频,谢谢您的支持!
