2018.8.2直播课堂笔记
今天课程先是对上次课程知识点的一个回顾(2.17 隐藏权限lsattr/chattr2.18 特殊权限set_uid2.19 特殊权限set_gid2.20 特殊权限stick_bit 2.21 软链接文件2.22 硬连接文件2.23/2.24/2.25 find命令)。
1.1然后文件类型,常用的这几个应该熟记,(Linux文件类型常见的有:普通文件、目录、字符设备文件、块设备文件、符号链接文件等)。常用的文件名后缀也应该了解一下(*.php ------这个大家都知道吧,是能用php语言解释器进行解释,能用浏览器打开的文件; *.so -------这类是库文件; *.doc *.obt --------这是OpenOffice 能打开的文件; .bz2 ------bzip2的压缩文件 .gz ------gzip的压缩文件 .tar ------tar打包文件(是包文件不是压缩文件) .tbz------tar打包并用bzip压缩文件 .tgz-----tar打包并用gzip压缩的文件 .au -----audio文件 .gif -----gif图象文件 .html/.htm-----HTML文件 .jpg-----JPEG图象文件 .pdf------电子文档(PDF格式的) .png-----PNG图象文件 .ps------postscinpt文件(打印格式文件) .txt------纯文本文件 .wav-----audio文件 .xpm-----图象文件 .conf-------配置文件 .lock-------LOCK文件(用来判断一个文件或设备是否被使用) .rpm------REDHATPackage.Manager文件(套件包或软件包) .c -------C源程序代码文件 .cpp------C++源程序代码文件 .h -------C或C++程序的头文件 .o------程序目标文件 .pl------perl脚本文件 .so-----类库文件)。
1.2linux与windows互传工具,这里介绍了三个工具(lrzsz xftp winscp)这都是基于XSHELL的传输工具。这里安装lrzsz的时候提到一个知识点通过已知命令查找yum安装包。这个命令“yum search rz”
#[root@localhost /]# yum search rz
Loaded plugins: fastestmirror
Loading mirror speeds from cached hostfile
* base: centos.01link.hk
* extras: mirrors.shu.edu.cn
* updates: centos.01link.hk
N/S matched: rz =======================================================================
lrzsz.x86_64 : The lrz and lsz modem communications programs
Name and summary matches only, use "search all" for everything.
这里还有一个额外的知识点,用“yum install -y httpd”如果不加"y"会提示“y/d/n”,“y”是直接安装,“d”是只下载不安装,“n”是不安装!
1.3 用户配置文件和密码配置文件,这里有两个文件"/etc/passwd"这里有7列内容需要掌握,可能面试的时候会遇到。
#[root@localhost etc]# cat passwd
root:x:0:0:root:/root:/bin/bash 用户名:口令:用户标识号:组标识号:注释性描述:主目录:登录Shell。
还有一个“/etc/shadow”这里有9段内容,
#[root@localhost etc]# cat passwd
root:x:0:0:root:/root:/bin/bash 登录名:加密口令:最后一次修改时间:最小时间间隔:最大时间间隔:警告时间:不活动时间:失效时间:标志
有个扩展知识点:统计系统中有多少用户?我们可以用这几个命令
[root@localhost /]# wc -l /etc/passwd
21 /etc/passwd
[root@localhost /]# cat -n /etc/passwd
1 root:x:0:0:root:/root:/bin/bash
2 bin:x:1:1:bin:/bin:/sbin/nologin
3 daemon:x:2:2:daemon:/sbin:/sbin/nologin
4 adm:x:3:4:adm:/var/adm:/sbin/nologin
5 lp:x:4:7:lp:/var/spool/lpd:/sbin/nologin
6 sync:x:5:0:sync:/sbin:/bin/sync
7 shutdown:x:6:0:shutdown:/sbin:/sbin/shutdown
8 halt:x:7:0:halt:/sbin:/sbin/halt
9 mail:x:8:12:mail:/var/spool/mail:/sbin/nologin
10 operator:x:11:0:operator:/root:/sbin/nologin
11 games:x:12:100:games:/usr/games:/sbin/nologin
12 ftp:x:14:50:FTP User:/var/ftp:/sbin/nologin
13 nobody:x:99:99:Nobody:/:/sbin/nologin
14 systemd-network:x:192:192:systemd Network Management:/:/sbin/nologin
15 dbus:x:81:81:System message bus:/:/sbin/nologin
16 polkitd:x:999:998:User for polkitd:/:/sbin/nologin
17 sshd:x:74:74:Privilege-separated SSH:/var/empty/sshd:/sbin/nologin
18 postfix:x:89:89::/var/spool/postfix:/sbin/nologin
19 chrony:x:998:996::/var/lib/chrony:/sbin/nologin
20 knightlai:x:1000:1000::/home/knightlai:/bin/bash
21 user1:x:1001:1001::/home/user1:/bin/bash
[root@localhost /]# vi /etc/passwd
1 root:x:0:0:root:/root:/bin/bash
2 bin:x:1:1:bin:/bin:/sbin/nologin
3 daemon:x:2:2:daemon:/sbin:/sbin/nologin
4 adm:x:3:4:adm:/var/adm:/sbin/nologin
5 lp:x:4:7:lp:/var/spool/lpd:/sbin/nologin
6 sync:x:5:0:sync:/sbin:/bin/sync
7 shutdown:x:6:0:shutdown:/sbin:/sbin/shutdown
8 halt:x:7:0:halt:/sbin:/sbin/halt
9 mail:x:8:12:mail:/var/spool/mail:/sbin/nologin
10 operator:x:11:0:operator:/root:/sbin/nologin
11 games:x:12:100:games:/usr/games:/sbin/nologin
12 ftp:x:14:50:FTP User:/var/ftp:/sbin/nologin
13 nobody:x:99:99:Nobody:/:/sbin/nologin
14 systemd-network:x:192:192:systemd Network Management:/:/sbin/nologin
15 dbus:x:81:81:System message bus:/:/sbin/nologin
16 polkitd:x:999:998:User for polkitd:/:/sbin/nologin
17 sshd:x:74:74:Privilege-separated SSH:/var/empty/sshd:/sbin/nologin
18 postfix:x:89:89::/var/spool/postfix:/sbin/nologin
19 chrony:x:998:996::/var/lib/chrony:/sbin/nologin
20 knightlai:x:1000:1000::/home/knightlai:/bin/bash
21 user1:x:1001:1001::/home/user1:/bin/bash
:set nu
1.4 用户组管理这里有个“/etc/group”文件
#[root@localhost /]# cat /etc/group
root:x:0://第一字段:用户组名称; 第二字段:用户组密码;第三字段:GID ;第四字段:用户列表,每个用户之间用,号分割;本字段可以为空;如果字段为空表示用户组为GID的用户
bin:x:1:
mail:x:12:postfix
还有一个用户组密码配置文件/etc/gshadow
#[root@localhost /]# cat /etc/gshadow
root::://1.组名: 是用户组的名称,由字母或数字构成。2.口令:用户组密码,这个段可以是空的或!,如果是空的或有!,表示没有密码 3.组管理者:这个字段也可为空,如果有多个用户组管理者,用,号分割 .4.组内用户列表:如果有多个成员,用,号分割 ;
bin:::
daemon:::
sys:::
adm:::
tty:::
disk:::
lp:::
mem:::
这个4段是和前面/etc/group相对应的!
#[root@localhost /]# cd /etc
#[root@localhost etc]# ls
AA.txt csh.login grub2.cfg locale.conf passwd- resolv.conf.save sudo-ldap.conf
adjtime dbus-1 grub.d localtime pkcs11 rpc sysconfig
aliases default gshadow login.defs pki rpm sysctl.conf
aliases.db depmod.d gshadow- logrotate.conf plymouth rsyslog.conf sysctl.d
备份文件同名带有"-"名的其实是为备份文件。
1.5用户组的添加和删除 groupadd 增加用户组 groupdel 删除用户组
group [-g GID]groupname指定GID,不加-g选项,按照系统默认的gid创建组,跟uid一样,gid是从1000开始的.
扩展知识点:批量增加或者删除用户组?这里需要一个shell脚本,用到了一个for循环“for(i=0;i<=10;i++) do groupadd i ; done“
1.6用户管理 useradd 增加用户 userdel 删除用户 这个是用户组增加删除差不多。
useradd [-d home] [-s shell] [-c comment] [-m [-k template]] [-f inactive] [-e expire ] [-p passwd] [-r] name下面有几个参数:
-c:加上备注文字,备注文字保存在passwd的备注栏中。-d:指定用户登入时的主目录,替换系统默认值/home/<用户名>
-D:变更预设值。-e:指定账号的失效日期,日期格式为MM/DD/YY,例如06/30/12。缺省表示永久有效。
-f:指定在密码过期后多少天即关闭该账号。如果为0账号立即被停用;如果为-1则账号一直可用。默认值为-1.
-g:指定用户所属的群组。值可以使组名也可以是GID。用户组必须已经存在的,期默认值为100,即users。
-G:指定用户所属的附加群组。-m:自动建立用户的登入目录。-M:不要自动建立用户的登入目录。
-n:取消建立以用户名称为名的群组。-r:建立系统账号。-s:指定用户登入后所使用的shell。默认值为/bin/bash。
-u:指定用户ID号。该值在系统中必须是唯一的。0~499默认是保留给系统用户账号使用的,所以该值必须大于499。
1.7 usermod 命令修改 语 法:usermod [-LU][-c <备注>][-d <登入目录>][-e <有效期限>][-f <缓冲天数>][-g <群组>][-G <群组>][-l <帐号名称>][-s <shell>][-u <uid>][用户帐号]
-c<备注> 修改用户帐号的备注文字。-d登入目录> 修改用户登入时的目录。-e<有效期限> 修改帐号的有效期限。
-f<缓冲天数> 修改在密码过期后多少天即关闭该帐号。-g<群组> 修改用户所属的群组。
-G<群组> 修改用户所属的附加群组。-l<帐号名称> 修改用户帐号名称。 -L 锁定用户密码,使密码无效。
-s<shell> 修改用户登入后所使用的shell。-u<uid> 修改用户ID。 -U 解除密码锁定。
1.8 passwd -l 锁定用户密码 -u 解锁用户密码
扩展知识点:"echo "387646" | passwd --stdin root 只输入一次密码shell脚本中常用!
usermod - L 和passwd -l 基本上没有什么 区别,如果 用usermod - L锁定用户,也可以用passwd -u解锁用户。
1.9 mkpasswd 密码生成命令,
#[root@localhost etc]# yum provides mkpasswd
Loaded plugins: fastestmirror
Loading mirror speeds from cached hostfile
* base: mirror.vpshosting.com.hk
* extras: mirrors.shu.edu.cn
* updates: mirror.vpshosting.com.hk
expect-5.45-14.el7_1.x86_64 : A program-script interaction and testing utility
Repo : base
Matched from:
Filename : /usr/bin/mkpasswd
# mkpasswd -l 20 -d 5 -c 5 -C 5 -s 5
Z}K7hp0UPJ6v@&,c5{d3
-l # (密码的长度定义, 默认是 9) -d # (数字个数, 默认是 2)-c # (小写字符, 默认是 3) -C # (大写字符, 默认是 2)
-s # (特殊字符, 默认是 1) -p prog (程序设置密码, 默认是 passwd)
格式4.1 df命令
4.2 du命令
4.3/4.4 磁盘分区
4.5/4.6 磁盘格式化
4.7/4.8 磁盘挂载
4.9 手动增加swap空间
4.10/4.11/4.12 lvm讲解
4.13 磁盘故障小案例
4.1 df命令
df (disk filesystem的简写)用于查看已挂载磁盘的总容量、使用容量、剩余容量等。
df也有三个参数可以看一下:
| i | 查看inodes的使用情况 |
| h | 表示使用合适的单位显示 |
| k 、 m | 表示以KB或MB为单位显示 |
这里可以看到第二列就是indoes
[root@knightlai11 ~]# df -i
Filesystem      Inodes IUsed   IFree IUse% Mounted on
/dev/sda3      8430080 25908 8404172    1% /
devtmpfs        121997   355  121642    1% /dev
tmpfs           124744     1  124743    1% /dev/shm
tmpfs           124744   704  124040    1% /run
tmpfs           124744    16  124728    1% /sys/fs/cgroup
/dev/sda1       102400   326  102074    1% /boot
tmpfs           124744     1  124743    1% /run/user/0
[root@knightlai11 ~]# df -h
Filesystem      Size  Used Avail Use% Mounted on
/dev/sda3        17G  977M   16G   6% /
devtmpfs        477M     0  477M   0% /dev
tmpfs           488M     0  488M   0% /dev/shm
tmpfs           488M  7.7M  480M   2% /run
tmpfs           488M     0  488M   0% /sys/fs/cgroup
/dev/sda1       197M  102M   96M  52% /boot
tmpfs            98M     0   98M   0% /run/user/0
[root@knightlai11 ~]# df -m
Filesystem     1M-blocks  Used Available Use% Mounted on
/dev/sda3          16455   977     15479   6% /
devtmpfs             477     0       477   0% /dev
tmpfs                488     0       488   0% /dev/shm
tmpfs                488     8       480   2% /run
tmpfs                488     0       488   0% /sys/fs/cgroup
/dev/sda1            197   102        96  52% /boot
tmpfs                 98     0        98   0% /run/user/0
4.2 du命令
du(disk useage的缩写)用来查看某个目录或文件所占空间的大小.

一般格式为:du[][文件或者目录名]
du也有几个参数需要看一下:
| a | 表示全部文件和目录大小都列出来 |
| b | 表示列出的值以B为单位输出 |
| k | 表示以KB为单位输出 |
| m | 表示以MB为单位输出 |
| h | 表示系统自动调节单位 |
| c | 表示最后加总 |
| s | 表示只列出总和 |
[root@knightlai11 /]# du -sh etc
34M	etc
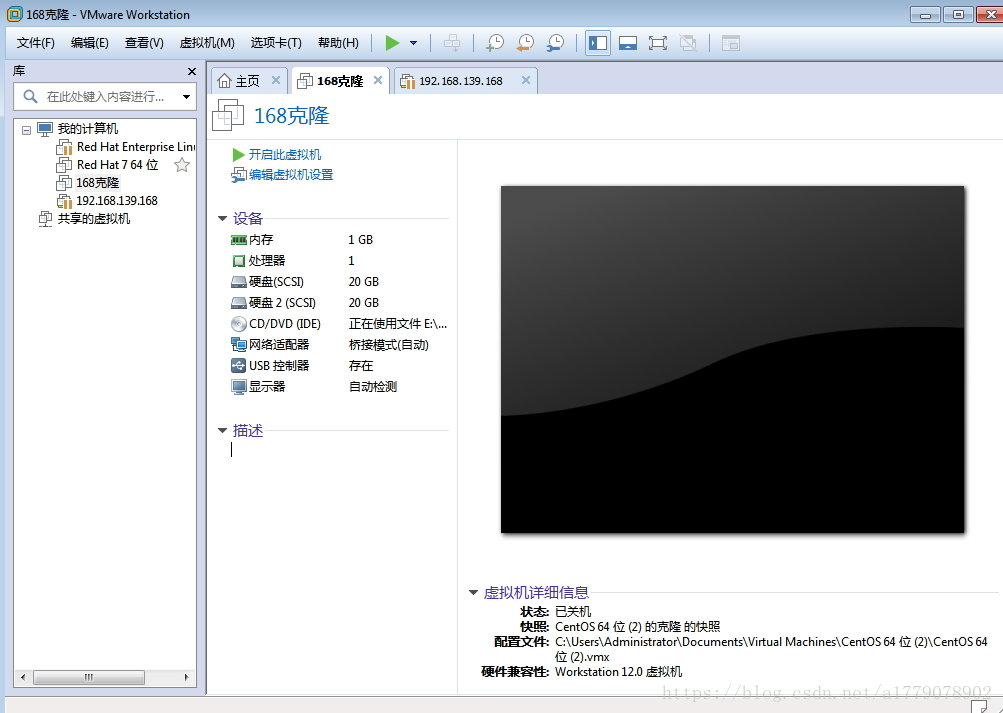
4.3/4.4 磁盘分区
这里因为我们是虚拟机所以这个实操相对方便一点,我们这里在虚拟机上新建一个硬盘来分区.

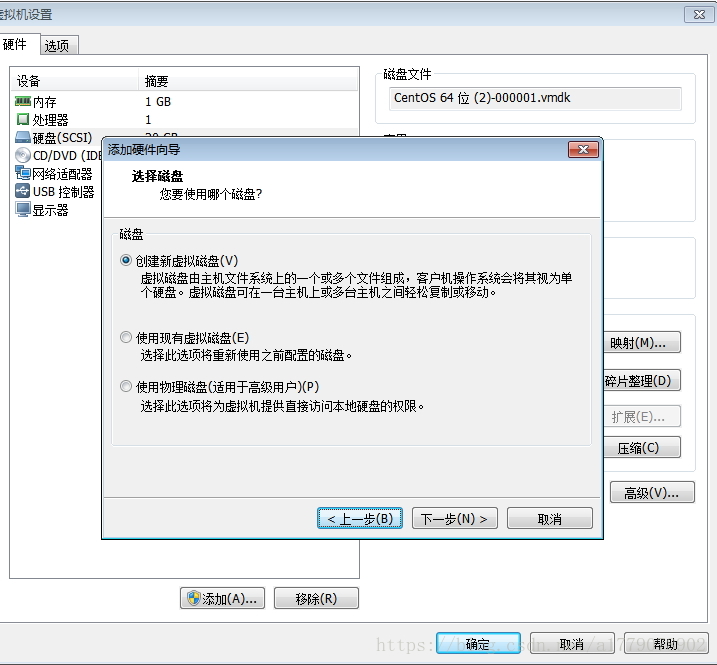
这里有一个非常重要的命令fdisk命令(fdisk只能划分小于2TB的分区)
fdisk用法: fdisk[-l][设备名称]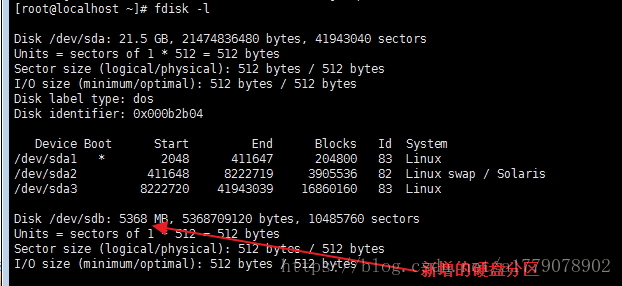
[root@localhost ~]# fdisk /dev/sdb
Welcome to fdisk (util-linux 2.23.2).

Changes will remain in memory only, until you decide to write them.
Be careful before using the write command.

Device does not contain a recognized partition table
Building a new DOS disklabel with disk identifier 0x2fd55fc7.

Command (m for help):
Command action
   a   toggle a bootable flag
   b   edit bsd disklabel
   c   toggle the dos compatibility flag
   d   delete a partition
   g   create a new empty GPT partition table
   G   create an IRIX (SGI) partition table
   l   list known partition types
   m   print this menu
   n   add a new partition
   o   create a new empty DOS partition table
   p   print the partition table
   q   quit without saving changes
   s   create a new empty Sun disklabel
   t   change a partition's system id
   u   change display/entry units
   v   verify the partition table
   w   write table to disk and exit
   x   extra functionality (experts only)
这里有几个参数有必要解释一下:
| p | 表示打印当前磁盘分区情况 |
| n | 表示建立一个分区 |
| w | 表示保存 |
| q | 表示退出 |
| d | 表示删除一个分区 |
这里我们为主分区分一个2G
Partition type:
   p   primary (0 primary, 0 extended, 4 free)
   e   extended
Select (default p): p
Partition number (1-4, default 1): 1
First sector (2048-10485759, default 2048):
Using default value 2048
Supported: 10^N: KB (KiloByte), MB (MegaByte), GB (GigaByte)
            2^N: K  (KibiByte), M  (MebiByte), G  (GibiByte)
Last sector, +sectors or +size{K,M,G} (2048-10485759, default 10485759): +2G
Partition 1 of type Linux and of size 2 GiB is set

Device Boot      Start         End      Blocks   Id  System
/dev/sdb1            2048     4196351     2097152   83  Linux
剩下的全部给扩展分区:
Command (m for help): n
Partition type:
   p   primary (1 primary, 0 extended, 3 free)
   e   extended
Select (default p): e
Partition number (2-4, default 2):
First sector (4196352-10485759, default 4196352):
Using default value 4196352
Last sector, +sectors or +size{K,M,G} (4196352-10485759, default 10485759):
Using default value 10485759
Partition 2 of type Extended and of size 3 GiB is set

Command (m for help): p

Disk /dev/sdb: 5368 MB, 5368709120 bytes, 10485760 sectors
Units = sectors of 1 * 512 = 512 bytes
Sector size (logical/physical): 512 bytes / 512 bytes
I/O size (minimum/optimal): 512 bytes / 512 bytes
Disk label type: dos
Disk identifier: 0x2fd55fc7

   Device Boot      Start         End      Blocks   Id  System
/dev/sdb1            2048     4196351     2097152   83  Linux
/dev/sdb2         4196352    10485759     3144704    5  Extended
以后在生产环境中,不要随意的去分区,执行分区操作的时候也要非常小心。一但把服务器的数据分没了就.............
磁盘格式化:
硬盘虽然分好区了,但是还是不能使用,我们必需要格式化以后才能正常使用!
格式化:其实就是安装文件系统mke2fs命令常用选项:
-b 表示分区时设定每个数据区块占用的空间大小
-i 表示设定inode的大小
-N 表示设定的inode的数量。
-c 表示在格式化前先检测一下磁盘是否有问题。
-L 表示预设该分区的标签
-j 表示建立ext3格式的分区
-t 用来指定文件系统的类型。下面我们给前面分好的区格式化:
[root@localhost /]# mke2fs -t ext4 /dev/sdb1
mke2fs 1.42.9 (28-Dec-2013)
Filesystem label=
OS type: Linux
Block size=4096 (log=2)
Fragment size=4096 (log=2)
Stride=0 blocks, Stripe width=0 blocks
131072 inodes, 524288 blocks
26214 blocks (5.00%) reserved for the super user
First data block=0
Maximum filesystem blocks=536870912
16 block groups
32768 blocks per group, 32768 fragments per group
8192 inodes per group
Superblock backups stored on blocks:
	32768, 98304, 163840, 229376, 294912

Allocating group tables: done
Writing inode tables: done
Creating journal (16384 blocks): done
Writing superblocks and filesystem accounting information: done
4.7/4.8 磁盘挂载
分好区,格式化完以后,我们就可以挂载这些磁盘来使用了。在挂载分区前,挂载点目录下必须是个空目录。一旦某个分区挂载到这个挂载点下,再往这个目录写数据时,就都会写到该分区中。
| moutnt -a | 会把/etc/fstab中出现的所有磁盘分区挂载上 |
| mount -t | 指定挂载分区类型 |
| mount -o | 指定挂载的分区有哪些特性 |
[root@localhost /]# mount /dev/sdb5 /testdir/
[root@localhost /]# df
Filesystem     1K-blocks    Used Available Use% Mounted on
/dev/sda3       16849920 1288280  15561640   8% /
devtmpfs          487988       0    487988   0% /dev
tmpfs             498976       0    498976   0% /dev/shm
tmpfs             498976    7748    491228   2% /run
tmpfs             498976       0    498976   0% /sys/fs/cgroup
/dev/sda1         201380  103964     97416  52% /boot
tmpfs              99796       0     99796   0% /run/user/0
/dev/sdb5        3028752    9216   2845968   1% /testdir
这里有个配置文件需要了解一下 /etc/fstab
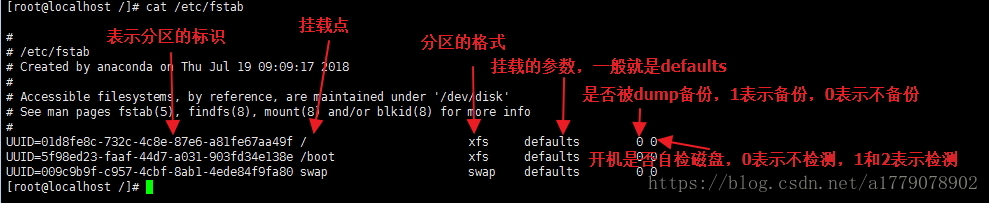
这里介绍一下第4列 挂载的参数有
| Async/sync |
设置是否为同步方式运行,默认为async |
| auto/noauto |
当下载mount -a 的命令时,此文件系统是否被主动挂载。默认为auto |
| rw/ro |
是否以以只读或者读写模式挂载 |
| exec/noexec |
限制此文件系统内是否能够进行"执行"的操作 |
| user/nouser |
是否允许用户使用mount命令挂载 |
| suid/nosuid |
是否允许SUID的存在 |
| Usrquota |
启动文件系统支持磁盘配额模式 |
| Grpquota |
启动文件系统对群组磁盘配额模式的支持 |
| Defaults |
同事具有rw,suid,dev,exec,auto,nouser,async等默认参数的设置 |
umount 后面可以跟挂载点,也可以跟分区名(如/dev/sdb5),但是不可以跟LABEL和UUID.
4.9 手动增加swap空间
这个在装系统的时候我们接触过这个命令,如果实际生产环境中遇到了虚拟内存不够用的情况,就必须增加一个虚拟磁盘,因为我们不可能再给磁盘分区.
增加虚拟磁盘的基本思路是:建立swapfile->格式化为swap格式->启用虚拟磁盘这里有一个dd命令需要了解一下:
dd if指定源(一般是写/dev/zero,它是UNIX系统特有的一个文件,它可以源源不断地提供“0”)
of 指定目标文件,bs定义块大小,count定义块的数量。其中bs和count这两个参数决定了目标文件的大小,
目标文件大小=bs*count
a.先建立一个swapfile:
[root@localhost /]# dd if=/dev/zero of=/tmp/newdisk bs=1M count=1024
1024+0 records in
1024+0 records out
1073741824 bytes (1.1 GB) copied, 45.3499 s, 23.7 MB/s
b.格式化为swap格式
[root@localhost /]# mkswap /tmp/newdisk
Setting up swapspace version 1, size = 1048572 KiB
no label, UUID=81ad5ebe-9342-47c4-879a-72f2bfdeaee2
c.文件格式化后,就可以挂载使用了,这里我们看一下挂载前后的内存对比:
[root@localhost /]# free -m
              total        used        free      shared  buff/cache   available
Mem:            974         121          73           7         779         668
Swap:          3813           0        3813
执行完swapon /tmp/newdisk,从3813变成了4837说明增加成功了!
[root@localhost /]# swapon /tmp/newdisk
swapon: /tmp/newdisk: insecure permissions 0644, 0600 suggested.
[root@localhost /]# free -m
              total        used        free      shared  buff/cache   available
Mem:            974         121          72           7         779         668
Swap:          4837           0        4837
4.10/4.11/4.12 lvm讲解
这个我们需要了解几个概念:LVM(Logic Volume Manager)是逻辑卷管理的简称。它是Linux环境下对磁盘分区管理的一种机制。对于其他的的UNIX(AIX/HP/SUM)操作系统,以及Windows系统也有类似的磁盘管理软件。
逻辑卷管理的3个概念:

PV(physical volume) 物料卷

VG (Volume Group) 卷组

LG (Logical volume)逻辑卷
下面我们来实操一下怎么去扩容与缩容磁盘空间:

a.创建完以后,我们可以看一下 :
Disk /dev/sdb: 5368 MB, 5368709120 bytes, 10485760 sectors
Units = sectors of 1 * 512 = 512 bytes
Sector size (logical/physical): 512 bytes / 512 bytes
I/O size (minimum/optimal): 512 bytes / 512 bytes
Disk label type: dos
Disk identifier: 0xaeb7a75c

   Device Boot      Start         End      Blocks   Id  System
/dev/sdb1            2048     2099199     1048576   8e  Linux LVM
/dev/sdb2         2099200     4196351     1048576   8e  Linux LVM
/dev/sdb3         4196352     6293503     1048576   8e  Linux LVM
b. 现面开始创建物理卷
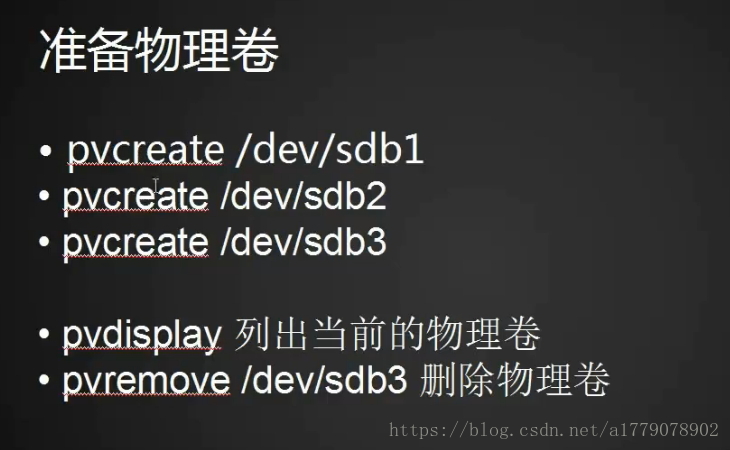
创建物理卷
[root@localhost /]# pvcreate /dev/sdb1 /dev/sdb2
  Device /dev/sdb2 excluded by a filter.
WARNING: ext4 signature detected on /dev/sdb1 at offset 1080. Wipe it? [y/n]: y
  Wiping ext4 signature on /dev/sdb1.
  Physical volume "/dev/sdb1" successfully created.
[root@localhost /]# pvs
  PV         VG Fmt  Attr PSize PFree
  /dev/sdb1     lvm2 ---  2.00g 2.00g
我们把 /dev/sdb1 和 /dev/sdb2合并成物理卷vg1用pvs可以查看当前的物理卷
[root@localhost /]# vgcreate vg1 /dev/sdb1 /dev/sdb2
  Physical volume "/dev/sdb2" successfully created.
  WARNING: Device /dev/sdb1 has size of 2097152 sectors which is smaller than corresponding PV size of 4194304 sectors. Was device resized?
  Volume group "vg1" successfully created
[root@localhost /]# vgs
  WARNING: Device /dev/sdb1 has size of 2097152 sectors which is smaller than corresponding PV size of 4194304 sectors. Was device resized?
  One or more devices used as PVs in VG vg1 have changed sizes.
  VG  #PV #LV #SN Attr   VSize VFree
  vg1   2   0   0 wz--n- 2.99g 2.99g
创建逻辑卷
[root@localhost /]# lvcreate -L 100M /dev/vg1/lv1
  Volume group name expected (no slash)
  Run `lvcreate --help' for more information.
[root@localhost /]# lvcreate -L 100M -n lv1 vg1
  WARNING: Device /dev/sdb1 has size of 2097152 sectors which is smaller than corresponding PV size of 4194304 sectors. Was device resized?
  One or more devices used as PVs in VG vg1 have changed sizes.
  Logical volume "lv1" created.
[root@localhost /]# lvs
  WARNING: Device /dev/sdb1 has size of 2097152 sectors which is smaller than corresponding PV size of 4194304 sectors. Was device resized?
  One or more devices used as PVs in VG vg1 have changed sizes.
  LV   VG  Attr       LSize   Pool Origin Data%  Meta%  Move Log Cpy%Sync Convert
  lv1  vg1 -wi-a----- 100.00m
格式化当前逻辑卷格式为ex4
[root@localhost /]# mkfs.ext4 /dev/vg1/lv1
mke2fs 1.42.9 (28-Dec-2013)
Filesystem label=
OS type: Linux
Block size=1024 (log=0)
Fragment size=1024 (log=0)
Stride=0 blocks, Stripe width=0 blocks
25688 inodes, 102400 blocks
5120 blocks (5.00%) reserved for the super user
First data block=1
Maximum filesystem blocks=33685504
13 block groups
8192 blocks per group, 8192 fragments per group
1976 inodes per group
Superblock backups stored on blocks:
	8193, 24577, 40961, 57345, 73729

Allocating group tables: done
Writing inode tables: done
Creating journal (4096 blocks): done
Writing superblocks and filesystem accounting information: done
挂载当前逻辑卷
[root@localhost /]# mount /dev/vg1/lv1 /mnt
[root@localhost /]# df
Filesystem          1K-blocks    Used Available Use% Mounted on
/dev/sda3            16849920 2492048  14357872  15% /
devtmpfs               487988       0    487988   0% /dev
tmpfs                  498976       0    498976   0% /dev/shm
tmpfs                  498976    7760    491216   2% /run
tmpfs                  498976       0    498976   0% /sys/fs/cgroup
/dev/sda1              201380  103964     97416  52% /boot
tmpfs                   99796       0     99796   0% /run/user/0
/dev/sdb5             3028752    9216   2845968   1% /testdir
/dev/mapper/vg1-lv1     95054    1550     86336   2% /mnt
现在扩容
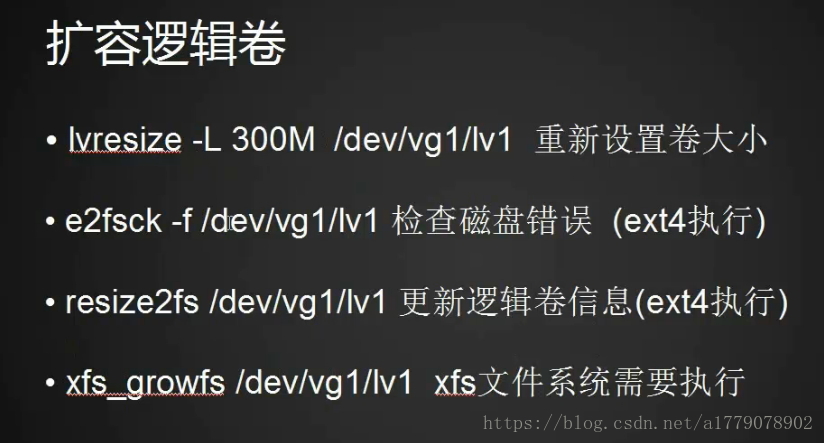
扩容以后再看一下,
[root@localhost /]# df
Filesystem          1K-blocks    Used Available Use% Mounted on
/dev/sda3            16849920 2492088  14357832  15% /
devtmpfs               487988       0    487988   0% /dev
tmpfs                  498976       0    498976   0% /dev/shm
tmpfs                  498976    7760    491216   2% /run
tmpfs                  498976       0    498976   0% /sys/fs/cgroup
/dev/sda1              201380  103964     97416  52% /boot
tmpfs                   99796       0     99796   0% /run/user/0
/dev/sdb5             3028752    9216   2845968   1% /testdir
/dev/mapper/vg1-lv1    194460    1544    178580   1% /mnt
其实缩容就是反着做一下就可以:
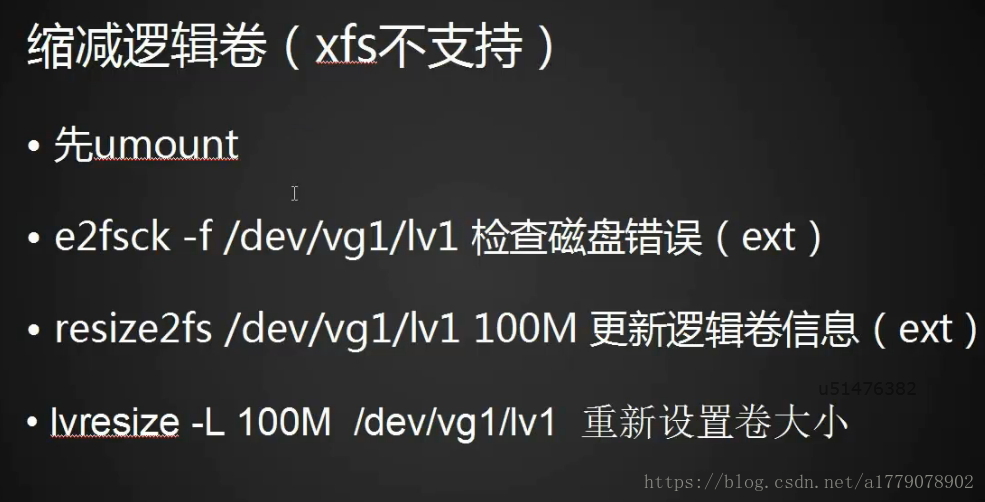
以上是针对ext4文件!
4.13 磁盘故障小案例

一般出现这个错误,主要是磁盘挂载点出现问题。我们可以在 /etc/fstab找到我们有问题的那个配置信息删除
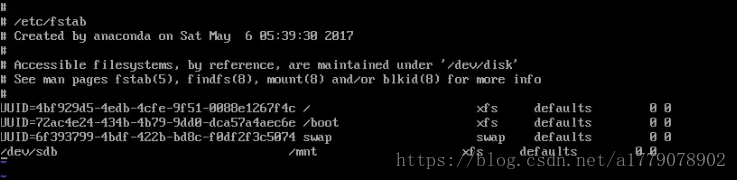
,重启就可以!