@
前言
本次的情况先说明一下:
任务就是在公司的内网服务器中搭建一个pgsql的数据库
无yum下载,只能使用rpm文件搞定相关软件安装

一、安装环境
liunx系统: Centos7
pgsql数据库:postgresql-10.2
服务器视图化工具:finalshell
数据库视图化工具:Navicat 12
本次pgsql的文件存放位置: /home/pgsql

二、开始安装pgsql (按照操作流程来的)
(1)解压压缩包
[root@localhost pgsql]# tar -zxvf postgresql-10.2.tar.gz
(2)进入压缩后文件
[root@localhost pgsql]# cd postgresql-10.2
[root@localhost pgsql]# ls
aclocal.m4 configure contrib doc HISTORY Makefile src
config configure.in COPYRIGHT GNUmakefile.in INSTALL README
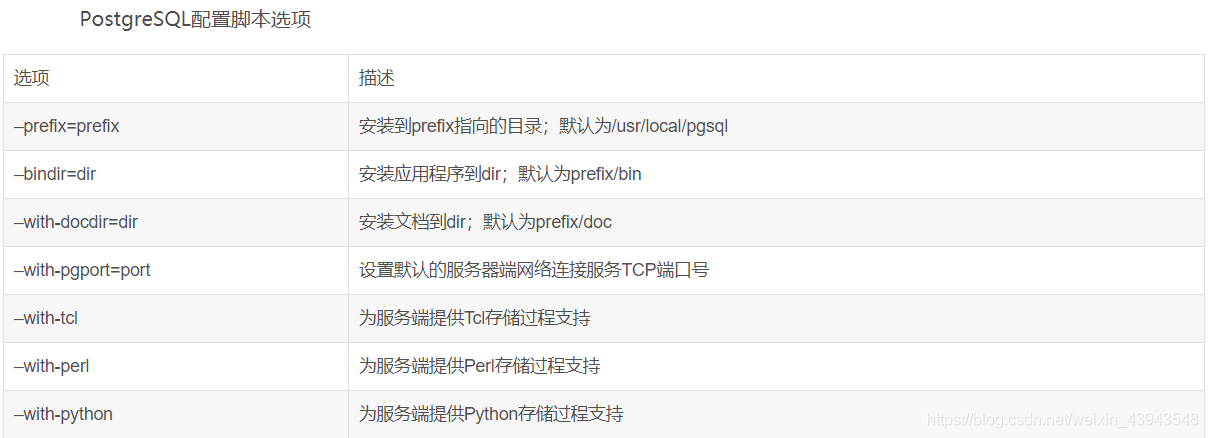
(3)编译postgresql源码
[root@localhost postgresql-10.2]# ./configure --prefix=/home/pgsql/postgresql
出现问题请一定要看后面问题解决方案!!!
[root@localhost postgresql-10.2]# make
[root@localhost postgresql-10.2]# make install
至此,已完成postgreql的安装。进入/home/pgsql/postgresql目录可以看到安装后的postgresql的文件。
[root@localhost postgresql]# ls
bin include lib share
(4)创建一个用户
创建pgsql用户并设置密码:
[root@localhost postgresql]# groupadd postgres
[root@localhost postgresql]# useradd postgres
[root@localhost postgresql]# passwd postgres
[root@localhost postgresql]# id postgres
uid=501(postgres) gid=501(postgres) 组=501(postgres)
两次输入密码并确认
(5)创建pgsql的数据库存储data主目录,并修改文件所有者
[root@localhost postgresql-10.2]# cd /home/pgsql/postgresql
[root@localhost postgresql]# mkdir data
[root@localhost postgresql]# chown postgres:postgres data
[root@localhost postgresql]# ls -al
total 20
drwxr-xr-x. 7 root root 68 Mar 30 14:38 .
drwxr-xr-x. 4 root root 77 Mar 30 15:52 ..
drwxr-xr-x. 2 root root 4096 Mar 30 14:35 bin
drwx------. 19 postgres postgres 4096 Mar 30 15:34 data
drwxr-xr-x. 6 root root 4096 Mar 30 14:35 include
drwxr-xr-x. 4 root root 4096 Mar 30 14:35 lib
drwxr-xr-x. 6 root root 4096 Mar 30 14:35 share
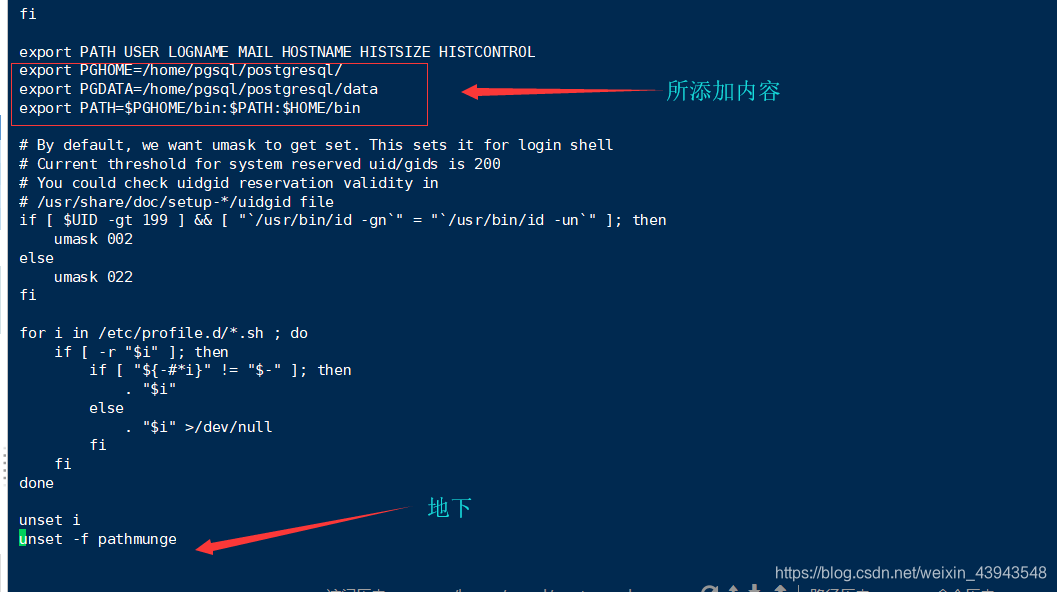
(6)添加环境变量
[root@localhost postgresql]# vi /etc/profile
添加内容为:
export PGHOME=/home/pgsql/postgresql/
export PGDATA=/home/pgsql/postgresql/data
export PATH=$PGHOME/bin:$PATH:$HOME/bin
刷新一下
[root@localhost postgresql]# source /etc/profile
(7)换postgres账号并使用initdb初始化数据库
[root@localhost /]# su postgres
bash-4.2$ cd /home/pgsql/postgresql
bash-4.2$ initdb
The files belonging to this database system will be owned by user "postgres".
This user must also own the server process.
The database cluster will be initialized with locale "en_US.UTF-8".
The default database encoding has accordingly been set to "UTF8".
The default text search configuration will be set to "english".
Data page checksums are disabled.
fixing permissions on existing directory /home/pgsql/postgresql/data ... ok
creating subdirectories ... ok
selecting default max_connections ... 100
selecting default shared_buffers ... 128MB
selecting dynamic shared memory implementation ... posix
creating configuration files ... ok
running bootstrap script ... ok
performing post-bootstrap initialization ... ok
syncing data to disk ... ok
WARNING: enabling "trust" authentication for local connections
You can change this by editing pg_hba.conf or using the option -A, or
--auth-local and --auth-host, the next time you run initdb.
Success. You can now start the database server using:
pg_ctl -D /home/pgsql/postgresql/data -l logfile start
可以看到 /home/pgsql/postgresql/data已经有文件了。
bash-4.2$ cd /home/pgsql/postgresql/data
bash-4.2$ ls
base pg_commit_ts pg_hba.conf pg_logical pg_notify pg_serial pg_stat pg_subtrans pg_twophase pg_wal postgresql.auto.conf
global pg_dynshmem pg_ident.conf pg_multixact pg_replslot pg_snapshots pg_stat_tmp pg_tblspc PG_VERSION pg_xact postgresql.conf
(8)配置pgsql的服务
修改/pgsql/postgresql/data目录下的两个文件。
postgresql.conf : 配置PostgreSQL数据库服务器的相应的参数。
pg_hba.conf : 配置对数据库的访问权限。
bash-4.2$ vi postgresql.conf
listen_addresses = '*'                 # what IP address(es) to listen on;
                                        # comma-separated list of addresses;
                                        # defaults to 'localhost'; use '*' for all
                                        # (change requires restart)
port = 5432                            # (change requires restart)
其中,参数“listen_addresses”表示监听的IP地址,默认是在localhost处监听,也就是127.0.0.1的ip地址上监听,只接受来自本机localhost的连接请求,这会让远程的主机无法登陆这台数据库,如果想从其他的机器上登陆这台数据库,需要把监听地址改为实际网络的地址,一种简单的方法是,将行开头的#去掉,把这个地址改为*,表示在本地的所有地址上监听。
bash-4.2$ vi pg_hba.conf
找到最下面这一行 ,这样局域网的人才能访问。红色为新添加内容。
IPv4 local connections:
host all all 0.0.0.0/0 trust
host all all 127.0.0.1/32 trust
(9)设置开机自启动
bash-4.2$ cd /home/pgsql/postgresql-10.2/contrib/start-scripts
bash-4.2$ ls
freebsd linux macos osx
1)切换为root用户,修改linux文件属性,添加X属性
bash-4.2$ su root
Password:
[root@localhost start-scripts]# chmod a+x linux
2)复制linux文件到/etc/init.d目录下,更名为postgresql
[root@localhost start-scripts]# cp linux /etc/init.d/postgresql
3)修改/etc/init.d/postgresql文件的两个变量
[root@localhost start-scripts]# vi /etc/init.d/postgresql
prefix设置为postgresql的安装路径:/pgsql/postgresql
PGDATA设置为postgresql的数据目录路径:/pgsql/postgresql/data
4)设置postgresql服务开机自启动
[root@localhost start-scripts]# chkconfig --add /etc/init.d/postgresql
查看开机自启动服务设置成功。
[root@localhost start-scripts]# chkconfig
postgresql 0:关闭 1:关闭 2:启用 3:启用 4:启用 5:启用 6:关闭
5)打开5432的防火墙
//开放5432端口
firewall-cmd --zone=public --add-port=5432/tcp --permanent
//跟新防火墙规则
firewall-cmd --reload
//防火墙列表
firewall-cmd --zone=public --list-ports
//防火墙状态
systemctl status firewalld
//启动防火墙
systemctl start firewalld
//关闭防火墙
systemctl stop firewalld.service
systemctl disable firewalld.service
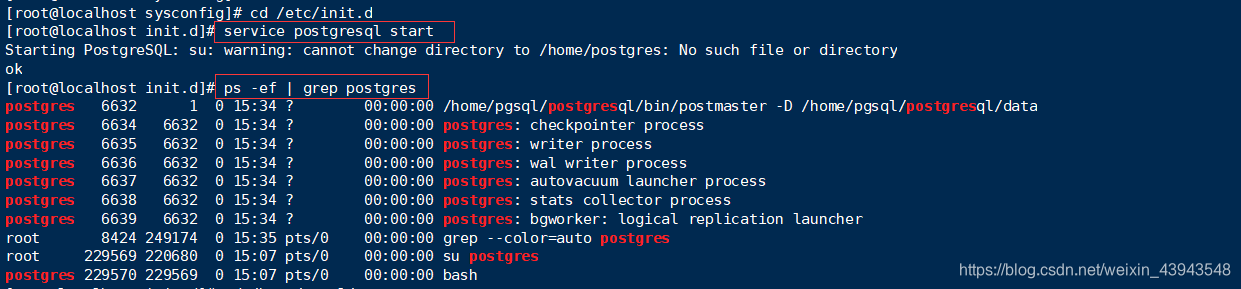
(10)开启服务 service postgresql start
[root@localhost sysconfig]# cd /etc/init.d
[root@localhost init.d]# service postgresql start
Starting PostgreSQL: su: warning: cannot change directory to /home/postgres: No such file or directory ok
查看postgresql的状态
[root@localhost init.d]# ps -ef | grep postgres
三、问题解决方案
1、两个问题
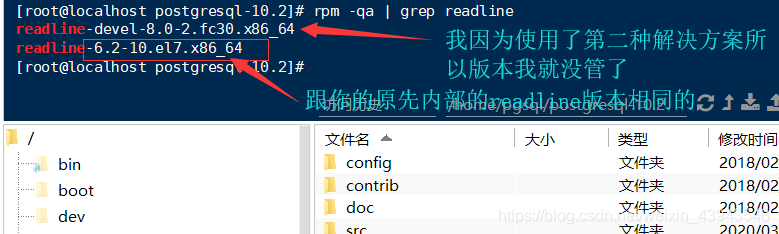
①第一个问题 : configure:error:readline library not found (readline的软件问题)
解决方法1:下载一个合适的版本!(记住一定要是合适的版本!)
readline-devel下载地址
不知道什么才叫合适的点这里
解决方法2:加上--without-readline(不用readline功能)
./configure --prefix=/home/pgsql/postgresql --without-readline
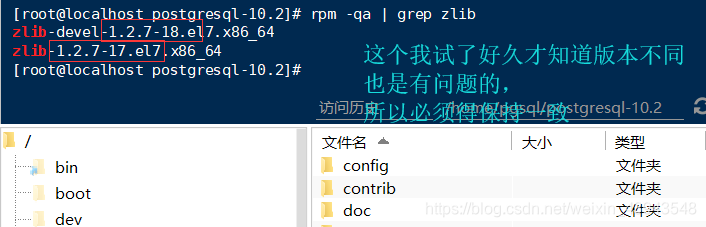
②第二个问题 : configure: error: zlib library not found (zlib的软件问题)
解决方案: 下载一个合适的版本!(记住一定要是合适的版本!)
zlib-devel下载地址
不知道什么才叫合适的点这里
2、npm的安装过程
(1)下载一个npm文件
(2)运行一个npm文件:rpm -ivh rpm文件名 (有可能版本和系统不一致而导致用不了的)
--force (强行覆盖)
--nodeps (忽略依赖关系)
列如:rpm -ivh zlib-devel-1.2.7-18.el7.x86_64.rpm --force --nodeps
后言
本次搞这个是最累人的一次了:我先讲一下比较有用的参考:
内容很详细了,不过是2018年的多少有些变动了,【主要参考】
这个也可以的,我也就是参照一部分的内容,【次要参考】
rpm写的很详细,只不过我要用的就前面一点点
因为之前没有搞过这种情况的服务器,什么都要先下下来然后再上传到服务器上。经过这一次我也涨见识了许多。
①了解了yum源可以换成163的源
②rpm文件原来还可以这么玩
③pgsql等一些配置服务的配置
我是按照流程一步一步来的,如果有什么纰漏大家也可以看我推荐的参考。
也欢迎大家在评论区讨论(~ ̄▽ ̄)~