spring-boot版本:2.x
一、配置中心
配置中心支持从git,svn,本地获取配置文件,本文使用gitlab,(之后补充从本地获取)
1、配置文件项目
此项目下是配置文件,上传到gitlab
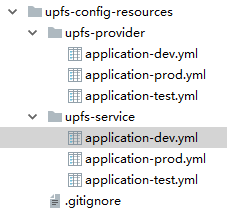
upfs-provider和upfs-service对应项目名称,config client端配置的name,spring.application.name
dev:开发环境
prod:生产环境
test:测试环境
application-dev.yml文件,只简单配置了一个属性

property1: service-dev12、配置中心Conifg Server

pom.xml
<dependency>
    <groupId>org.springframework.cloud</groupId>
    <artifactId>spring-cloud-config-server</artifactId>
</dependency>
UpfsConfigApplication.java
package com.urthink.upfs.upfsconfig;

import org.springframework.boot.SpringApplication;
import org.springframework.boot.autoconfigure.SpringBootApplication;
import org.springframework.cloud.config.server.EnableConfigServer;

@SpringBootApplication
@EnableConfigServer
public class UpfsConfigApplication {

    public static void main(String[] args) {
        SpringApplication.run(UpfsConfigApplication.class, args);
    }

}
bootstrap.yml
spring:
  application:
    name:  upfs-config
  profiles:
    active: dev

logging:
  config: classpath:log4j2.xml
bootstrap-dev.yml
server:
  port: 8888

spring:
  cloud:
    config:
      server:
        git:
          uri: http://[email protected]:8082/urthink-upfs/upfs-config-resources.git
          username: username
          password: password
search-paths: '{application}'uri:gitlab地址,注意:有端口号的加上端口号
search-paths:'{application}' 注意格式,带双单引号
搜索路径,对应config client端配置的name,和upfs-config-resources下的子目录名称自动匹配,从浏览器访问也可以。
3、Config Server测试
Config Server启动以后,我们可以通过它暴露的端点获取配置文件内容,http请求地址与配置文件映射关系如下:
# 映射{application}-{profile}.properties文件
/{application}/{profile}/[{label}]
/{label}/{application}-{profile}.properties
/{application}-{profile}.properties
/{label}/{application}-{profile}.yml
/{application}-{profile}.yml
{application}通常使用微服务名称,对应Git仓库中文件名的前缀;
{profile}对应{application}-后面的dev、pro、test等;
{label}对应Git仓库的分支名,默认为master。
http://localhost:8888/upfs-service-dev.yml
http://localhost:8888/master/upfs-service-dev.yml

http://localhost:8888/upfs-service/dev
http://localhost:8888/upfs-service/dev/master

4、配置中心Conifg Client

UpfsServiceApplication.java
package com.urthink.upfs.upfsservice;

import org.springframework.boot.SpringApplication;
import org.springframework.boot.autoconfigure.SpringBootApplication;

@SpringBootApplication
public class UpfsServiceApplication {

    public static void main(String[] args) {
        SpringApplication.run(UpfsServiceApplication.class, args);
    }

}
ClientController.java
package com.urthink.upfs.upfsservice.controller;

import org.springframework.beans.factory.annotation.Value;
import org.springframework.web.bind.annotation.RequestMapping;
import org.springframework.web.bind.annotation.RequestMethod;
import org.springframework.web.bind.annotation.RestController;

/**
 * ClientController
 *
 * @author happyqing
 * @version 1.0.0
 * @CreateDate 2019/6/10
 */
@RestController
public class ClientController {

    // 配置中心文件里的key
    @Value("${property1}")
    private String property1;

    @RequestMapping(value = "/test", method = RequestMethod.GET)
    public String test(){
        return property1;
    }
}
bootstrap.yml
spring:
  application:
    name:  upfs-service
  profiles:
    active: dev

logging:
  config: classpath:log4j2.xml
bootstrap-dev.yml
server:
  port: 8080

spring:
  cloud:
    config:
      uri: http://localhost:8888
      profile: test
      label: master
5、Conifg Client测试
http://localhost:8080/test

二、配置中心使用本地配置文件
1、config server端

upfs-service-native.yml
property1: native-service-nativebootstrap-native.yml
server:
  port: 8888

spring:
  cloud:
    config:
      server:
        native:
          searchLocations: classpath:nativeconfig   # 配置文件所在目录,classpath(类路径)和file(系统文件路径)两种
          #search-paths: '{application}'
native下并没有search-paths属性。
nativeconfig目录下可以用应用名-profile.yml方式命名
2、config client端

bootstrap-native.yml
server:
  port: 8080

spring:
  cloud:
    config:
      uri: http://localhost:8888
      profile: native
      label: master
三、连接注册中心
1、服务端:upfs-config
pom.xml加入eureka
<dependency>
    <groupId>org.springframework.cloud</groupId>
    <artifactId>spring-cloud-starter-netflix-eureka-client</artifactId>
</dependency>
UpfsConfigApplication.java加入注解@EnableDiscoveryClient
package com.urthink.upfs.upfsconfig;

import org.springframework.boot.SpringApplication;
import org.springframework.boot.autoconfigure.SpringBootApplication;
import org.springframework.cloud.client.discovery.EnableDiscoveryClient;
import org.springframework.cloud.config.server.EnableConfigServer;

@SpringBootApplication
@EnableConfigServer
@EnableDiscoveryClient
public class UpfsConfigApplication {

    public static void main(String[] args) {
        SpringApplication.run(UpfsConfigApplication.class, args);
    }

}
bootstrap-dev.yml加入eureka配置
server:
  port: 8888

spring:
  cloud:
    config:
      server:
        git:
          uri: http://[email protected]:8082/urthink-upfs/upfs-config-resources.git
          username: username
          password: password
          search-paths: '{application}'

eureka:
  instance:
    prefer-ip-address: true
    #Eureka客户端向服务端发送心跳的时间间隔,单位为秒(客户端告诉服务端自己会按照该规则),默认30
    lease-renewal-interval-in-seconds: 10
    #Eureka服务端在收到最后一次心跳之后等待的时间上限,单位为秒,超过则剔除(客户端告诉服务端按照此规则等待自己),默认90
    lease-expiration-duration-in-seconds: 12
  client:
    registry-fetch-interval-seconds: 10 #eureka client刷新本地缓存时间,默认30
    serviceUrl:
      defaultZone: http://localhost:8761/eureka/
2、客户端upfs-service
pom.xml加入eureka
<dependency>
    <groupId>org.springframework.cloud</groupId>
    <artifactId>spring-cloud-starter-netflix-eureka-client</artifactId>
</dependency>
UpfsServiceApplication.java加入注解@EnableDiscoveryClient
package com.urthink.upfs.upfsservice;

import org.springframework.boot.SpringApplication;
import org.springframework.boot.autoconfigure.SpringBootApplication;
import org.springframework.cloud.client.discovery.EnableDiscoveryClient;

@SpringBootApplication
@EnableDiscoveryClient
public class UpfsServiceApplication {

    public static void main(String[] args) {
        SpringApplication.run(UpfsServiceApplication.class, args);
    }

}
bootstrap-dev.yml加入eureka配置
server:
  port: 8080

spring:
  cloud:
    config:
      profile: dev
      label: master
      discovery:
        enabled: true
        service-id: upfs-config

eureka:
  instance:
    prefer-ip-address: true
    #Eureka客户端向服务端发送心跳的时间间隔,单位为秒(客户端告诉服务端自己会按照该规则),默认30
    lease-renewal-interval-in-seconds: 10
    #Eureka服务端在收到最后一次心跳之后等待的时间上限,单位为秒,超过则剔除(客户端告诉服务端按照此规则等待自己),默认90
    lease-expiration-duration-in-seconds: 12
  client:
    registry-fetch-interval-seconds: 10 #eureka client刷新本地缓存时间,默认30
    serviceUrl:
      defaultZone: http://localhost:8761/eureka/
四、RefreshScope
在这个范围内的所有bean 仅在首次访问时初始化,所以这个范围强制懒加载。这个注解会给范围内的每个bean创建个代理对象.
如果刷新bean,则下次访问bean时(即执行方法)将创建一个新实例。所有生命周期方法都应用于bean实例,因此在刷新时会调用在bean工厂的销毁回调方法,然后在创建新实例时正常调用初始化回调。从原始bean定义创建新的bean实例,因此在创建时会重新评估任何外化内容(属性占位符或字符串文字中的表达式)
客户端upfs-service
1、pom.xml引入
<dependency>
    <groupId>org.springframework.boot</groupId>
    <artifactId>spring-boot-starter-actuator</artifactId>
</dependency>
2、是使用刷新的类上加上注解@RefreshScope
ClientController.javapackage com.urthink.upfs.upfsservice.controller;
import org.springframework.beans.factory.annotation.Value;
import org.springframework.cloud.context.config.annotation.RefreshScope;
import org.springframework.web.bind.annotation.RequestMapping;
import org.springframework.web.bind.annotation.RequestMethod;
import org.springframework.web.bind.annotation.RestController;
/**
* ClientController
*
* @author happyqing
* @version 1.0.0
* @CreateDate 2019/6/10
*/
@RestController
@RefreshScope
public class ClientController {
// 配置中心文件里的key
@Value("${property1}")
private String property1;
@RequestMapping(value = "/test", method = RequestMethod.GET)
public String test(){
return property1;
}
}3、bootstrap-dev.yml加入开启监控接口
# 开启监控接口
management:
  endpoints:
    web:
      exposure:
        include: "*"
        #include: refresh,health,info #打开部分
4、使用测试,
响应:service-dev1
修改服务器端配置文件upfs-service-dev.yml
property1: service-dev1
为
property1: service-dev1-refresh
并git提交,push
访问刷新接口:http://localhost:8080/actuator/refresh
响应405,
这个接口得用post请求访问,日志中显示

使用postman访问接口,还显示了哪些属性更新了,

响应:service-dev1-refresh
已经刷新过来了,
参考:
Spring Boot 2.0官方文档之 Actuator
https://blog.csdn.net/alinyua/article/details/80009435
