Pyhton浅谈-Python与中间件之RabbitMQ(6)
一、RabbitMQ介绍:
1.RabbitMQ介绍:
RabbitMQ是实现了高级消息队列协议(AMQP)的开源消息代理软件(亦称面向消息的中间件);
RabbitMQ在全球范围内在小型初创公司和大型企业中进行了超过 35,000次RabbitMQ生产部署,是最受欢迎的开源消息代理;
2.消息代理的应用:
将消息路由到一个或多个目的地;
将消息转换为替代表示;
执行消息聚合,将消息分解为多个消息并将其发送到目的地,然后将响应重新组合成一条消息以返回给用户;
与外部存储库交互以扩充消息或存储消息;
调用Web服务以检索数据;
回应事件或错误;
使用发布 - 订阅模式提供内容和基于主题的消息路由;
3.RabbitMQ的工作原理:
RabbitMQ的工作原理如图所示:
Server1先与消息代理Broker建立连接,连接建立成功后,Server1通过本地的代理Proxy1注册登录到Broker,Broker将Server1的消息添加到队列里面,随后通过Proxy1向Server1告知此消息,Server2运行原理同Server1;发送消息时,Server1从Broker里面找到Server2的消息队列,将信息传递过去。
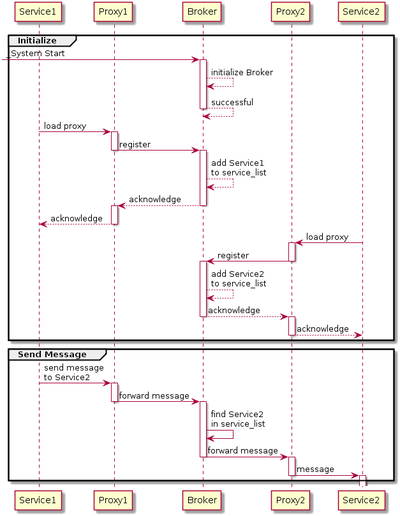
图 1 RabbitMQ的工作原理
4.AMQP (Advanced Message Queuing Protocol,高级消息队列协议)介绍:
AMQP 是一种可编程的协议,定义了三种实体(对象)——queues, exchanges and bindings:
- exchanges:消息中转站,包含多种类型;
- bindings: 消息转发规则,定义了route(路由),规定怎么把消息发到队列;
- queues: 队列,存储信息,用于消费(获取);
AMQP协议工作时,先由发送者Publisher发送消息至Exchanges,随后这些消息在Exchanges跟bindings进行绑定,再通过Routes转发到queues里面,最后送到Consumer手中。
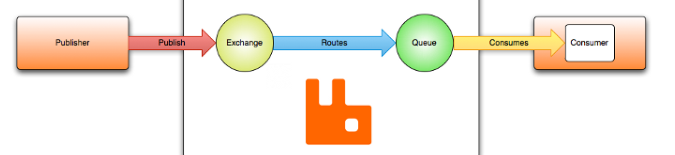
图 2 AMQP协议工作原理
5.Exchanges的类型:
Exchanges总共分为四种类型:Direct Exchange、fanout Exchange、Topic Exchange、Headers Exchange。
<1>.Direct Exchange(默认):
queue创建时,绑定一个同名的routing key:
用途:把任务分配给多个workers,每个work做特定工作,比如写日志。
图 3 Direct Exchange工作模式
<2>.fanout Exchange:
传递消息到每一个queue,忽略routing key;
用途:把任务分配给多个workers,每个work做特定工作,比如写日志;

图 4 fanout Exchange工作模式
<3>.Topic Exchange:
根据规则匹配相应的queue,实现发布/订阅;
用途:根据不同标签更新新闻,根据位置信息提供商品;
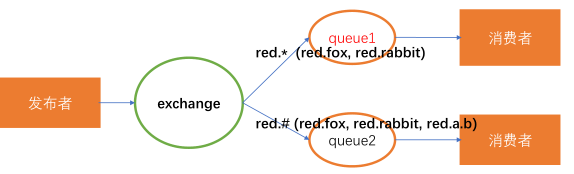
图 5 Topic Exchange工作模式
<4>.Headers Exchange:
根据多个属性当作消息头,忽略routing key,需要开发者定义更多内容;
用途:当direct exchanges的routing key不是字符串时,可使用这个自定义属性匹配;
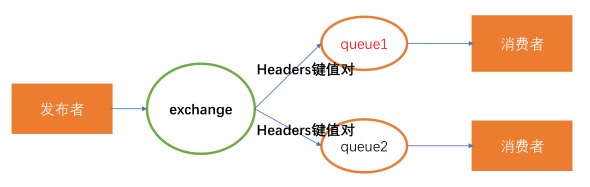
图 6 Headers Exchange工作模式
二、RabbitMQ下载(以CentOS7为例):
此处分享我的安装笔记,http://note.youdao.com/noteshare?id=cc59de639adba1b2ef9dc60ce08b344a&sub=07794ED656674CC29EE4306E22748725,需要的朋友们可以参考一下。
三、Python操作RabbitMQ:
此代码分为两段接收端和发送端两个,接收端负责接收发送端发送的消息,发送端负责发送消息,双方会连接到相同的RabbitMQ上:
#!/usr/bin/env python
# -*- coding:utf-8 -*-
# Author:catt1e
# 接收端


import time
import pika


# 连接服务
config = {
    "username": "root",
    "password": "root",
    "host": "127.0.0.1",
    "port": ""
}
creds = pika.PlainCredentials(config["username"], config["password"])
params = pika.ConnectionParameters(config["host"], credentials=creds)
connection = pika.BlockingConnection(params)

# 创建队列
channel = connection.channel()
channel.queue_declare(queue="msg_queue", durable=True) # 队列持久化

# 接收消息
def callback(ch, method, properties, body):
    print(f"收到消息:{body}")
    time.sleep(body.count(b"-"))
    print('ok')
    ch.basic_ack(delivery_tag=method.delivery_tag) # 消息持久化


# 均衡任务
channel.basic_qos(prefetch_count=1)
channel.basic_consume("msg_queue", callback)

channel.start_consuming()
#!/usr/bin/env python
# -*- coding:utf-8 -*-
# Author:catt1e
# 发送端


import sys
import pika


# 连接服务
config = {
    "username": "root",
    "password": "root",
    "host": "127.0.0.1",
    "port": ""
}
creds = pika.PlainCredentials(config["username"], config["password"])
params = pika.ConnectionParameters(config["host"], credentials=creds)
connection = pika.BlockingConnection(params)

# 创建队列
channel = connection.channel()
channel.queue_declare(queue="msg_queue", durable=True)

# 发送消息
msg = " ".join(sys.argv[1:]) or "new msg from catt1e"
channel.basic_publish(exchange="",
                    routing_key="msg_queue",
                    body=msg,
                    properties=pika.BasicProperties(
                        delivery_mode=2
                    ))

print(f"发送消息:{msg}")
connection.close()