参考网站:
https://blog.csdn.net/vipbupafeng/article/details/80271089
1、下载
官网链接:https://dev.mysql.com/downloads/mysql/5.7.html#downloads
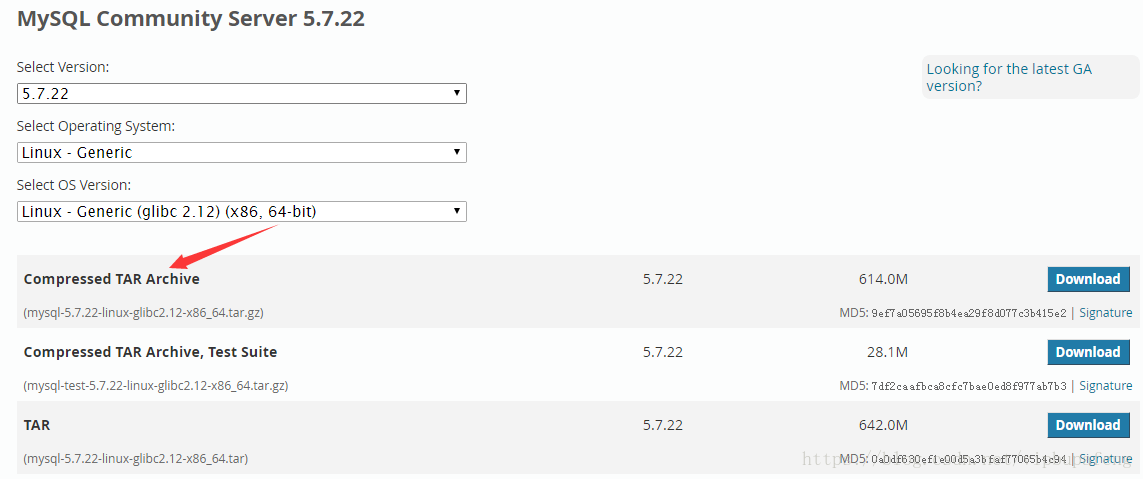
下载之后用xftp上传到linux
或
在线下载:wget https://cdn.mysql.com//Downloads/MySQL-5.7/mysql-5.7.22-linux-glibc2.12-x86_64.tar.gz
2、解压
tar zxvf mysql-5.7.22-linux-glibc2.12-x86_64.tar.gz -C /usr/local/mysql
建议:不要安装到其它目录,否则数据库初始化的时候会报cannot change dir的错,不好搞
3、重命名
mv mysql-5.7.22-linux-glibc2.12-x86_64 mysql
4、卸载系统自带mysql
查看:rpm -qa | grep mysql
卸载:rpm -e --nodeps softfullname
5、创建用户组和用户
创建用户组:groupadd mysql
创建用户:useradd -r -g mysql mysql
为了安全性,给mysql数据库创建专有用户,该用户只能访问mysql目录,不能访问系统其它目录
另外不建议直接用root初始化mysql,否则连接mysql时会报错:[ERROR] Fatal error: Please read "Security" section of the manual to find out how to run mysqld as root!
6、给mysql目录指定专有用户和用户组
首先创建data目录:
cd /usr/local/mysql
mkdir data
指定用户和用户组:
cd /usr/local
chown -R mysql mysql/
chgrp -R mysql mysql/
-R包含目录下所有和目录和文件
7、初始化mysql
cd /usr/local/mysql/bin
./mysqld --initialize --user=mysql --basedir=/usr/local/mysql/ --datadir=/usr/local/mysql/data/ --lc_messages_dir=/usr/local/mysql/share --lc_messages=en_US
记住生成的临时密码
如果忘记密码或者想重新初始化,可以先将mysql/data目录中文件删除,然后再执行初始化命令
8、配置my.cnf
从5.7.17后mysql就没有默认的my_default.cnf文件,需要手动创建
cd /etc
cat>>my.cnf
输入以下内容,ctrl+D退出
精简版:
- [mysqld]
- basedir=/usr/local/mysql/
- datadir=/usr/local/mysql/data/
可选版:
- # For advice on how to change settings please see
- # http://dev.mysql.com/doc/refman/5.7/en/server-configuration-defaults.html
- # *** DO NOT EDIT THIS FILE. It's a template which will be copied to the
- # *** default location during install, and will be replaced if you
- # *** upgrade to a newer version of MySQL.
- [mysqld]
- # sql_mode = NO_ENGINE_SUBSTITUTION,STRICT_TRANS_TABLES
- # 一般配置选项
- basedir = /usr/local/mysql/
- datadir = /usr/local/mysql/data
- port = 3306
- character-set-server = utf8
- explicit_defaults_for_timestamp = true
- # socket = /var/run/mysqld/mysqld.sock
- #下面是可选项,要不要都行,如果出现启动错误,则全部注释掉,保留最基本的配置选项,然后尝试添加某些配置项后启动,检测配置项是否有误
- back_log = 300
- max_connections = 3000
- max_connect_errors = 50
- table_open_cache = 4096
- max_allowed_packet = 32M
- #binlog_cache_size = 4M
- max_heap_table_size = 128M
- read_rnd_buffer_size = 16M
- sort_buffer_size = 16M
- join_buffer_size = 16M
- thread_cache_size = 16
- query_cache_size = 128M
- query_cache_limit = 4M
- ft_min_word_len = 8
- thread_stack = 512K
- transaction_isolation = REPEATABLE-READ
- tmp_table_size = 128M
- #log-bin=mysql-bin
- long_query_time = 6
- server_id=1
- innodb_buffer_pool_size = 1G
- innodb_thread_concurrency = 16
- innodb_log_buffer_size = 16M
- innodb_log_file_size = 512M
- innodb_log_files_in_group = 3
- innodb_max_dirty_pages_pct = 90
- innodb_lock_wait_timeout = 120
- innodb_file_per_table = on
- [mysqldump]
- quick
- max_allowed_packet = 32M
- [mysql]
- no-auto-rehash
- default-character-set=utf8
- safe-updates
- [myisamchk]
- key_buffer = 16M
- sort_buffer_size = 16M
- read_buffer = 8M
- write_buffer = 8M
- [mysqlhotcopy]
- interactive-timeout
- [mysqld_safe]
- open-files-limit = 8192
- [client]
- /bin/bash: Q: command not found
9、启动
cd /usr/local/mysql/bin
启动:./mysqld_safe --user=mysql &
10、设为开机启动
cd /usr/local/mysql/support-files/
cp mysql.server /etc/init.d/mysql
vi /etc/init.d/mysql
将mysql目录填上:
basedir=/usr/local/mysql/
datadir=/usr/local/mysql/data/
授权:chmod +x /etc/init.d/mysql
设为开机启动:chkconfig --add mysql
11、service启动
重启服务:service mysql restart
停止服务:service mysql stop
启动服务:service mysql start
查看服务:service mysql status
启动出现故障:The server quit without updating PID file问题的解决办法
http://www.jb51.net/article/48625.htm
12、登录mysql修改密码授权远程登录
cd /usr/local/mysql/bin
登录:./mysql -u root -p 输入临时密码
修改密码:set password=password("root");
登录授权:grant all privileges on *.* to'root' @'%' identified by 'root';
授权生效:flush privileges;
可使用navicat或sqlyog等工具进行登录,注意关闭防火墙或开放3306端口
防火墙设置参考:https://blog.csdn.net/vipbupafeng/article/details/80287788