一、常见的模板引擎
JSP、Velocity、Freemarker、Thymeleaf
1.1.Thymeleaf入门
模板引擎的原理
模板引擎可以看做是一种文件(内容)合成技术,我们可以使用某种模板引擎(Freemarker),使用填充数据,对模板进行合并可以输出响应的文件 , 如: model(数据) + ftl (模板文件) = html(合并成html)
1.1.1.引入jar包
<!--thymeleaf模板-->
        <dependency>
            <groupId>org.springframework.boot</groupId>
            <artifactId>spring-boot-starter-thymeleaf</artifactId>
        </dependency>

<!--如果用到jquery 导入jquery jar包-->
        <dependency>
            <groupId>org.webjars</groupId>
            <artifactId>jquery</artifactId>
            <version>3.4.1</version>
        </dependency>
只要我们把HTML页面放在classpath:/templates/,thymeleaf就能自动渲染;
1.1.2.创建创建文件: resources/templates/hello.html
<!DOCTYPE html>
<!--导入命名空间 -->
<html lang="en" xmlns:th="http://www.thymeleaf.org">
<head>
    <meta charset="UTF-8">
    <title>Title</title>
</head>


<script src="webjars/jquery/3.4.1/jquery.js">
</script>
<script>
    alert($)
</script>


<body>
<h1>成功!</h1>
<!--使用语法th:text 将div里面的文本内容设置为 -->
<div th:text="${hello}">这是显示欢迎信息</div>
</body>
</html>
1.1.3.编写controller
package cn.itcource.web.controller;

import org.springframework.stereotype.Controller;
import org.springframework.ui.Model;
import org.springframework.web.bind.annotation.RequestMapping;

@Controller
public class HelloController {
    @RequestMapping("/hello")
    public String hello(Model model){
        model.addAttribute("hello","王哈哈");
        return "hello";
    }
}
二、Thymeleaf的自动配置原理
1.Thymeleaf配置
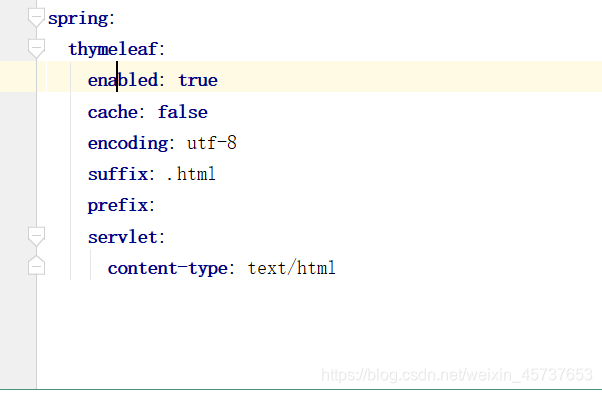
- 可以对Thymeleaf的配置做调整,但是不是必须,建议不要配置,默认的配置足够用。
spring:
  thymeleaf:
    enabled: true
    cache: false
    encoding: utf-8
    suffix: .html
    prefix:
    servlet:
      content-type: text/html
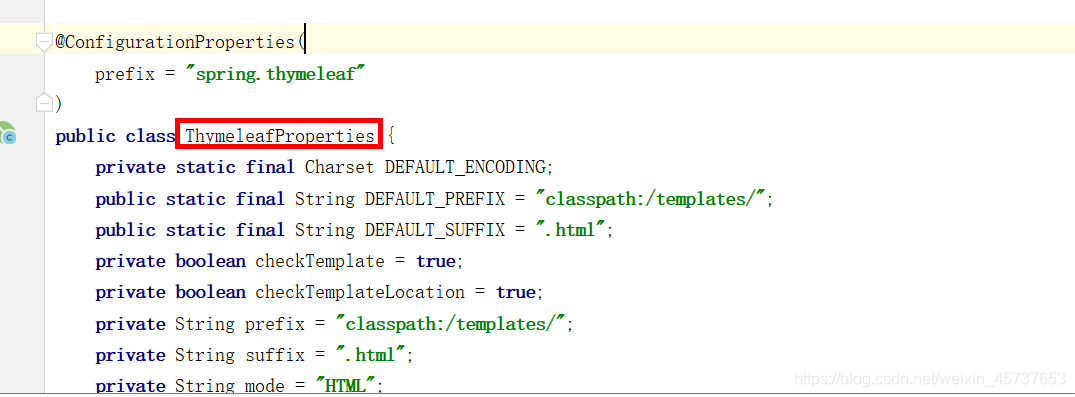
2.Thymeleaf自动配置原理
- 配置项被读取到ThymeleafProperties对象中,
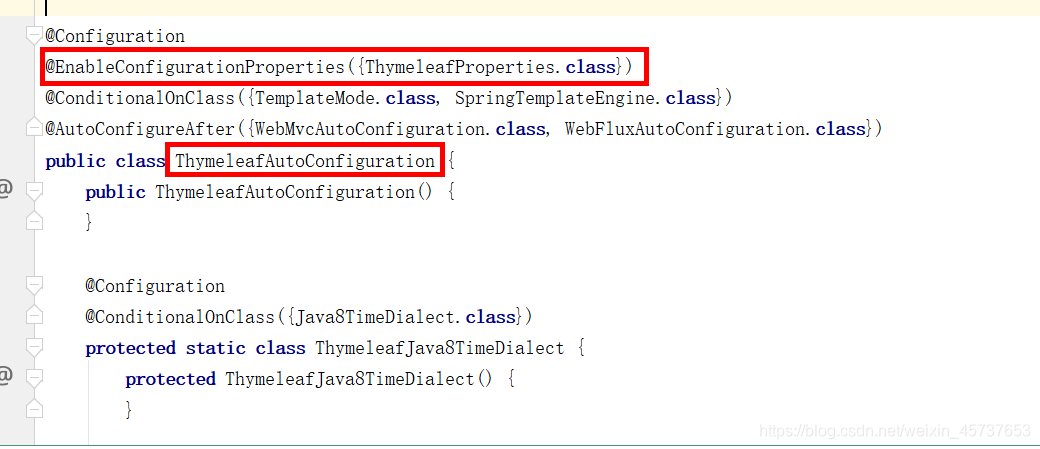
- ThymeleafAutoConfiguration 它会使用ThymeleafProperties中的配置项目,自动配置Thymeleaf
点击任意配置项跳转到
ThymeleafAutoConfiguration 它会使用ThymeleafProperties中的配置项目
然后自动配置Thymeleaf
三、配置拦截器
定义拦截器类
/**
 * 拦截器(可以继承HandlerInterceptorAdapter)
 * 也可以实现
 *
 *      可以打上注解@Configuration交给spring管理,然后WebConfig就不用new,直接注入
 *
 */
@Slf4j
public class MyInterceptor implements HandlerInterceptor {

    //在controller方法调用前,先执行该方法,
    @Override
    public boolean preHandle(HttpServletRequest request, HttpServletResponse response, Object handler) throws Exception {
        String requestURI = request.getRequestURI();
        log.info("拦截... uri:" + requestURI);
        return true;
    }
}
注册拦截器(创建拦截器配之类: config/WebConfig)
/**
 * 针对web的配置
 *      WebMvcConfigurer:针对于springmvc配置的接口
 */

@Configuration
public class WebConfig implements WebMvcConfigurer {

    //添加拦截器的方法
    @Override
    public void addInterceptors(InterceptorRegistry registry) {
        //添加拦截器
        registry.addInterceptor(new MyInterceptor())
                //拦截所有请求
                .addPathPatterns("/**")
                //排除请求、资源
                .excludePathPatterns("/static/**","/hello","/webjars/**","/login");
    }

    //添加视图控制器(访问/wxy这个请求路径、跳转到resources下的templates/hello2.html)
    @Override
    public void addViewControllers(ViewControllerRegistry registry) {
        registry.addViewController("/wxy").setViewName("hello2.html");
    }
}
