转自:https://blog.csdn.net/myknotruby/article/details/78507493
记录一下Tensorflow 1.4的安装过程,安装环境:
- 操作系统Ubuntu16.04 TLS
- 显卡NVIDIA GTX 1080
- CUDA9.0+cuDNN7
- Python: 2.7
- Anaconda 5.0.1
1. 更新Ubuntu16.04源
使用的是中科大的源:
$ cd /etc/apt/
$ sudo cp sources.list sources.list.bak
$ sudo vi sources.list
把下面的这些源添加到source.list文件头部:
deb http://mirrors.ustc.edu.cn/ubuntu/ xenial main restricted universe multiverse
deb http://mirrors.ustc.edu.cn/ubuntu/ xenial-security main restricted universe multiverse
deb http://mirrors.ustc.edu.cn/ubuntu/ xenial-updates main restricted universe multiverse
deb http://mirrors.ustc.edu.cn/ubuntu/ xenial-proposed main restricted universe multiverse
deb http://mirrors.ustc.edu.cn/ubuntu/ xenial-backports main restricted universe multiverse
deb-src http://mirrors.ustc.edu.cn/ubuntu/ xenial main restricted universe multiverse
deb-src http://mirrors.ustc.edu.cn/ubuntu/ xenial-security main restricted universe multiverse
deb-src http://mirrors.ustc.edu.cn/ubuntu/ xenial-updates main restricted universe multiverse
deb-src http://mirrors.ustc.edu.cn/ubuntu/ xenial-proposed main restricted universe multiverse
deb-src http://mirrors.ustc.edu.cn/ubuntu/ xenial-backports main restricted universe multiverse
最后更新源和更新已安装的包:
$ sudo apt-get update
$ sudo apt-get upgrade
2. 安装GTX1080驱动
安装 Nvidia 驱动 384,比较新,可以支持GTX1080显卡。
$ sudo add-apt-repository ppa:graphics-drivers/ppa
第一次运行出现如下的警告:
Fresh drivers from upstream, currently shipping Nvidia.
## Current Status
We currently recommend: `nvidia-384`, Nvidia's current long lived branch.
...
This PPA is currently in testing, you should be experienced with packaging before you dive in here. Give us a few days to sort out the kinks.
Volunteers welcome! See also: https://github.com/mamarley/nvidia-graphics-drivers/
http://www.ubuntu.com/download/desktop/contribute
回车后继续:
$ sudo apt-get update
$ sudo apt-get install nvidia-384
$ sudo apt-get install mesa-common-dev
$ sudo apt-get install freeglut3-dev
之后,重启操作系统让GTX1080显卡驱动生效。
查看显卡驱动是否安装好:
$ sudo lshw -c video | grep configuration
之后可以看到输出的显卡驱动名称,其中一条为 driver=nvidia
3. 下载并安装NVIDIA CUDA Tookit 9
下载地址:
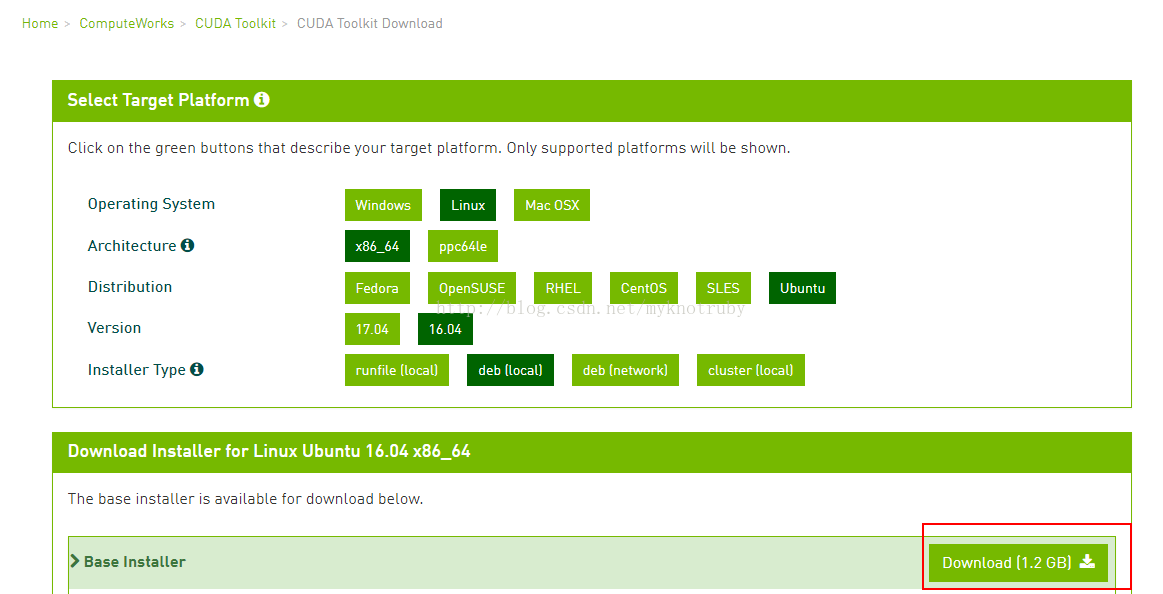
下载的文件名为cuda-repo-ubuntu1604-9.0-local_9.0.176-1_amd64.deb
1) 安装repository元数据
$ sudo dpkg -i cuda-repo-ubuntu1604-9.0-local_9.0.176-1_amd64.deb
2) 安装Key
$ sudo apt-key add /var/cuda-repo-ubuntu1604-9.0-local_9.0.176-1_amd64/7fa2af80.pub
3)更新apt cache
$ sudo apt-get update
4) 安装
$ sudo apt-get install cuda
5) 更新环境变量
$ sudo export PATH=/usr/local/cuda-9.0/bin:$PATH
$ sudo export LD_LIBRARY_PATH=/usr/local/cuda-9.0/lib64
把这2句命令也加入/etc/rc.local最后。
4. 安装cuDNN7.0
下载cuDNN的地址:
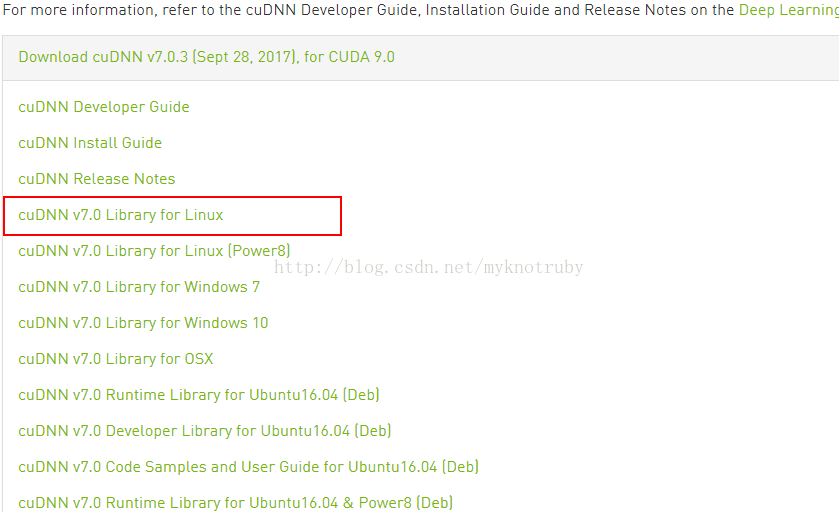
下载后文件名为cudnn-9.0-linux-x64-v7.tgz
1)安装只需要复制文件
$ tar xvzf cudnn-9.0-linux-x64-v7.tgz $ sudo cp cuda/include/cudnn.h /usr/local/cuda/include$ sudo cp cuda/lib64/libcudnn* /usr/local/cuda/lib64$ sudo chmod a+r /usr/local/cuda/include/cudnn.h /usr/local/cuda/lib64/libcudnn*
2)配置环境变量
在/etc/rc.local最后加入
export LD_LIBRARY_PATH=$LD_LIBRARY_PATH:/usr/local/cuda/lib64:/usr/local/cuda/extras/CUPTI/lib64export CUDA_HOME=/usr/local/cuda
3) 建软链接
将/usr/local/cuda-9.0/targets/x86_64-linux/lib/libcudnn.so.7文件复制备份成/usr/local/cuda-9.0/targets/x86_64-linux/lib/libcudnn.so.7.bak。
再执行以下命令为libcudnn.so.7.0.3(具体版本号可能会变)建立一个软链接,名字为libcudnn.so.7
$ cd /usr/local/cuda-9.0/targets/x86_64-linux/lib/libcudnn.so.7
$ sudo ln -sf /usr/local/cuda-9.0/targets/x86_64-linux/lib/libcudnn.so..7.0.3 /usr/local/cuda-9.0/targets/x86_64-linux/lib/libcudnn.so.7
否则,在后面安装Bazel时会出现以下错误
libcudnn.so.7 is not a symbolic link
libcudnn.so.7 -> libcudnn.so.7.0.3
该错误可以通过sudo ldconfig -v 查看到。
5. 安装Anaconda
因为ubuntu16.04自带python2.7,所以可以直接安装Anaconda面向python2.7的版本。到https://www.anaconda.com/download/#linux下载linux安装包,对应python2.7
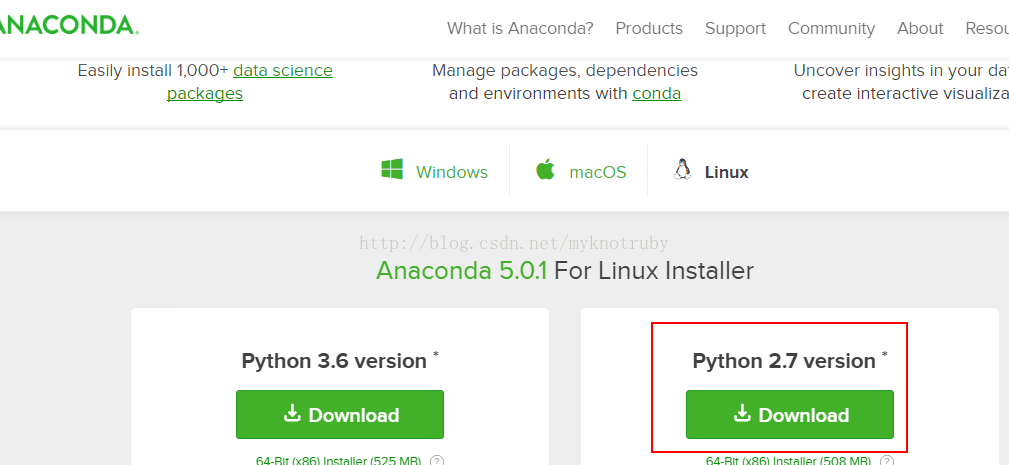
下载后文件名为Anaconda2-5.0.1-Linux-x86_64.sh
增加可执行权限,并安装:
$ chmod a+x ./Anaconda2-5.0.1-Linux-x86_64.sh
$ ./Anaconda2-5.0.1-Linux-x86_64.sh
安装步骤需要注意:
1)弹出 “In order to continue the installation process, please review the license agreement.” 时,点回车看license,再拉到底,点Yes。
2)回车接受default install location。
3)提示 “Do you wish the installer to prepend the Anaconda<2 or 3> install location to PATH in your /home/<user>/.bashrc ?” 时,输入Yes
4)提示“Thank you for installing Anaconda2!”时表示安装成功。
5)安装程序自动在~/.bashrc里加入了PATH环境变量,为了在当前terminal起效果,执行:
$ source ~/.bashrc
7)打开anaconda
$ anaconda-navigator
8)更新setuptools
$ pip install --upgrade -I setuptools
否则,安装后tensorflow后,执行import tensorflow as tf时,会出现
ImportError: No module named platflom 错误。
6. 安装Bazel
1) 安装JDK 8
尽管ubuntu16.04自带openjdk-8,但发现apt还是找不到jdk,所以在没有卸载的情况下,又重新装了一遍,apt自动安装了openjdk 9。
命令:
$ sudo apt-get install openjdk-8-jdk
尽管上面输入的是jdk8,但自动安装了jdk9,为什么?
2)把Bazel的发行URI临时加入包的源
在bash中执行:
$ echo "deb [arch=amd64] http://storage.googleapis.com/bazel-apt stable jdk1.8" | sudo tee /etc/apt/sources.list.d/bazel.list$ curl https://bazel.build/bazel-release.pub.gpg | sudo apt-key add -
3) 并装并更新Bazel
$ sudo apt-get update && sudo apt-get install bazel
$ sudo apt-get upgrade bazel
7. 安装Tensorflow依赖的python库
安装Tensorflow前必须安装以下python库:
- numpy, 数值计算用的库.
- dev, python扩展库.
- pip, pip包安装管理库.
- wheel, 用于处理.whl压缩格式的库
如果是基于Python 2.7,使用以下命令:
$ sudo apt-get install python-numpy python-dev python-pip python-wheel
如果是基于Python 3.n,使用以下命令:
$ sudo apt-get install python3-numpy python3-dev python3-pip python3-wheel
因为是装GPU版,还需要安装cuda的libcupti-dev库
$ sudo apt-get install libcupti-dev
8. 编译并安装Tensorflow
1) 配置
进入git下载的tensorflow目录,进行编译前参数配置
$ cd tensorflow
$ ./configure
Please specify the location of python. [Default is /home/ceiec/anaconda2/envs/tensorflow/bin/python]:
Found possible Python library paths:
/home/ceiec/anaconda2/envs/tensorflow/lib/python2.7/site-packages
Please input the desired Python library path to use. Default is [/home/ceiec/anaconda2/envs/tensorflow/lib/python2.7/site-packages]
Do you wish to build TensorFlow with jemalloc as malloc support? [Y/n]: Y
jemalloc as malloc support will be enabled for TensorFlow.
Do you wish to build TensorFlow with Google Cloud Platform support? [Y/n]: n
No Google Cloud Platform support will be enabled for TensorFlow.
Do you wish to build TensorFlow with Hadoop File System support? [Y/n]: n
No Hadoop File System support will be enabled for TensorFlow.
Do you wish to build TensorFlow with Amazon S3 File System support? [Y/n]: n
No Amazon S3 File System support will be enabled for TensorFlow.
Do you wish to build TensorFlow with XLA JIT support? [y/N]: N
No XLA JIT support will be enabled for TensorFlow.
Do you wish to build TensorFlow with GDR support? [y/N]: N
No GDR support will be enabled for TensorFlow.
Do you wish to build TensorFlow with VERBS support? [y/N]: N
No VERBS support will be enabled for TensorFlow.
Do you wish to build TensorFlow with OpenCL support? [y/N]:N
No OpenCL support will be enabled for TensorFlow.
如果选opencl,则configure会检查opencl相关的文件,这里不需要,所以选择No
Do you wish to build TensorFlow with CUDA support? [y/N]:Y 这里是必须的
CUDA support will be enabled for TensorFlow.
Please specify the CUDA SDK version you want to use, e.g. 7.0. [Leave empty to default to CUDA 8.0]:9.0
Please specify the location where CUDA 9.0 toolkit is installed. Refer to README.md for more details. [Default is /usr/local/cuda]:
Please specify the cuDNN version you want to use. [Leave empty to default to cuDNN 6.0]:7
上面不能写成7.0,否则会报错。
Please specify the location where cuDNN 7 library is installed. Refer to README.md for more details. [Default is /usr/local/cuda]:
Please specify a list of comma-separated Cuda compute capabilities you want to build with.
You can find the compute capability of your device at: https://developer.nvidia.com/cuda-gpus.
Please note that each additional compute capability significantly increases your build time and binary size. [Default is: 6.1]3.0
兼容性等级填3.0
Do you want to use clang as CUDA compiler? [y/N]:
nvcc will be used as CUDA compiler.
Please specify which gcc should be used by nvcc as the host compiler. [Default is /usr/bin/gcc]:
Do you wish to build TensorFlow with MPI support? [y/N]:
No MPI support will be enabled for TensorFlow.
Please specify optimization flags to use during compilation when bazel option "--config=opt" is specified [Default is -march=native]:
Add "--config=mkl" to your bazel command to build with MKL support.
Please note that MKL on MacOS or windows is still not supported.
If you would like to use a local MKL instead of downloading, please set the environment variable "TF_MKL_ROOT" every time before build.
Configuration finished
如果选择错了,就中断再来配置一遍。
2)编译
编译GPU版本pip安装包
$ bazel build --config=opt //tensorflow/tools/pip_package:build_pip_package
这里时间会比较长,可能要半小时以上。bazel编译完后,在bazel-bin/....文件夹内生成了一个build_pip_package脚本,运行该脚本可以在/tmp/tensorflow_pkg下生成.whl安装文件(也可以选择其他文件夹),命令如下:
$ bazel-bin/tensorflow/tools/pip_package/build_pip_package /tmp/tensorflow_pkg
生成的安装文件为tensorflow-1.4.0-cp27-cp27mu-linux-x86_64.whl
3) 安装pip包
安装上一步生成的.whl包文件:
$ sudo pip install /tmp/tensorflow_pkg/tensorflow-1.4.0-cp27-cp27mu-linux-x86_64.whl
9. 验证是否安装正确
1)简单验证
开一个terminal,cd到非tensorflow代码之外的目录:
$ python
在交互命令中,输入小测试程序:
# Python
>>>import tensorflow as tf
>>>hello = tf.constant('Hello, TensorFlow!')
>>>sess = tf.Session()
>>>print(sess.run(hello))
如果Tensorfow正常安装,会显示:
Hello, TensorFlow!
如果执行import tensorflow as tf时,出现了
ImportError: No module named platflom,则可以升级setuptool后,用.whl文件重装tensorflow来解决该问题。
$pip install --upgrade -I setuptools
$pip install --ignore-installed --upgrade tensorflow-1.4.0-cp27-cp27mu-linux-x86_64.whl
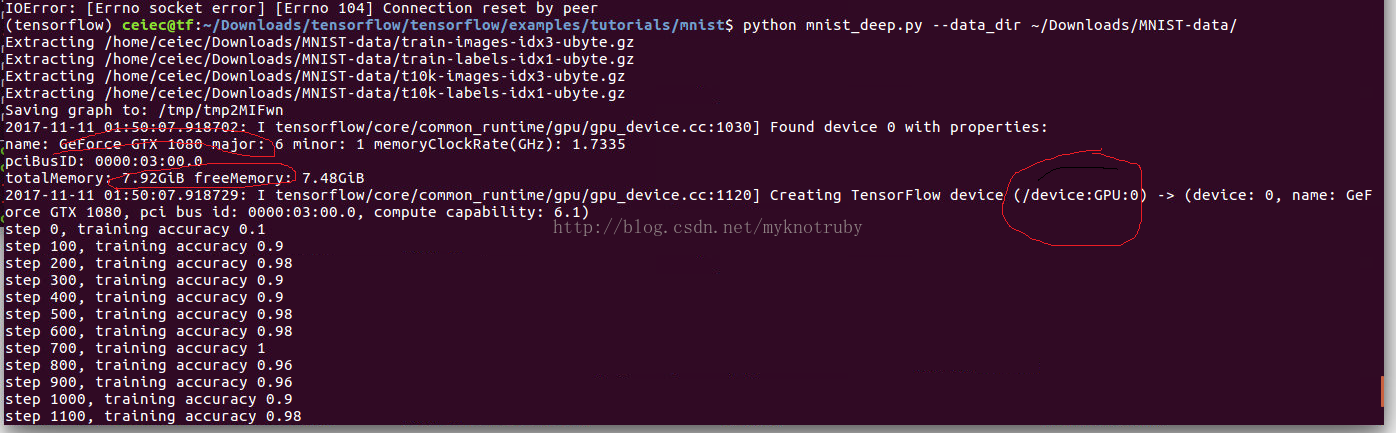
2)验证GPU计算是否正常
下载MNIST的训练数据
放入~/Downloads/MNIST-data文件夹内。
用tutorial中自带的MNIST例子进行GPU训练。
$ python <tensorflow_home>/tensorflow/examples/tutorials/mnist/mnist_deep.py
--data-dir ~/Downloads/MNIST-data
正常的结果如下,红色标出的/device:GPU:0说明已经使用GPU了进行训练。