1. 检测是否到了规定时间

import datetime
from threading import Timer

def time_loop():
    n_time = datetime.datetime.now()
    b_time = datetime.datetime.strptime(str(n_time.date())+'13:18', '%Y-%m-%d%H:%M') #每天的10:59开始
	e_time =  datetime.datetime.strptime(str(n_time.date())+'14:09', '%Y-%m-%d%H:%M') #每天的11:09开始
    if n_time > b_time and n_time < e_time:
       print(n_time)
       return
    Timer(20, time_loop).start()#重新定时

Timer(20, time_loop).start() #每隔20s检测一次
2. 爬取网站图片

import requests # 导入模块
import os
from bs4 import BeautifulSoup
def get_html_text(url): # 获取html文本内容
return requests.get(url).text # 这里通过GET请求拿到返回的网页文本内容
def get_images_urls(html_text):
urls = [] # 保存提取的url列表
names = []
soup = BeautifulSoup(html_text, 'html.parser') # 创建一个soup对象,可以打印出来看看里面的内容
div_tag = soup.find('div', {'id': 'post_content'}) # 查找id=post_content的标签
img_tag_list = div_tag.find_all_next('img') # 查找div下面的所有img标签
for img_tag in img_tag_list[:-4]: # 观察找到结果发现从倒数第四个开始并不是表情包,所以只迭代到倒数第四个
try:
if img_tag.attrs['alt'] is not None: #去掉网站中某些没有['alt']值的图片
url = img_tag.attrs['src'] # 提取img标题的src元素的值
name = img_tag.attrs['alt'] #获取图片标题
urls.append(url)
names.append(name)
except Exception as e:
pass
new_list = []
num = 0
for i in names: #检测是否有重名的图片
if i not in new_list:
new_list.append(i)
else:
num += 1
new_list.append(str(i)+str(num))
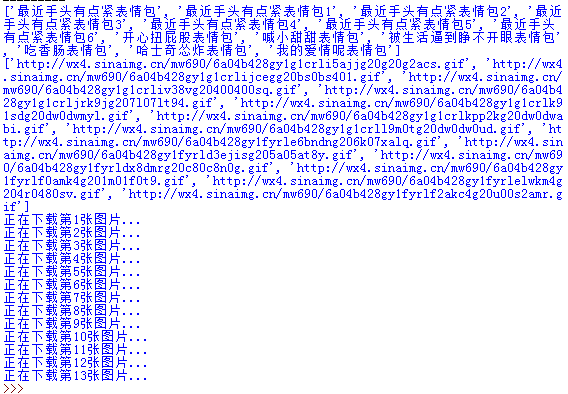
print(new_list)
print(urls)
return urls,new_list
def save_images(dir, urls,names):
if not os.path.exists(dir): # 使用os模块来判断文件夹是否存在,不存在则创建
os.makedirs(dir)
count = 0
for url in urls:
print('正在下载第{}张图片...'.format(str(count+1)))
ext = url.split('.')[-1] # 拿到图片的扩展名
filename = dir + '/' + str(names[count]) + '.' + ext # 拼接图片的存储路径
content = requests.get(url).content # 通过GET请求获取图片的二进制内容,注意拿网页源码时候是text
with open(filename, 'wb+') as f: # 已写二进制的形式打开文件
f.write(content) # 将图片内容写入
count += 1 # count 用于计数,递增1
if __name__ == '__main__':
url = 'http://www.bbsnet.com/xiongmaoren-18.html'
html_text = get_html_text(url)
urls,names = get_images_urls(html_text)
save_images("D:\\Image",urls,names)
3. 生成自己的IP池

#!/usr/bin/env python3
# -*- coding: utf-8 -*-
import requests,threading,datetime
from bs4 import BeautifulSoup
import random
from fake_useragent import UserAgent


"""
1、抓取西刺代理网站的代理ip
2、并根据指定的目标url,对抓取到ip的有效性进行验证
3、最后存到指定的path
"""

# ------------------------------------------------------文档处理--------------------------
# 写入文档
def write(path,text):
    with open(path,'a', encoding='utf-8') as f:
        f.writelines(text)
        f.write('\n')
# 清空文档
def truncatefile(path):
    with open(path, 'w', encoding='utf-8') as f:
        f.truncate()
# 读取文档
def read(path):
    with open(path, 'r', encoding='utf-8') as f:
        txt = []
        for s in f.readlines():
            txt.append(s.strip())
    return txt

# 计算时间差,格式: 时分秒
def gettimediff(start,end):
    seconds = (end - start).seconds
    m, s = divmod(seconds, 60)
    h, m = divmod(m, 60)
    diff = ("%02d:%02d:%02d" % (h, m, s))
    return diff

# ----------------------------------------------------------------------------------------------------------------------
# 返回一个随机的请求头 headers
def getheaders():
    return {"User-Agent":ua.random}

# -----------------------------------------------------检查ip是否可用---------------------
def checkip(targeturl,ip):
    headers =getheaders()  #定制请求头
    proxies = {ip.split(':')[0]: ip}  # 代理ip
    try:
        response=requests.get(url=targeturl,proxies=proxies,headers=headers,timeout=5).status_code
        if response == 200 :
            return True
        else:
            return False
    except:
        return False

#-------------------------------------------------------获取代理方法----------------------
# 免费代理 XiciDaili
def findip(type,pagenum,targeturl,path): # ip类型,页码,目标url,存放ip的路径
    list={'1': 'http://www.xicidaili.com/nt/', # xicidaili国内普通代理
          '2': 'http://www.xicidaili.com/nn/', # xicidaili国内高匿代理
          '3': 'http://www.xicidaili.com/wn/', # xicidaili国内https代理
          '4': 'http://www.xicidaili.com/wt/'} # xicidaili国外http代理
    url=list[str(type)]+str(pagenum) # 配置url
    headers = getheaders() # 定制请求头
    html=requests.get(url=url,headers=headers,timeout = 5).text
    soup=BeautifulSoup(html,'lxml')
    all=soup.find_all('tr',class_='odd')
    for i in all:
        t=i.find_all('td')
        ip=t[5].text+'://'+t[1].text+':'+t[2].text
        ip=ip.lower()
        is_avail = checkip(targeturl,ip)
        if is_avail == True:
            write(path=path,text=ip)
            print(ip)

#-----------------------------------------------------多线程抓取ip入口--------------------
def getip(targeturl,path):
     truncatefile(path) # 爬取前清空文档
     start = datetime.datetime.now() # 开始时间
     threads=[]
     for type in range(4):   # 四种类型ip,每种类型取前三页,共12条线程
         for pagenum in range(3):
             t=threading.Thread(target=findip,args=(type+1,pagenum+1,targeturl,path))
             threads.append(t)
     print('开始爬取代理ip')
     for s in threads: # 开启多线程爬取
         s.start()
     for e in threads: # 等待所有线程结束
         e.join()
     print('爬取完成')
     end = datetime.datetime.now() # 结束时间
     diff = gettimediff(start, end)  # 计算耗时
     ips = read(path)  # 读取爬到的ip数量
     print('一共爬取代理ip: %s 个,共耗时: %s \n' % (len(ips), diff))

#-------------------------------------------------------启动-----------------------------
# if __name__ == '__main__':
def get_ip():
    path = 'E:\\ip.txt' # 存放爬取ip的文档path
    targeturl = "https://blog.csdn.net/fengge2018/article/details/104602231" # 验证ip有效性的指定url
    getip(targeturl,path)

ua = UserAgent()
get_ip()
4. opencv读取文件夹中的图片
import cv2 as cv
import numpy as np
from PIL import Image, ImageDraw, ImageFont
import os

def isresize(img): #将图片大小调整为合适
    height = img.shape[0]
    weight = img.shape[1]
    if height>900 or weight>900 :
        img = cv.resize(img,(int(height*0.1),int(weight*0.1)))
    return img

def Add_Label(img,name,left=0, top=0,textColor=(0, 255, 0), textSize=20):
    if (isinstance(img, np.ndarray)):  #判断是否OpenCV图片类型,若是,则转成pil格式
        img = Image.fromarray(cv.cvtColor(img, cv.COLOR_BGR2RGB))
    draw = ImageDraw.Draw(img)
    fontText = ImageFont.truetype("font/simsun.ttc", textSize, encoding="utf-8")
    draw.text((left, top), name, textColor, font=fontText)#位置可调
    return cv.cvtColor(np.asarray(img), cv.COLOR_RGB2BGR)

def img_show(name):
    path = "F:/Image/"+name #图片路径名
    img = cv.imdecode(np.fromfile(path,dtype=np.uint8),-1)#解决不能带中文名路径的问题
    img = isresize(img)
    img = Add_Label(img,name,textColor=(0, 0, 255)) #添加中文在图片上显示
    cv.imshow(' ',img)
    cv.waitKey(0)

index = -1  #索引号
image = os.listdir("F:/Image/") #image变量为 ['奖牌.png', '红会徽.png', '透明会徽.png'……等]
for i in image: #遍历
    index += 1 #索引号从0开始
    img_show(image[index]) #显示一张图片
5. opencv使用手机摄像头
import cv2
cap = cv2.VideoCapture(1)
if False == cap.isOpened():
    # http://192.168.43.245:8081可以通过你的IP摄像机app获得,记得关闭密码
    cap.open('http://192.168.43.245:8081/video')
while (True):
    ret,frame = cap.read()
    if False == ret:
        break
    cv2.imshow('frame',frame)
    if cv2.waitKey(1) & 0xFF==ord('q'):
        break
cv2.release()#释放摄像头
cv2.destroyAllWindows()     # 毁掉所有窗口
6. matlab使用手机摄像头
clc;clear;close all

IP = '192.168.43.10:8080';#可以通过你的IP摄像机app获得,记得关闭密码

url = strcat('http://',IP,'/shot.jpg');#获取一张图片

pic = imread(url);

fhandle = image(pic);

while(1)
	pic = imread(url);
	set(fhandle,'CData',pic);
	drawnow;
end
7. 爬虫百度翻译、百度百科

import hashlib,json,random,requests,urllib.parse
import urllib.request,re
from bs4 import BeautifulSoup
import time

class Baidu_API(object):
    def __init__(self):
        self.appid = '20200206000381024'  #可以自己去申请自己的
        self.secretKey = 'qzGAYtvm3kd4lIrAt5LP'
        self.url = 'http://api.fanyi.baidu.com/api/trans/vip/translate'
        self.search_url = 'https://baike.baidu.com/item/'

    def search(self, info):
        result = []
        url = self.search_url + urllib.parse.quote(info)
        html = urllib.request.urlopen(url)
        content = html.read().decode('utf-8')
        html.close()
        soup = BeautifulSoup(content, "lxml")
        text = soup.find('div', class_="lemma-summary").children
        for x in text:
            if x != '\n' and x != '\r\n':
               word = re.sub(re.compile(r"<(.+?)>"),'',str(x))
               words = re.sub(re.compile(r"\[(.+?)\]"),'',word)
               result.append(words)
        return ''.join(result).replace('\n\xa0\n','')

    def is_chinese(self,uchar):
        if '\u4e00' <= uchar <= '\u9fff':
            return True
        else:
            return False

    def translate(self, info):
        if self.is_chinese(info):
            fromLang = 'zh'
            toLang = 'en'
        else:
            fromLang = 'en'
            toLang = 'zh'
        salt = random.randint(32768, 65536)
        def md5(str):
            str = str.encode('utf-8')  # python2 不需要此行代码
            m = hashlib.md5()
            m.update(str)
            return m.hexdigest()
        sign = self.appid + info + str(salt) + self.secretKey
        sign = md5(sign)
        url = self.url + '?appid=' + self.appid + '&q=' + info + '&from=' + fromLang + '&to=' + toLang + '&salt=' + str(
            salt) + '&sign=' + sign
        response = requests.get(url)
        try:
            return response.json()["trans_result"][0]["dst"]
        except:
            return response.json()["error_msg"]

if __name__ == '__main__':
	baidu = Baidu_API()
	info = input('请输入:')
	print(baidu.translate(info)) #翻译
	#print(baidu.search(info)) #百度百科
8. 爬虫疫情状况
import hashlib,json,random,requests,urllib.parse
import urllib.request,re
from bs4 import BeautifulSoup
import time
class Tencent_API(object):
def __init__(self):
self.url = 'https://view.inews.qq.com/g2/getOnsInfo?name=disease_h5&callback=jQuery341001657575837432268_1581070969707&_=1581070969708'
self.headers = {'user-agent': 'Mozilla/5.0 (Linux; Android 6.0; Nexus 5 Build/MRA58N) AppleWebKit/537.36 (KHTML, like Gecko) Chrome/78.0.3904.108 Mobile Safari/537.36'}
def state(self,search_info):
res = requests.get(self.url, headers=self.headers).text
temp = json.loads(res.split('jQuery341001657575837432268_1581070969707(')[1].split(')')[0])
data = json.loads(temp['data'])
china_data = data['areaTree'][0]['children']
city_data = []
province_data = []
country_result,city_result = {},{}
if search_info[0] == '全国':
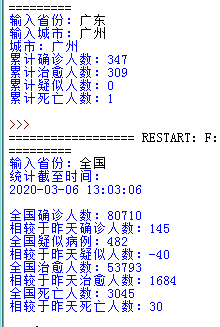
print('统计截至时间:\r\n{}\r\n\r\n全国确诊人数:{}\r\n相较于昨天确诊人数:{}\r\n全国疑似病例:{}\r\n相较于昨天疑似人数:{}\r\n全国治愈人数:{}\r\n相较于昨天治愈人数:{}\r\n全国死亡人数:{}\r\n相较于昨天死亡人数:{}\r\n'.format(
str(data['lastUpdateTime']),str(data['chinaTotal']['confirm']),str(data['chinaAdd']['confirm']),str(data['chinaTotal']['suspect']),str(data['chinaAdd']['suspect']),str(
data['chinaTotal']['heal']),str(data['chinaAdd']['heal']),str(data['chinaTotal']['dead']),str(data['chinaAdd']['dead'])))
return
for i in china_data:
province_data.append(i['name'])
city_data.append(i['children'])
if search_info[0] in province_data:
num = province_data.index(search_info[0])
data_path = city_data[num]
for i in data_path:
name = i['name']
today = i['today']
total = i['total']
if name == search_info[1]:
print('城市:{}\r\n累计确诊人数:{}\r\n累计治愈人数:{}\r\n累计疑似人数:{}\r\n累计死亡人数:{}\r\n'.format(
name,str(total['confirm']),str(total['heal']),str(total['suspect']),str(total['dead'])))
return
if __name__ == '__main__':
virus = Tencent_API()
province = input('输入省份:')
if province != '全国':
city = input('输入城市:')
else:
city = None
virus.state([province,city])
9. python发短信

from twilio.rest import Client
import time

class Twilio_notify(object):
    def __init__(self): #下面的信息可以自己去twilio官网注册
        self.account_sid = 'AC8fef9092a875cc1a2d03c5c63059bc87'
        self.auth_token = 'e85b4c6e701de4c0437336e3c39e09b6'
        self.client = Client(self.account_sid, self.auth_token)

    def send_wxpyerr_message(self):
        send_time = time.strftime("%Y-%m-%d %H:%M:%S", time.localtime())
        message = self.client.messages.create(
            to="+861360287****", #你的手机号
            from_="+19282482205",
            body="\n微信掉线啦啦\n\n时间:%s\n\n——由阿峰robot自动发送"%send_time)

if __name__ == '__main__':
	twilio = Twilio_notify()
	twilio.send_wxpyerr_message()
10. 防止微信机器人掉线(测试中)

from threading import Timer
import time
import datetime
from twilio.rest import Client
from wxpy import *
import random

class Twilio_notify(object):
    def __init__(self):
        self.account_sid = 'AC8fef9092a875cc1a2d03c5c63059bc87'
        self.auth_token = 'e85b4c6e701de4c0437336e3c39e09b6'
        self.client = Client(self.account_sid, self.auth_token)

    def send_wxpyerr_message(self):
        send_time = time.strftime("%Y-%m-%d %H:%M:%S", time.localtime())
        message = self.client.messages.create(
            to="+861360287****", #你的手机号
            from_="+19282482205",
            body="\n微信掉线啦啦\n\n时间:%s\n\n——由阿峰robot自动发送"%send_time)


class Robot_login(Twilio_notify):
    def __init__(self):
        Twilio_notify.__init__(self)
        Timer(30, self.timer_loop).start() #定时和机器人聊天
        self.data = '终于到了小时候你羡慕的年纪'
        self.flag = 1 #机器人控制状态
        self.login() #登陆微信网页版

    def login(self):
        try:
            bot = Bot(console_qr=2,cache_path=True)
            #bot = Bot(cache_path=True) #在linux运行代码,需要参数console_qr=2,在windows就不要
        except Exception as e:
            return
        mps = bot.mps() #获取所有公众号
        # 以下两个公众号都是我做的,内接了小冰机器人,如果要使用的关注即可
        self.robot_1 = mps.search('广工17集成2班')[0] #机器人1号
        self.robot_2 = mps.search('高校学车吧')[0] #机器人2号
        group = bot.groups(update=True).search('python')[0] #测试的群聊,记得要把群聊保存到账户
        #也可以是一个好友:friend = bot.friends(update=True).search('单身狗')[0]
        print('1:',self.robot_1)
        print('2:',self.robot_2)

        print('初始化成功!')
        try:
            @bot.register(self.robot_1) #如果收到机器人1号消息就进入,收到消息相当于自己账户给公众号发了消息,并且得到小冰的回复了
            def xiaobin1_reply(msg):
                print('1回复的消息:',msg.text)
                group.send('[机器人1号]: '+msg.text)# 转发消息到测试群
                self.data = msg.text #保存小冰回复的消息,待会转发给机器人2号

            @bot.register(self.robot_2)#如果收到机器人2号息就进入
            def xiaobin2_reply(msg):
                print('2回复的消息:',msg.text)
                group.send('[机器人2号]: '+msg.text)# 转发消息到测试群
                self.data = msg.text#保存小冰回复的消息,待会转发给机器人1号

            bot.join() #堵塞线程,直到微信发生错误退出,否则一直等待检测上面两个注册的机器人状态
        except Exception as e:
            super().send_wxpyerr_message()

    def timer_loop(self):#定时,以防太频繁地发消息
        try:
            n_time = datetime.datetime.now()
            b_time = datetime.datetime.strptime(str(n_time.date())+'00:30', '%Y-%m-%d%H:%M')
            e_time = datetime.datetime.strptime(str(n_time.date())+'06:30', '%Y-%m-%d%H:%M')
            if n_time > b_time and n_time<e_time:#在凌晨的话,发消息频率高一点
               c_time = random.randint(20,40) #20s到40s再讲消息转发给机器人
            else: #在白天,慢一点
               c_time = random.randint(80,120)
            Timer(c_time, self.timer_loop).start() #开始下一次的定时
            if self.flag == 1:
               print('1收到的消息',self.data)
               self.robot_1.send(self.data)
               self.flag = 0
            else:
               print('2收到的消息',self.data)
               self.robot_2.send(self.data)
               self.flag = 1
        except Exception as e:
            print(e)

    def report_err(self):
        super().send_wxpyerr_message()

if __name__ == '__main__':
    trytimes = 3 #如果3次失败,就算了
    robot = Robot_login()
    while trytimes>0:
        print('正在重新登陆')
        time.sleep(5)
        trytimes -= 1
        robot.login()
    robot.report_err()
11. 每天定时问候、群聊秘书的微信机器人

from threading import Timer
from wxpy import *
import hashlib,json,random,requests,urllib.parse
import urllib.request,re
from bs4 import BeautifulSoup
import time
from twilio.rest import Client
from fake_useragent import UserAgent

class Net_From(object):
    def __init__(self):
        pass

    def get_msg(self): #心灵鸡汤
        url = 'http://www.59xihuan.cn/index_1.html'
        h = requests.get(url)
        html = h.text
        news_bf = BeautifulSoup(html,"html.parser")
        msg = news_bf.find('div', class_='pic_text1')
        news = msg.text.replace(' ','')
        return news.replace('\n','')

    def get_news(self): #词霸每日一语
        r = requests.get('http://open.iciba.com/dsapi/')
        contents = r.json()['content']
        translation = r.json()['translation']
        return contents

class Robot_login(Net_From):
    def __init__(self):
        Net_From.__init__(self)
        Timer(100, self.timer_msg).start()#定时每天的消息,第一次在60s后发送
        self.chat_data = {}
        self.now_user = None #保存当前聊天对象信息的变量
        self.login()

    def login(self):
        bot = Bot(console_qr=2,cache_path=True)
        #bot = Bot(cache_path=True)
        xioabing = bot.mps().search('高校学车吧')[0] #机器人
        friends = bot.friends(update=True)#获取好友
        bot.enable_puid('wxpy_puid.pkl')#用puid唯一性识别消息对象
        print('初始化好友成功 : %d 人'%len(friends))#获取好友个数
        groups = bot.groups(update=True)
        print('初始化群聊成功 : %d 个群聊'%len(groups))#获取群聊个数
		self.group = bot.groups(update=True).search('python')[0] #接收每天问候的群聊
        try:
            @bot.register(groups, TEXT ,except_self=False) #当有群消息时,except_self=False意味着也可以检测自己发到群里的消息
            def groups_reply(msg):
                if not msg.is_at: #如果没人艾特,则退出函数
                    return
                else:
                    if msg.text[1:3] == '所有人': #如果是艾特所有人,也退出
                        return
                    else:
                        text = str(msg.text).replace('@%s '%msg.chat.self.name,'')#获取消息内容
                        member_name = str(msg.member.name) #获取是艾特我的群员的昵称
                        group_name = str(msg.chat.name) #获取群聊名称
                        if msg.member.puid not in self.chat_data.keys():#确定是否是第一次艾特我
                            #保存艾特我时的群成员puid、群名称、群员昵称,更新到字典
                            self.chat_data.update({msg.member.puid:{'群':msg.chat,'名':member_name}})
                            msg.reply("阿峰收到收到,尽快回复你[呲牙]\n\n%s\r\n\r\n--------------------\r\n@%s"%(text,member_name))
                            #转发消息到文件传输助手
                            bot.file_helper.send('被群<%s>的%s艾特了\n\n%s'%(group_name,member_name,text))
                            msg.mark_as_read()#取消群聊息小红点
                        else: #如果是同一个群聊同一个人艾特我
                            self.now_user = msg.member.puid #保存该成员的puid到变量
                            xiaobing.send(text) #转发该消息给机器人

            @bot.register(xiaobing)
            def xiaobin_reply(msg):
                if self.now_user is not None:#如果是刚才艾特我两次的那个人
                    to_object = self.chat_data[self.now_user]['群'] #找到该群聊
                    member_name = self.chat_data[self.now_user]['名'] #找到该成员的群昵称
                    msg.forward(to_object,suffix='\r\n--------------------\r\n@%s'%member_name) #消息回复
                    self.now_user = None

            bot.join()#堵塞线程
        except Exception as e:
            print(e)

    def timer_msg(self):
        self.group.send('%s'%super().get_msg())
        self.group.send('%s'%super().get_news())
        self.group.send('晚安!')
        Timer(86400, self.timer_msg).start()#下次定时时间为一天

if __name__ == '__main__':
    robot = Robot_login()
12. 使用turtle做倒计时

import time
import turtle

#注意,原理是和数码管一样,用到哪一段才点亮哪一段
# 但是它这个顺序和数码管的不同
# turtle是从中间一横开始,往右,往下,往左,往上,再往右来走完一个8字

turtle.setup(250,250,None,None)#设置窗体大小和位置

def drawLine(draw):#绘制单段数码管
    turtle.pendown() if draw else turtle.penup() #如果draw为真,落下画笔,海龟在爬行,否则抬起画笔,海龟在飞行
    turtle.fd(40)#向海龟的正前方运行40
    turtle.right(90)#海龟向右转90度

def drawDigit(digit):#根据数字绘制七段数码管
    turtle.pencolor("red")
    drawLine(True) if digit in [2,3,4,5,6,8,9] else drawLine(False) #数码管标号为1的那段
    turtle.pencolor("green")
    drawLine(True) if digit in [0,1,3,4,5,6,7,8,9] else drawLine(False)#数码管标号为2的那段
    turtle.pencolor("blue")
    drawLine(True) if digit in [0,2,3,5,6,8,9] else drawLine(False)#数码管标号为3的那段
    turtle.pencolor("purple")
    drawLine(True) if digit in [0,2,6,8] else drawLine(False)#数码管标号为4的那段
    turtle.left(90)#海龟向左转90度,因为上一次已经向右转了90度,如果要直走必须转回来
    turtle.pencolor("yellow")
    drawLine(True) if digit in [0,4,5,6,8,9] else drawLine(False)#数码管标号为5的那段
    turtle.pencolor("cyan")
    drawLine(True) if digit in [0,2,3,5,6,7,8,9] else drawLine(False)#数码管标号为6的那段
    turtle.pencolor("pink")
    drawLine(True) if digit in [0,1,2,3,4,7,8,9] else drawLine(False)#数码管标号为7的那段
    turtle.left(180)#海龟向左转180度,转180度,转过上一次已经向右转的90度,再转90度,为下一个数字做准备
    turtle.penup()#为绘制后续数字确定位置,海龟在飞
    turtle.fd(20)#为绘制后续数字确定位置,向海龟的正前方运行20

def drawDate(date):#获得要输出的数字
    for i in date:
        drawDigit(eval(i))#通过eval()函数将数字变为整数

def showtime(t):
    turtle.penup()#抬起画笔,海龟在飞行
    turtle.fd(-40)#画笔向前-300
    turtle.pensize(5)#画笔大小为5
    drawDate('%s'%t)
    #turtle.hideturtle()
    turtle.reset()
    #turtle.delay(delay=1000)
    #turtle.done()#turtle.done()函数:如果是文件式描写方法,程序运行结束后不会退出,需要手工关闭窗体退出


if __name__ == "__main__":
    t = 60
    while t>0:
        if t>9:
            turtle.speed(15)
        else:
            turtle.speed(8)
        showtime(t)
        t -= 1
13. 在阿里云服务器后台运行脚本
先在根目录新建文件夹,使用FileZilla将脚本上传
mkdir mystudy
cd mystudy
mkdir python
ll

使用python3运行脚本,运行后然后扫码登陆,会生成一个wxpy.pkl文件,存放着登陆状态的信息
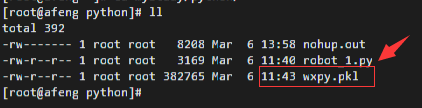
在5分钟之内执行以下指令,让脚本在服务器后台运行,期间由于wxpy.pkl的存在,不再需要第二次扫码登陆,同时代码里print的信息都会存放在nohub.out文件中(看上图)
nohup python3 robot_1.py &
注意自己系统的默认python是python2还是python3,可以使用 python --version 来查看,同时后面跟的是脚本文件的名字,主义要在脚本所在目录运行
之后,在手机端查看是否登陆成功,需要机器人有信息发送过来,则说明可以了,此时按 ctrl+C 退出nohup指令,接着输入以下指令查看进程信息
ps -ef | grep python3

如上图,我的robot_1.py文件已进入后台运行,前面的4439是脚本的线程号,可以用以下指令关闭后台运行
kill PID(线程号)
14. 自制密码管理器 —— 使用python、RSA加密文件(加强版)
(上方是文章链接,点击可进入)
如有错误,谢谢指正!
