1 反向代理
1.1 什么是反向代理
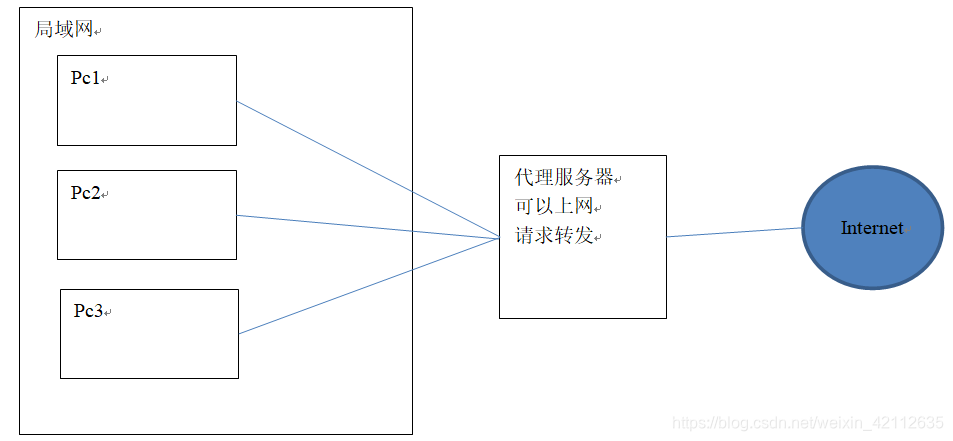
正向代理
反向代理:
反向代理(Reverse Proxy)方式是指以代理服务器来接受 internet 上的连接请求,然后 将请求转发给内部网络上的服务器,并将从服务器上得到的结果返回给 internet 上请求连接的客户端,此时代理服务器对外就表现为一个反向代理服务器。
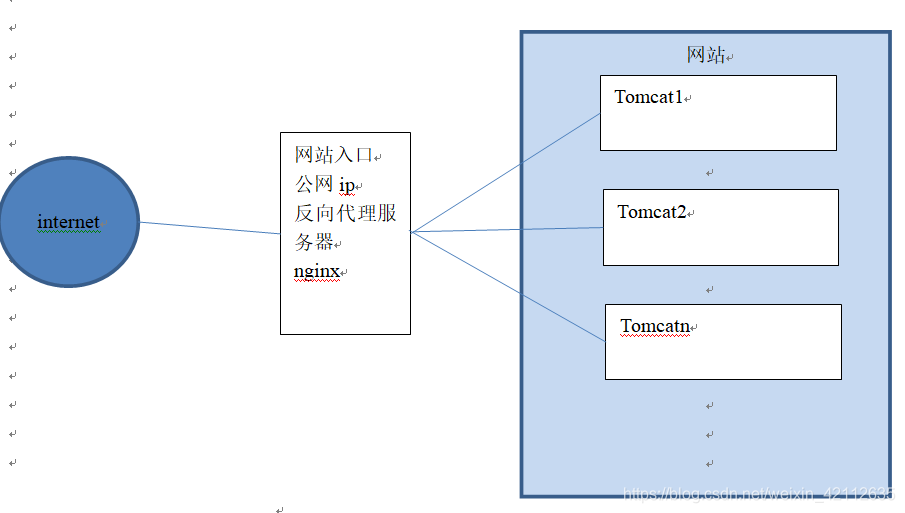
反向代理服务器决定哪台服务器提供服务。
根据不同的域名请求,Nginx 会将请求转发到对应的服务器,从而隐藏真实的服务器地址。
反向代理服务器不提供服务,也是
请求的转发。
1.2 反向代理的好处
反向代理的好处:隐藏真实内部 ip 地址,请求先访问 nginx 代理服务器(外网可以访问到),再使用 nginx 服务器转发到真实服务器中。
1.3 Nginx 实现反向代理
两个域名指向同一台 nginx 服务器,用户访问不同的域名显示不同的网页内容。
- 两个域名是
www.e3mall.com和www.taotao.com nginx服务器使用虚拟机:192.168.153.11

第一步:安装两个
tomcat,分别运行在8080和8081端口。
下载 Tomcat:
wget https://archive.apache.org/dist/tomcat/tomcat-8/v8.0.23/bin/apache-tomcat-8.0.23.tar.gz
解压:
tar -zxvf apache-tomcat-8.0.23.tar.gz
复制两个 Tomcat:
cp apache-tomcat-8.0.23 tomcat-1 -r
cp apache-tomcat-8.0.23 tomcat-2 -r
[root@weaver-1 ~]# ll
total 8872
-rw-------. 1 root root    1801 Jan  6 15:48 anaconda-ks.cfg
drwxr-xr-x. 9 root root     160 Mar 18 03:43 apache-tomcat-8.0.23
-rw-r--r--. 1 root root 9076980 May 19  2015 apache-tomcat-8.0.23.tar.gz
drwxr-xr-x. 9 root root     160 Mar 18 03:44 tomcat-1
drwxr-xr-x. 9 root root     160 Mar 18 03:44 tomcat-2
[root@weaver-1 ~]#
修改 tomcat-1 的端口号为 8001:
vi tomcat-1/conf/server.xml
修改三个端口:
# 8005 改为 8006
<Server port="8006" shutdown="SHUTDOWN">
  <!-- Security listener. Documentation at /docs/config/listeners.html
  <Listener className="org.apache.catalina.security.SecurityListener" />
......
    # 8080 改为 8001
    <Connector port="8001" protocol="HTTP/1.1"
               connectionTimeout="20000"
               redirectPort="8443" />
......
    # 8009 改为 8010
    <Connector port="8010" protocol="AJP/1.3" redirectPort="8443" />
修改 tomcat-2 的端口号为 8002:
vi tomcat-2/conf/server.xml
修改三个端口:
# 8005 改为 8007
<Server port="8007" shutdown="SHUTDOWN">
  <!-- Security listener. Documentation at /docs/config/listeners.html
  <Listener className="org.apache.catalina.security.SecurityListener" />
......
    # 8080 改为 8002
    <Connector port="8002" protocol="HTTP/1.1"
               connectionTimeout="20000"
               redirectPort="8443" />
......
    # 8009 改为 8011
    <Connector port="8011" protocol="AJP/1.3" redirectPort="8443" />
第二步:启动两个
tomcat:
tomcat-1/bin/startup.sh
tomcat-2/bin/startup.sh
[root@weaver-1 ~]# tomcat-1/bin/startup.sh
Using CATALINA_BASE:   /root/tomcat-1
Using CATALINA_HOME:   /root/tomcat-1
Using CATALINA_TMPDIR: /root/tomcat-1/temp
Using JRE_HOME:        /usr/java/jdk1.8.0_131
Using CLASSPATH:       /root/tomcat-1/bin/bootstrap.jar:/root/tomcat-1/bin/tomcat-juli.jar
Tomcat started.
[root@weaver-1 ~]# tomcat-2/bin/startup.sh
Using CATALINA_BASE:   /root/tomcat-2
Using CATALINA_HOME:   /root/tomcat-2
Using CATALINA_TMPDIR: /root/tomcat-2/temp
Using JRE_HOME:        /usr/java/jdk1.8.0_131
Using CLASSPATH:       /root/tomcat-2/bin/bootstrap.jar:/root/tomcat-2/bin/tomcat-juli.jar
Tomcat started.
[root@weaver-1 ~]#
查看启动成功与否:
tail -f tomcat-1/logs/catalina.out
tail -f tomcat-2/logs/catalina.out

测试:
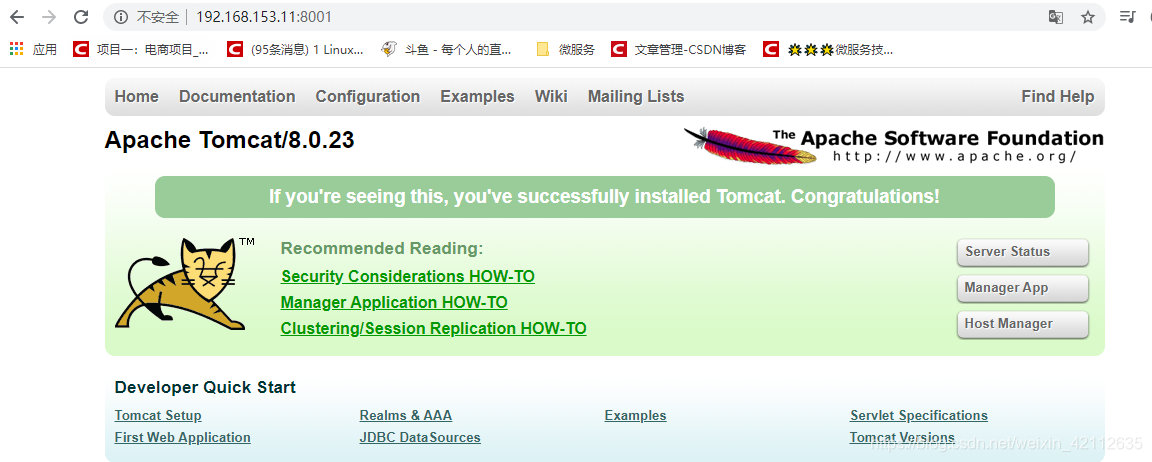
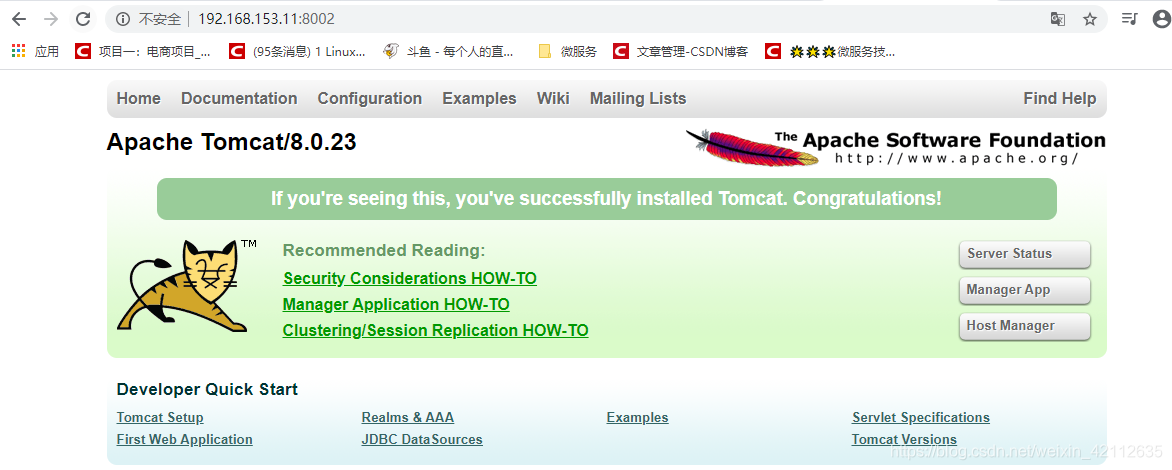
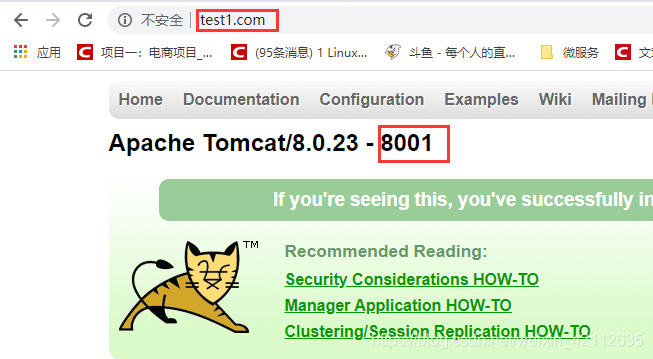
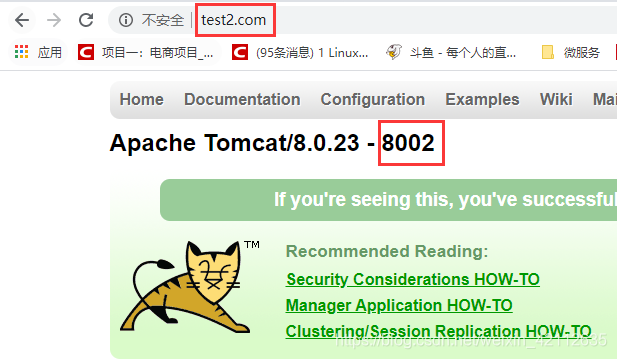
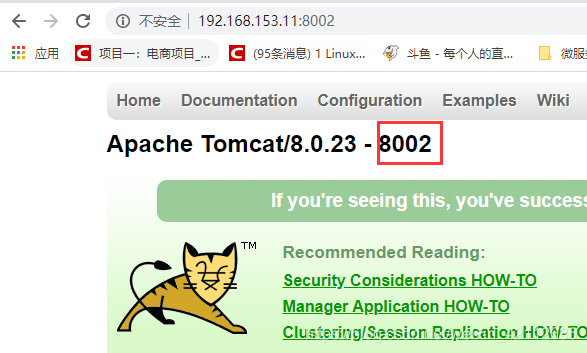
修改欢迎页:
vi tomcat-1/webapps/ROOT/index.jsp
vi tomcat-2/webapps/ROOT/index.jsp
```bash
<h1>${pageContext.servletContext.serverInfo} - 8001</h1>
<h1>${pageContext.servletContext.serverInfo} - 8002</h1>
刷新页面:

第三步:反向代理服务器的配置
修改 nginx 的配置文件:
vi /usr/local/nginx/conf/nginx.conf
#user  nobody;
worker_processes  1;

#error_log  logs/error.log;
#error_log  logs/error.log  notice;
#error_log  logs/error.log  info;

#pid        logs/nginx.pid;


events {
    worker_connections  1024;
}


http {
    include       mime.types;
    default_type  application/octet-stream;

    #access_log  logs/access.log  main;

    sendfile        on;

    keepalive_timeout  65;

    #gzip  on;

    server {
        listen       80;                 # server监听的端口号
        server_name  localhost;          # 配置域名

        location / {
            root   html;                 # 拦截后,跳转根路径
            index  index.html index.htm; # 默认页面
        }

    }

	############ 添加配置一
	server {
        listen       80;
        server_name  www.test1.com;

        location / {
            proxy_pass   http://127.0.0.1:8001;
            index  index.html index.htm;
        }

    }

	############ 添加配置二
	server {
        listen       80;
        server_name  www.test2.com;

        location / {
            proxy_pass   http://127.0.0.1:8002;
            index  index.html index.htm;
        }

    }

}
或者配置如下:
#user  nobody;
worker_processes  1;

#error_log  logs/error.log;
#error_log  logs/error.log  notice;
#error_log  logs/error.log  info;

#pid        logs/nginx.pid;


events {
    worker_connections  1024;
}


http {
    include       mime.types;
    default_type  application/octet-stream;

    #access_log  logs/access.log  main;

    sendfile        on;

    keepalive_timeout  65;

    #gzip  on;

    server {
        listen       80;                 # server监听的端口号
        server_name  localhost;          # 配置域名

        location / {
            root   html;                 # 拦截后,跳转根路径
            index  index.html index.htm; # 默认页面
        }

    }

	############ 添加配置一
	upstream test1 {
        server 127.0.0.1:8001;
    }
	server {
        listen       80;
        server_name  www.test1.com;

        location / {
            proxy_pass   http://test1;
            index  index.html index.htm;
        }

    }

	############ 添加配置二
	upstream test2 {
        server 127.0.0.1:8002;
    }
	server {
        listen       80;
        server_name  www.test2.com;

        location / {
            proxy_pass   http://test2;
            index  index.html index.htm;
        }

    }

}
第四步:
nginx重新加载配置文件。
/usr/local/nginx/sbin/nginx -s reload
第五步:配置域名
在本机的 hosts 文件中添加域名和 ip 的映射关系
192.168.153.11 www.test.com
192.168.153.11 www.test1.com
192.168.153.11 www.test2.com
测试: