目的:
因从事嵌入式软件,项目中需要使用mongodb,最终需要熟悉c-driver的API,小白在搭建环境有些浪费时间,故写篇笔记记录供大家学习,当然也希望大家有什么疑问或不足可以相互交流:[email protected]
在Ubuntu上的安装mongodb
方法一:sudo apt-get install mongodb-server
测试是否安装成功:
1. 运行mongoDB服务命令(需要使用root权限):mongod
如有下输出说明已经运行:

2. Mongodb后台管理Shell(root下):
shell> mongo
有如下现象是正常工作:

方法二:官网下载对应位数的安装包。
参考链接:http://www.runoob.com/mongodb/mongodb-linux-install.html
我使用的32为Ubuntu,所以下载的包为3.3.3版本。关于版本编号自行百度。
下载安装包:mongodb-linux-i686-3.0.1.tgz
解压:tar zxvf mongodb-linux-i686-3.0.1.tgz
mv mongodb-linux-i686-3.0.1/ /usr/local/mongodb # 将解压包拷贝到指定目录
MongoDB 的可执行文件位于 bin 目录下,所以可以将其添加到PATH 路径中:
export PATH=<mongodb-install-directory>/bin:$PATH
<mongodb-install-directory> 为你 MongoDB 的安装路径。如本文的 /usr/local/mongodb
建议将其写入开机启动脚本:~/.bashrc中。
创建数据库目录
MongoDB的数据存储在data目录的db目录下,但是这个目录在安装过程不会自动创建,所以你需要手动创建data目录,并在data目录中创建db目录。
以下实例中我们将data目录创建于根目录下(/)。
注意:/data/db 是 MongoDB 默认的启动的数据库路径(--dbpath)。
mkdir -p /data/db
现在我们只需要找到/usr/local/mongodb/bin目录下的:mongod与mongo,和上面的操作运行一样。
注意:
1. 大概解释一下bin中文件:
mongod:暂且理解为服务器
mongo:暂且理解为可以输入命令的客户端。
mongodimport:导入数据
mongoexport:导出数据
网上教程还有使用一些参数设置
mongod --port 27017(默认)--dbpath /data/db --logpath /……….(不了解)
2. 在后台shell测试命令(mydb和mycoll是我自己创建的,刚刚安装是没有的,刚安装可能只有local):
show dbs ----》 查看已经存在的数据:

use mydb ---》使用mydb数据库,查看里面有几个集合:
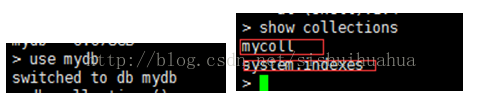
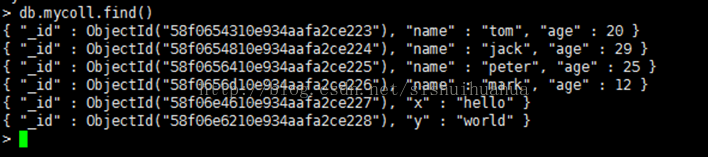
db.mycoll.find() ----->查看mycoll这个集合中的文档:
具体一些操作命令查看网上博客
http://www.cnblogs.com/xiangxiaodong/archive/2013/01/13/2858363.html
安装mongo-c-driver
预安装
需要先安装依赖库OpenSSL,来建立ssl连接到MongoDB
RedHat / Fedora系统:
$ sudo yum install pkg-config openssl-devel cyrus-sasl-devel
Debian / Ubuntu系统:
$ sudo apt-get install pkg-config libssl-dev libsasl2-dev
FreeBSD系统:
$ su -c 'pkg install pkgconf openssl cyrus-sasl2'
参考:http://api.mongodb.org/c/1.3.3/installing.html#installing-unix
这里下载的MongoDB的C语言驱动是 mongo-c-driver-1.3.5.tar.gz。
解压后打开mongo-c-driver-1.3.5目录下的 README 文件,按其中讲的方法安装,如下:
# tar xzf mongo-c-driver-1.3.5.tar.gz
# cd mongo-c-driver-1.3.5
# ./configure
# make
# sudo make install
注意:有可能在安装的时候有error,目前我测试在seeing虚拟机安装失败,在我自己的虚拟机安装成功。安装失败可能原因:版本不懂。
官方参考链接:
http://mongoc.org/libmongoc/1.6.2/index.html

编写连接MongoDB的程序 test.c
/*
* 创建连接
创建一个数据库  mydb
创建一个集合	mycoll
**
**/

#include <bson.h>
#include <bcon.h>
#include <mongoc.h>

int main (int   argc, char *argv[])
{
   mongoc_client_t      *client;
   mongoc_database_t    *database;
   mongoc_collection_t  *collection;
   bson_t               *command,
                         reply,
                        *insert;
   bson_error_t          error;
   char                 *str;
   bool                  retval;

   /*
    * Required to initialize libmongoc's internals
    */
   mongoc_init();

   /*
    * Create a new client instance
    */
   client = mongoc_client_new ("mongodb://localhost:27017");

   /*
    * Register the application name so we can track it in the profile logs
    * on the server. This can also be done from the URI (see other examples).
    */
   //mongoc_client_set_appname (client, "connect-example");

   /*
	创建一个集合db_name  集合中的表叫coll_name(暂且这样叫吧)
    * Get a handle on the database "mydb" and collection "mycoll"
    */
   database = mongoc_client_get_database (client, "mydb");//获取或者创建数据库的名称
   collection = mongoc_client_get_collection (client, "mydb", "mycoll"); //在这个db_name中获取或者创建一个cioll_name的集合

   /*
    * Do work. This example pings the database, prints the result as JSON and
    * performs an insert
    */
   command = BCON_NEW ("ping", BCON_INT32(1));//如何连接ping通了,就执行插入操作。

   retval = mongoc_client_command_simple (client, "admin", command, NULL, &reply, &error);

   if (!retval) {
      fprintf (stderr, "%s\n", error.message);
      return EXIT_FAILURE;
   }

   str = bson_as_json (&reply, NULL);
   //printf ("line %d\n", __LINE__);
   printf ("%s\n", str);
   //printf ("line %d\n", __LINE__);

   insert = BCON_NEW ("hello", BCON_UTF8 ("world"));

   if (!mongoc_collection_insert (collection, MONGOC_INSERT_NONE, insert, NULL, &error)) {
      fprintf (stderr, "%s\n", error.message);
   }

   bson_destroy (insert);
   bson_destroy (&reply);
   bson_destroy (command);
   bson_free (str);

  /*
    * Release our handles and clean up libmongoc
    */
   mongoc_collection_destroy (collection);
   mongoc_database_destroy (database);
   mongoc_client_destroy (client);
   mongoc_cleanup ();

   return 0;
}
编译test.c
# gcc -o test test.c -I/usr/local/include/libmongoc-1.0-I/usr/local/include/libbson-1.0/ -lmongoc-1.0 -lbson-1.0
如果在运行的时候报错找不到动态链接库,需要检查一下是否安装正确。
正常安装的话会有以下库:libbson.so------>mongodb解析的数据为bson数据,类似json。
其中libbson是附带的捆绑的库,系统若无,脚本会自动安装。

如果运行成功输出:{ "ok" : 1 }
在shell后台使用以上命令:(我们这创建了一个mydb数据库,在这个数据库中添加了一个集合,在这个集合添加一条文档 hello:“world”)
查看mongo-c-driver官方API使用
官方参考链接:http://mongoc.org/libmongoc/1.6.2/api.html
中文翻译请参考:http://www.cnblogs.com/oloroso/p/5733083.html
在运行代码之后,需要在后台shell查看是否有增删改查。之后还会更详细的讲解增删改查的api使用。个人感觉官方给的例子没有解释代码意思,需要查看文档。
