一.gdb简介
- gdb工具是Linux环境下的调试工具。(本文在centos6.5环境下测试)
- 在编译源文件时候必须加上 -g选项。
- 开始调试方式:gdb binfile
- 退出方式 quit 或者ctrl+d.
gdb调试过程常用命令:
   list/l 行号:显示源代码,接着上次的位置往下列,每次列10行。
   list/l 函数名:列出某个函数的源代码。
   r或run:运行程序。
   s或step:进入函数调用
   breaktrace(bt):查看各级函数调用及参数
   info(i) locals:查看当前栈帧局部变量的值
   info break :查看断点信息。
   finish:执行到当前函数返回,然后挺下来等待命令
   print(p):打印表达式的值,通过表达式可以修改变量的值或者调用函数
   set var:修改变量的值
   quit:退出gdb
   break(b) 行号:在某一行设置断点
   break 函数名:在某个函数开头设置断点
   continue(或c):从当前位置开始连续而非单步执行程序
   run(或r):从开始连续而非单步执行程序
   delete breakpoints:删除所有断点
   delete breakpoints n:删除序号为n的断点
   disable breakpoints:禁用断点
   enable breakpoints:启用断点
   info(或i) breakpoints:参看当前设置了哪些断点
   display 变量名:跟踪查看一个变量,每次停下来都显示它的值
   undisplay:取消对先前设置的那些变量的跟踪
   until X行号:跳至X行
   p 变量:打印变量值
   n 或 next:单条执行
二、调试多进程
在默认的情况下,gdb只会调试主进程,如果想要调试多个进程,需要进行一些设置:
1.show follow-fork-mode命令和show detach-on-fork

默认follow-fork-mode是parent,detach-on-fork是on,此时只调试主进程。
2.set follow-fork-mode和set detach-on-fork
这个命令可以对这两个模式重新设置进行多进程的调试
其中follow-fork-mode 有两个选项:[parent]和[child]
detach-on-fork 有两个选项:[on]和[off]
那么就有以下四种情况,各自代表不同的含义:
1.parent                   on               只调试主进程(GDB默认)
2.child                    on               只调试子进程
3.parent                   off              同时调试两个进程,gdb跟主进程,子进程block在fork位置
4.child                    off              同时调试两个进程,gdb跟子进程,主进程block在fork位置
下面进行设置:

测试文件:
  1 #include<stdio.h>
  2 #include<unistd.h>
  3 #include<sys/types.h>
  4 #include<sys/wait.h>
  5 #include<stdlib.h>
  6 int main()
  7 {
  8 pid_t pid;
  9 pid=fork();
 10 if(pid<0)
 11 {
 12
 13     perror("fork");
 14     exit(1);
 15
 16 }
 17 if(pid==0)
 18 {//child
 19 printf("I am Child,My id is:%d,My fathers id is:%d\n",getpid(),getppid());
 20
 21 }
 22 if(pid>0)
 23 {//father
 24 printf("I am Father,My id is:%d\n",getpid());
 25 wait(NULL);
 26 }
 27
 28     return 0;
 29 }
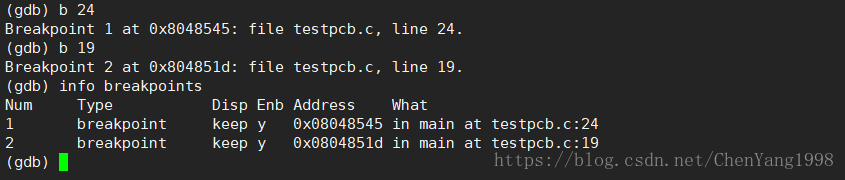
3.接下来,在分别在父子进程的地方下断点:
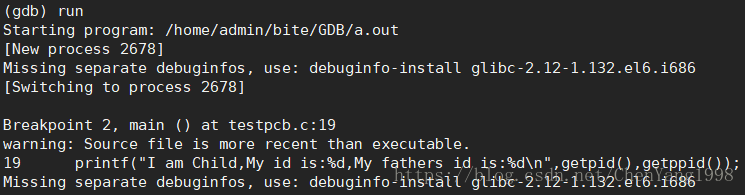
4.运行程序,查询正在运行的进程:

每一个被调试的进程,操作系统都会给他分配一个inferior结构体来描述这个进程的调试信息,并且为它分配id,每一个进程对应一个inferior,每个不同的inferior都有不同的地址空间,有时候在进程的还没有启动的时候inferior就存在了。
5.切换调试的进程:
inferior<infer number>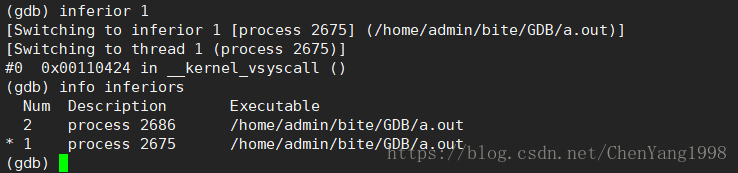
6.其他操作
添加调试进程
1.add-inferior [-copies n] [-exec executable]添加一个或者多个调试进程,n代表添加个数,没有指定时候,默认添加一个,executable为调试文件路径,如果没有指定,则程序留空,增加后可使用file命令重新指定执行程序。这时候创建的inferior其关联的进程并没启动。
删除编号为inferno的inferior。如果这个程序正在运行,则不能删除,必须先detach掉或者kill掉这个inferior。
2.remove-inferior inferno
复制n个编号为inferno的inferior,如果不指定n,则复制一个,不指定inferno的话,默认复制当前进程。
3.clone-inferior [n][inferno]detach分离掉编号为inferno 的inferior,注意就算detach掉,这个inferior还是存在,等待用户再一次使用run命令让它运行起来。
4.detach-inferior infernokill掉编号为inferno 的inferior,注意就算被掉,这个inferior同样还是存在,等待用户再一次使用run命令让它运行起来。
5.kill-inferior inferno6.set schedule-multiple on|off当设置为off的时候:只有当前inferior会执行
当设置为on的时候:所有是执行状态的inferior都会执行
7.scheduler-locking注意当scheduler-locking为on的时候,即使scheduler-multiple为on,也只有当前进程的当前线程会执行。默认是step。可以通过show sheduler-locking来查看,
8.set follow-exec-mode new|same设置为new:当发生exec的时候,在执行exec的inferior上控制子进程。
设置为same:新建一个inferior给执行起来的子进程。而父进程的inferior仍然保留,当前保留的inferior的程序状态是没有执行。
9. set print inferior-events用于设置inferior的状态提示信息,可以设置为on或者off。
10.maint info program-spaces用来查看当前GDB一共管理了多少的地址空间。
三、调试多线程
gdb是默认支持调试多线程的。跟主线程,新线程block在创建的地方。
测试文件:
  1 #include<stdio.h>
  2 #include<pthread.h>
  3
  4 void *run1(void *arg)
  5 {
  6 printf("I am thread 1,My id is:%d\n",pthread_self());
  7 }
  8 void * run2(void *arg)
  9 {
 10     printf("I am thread2 ,My id is:%d\n",pthread_self());
 11 }
 12  int main()
 13 {
 14     pthread_t t1,t2;
 15     pthread_create(&t1,NULL,run1,NULL);
 16     pthread_create(&t2,NULL,run2,NULL);
 17     pthread_join(t1,NULL);
 18     pthread_join(t2,NULL);
 19     return 0;
 20 }
 21
这里创建了两个线程,所以一共有三个线程。这里分别在两个线程函数内部打了两个断点.

1.调试多线程常用命令
1.info threads
当调试多线程的时候,gdb会为每一个线程分配一个线程id,一般从1开始,这里的线程id和t1不一样。我们可以查看线程情况,由于我们的第一个断点在线程run1中,所以2号线程正在运行。
2.thread ID切换调试的线程,ID即线程编号。
3.show scheduler-locking
  set  scheduler-locking on|off|step
查看线程锁定情况和设置线程锁定情况,当设置为on的时候,锁定其余线程,只有当前线程会运行。设置为off,不锁定任何线程,默认值。当设置为step的时候,只有被调试的线程会运行。
4.thread apply id1 id2 id3 commond
  thread apply all commond
第一个是让指定的线程1,2,3执行commond命令,第二个是所有线程都执行commond命令。
5.break FileName.cpp:LinuNum thread all:
所有线程都在文件FileName.cpp的第LineNum行有断点。
6.set target-async on/ff
同步和异步。同步,gdb在输出提示符之前等待程序报告一些线程已经终止的信息。而异步的则是直接返回。