一、表单验证类型
表单验证通常分为2种:
1.form表单提交后台验证;2.ajax无刷新页面验证
表单验证方法分为:浏览器验证,服务端验证,浏览器和服务器端双重验证及ajax技术验证
二、H5表单基本特性介绍
required:设置表单元素必填;pattern:表单元素使用正则;
novalidate:用在form标签上,表示表单中设置必填时,提交表单时不去验证(不强制进行填写)
formnovalidate:用在input表单按钮上的,提交表单时不去验证必填(required)
autocomplete:自动提示;禁止自动提示是autocomplete="off"
for:对应input中id对应的值
    <label for="">工号</label>
    <input type="text" name="user" placeholder="请输入工号" pattern="^d{5}">
三、H5表单验证API
主要有如下API:
1.validity属性:表单设置的相应属性是否设置,设置并符合返回true
用户名:<input type="text" name="" id="username">
<script type="text/javascript">
    var username=document.getElementById('username');
    console.log(username.validity);
</script>
打印validity属性如下

valueMissing:验证required,如上input标签required,但表单没有填值时,则值为true
用法:在input表单中将required特性设置为true
<input type="text" name="myText" required>
typeMismatch:验证是否符合某种类型,如表单中设置type="email",若表单中输入的值不为email类型,则为false
用法:指定表单控件的type属性值
<input type="email" name="myEmail">
patternMismatch:验证输入的值是否符合正则表达式,不符合返回false
用法:在表单控件上设置pattern特性,并赋予适当的匹配规则
<input type="text" name="IdCard" pattern="[0-9]{16}">
tooLong:验证表单字符maxLength最大长度
用法:在表单控件上设置maxLength特性
<input type="text" name="limit" maxLength="100">
tooShort:验证表单字符minLength最小长度
用法:在表单控件上设置minLength特性
<input type="text" name="limit" minLength="30">
rangeUnderflow:验证输入的最大值min
用法:为表单控件设置min特性,并赋予允许的最小值
<input type="range" name="age" min="18">
rangeOverflow:验证输入的最小值max
用法:为表单控件设置max特性,并赋予允许的最小值
<input type="range" name="age" min="35">
stepMismatch:输入的值不符合step特性所推算出的规则
用法:为表单控件设置step特性,指定数值的增量
<input type="range" name="Level" min="0" max="100" step="5">
用于填写数值的表单元素,可能需要同时设置min、max和step特性,这就限制了输入的值必须是最小值与step特性值的倍数之和。如范围从2到6,step特性值为2,因为合法值为该范围内的偶数,其他数值均无法通过验证。如果输入值不符合要求,则stepMismatch属性返回true,否则返回false。
badInput:用户提供了一个浏览器无法识别的input元素
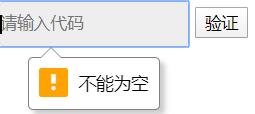
customError:自定义验证错误信息setCustomValidity()
自定义验证消息的典型用例是验证控件中的值是否一致。例如,密码和密码确认两个输人框的值不匹配。只要定制了验证消息,控件就会处于无效状态,并且customError返回true。要清除错误,只需在控件上调用setCustomValidity("")即可。
    <form action="">
        <input type="text" id="username" value="" required pattern="^\d{4}" placeholder="请输入代码" oninput="checkit(this)">
        <input type="submit" value="验证">
    </form>
    <script>
        function checkit(obj){
            console.log(obj.validity);
            var it=obj.validity;
            if(it.valueMissing===true){
                obj.setCustomValidity("不能为空");
            }else{
                if (it.patternMismatch===true) {
                    obj.setCustomValidity("必须是4个数字");
                } else {
                    obj.setCustomValidity("");
                }
            }
        }
    </script>
三、H5自带验证美化
1、表单中的选择器和伪类,可以让我们的表单验证显示更加美观
:required和 :optional ;必填项和选填项
:in-range和:out-of-range;在范围之内和不在范围之内
:valid和:invalid;符合表单验证和不符合表单验证
:read-only和:read-write;只读和可写
<style type="text/css">
    .container{
        max-width: 400px;margin: 20px auto;
    }
    input,select,textarea{width: 240px;margin:10px 0;border:1px solid #999;padding: .5em 1em;}
    label{color: #999;margin-left: 10px;}
    /*选填和必填的样式设置不同的*/
    input:required,textarea:required{  /*必填的样式*/
        border-right: 3px solid red;
    }
    input:optional,select:optional{  /*选填的样式*/
        border-right: 3px solid orange;
    }
    input:required + label::after{
        content: "(必填)"
    }
    input:optional + label::after{
        content: "(选填)"
    }
    input:focus,select:focus,textarea:focus{outline:0;}
    input:required:focus,textarea:required:focus{
        box-shadow: 0 0 3px 1px red;
    }
    input:optional:focus,textarea:optional:focus{
        box-shadow: 0 0 3px 1px orange;
    }
    input[type="submit"]{
        background-color: orange;
        padding: 2px 0;
        color: #fff;
    }
    input[type="submit"]:hover{
        background-color: orange;
    }
</style>
</head>
<body>
<div class="container">
    <form action="#">
        <input type="text" required><label>名称</label>
        <input type="email" required><label>邮箱</label>
        <input type="tel"><label>手机</label>
        <input type="url"><label>网址</label>
        <select name="#">
            <option value="1">选项一</option>
            <option value="2">选项二</option>
            <option value="3">选项三</option>
            <option value="4">选项四</option>
        </select>
        <textarea name="#" cols="30" rows="10" placeholder="留言(必填)" required></textarea>
        <input type="submit" value="提交表单">
    </form>
</div>
</body>

去掉webkit内核中表单的默认样式,用-webkit-appearance:none
将search后面的input框的清空图标换成自己想要的样式;
input[type="search"]::-webkit-search-cancel-button{ //在手机端可能不太兼容
    -webkit-appearance: none;
    height: 15px;
    width:15px;
    background-color: red;
}
去除number类型的输入框中的上下点击箭头
input[type=number]::-webkit-outer-spin-button{ /*number类型的input标签的上下箭头去掉了*/
-webkit-appearance:none;
margin:0;
}
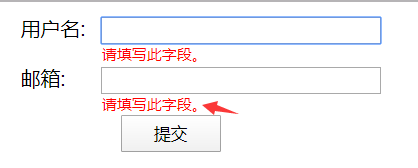
2、当我们输入的值不满足约束时,,浏览器会弹出错误提示,那么每个浏览器显示出的错误提示都不一样,此时我们需要统一他们的样式
实现原理是先阻止错误信息的默认冒泡,再创建新的气泡
<style>
    .container{
        margin:10px;
    }
    .oneline{
        height: 40px;
    }
    .oneline label{
        width: 60px;display: inline-block;
    }
    .oneline .sinput{
        width:220px;
    }
    input[type="submit"]{width: 80px;height: 30px;line-height:30px;margin-left:80px; }
    .error-message{color: red;font-size: 12px;text-indent: 65px;}
</style>
</head>
<body>
<div class="container">
    <form action="#" id="forms">
        <div class="oneline">
            <label for="name">用户名:</label>
            <input id="name" name="name" class="sinput" required="">
        </div>
        <div class="oneline">
            <label for="email">邮箱:</label>
            <input id="email" name="email" class="sinput" type="email" required>
        </div>
        <div class="oneline">
            <input type="submit" value="提交" id="thesubmit">
        </div>
    </form>
</div>
    <script>
        function replaceInvalidityUi(form){
            // 思路:1.先阻止它的冒泡,2.将错误信息删除,3.添加错误信息
            form.addEventListener("invalid",function(event){  //这里直接给form绑定事件,不需要给每隔input都去绑定
                event.preventDefault();
            },true);
            form.addEventListener("submit",function(event){
                if (!this.checkValidity()) {
                    event.preventDefault();
                }
            },true);

            // insertAdjacentHTML() 方法将指定的文本解析为 Element 元素,并将结果节点插入到DOM树中的指定位置。它不会重新解析它正在使用的元素,因此它不会破坏元素内的现有元素。这避免了额外的序列化步骤,使其比直接使用innerHTML操作更快。element.insertAdjacentHTML(position, text);
            // position
// 一个 DOMString,表示插入内容相对于元素的位置,并且必须是以下字符串之一:
// 'beforebegin':元素自身的前面。
// 'afterbegin':插入元素内部的第一个子节点之前。
// 'beforeend':插入元素内部的最后一个子节点之后。
// 'afterend':元素自身的后面。
// text
// 是要被解析为HTML或XML元素,并插入到DOM树中的 DOMString
            var submitBtn=document.getElementById("thesubmit");
            submitBtn.addEventListener("click",function(event){
                var inValidityField=form.querySelectorAll(":invalid"),
                errorMessage=form.querySelectorAll(".error-message"),
                parent;
//这里可以直接通过error-message类名来找到之前的错误的信息并将其删除,是因为原来的错误信息的类名也是error-message
                for (var i = 0; i < errorMessage.length; i++) {
                    errorMessage[i].parentNode.removeChild(errorMessage[i]);
                }
                for (var i = 0; i < inValidityField.length; i++) {
                    parent=inValidityField[i].parentNode;
                    parent.insertAdjacentHTML("beforeend","<div class='error-message'>"+inValidityField[i].validationMessage+"</div>");
                }
                if(inValidityField.length>0){
                    inValidityField[0].focus();
                }
            })
        }
        form=document.getElementById("forms");
        replaceInvalidityUi(form);
    </script>
</body>