-
开发步骤及开发工具

开发工具
pycharm #断点调试、热更新
xampp(mysql) #支持全平台
Navicat #可视化数据 -
pipenv安装
概念区别:创建虚拟环境的一个工具,虚拟环境和项目是绑定的安装pipenv:pip install pipenv #可以在任意目录
创建虚拟环境:pipenv install #必须在项目的目录下面
查看安装了哪些虚拟环境:pip list
进入项目的虚拟环境:pipenv shell
再次查看虚拟环境发现少了很多:pip list
退出虚拟环境:exit
安装flask
pipenv install flask #在虚拟环境下安装pipenv 使用基本命令
命令名 命令创建pipenv pipenv
启动pipenv pipenv shell(为存在虚拟环境可自动创建)
退出pipenv exit
查找所有安装包 piplist
环境内包的依赖展示 pipenv graph
查找虚拟环境的路径 pipenv --venv
卸载安装包 pipenv uninstall
-
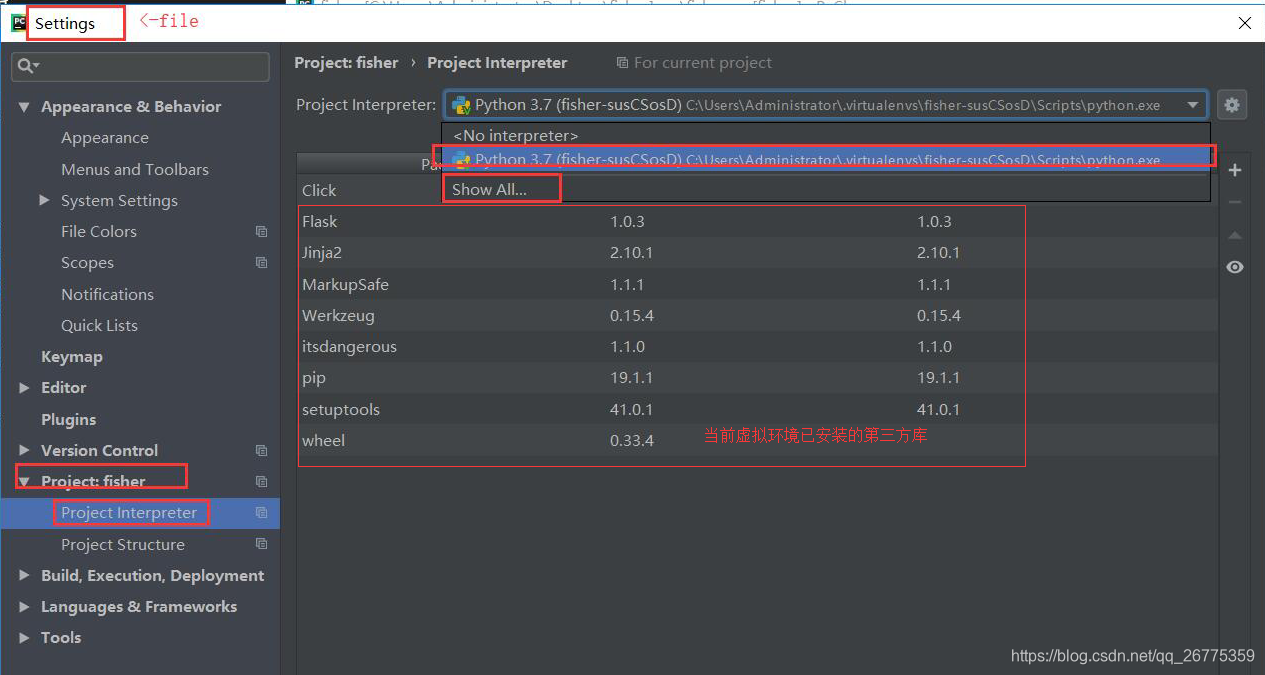
pycharm 虚拟环境默认解析器配置
file->setting->project:fisher->project interpreter
-
最简单的flask web运用原型
flisher.py
from flask import Flask

app = Flask(__name__)
app.config.from_object("config") #配置文件导入,      运用到模块的知识

#定义视图函数
@app.route("/hello/") #尾部加/重定向
def hello():
    return "hello world"

app.add_url_rule("/hello1",view_func=hello)   #另外一种的路由方式:基于类的视图(即插视图)

print(app.config["DEBUG"])
if __name__ == "__main__": #防止在生产环境中(nginx+uwsgi),服务被启用两次
    app.run(debug = app.config["DEBUG"])    #app config就是dist一个子类,所以可以用字典的方式读取
#app.run(host="0.0.0.0",debug=True,port=81)   #外网访问配置
DEBUG = True #规定配置文件的参数都必须大写,配置此项启用热更新
-
Response对象
内容:
#status code 200 400
#content-type http headers 默认text/html使用demo:
from flask import Flask,make_response headers={ "content-type":"text/plain" #显示普通文本 application/json web返回数据本质,指定了浏览器的解释返回内容 "location":"www.baidu.com" } #response = make_response("<html></html>",404) #response.headers = headers; cookie #return response return "<html></html>",404,headers #这种方式更通用 本质是元祖 -
写代码的3个原则
1 -> 很大概率出现假的判断放在前面 #少执行代码
2 -> 耗时的资源放在后面 #数据库的查询
3 -> 主干函数尽量简单,细节随意 #方便阅读,不强制看代码细节 -
python requests 发送http请求
安装requests
pipenv shell : pipenv install requests
使用demoimport requests class HTTP: def get(self,url,return_json = True): r = requests.get(url) if r.status_code == 200: #http状态码判断 return {} if return_json else "" #代码简化 return r.json() if return_json else r.text -
代码简化方法
1 -> 三元表达式(代替if else)
2 -> if +return
3 -> 复杂代码提取成函数 -
flask的json处理
1 -> flask做法:return jsonify(result)
2 -> 常规做法: return json.dumps(result),200,{“content-type”:“application/json”} -
flask项目目录结构规划
fisher.py #入口文件,初始化flask的核心对象、启动项目服务器
app
web #存放视图函数 -
python3打印对象的内存地址
print(id(app))
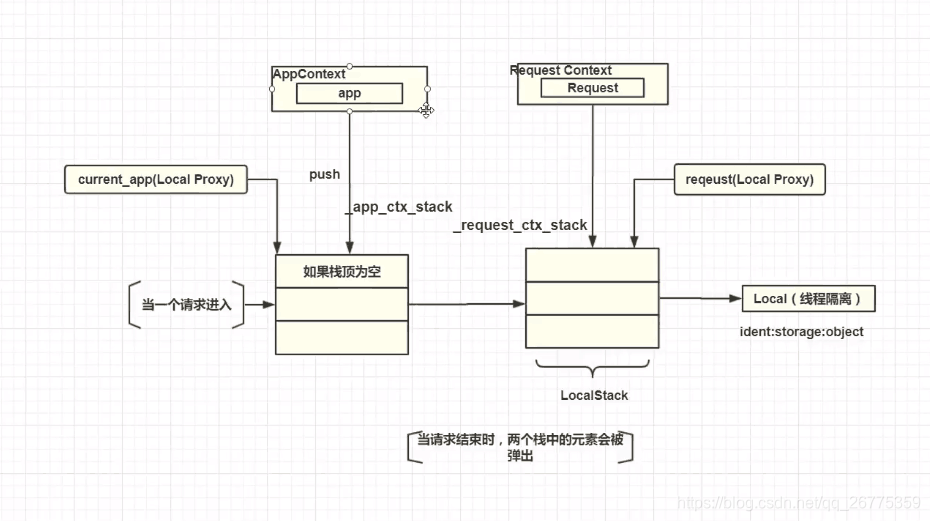
- flask的上下文
运用的上下文 flask -->Flask AppContext核心对象
请求上下文 request -->Reques AppContext核心对象
上下文流程图:
- python with使用
#实现了上下文协议的对象使用with     #with 上下文表达式:
      ->上下文表达式必须返回上下文管理器
   	#上下文管理器
   	#__enter__ __exit__


   例:数据库连接
   	1.连接数据库
   	2.sql
   	3.释放资源

   	例:文件读写
   	try:
   	    f = open(r'D:\t.txt')
   		print(f.read())
   	finally:
   	    f.close()


   	with open('') as f:
   	     f.read()


    例:类
   	class MyResource
   	    def __enter__(self):#执行顺序1
   		    print("connect to resource")
   			return self

   		def __exit__(self,exc_type,exc_value,tb):#执行顺序2
   		    if tb :
   			    print("process exception")
   			else:
   			    print("no exception")
   		    print("close connect to resource")

   			#return Turn  会触发except方法

   		def query(self):#执行顺序2
   		    print("query")
   	try:
   	    with MyResource() as resource:
   		    #1/0   会触发__exit__方法
   		    resource.query()
   	except Exception as ex:
   	    pass
