vue-router中文文档
在单页面应用中,路由的配置是我们必不可少的。
vue-router基本使用步骤
- 1、定义路由组件,一般放到单独的文件里(views/pages)
- 2、配置路由
router文件夹里的index.js 的代码示例
import Vue from 'vue'
//	创建路由器
import VueRouter from 'vue-router'
//	引入路由组件
import About from '../views/About.vue'
import Home from '../views/Home.vue'
Vue.use(VueRouter)
export default new VueRouter({
	// 配置n 个路由
	routes: [
		{path: '/about',component:About},
		{path: '/home',component:Home}
	]
})
- 3、在入口main.js注册路由器
// 自动引入router文件夹里的index.js文件
import router from './ router'
new Vue({  // 配置对象的属性名是一些确定的名称,不能随便修改
	el: '#app',
	components: {App},
	template: '<App/>',
	//	配置路由器,这里router:router可以简写(es6:对象中键值对同名可简写)
	router
})
- 4、在主页面App里面应用路由组件
// 左边是导航
<div class="left">
		<!--路由链接-->
		<!--	router-link 就相当于a标签,to相当于 a标签里面的href属性-->
    	<router-link to="/about" >About</router-link>
        <router-link to="/home" >Home</router-link>
</div>
// 右边是显示对应的内容
<div class="right">
		<!--用于渲染当前路由组件-->
		<!--当点击About显示对应About组件的内容-->
		<!-- 当点击Home显示对应Home组件的内容-->
    	<router-view></router-view>
</div>
默认显示指定路由组件
routes: [
		{path: '/about',component:About},
		{path: '/home',component:Home},
		// '/'代表根路径,
		{path:'/',redirect:'/home'}
	]
设置选中的路由链接的样式
在当前路由链接被选中时,会被默认添加一个router-link-active的名;
可以在主页面的style给这个类名添加指定样式;
嵌套路由
一个路由页面里面有其他的子路由页面;
在当前路由的增加children:[]来配置里面的子路由
export default new VueRouter({
    //   配置n个路由
    routes: [
        {
            path:'/about',
            component: About
        },
        {
            path:'/home',
            component: Home,
            children: [
                {  // 这里的路径要完整
                    path:'/home/news',
                    component:News
                }
                {
                	// 其他子路由依此类推
                }
                {  //	同样可以设置默认显示路由页面
					path:'/home',  // path:'' 也可表示当前路径
					redirect:''/home/news''
				}
            ]
        }
    ]
})
缓存路由
默认情况下, 被切换的路由组件对象会死亡释放, 再次回来时是重新创建的;
如果可以缓存路由组件对象, 可以提高用户体验;
<keep-alive>
	<router-view></router-view>
</keep-alive
向路由组件传递数据
$route :指的是当前显示的路由对象;
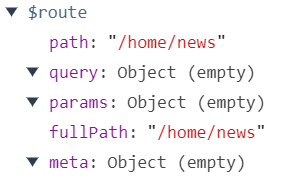
我们可以通过params和query来传参;
举例:home组件下的message组件给它的子路由组件messageDetail传参
1、利用params来传参
/*********路由配置routers:[]中的messageDetail的路径需要占位***************/
	{
	   	   path: 'message',
	       component: Message,
	       children: [
	         {
	           path: '/home/message/detail/:id',
	           component: MessageDetalil
	         }
	       ]
      }
/*********在message组件中通过router-link标签传值***************/
	<ul>
      <li v-for="m in messages" :key="m.id">
      	//	把需要传递的参数拼接的占位的位置
      	//	这样每个对应的路由对象$router.params都会有对应传过来的值。
        <router-link :to="`/home/message/detail/${m.id}`">{{m.title}}</router-link>
        <button @click="pushShow(m.id)">push查看</button>
        <button @click="replaceShow(m.id)">replace查看</button>
      </li>
   	</ul>
2、利用query来传参
/*********路由配置routers:[]中的messageDetail的路径不需要占位***************/
	{
	   	   path: 'message',
	       component: Message,
	       children: [
	         {
	           path: '/home/message/detail/',
	           component: MessageDetalil
	         }
	       ]
      }
/*********在message组件中通过router-link标签传值***************/
	<ul>
      <li v-for="m in messages" :key="m.id">
      	//	在‘?’后面用一个变量来接收传过来的值,
      	//	这样每个对应的路由对象$router.query都会有对应传过来的值。
        <router-link :to="`/home/message/detail/?id=${m.id}`">{{m.title}}</router-link>
        <button @click="pushShow(m.id)">push查看</button>
        <button @click="replaceShow(m.id)">replace查看</button>
      </li>
   	</ul>
编程式路由导航
$router:路由器对象,里面有相关的方法;
- this.$router.push(path): 相当于点击路由链接(可以返回到当前路由界面)
- this.$router.replace(path): 用新路由替换当前路由(不可以返回到当前路由界面)
- this.$router.back(): 请求(返回)上一个记录路由
- this.$router.go(-1): 请求(返回)上一个记录路由
- this.$router.go(1): 请求下一个记录路由
路由懒加载
为了提高性能,我们通常会把一级导航路由做路由懒加载。
原理:
- 在引入路由组件时用一个同名函数进行封装
- 当页面引用当前路由组件时,会调用这个函数,才会加载这个路由组件
代码示例:
const Message = () => import('../pages/Message')
const MessageDetalil = () => import('../pages/MessageDetail')
export default new VueRouter({
  routes: [
    {
      path: '/home',
      component: Home,
      children: [
         {
          path: 'message',
          //	此时component 映射的是引入Message的函数
          //	当请求对应的路由路径时,执行当前函数,引入当前路由组件
          component: Message,
          children: [
            {
              path: '/home/message/detail/',
              component: MessageDetalil
            }
       	  ]
         }
      ]
    },
    {
      path: '/',
      redirect: '/about'
    }
  ]
})
