-
Spring框架概述图
这张图展示了,搭建项目时所需要的模块(对应的jar包),例如:使用spring框架连接数据库,则需要用到Core, Aop, Dao模块的jar包。

-
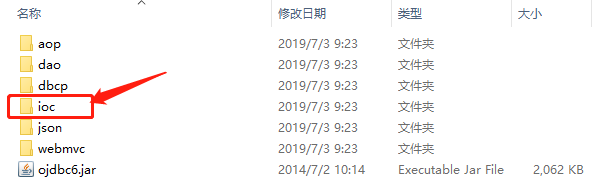
解压之后获得

本章主要介绍SpringIoC,所以只使用其中的ioc文件夹下的jar包和applicationContext.xml文件

-
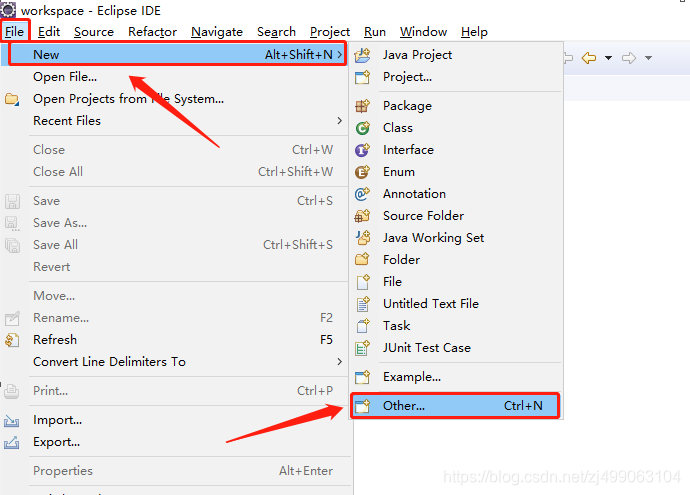
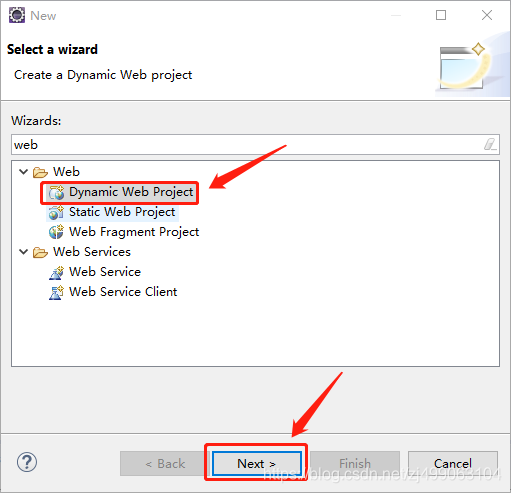
创建web project
打开eclipse,选择File >>> New >>> Dynamic Web Project
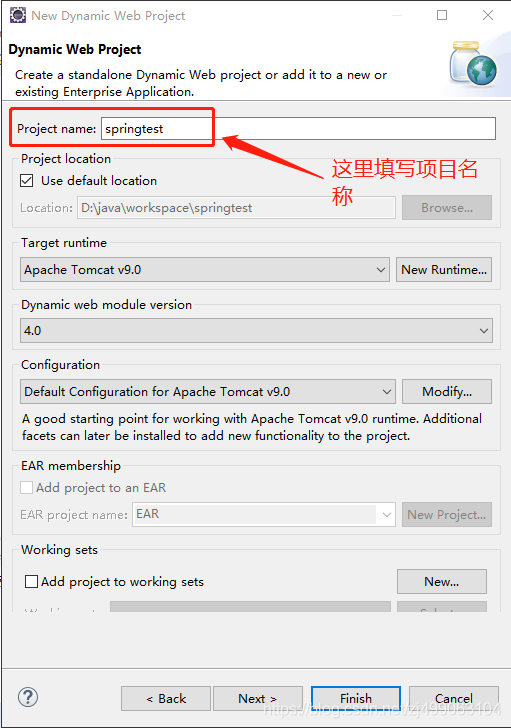
填写完项目名称之后,直接点击Finish,项目就创建完成了。
创建之后的目录结构如下:

-
打开下载的jar包,将ioc文件夹下的jar包复制到lib目录下,将applicationContext.xml文件复制到src目录下
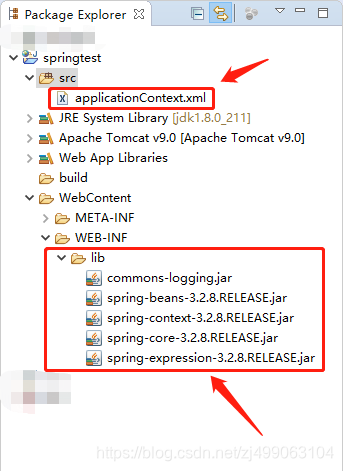
到此,环境已经准备完成。 -
使用SpringIoC创建对象的三种方法
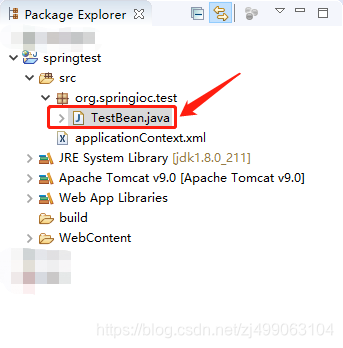
src目录下创建一个class文件,用于接下来的测试
第一种方法:采用new构造器创建对象
不使用框架
package org.springioc.test;

import java.util.Calendar;
import java.util.GregorianCalendar;

public class TestBean {

	public static void main(String[] args) {
		Calendar c1 = new GregorianCalendar();
		System.out.println("c1="+c1);

	}

}
使用框架
首先在applicationContext.xml中配置
<?xml version="1.0" encoding="UTF-8"?>
<beans xmlns="http://www.springframework.org/schema/beans" xmlns:xsi="http://www.w3.org/2001/XMLSchema-instance"
	xmlns:context="http://www.springframework.org/schema/context" xmlns:util="http://www.springframework.org/schema/util"
	xmlns:jee="http://www.springframework.org/schema/jee" xmlns:tx="http://www.springframework.org/schema/tx"
	xmlns:jpa="http://www.springframework.org/schema/data/jpa" xmlns:mvc="http://www.springframework.org/schema/mvc"
	xsi:schemaLocation="
		http://www.springframework.org/schema/beans http://www.springframework.org/schema/beans/spring-beans-3.2.xsd
		http://www.springframework.org/schema/context http://www.springframework.org/schema/context/spring-context-3.2.xsd
		http://www.springframework.org/schema/util http://www.springframework.org/schema/util/spring-util-3.2.xsd
		http://www.springframework.org/schema/jee http://www.springframework.org/schema/jee/spring-jee-3.2.xsd
		http://www.springframework.org/schema/tx http://www.springframework.org/schema/tx/spring-tx-3.2.xsd
		http://www.springframework.org/schema/data/jpa http://www.springframework.org/schema/data/jpa/spring-jpa-1.3.xsd
		http://www.springframework.org/schema/mvc http://www.springframework.org/schema/mvc/spring-mvc-3.2.xsd">

<!-- 使用new构造器方法创建对象 -->
<bean id="c2" class="java.util.GregorianCalendar"></bean>

</beans>
然后在测试类TestBean中通过框架创建对象
package org.springioc.test;

import java.util.Calendar;
import java.util.GregorianCalendar;

import org.springframework.context.ApplicationContext;
import org.springframework.context.support.ClassPathXmlApplicationContext;

public class TestBean {

	public static void main(String[] args) {
		Calendar c1 = new GregorianCalendar();
		System.out.println("c1="+c1);

		String conf = "applicationContext.xml";//配置文件的文件名
		//实例化容器
		ApplicationContext ac = new ClassPathXmlApplicationContext(conf);
		//创建对象,
		//ac.getBean("c2", Calendar.class)
		//c2为配置文件applicationContext.xml中的id
		//Calendar.class为获取对象的类型
		Calendar c2222 = ac.getBean("c2", Calendar.class);
		System.out.println("c2222="+c2222);

	}

}
第二种方法:采用静态工厂方法创建对象
不使用框架
测试类TestBean中
Calendar c3 = Calendar.getInstance();
使用框架
首先在applicationContext.xml中增加配置
<!-- 使用静态工厂方法创建对象 -->
<bean id="c3" class="java.util.Calendar" factory-method="getInstance"></bean>
测试类TestBean中
Calendar c3333 = ac.getBean("c3", Calendar.class);
System.out.println("c3333="+c3333);
第三中方法:采用对象工厂方法创建对象
不使用框架
测试类TestBean中
Date date = c3.getTime();
System.out.println("date="+date);
使用框架
首先在applicationContext.xml中增加配置,c3为第二种方法种配置的id
<!-- 采用对象工厂方法创建对象 -->
<bean id="date" factory-bean="c3" factory-method="getTime"></bean>
测试类TestBean中
Date date3333 = ac.getBean("date", Date.class);
System.out.println("date3333="+date3333);
- 创建对象时单例,非单例控制
使用以上方式创建对象,默认是单例(singleton),但是可以通过scope属性 更改,它的值有singleton(单例)和prototype(非单例)。
下面举例说明:
在src目录下新建目录org.spingioc.bean,在此目录下新建类ExampleBean
package org.springioc.bean;

public class ExampleBean {

	public void execute() {
		System.out.println("调用execute方法");
	}

}
使用框架,创建对象
首先配置applicationContext.xml
<bean id="e1" class="org.springioc.bean.ExampleBean"></bean>
编写测试类ExampleTest
package org.springioc.test;

import org.springframework.context.ApplicationContext;
import org.springframework.context.support.ClassPathXmlApplicationContext;
import org.springioc.bean.ExampleBean;

public class ExampleTest {

	public static void main(String[] args) {
		String conf ="applicationContext.xml";
		ApplicationContext ac = new ClassPathXmlApplicationContext(conf);
		ExampleBean e1 = ac.getBean("e1", ExampleBean.class);
		ExampleBean e2 = ac.getBean("e1", ExampleBean.class);
		System.out.println(e1==e2);
	}

}
结果为true,代表为singleton模式。
将applicationContext.xml增加scope属性,将它改为非单例模式
<bean scope="prototype" id="e1" class="org.springioc.bean.ExampleBean"></bean>
再次运行测试类ExampleTest,结果为false,代表为非单例模式。
- 创建对象时初始化动作
不使用框架,可以使用构造器和构造代码块实现对象的初始化
package org.springioc.bean;

public class ExampleBean {

	{
		System.out.println("构造代码块!");
	}

	public ExampleBean() {
		System.out.println("无参构造函数!");
	}

	public void execute() {
		System.out.println("调用execute方法");
	}

}
运行测试类ExampleTest,控制台显示

使用框架
首先在ExampleBean类中增加初始化函数init
	public void init() {
		System.out.println("初始化方法!");
	}
将init函数配置在applicationContext.xml中
<bean init-method="init" scope="prototype" id="e1" class="org.springioc.bean.ExampleBean"></bean>
运行测试类ExampleTest,控制台显示
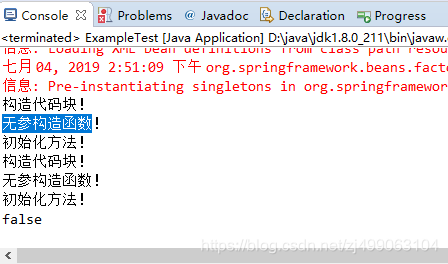
以上这两种方法初始化对象的区别,使用构造代码块和构造器初始化对象,是在对象创建的过程中初始化对象,使用init-method初始化对象,是在对象创建完成再对对象做初始化动作。
- 对象的销毁
在applicationContext.xml中配置destroy-method实现对象的销毁。使用bean中的这个属性,需要两个条件支持
第一个:必须实现AbstractApplicationContext容器,并且运行它的close方法
package org.springioc.test;

import org.springframework.context.support.AbstractApplicationContext;
import org.springframework.context.support.ClassPathXmlApplicationContext;

public class ExampleTest {

	public static void main(String[] args) {
		String conf ="applicationContext.xml";
		AbstractApplicationContext ac = new ClassPathXmlApplicationContext(conf);
		ac.close();
	}
}
第二个:对象必须是单例模式(singleton)
<bean destroy-method="destroy" init-method="init" scope="singleton" id="e1" class="org.springioc.bean.ExampleBean"></bean>
另外在ExampelBean中增加destroy方法
public void destroy() {
		System.out.println("销毁对象!");
	}
运行ExampleTest类,

- 控制单例对象的创建时机
若需在实例化容器的时候创建对象,需要在applicationContext.xml配置三个属性
第一个:abstract=“false”,不配置默认为false
第二个:scope=“singleton” ,不配默认为singleton
第三个:lazy-init="false"
<bean abstract="false" lazy-init="false" destroy-method="destroy" init-method="init" scope="singleton" id="e1" class="org.springioc.bean.ExampleBean"></bean>
否则在调用容器的getBean函数的时候创建对象
<bean abstract="false" lazy-init="true" destroy-method="destroy" init-method="init" scope="singleton" id="e1" class="org.springioc.bean.ExampleBean"></bean>
-
在applicationContext.xml中bean元素中配置的init-method, destroy-method, lazy-init是针对单个对象的;也可以在beans元素中配置default-init-method, default-destroy-method, default-lazy-init,这样对配置文件中的每一个对象都能生效。(了解)
-
SpringIoC依赖注入(控制反转或反向控制)
控制反转:改变了获取对象的方式,不使用框架的情况下,使用new创建对象;ioc中,由容器创建对象,对象的参数,以及对象之间的关系,只需要修改配置即可改变。
下面介绍两种方式:
第一种,构造器注入,这种方法需要创建有参的构造器
首先创建一个Phone类
package org.springioc.bean;

public class Phone {
	private String brand;
	private String price;

	public Phone(String brand, String price) {
		this.brand=brand;
		this.price=price;
	}

	public void show() {
		System.out.println("--手机--brand:"+brand+" price:"+price);
	}

	public void setBrand(String brand) {
		this.brand = brand;
	}

	public void setPrice(String price) {
		this.price = price;
	}

}
配置applicationContext.xml文件
<bean id="p1" class="org.springioc.bean.Phone">
	<!-- 构造器注入,index参数序号从零开始计数,value想要赋给对象属性的值 -->
	<constructor-arg index="0" value="苹果"></constructor-arg>
	<constructor-arg index="1" value="12000"></constructor-arg>
</bean>
编写测试类PhoneTest
package org.springioc.test;

import org.springframework.context.ApplicationContext;
import org.springframework.context.support.ClassPathXmlApplicationContext;
import org.springioc.bean.Phone;

public class PhoneTest {

	public static void main(String[] args) {
		ApplicationContext ac = new ClassPathXmlApplicationContext("applicationContext.xml");
		Phone p = ac.getBean("p1", Phone.class);
		p.show();
	}

}
第二种:set注入
创建Computer类
package org.springioc.bean;

public class Computer {
	private String brand;
	private String price;

	public void show() {
		System.out.println("--电脑--brand:"+brand+" price:"+price);
	}

	public void setBrand(String brand) {
		this.brand = brand;
	}

	public void setPrice(String price) {
		this.price = price;
	}

}
配置applicationContext.xml文件
<bean id="pc" class="org.springioc.bean.Computer">
	<!-- set注入,name对象属性,value属性值 -->
	<property name="brand" value="联想"></property>
	<property name="price" value="8000"></property>
</bean>
编写测试类PhoneTest
package org.springioc.test;

import org.springframework.context.ApplicationContext;
import org.springframework.context.support.ClassPathXmlApplicationContext;
import org.springioc.bean.Phone;

public class PhoneTest {

	public static void main(String[] args) {
		ApplicationContext ac = new ClassPathXmlApplicationContext("applicationContext.xml");
		Phone p = ac.getBean("p1", Phone.class);
		p.show();
	}

}
另一种情况如果属性值为一个对象,该如何用注入的方式
创建Student类
package org.springioc.bean;

public class Student {
	private Phone phone;
	private Computer pc;

	public void show() {
		phone.show();
		pc.show();
	}

	public void setPhone(Phone phone) {
		this.phone = phone;
	}

	public void setPc(Computer pc) {
		this.pc = pc;
	}

}
配置applicationContext.xml文件,使用ref引用原有的对象
<bean id="st" class="org.springioc.bean.Student">
	<property name="phone" ref="p1"></property>
	<property name="pc" ref="pc"></property>
</bean>
编写测试类StudentTest
package org.springioc.test;

import org.springframework.context.ApplicationContext;
import org.springframework.context.support.ClassPathXmlApplicationContext;
import org.springioc.bean.Student;

public class StudentTest {

	public static void main(String[] args) {
		ApplicationContext ac = new ClassPathXmlApplicationContext("applicationContext.xml");
		Student st = ac.getBean("st", Student.class);
		st.show();
	}

}
- 自动注入(autowrite),了解就可!
Spring IoC容器可以自动装配(autowire)相互协作bean之间的关联关系。因此,如果可能的话,可以自动让Spring通过检查BeanFactory中的内容,来替我们指定bean的协作者(其他被依赖的bean)。autowire一共有五种类型(“no”, “byName”, “byType”, “constructor”, “autodetect”)。由于autowire可以针对单个bean进行设置,因此可以让有些bean使用autowire,有些bean不采用。autowire的方便之处在减少或者消除属性或构造器参数的设置,这样可以给我们的配置文件减减肥!
下面以"byType"举例:
配置applicationContext.xml文件
<bean id="st1" class="org.springioc.bean.Student" autowire="byType"></bean>
修改测试类StudentTest
package org.springioc.test;

import org.springframework.context.ApplicationContext;
import org.springframework.context.support.ClassPathXmlApplicationContext;
import org.springioc.bean.Student;

public class StudentTest {

	public static void main(String[] args) {
		ApplicationContext ac = new ClassPathXmlApplicationContext("applicationContext.xml");
		Student st = ac.getBean("st1", Student.class);
		st.show();
	}
}
- 各种类型的信息注入配置
创建类MessageBean
package org.springioc.bean;

import java.sql.Date;
import java.util.List;
import java.util.Map;
import java.util.Properties;
import java.util.Set;
import java.util.Map.Entry;

public class MessageBean {
	private String name;
	private int age;
	private Date birth;
	private List<String> friends;
	private Set<String> cities;
	private Map<String,String> books;
	private Properties db;

	public void show() {
		String lstFriends="";
		for(int i=0;i<friends.size();i++) {
			lstFriends +=friends.get(i)+",";
		}
		System.out.println("name:"+name+", age:"+age+", birth:"+birth+", friends:"+lstFriends);

		for(String s : cities) {
			System.out.println(s);
		}

		Set<Entry<String,String>> booksSet = books.entrySet();
		for(Entry<String,String> e :booksSet) {
			System.out.println("key:"+e.getKey()+", value:"+e.getValue());
		}

		Set<Object> dbSet = db.keySet();
		for(Object key : dbSet) {
			System.out.println("key:"+key+", value:"+db.getProperty(key.toString()));
		}
	}

	public void setName(String name) {
		this.name = name;
	}

	public void setAge(int age) {
		this.age = age;
	}

	public void setBirth(String birth) {
		Date date =Date.valueOf(birth);
		this.birth = date;
	}

	public void setFriends(List<String> friends) {
		this.friends = friends;
	}

	public void setCities(Set<String> cities) {
		this.cities = cities;
	}

	public void setBooks(Map<String, String> books) {
		this.books = books;
	}

	public void setDb(Properties db) {
		this.db = db;
	}

}
第一,基础类型,和String类型
	<!-- 给name赋值null -->
	<property name="name">
		<null/>
	</property>
	<property name="age" value="18"></property>
	<!-- birth为Date类型,set方法需要重写 -->
	<property name="birth" value="2019-01-01"></property>
第二,List类型
	<property name="friends">
		<list>
			<value>朋友1</value>
			<value>朋友2</value>
		</list>
	</property>
第三,Set类型
	<property name="cities">
		<set>
			<value>城市1</value>
			<value>城市2</value>
		</set>
	</property>
第四,Map类型
	<property name="books">
		<map>
			<entry key="001" value="书1"></entry>
			<entry key="002" value="书2"></entry>
		</map>
	</property>
第五,Properties类型
	<property name="db">
		<props>
			<prop key="username">root</prop>
			<prop key="password">123456</prop>
		</props>
	</property>
编写测试类MessageTest
package org.springioc.test;

import org.springframework.context.ApplicationContext;
import org.springframework.context.support.ClassPathXmlApplicationContext;
import org.springioc.bean.MessageBean;

public class MessageTest {

	public static void main(String[] args) {
		ApplicationContext ac = new ClassPathXmlApplicationContext("applicationContext.xml");
		MessageBean msg = ac.getBean("msg", MessageBean.class);
		msg.show();
	}
}
第六,传递bean对象
<util:list id="fds">
	<value>朋友3</value>
	<value>朋友4</value>
</util:list>

<util:set id="cts">
	<value>城市3</value>
	<value>城市4</value>
</util:set>

<util:map id="boks">
	<entry key="003" value="书3"></entry>
	<entry key="004" value="书4"></entry>
</util:map>

<util:properties id="dbs">
	<prop key="user">root</prop>
	<prop key="password">123456</prop>
</util:properties>

<bean id="msg1" class="org.springioc.bean.MessageBean">
	<property name="friends" ref="fds"></property>
	<property name="cities" ref="cts"></property>
	<property name="books" ref="boks"></property>
	<property name="db" ref="dbs"></property>
</bean>
第七,Spring表达式注入
<bean id="msg1" class="org.springioc.bean.MessageBean">
	<property name="friends" ref="fds"></property>
	<property name="cities" ref="cts"></property>
	<property name="books" ref="boks"></property>
	<property name="db" ref="dbs"></property>
	<!-- 表达式注入 -->
	<property name="name" value="#{fds[0]}"></property>
	<property name="age" value="#{dbs.password}"></property>
</bean>
第八,读取properties文件
在src目录下创建db.properties文件,文件内容格式为key=value:
user=xiaohong
password=321123
配置applicationContext.xml文件,classpath代表src目录下
<util:properties id="dbParams" location="classpath:db.properties"/>
- 组件自动扫描
组件自动扫描,可以按指定的包路径,将包下所有组件扫描,如果发现类定义前有以下标记,会将组件扫描到Sping容器
@Component//其他组件
@Controller//控制层组件
@Service//业务层组件 xxxService
@Repository//数据访问层组件 xxxDao
@Named(需要引入第三方jar包,一般用不到!)
@Scope控制对象是否单例,默认单例
@PostConstruct指定init-method
@PreDestroy指定destroy-method
首先配置applicationContext.xml文件
<!-- 开启组件扫描 -->
<context:component-scan base-package="org.springioc.bean"/>
编写bean类Book.java
package org.springioc.bean;

import org.springframework.stereotype.Component;

@Component//默认id为类名首字母小写;也可以设置固定的id,@Component("id")
public class Book {
	private String name;
	private int	num;

	public void execute() {
		System.out.println("book的execute方法!");
	}
	public void show() {
		System.out.println("name:"+name+", num:"+num);
	}
}
编写测试类,BookTest.java
package org.springioc.bean;

import javax.annotation.PostConstruct;
import javax.annotation.PreDestroy;

import org.springframework.context.annotation.Scope;
import org.springframework.stereotype.Component;

@Component//默认id为类名首字母小写;也可以设置固定的id,@Component("id")
@Scope("prototype")//设置单例或非单例,不设置默认为singleton
public class Book {
	private String name;
	private int	num;

	@PostConstruct//设置初始化方法
	public void init() {
		System.out.println("初始化方法!");
	}

	@PreDestroy//设置方法销户方法
	public void destroy() {
		System.out.println("销毁方法!");
	}

	public void execute() {
		System.out.println("book的execute方法!");
	}
}
- 注入注解
@Resource:可以在变量定义前
或setXX方法前应用
@Autowired:可以在变量定义前
或setXX方法前应用
一般使用时,功能等价,都可以实现注入。
如果不存在多个匹配类型,使用@Resource
或@Autowired都可以。
如果存在多个匹配类型,建议按名称注入
@Resource(name=“指定名称”)或
@Autowired
@Qualifier(“p”)
如果指定名称注入,不会再按类型匹配注入。
新建一个web工程
配置applicationContext.xml
<!-- 开启组件扫描 -->
<context:component-scan base-package="cn.springioc"/>
编写Phone.java,Computer.java,Student.java
package cn.springioc.bean;

import org.springframework.stereotype.Component;

@Component
public class Phone {
	public void show(){
		System.out.println("显示手机配置信息");
	}
}
package cn.springioc.bean;

import org.springframework.stereotype.Component;

@Component
public class Computer {

	public void show(){
		System.out.println("显示计算机配置信息");
	}
}
package cn.springioc.bean;

import javax.annotation.Resource;

import org.springframework.beans.factory.annotation.Autowired;
import org.springframework.stereotype.Component;

@Component("st")
public class Student {

	@Resource//首先根据名字phone去匹配,如果匹配不到就按照类型去匹配。这里根据phone匹配能够找到
	private Phone phone;

	public void setPhone(Phone phone) {
		this.phone = phone;
	}

	@Autowired//首先根据名字pc去匹配,如果匹配不到就按照类型去匹配。这里根据pc匹配找不到,就根据类型去匹配
	private Computer pc;

	public void setPc(Computer pc) {
		this.pc = pc;
	}

	public void show() {
		phone.show();
		pc.show();
	}

}
编写测试类StudentTest.java
package cn.springioc.test;

import org.springframework.context.ApplicationContext;
import org.springframework.context.support.ClassPathXmlApplicationContext;

import cn.springioc.bean.Student;

public class StudentTest {

	public static void main(String[] args) {
		ApplicationContext ac = new ClassPathXmlApplicationContext("applicationContext.xml");
		Student st = ac.getBean("st", Student.class);
		st.show();
	}

}
@Resouce(name=“id”),按照名字id去匹配,如果匹配不到不会按照类型去匹配,匹配不到就抛错
@Resource(name="pc1")//按照名字去匹配pc1,如果找不到就报错
	private Computer pc;
	public void setPc(Computer pc) {
		this.pc = pc;
	}
将Computer.java,的bean的id改为pc1,否则会抛错
@Component("pc1")
public class Computer {

	public void show(){
		System.out.println("显示计算机配置信息");
	}
}
@Autowired 和 @Qualifier(“id”)按照指定的id名字匹配
	@Autowired
	@Qualifier("pc1")
	private Computer pc;
	public void setPc(Computer pc) {
		this.pc = pc;
	}
或则
private Computer pc;
	@Autowired
	public void setPc(@Qualifier("pc1") Computer pc) {
		this.pc = pc;
	}
