//这是第一种上传图片的方法 只能上传单张图片
        <el-form-item label="风景">
          <el-upload
            class="upload-demo"
            action="http://localhost:9083/student/uploadPhoto"
            :headers="headers"
            list-type="picture"
          >
		<el-button size="small" type="primary">点击上传</el-button>
	</el-upload>
</el-form-item>

//这是第二种上传图片的方法  可以放在form表单中
 <el-form>
          <input class="file" type="file" title="请选择文件" value="请选择文件" />
 </el-form>


export default {
  data() {
    return {
       headers: {
          "Access-Control-Allow-Origin": "http://127.0.0.1:9083"
        },
       fileList: [{}],
       formcity:{}
   }, saveStudent() {
   //new一个formData对象因为图片的格式需要转换
      let formData = new FormData();
      formData.append(
        "photo",
        document.querySelector("input[type=file]").files[0]
      );
      //后台是用photo这个属性名接的

      for (var obj in this.formcity) {
        formData.append(obj, this.formcity[obj]);
      }
      //通过遍历form表单的对象来把form中的每个属性放到new的对象当中

      axios({
        url: "http://localhost:9083/student/save",
        data: formData,
        method: "post",
        headers: {
          "Content-Type": "multipart/form-mixed",
          "Access-Control-Allow-Origin": "http://127.0.0.1:9083"
        }
      })
        .then(res => {
          console.log(res.data);
        })
        .catch(e => {
          console.log(e);
        }); // 发送请求
    }

}
   //从配置文件中取出存储照片的磁盘
    @Value("${upload.rootDir}")
    private String uploadRootDir;

//这个方法是用来接收第一种方法上传图片的:具体如下
    @RequestMapping("/student/uploadPhoto")
    public Map<String, Object> uploadPhoto(@RequestParam(required = false, name = "file") MultipartFile file) 			     throws IOException {
       upload(file); //调用自己的工具类保存

        //返回类型无所谓
        return null;
    }

//这个类是用于第二种方法 添加整个对象时如添加学生
    @RequestMapping("/student/save")
    public Map<String, Object> save(Student student, City city, @RequestParam(required = false, name = "photo") MultipartFile photo) throws IOException {
        FileInfo fileInfo = upload(photo);//调用自己的工具类保存

        city.setCityScenery(fileInfo.getPath());
       //fileInfo.getPath()是在工具类中存好的照片路径
        int insertcity = cityApi.insertcity(city); //调用添加的方法存到数据库
        return Collections.singletonMap("error", false);

    }

    private FileInfo upload(MultipartFile photo) throws IOException {
        String originalFilename = photo.getOriginalFilename(); // te.st.gif 获取文件名
        String extension = getExtension(originalFilename); //去掉后缀名
        String fileName = UUID.randomUUID().toString() + extension; // UUID.gif
        String filePath = "/photo/" + new SimpleDateFormat("yyyyMMdd").format(new Date()) + "/" + fileName;
        long size = photo.getSize();
		//保存的格式为photo文件夹/日期文件夹/照片                这样方便查看

        //FileInfo是自己创建的类 下面有详细介绍
        FileInfo fileInfo = new FileInfo();
        fileInfo.setName(fileName);
        fileInfo.setOriginalName(originalFilename);
        fileInfo.setSize(size);
        fileInfo.setPath(filePath);

//        uploadRootDir是磁盘路径
        String absolutePath = uploadRootDir + filePath;

        File file = new File(absolutePath);
        file.getParentFile().mkdirs(); //创建文件夹

        photo.transferTo(file);  //保存文件
        System.out.println("存储的路径是" + fileInfo);
        return fileInfo;
    }

    //    这个方法是去掉后缀名
    private String getExtension(String originalFilename) {
        String extension = "";
        int index = originalFilename.lastIndexOf('.');
        if (index != -1) {
            extension = originalFilename.substring(index); // .gif
        }
        return extension;
    }
上面的FileInfo是自己创建的类
@Data
public class FileInfo {
    private Integer id;
    private String originalName;
    private String name;
    private Long size;
    private String path;
}
下面是配置文件
#这里用的是application.properties
upload.rootDir=E:\\upload
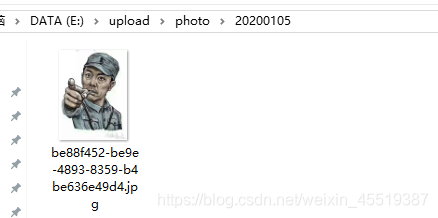
这就是保存的案例
数据库中存的路径是\photo\20200105\be88f452-be9e-4893-8359-b4be636e49d4.jpg

如何展示图片
  <el-table-column label="图片">
     <template slot-scope="scope">
       <img :src="'http://localhost:9083/showImg?pathName='+scope.row.cityScenery" />
     </template>
  </el-table-column>
//之前保存的路径存到了cityScenery
//展示的时候需要到后台io流处理一下所以写了一个请求的语句
//这个方法的路径就是 localhost:9083/showImg
//这里依然是读取配置文件中的磁盘路径
   @Value("${upload.rootDir}")
    private String uploadRootDir;

    @RequestMapping(value = "/showImg")
    @ResponseBody
    public void showImg(HttpServletRequest request, HttpServletResponse response, String pathName) {
    //IO流读取就是之前学过的知识这里不过太多解释
        File imgFile = new File(uploadRootDir+pathName);
        FileInputStream fin = null;
        OutputStream output = null;
        try {
            output = response.getOutputStream();
            fin = new FileInputStream(imgFile);
            byte[] arr = new byte[1024 * 10];
            int n;
            while ((n = fin.read(arr)) != -1) {
                output.write(arr, 0, n);
            }
            output.flush();
        } catch (IOException e) {
            e.printStackTrace();
        }
        try {
            output.close();
        } catch (IOException e) {
            e.printStackTrace();
        }
    }
下面是配置文件
#这里用的是application.properties
upload.rootDir=E:\\upload
以上就是上传图片的基本技术,有报错的可联系本人,共同进步.
代码千万行,注视第一行。格式不规范,报错两行泪!~
