1Pytorchのオブジェクト検出組み込みモデル
torchvisionライブラリの下のmodelsldetectonディレクトリで、__int__。pyファイルを見つけます。このファイルには、エクスポート可能なPyTorchに組み込まれているターゲット検出モデルが格納されています。
2MaskR-ターゲット検出を実現するCNN組み込みモデル
2.1コードロジックの簡単な説明
COCO2017データセットの事前トレーニング済みモデルmaskrcnm_resnet50_fpn_cocoをメモリにロードし、このモデルを使用して画像のオブジェクト検出を実行します。
2.2コードコンバット:ターゲット検出を達成するためのMaskR-CNN組み込みモデル
Maskrcnn_resent_Object Detection.py
from PIL import Image
import matplotlib.pyplot as plt
import torchvision.transforms as T
import torchvision
import numpy as np
import cv2
import random
import os
os.environ['KMP_DUPLICATE_LIB_OK'] = 'True'
# 加载模型
model = torchvision.models.detection.maskrcnn_resnet50_fpn(pretrained=True)
model.eval()
# 标签
COCO_INSTANCE_CATEGORY_NAMES = [
'__background__', 'person', 'bicycle', 'car', 'motorcycle', 'airplane', 'bus',
'train', 'truck', 'boat', 'traffic light', 'fire hydrant', 'N/A', 'stop sign',
'parking meter', 'bench', 'bird', 'cat', 'dog', 'horse', 'sheep', 'cow',
'elephant', 'bear', 'zebra', 'giraffe', 'N/A', 'backpack', 'umbrella', 'N/A', 'N/A',
'handbag', 'tie', 'suitcase', 'frisbee', 'skis', 'snowboard', 'sports ball',
'kite', 'baseball bat', 'baseball glove', 'skateboard', 'surfboard', 'tennis racket',
'bottle', 'N/A', 'wine glass', 'cup', 'fork', 'knife', 'spoon', 'bowl',
'banana', 'apple', 'sandwich', 'orange', 'broccoli', 'carrot', 'hot dog', 'pizza',
'donut', 'cake', 'chair', 'couch', 'potted plant', 'bed', 'N/A', 'dining table',
'N/A', 'N/A', 'toilet', 'N/A', 'tv', 'laptop', 'mouse', 'remote', 'keyboard', 'cell phone',
'microwave', 'oven', 'toaster', 'sink', 'refrigerator', 'N/A', 'book',
'clock', 'vase', 'scissors', 'teddy bear', 'hair drier', 'toothbrush']
def get_prediction(img_path, threshold): # 定义模型,并根据阈值过滤结果
img = Image.open(img_path).convert('RGB') # 需要转化:RuntimeError: The size of tensor a (4) must match the size of tensor b (3) at non-singleton
transform = T.Compose([T.ToTensor()])
img = transform(img)
# MaskR - CNN模型会返回一个字典对象,该字典对象中包含如下key值:
# boxes∶每个目标的边框信息。
# labels:每个目标的分类信息。
# scores:每个目标的分类分值。
# masks:每个目标的像素掩码(Mask)。
pred = model([img]) # 调用模型
print('pred')
print(pred)
pred_score = list(pred[0]['scores'].detach().numpy())
pred_t = [pred_score.index(x) for x in pred_score if x > threshold][-1]
print("masks>0.5")
print(pred[0]['masks'] > 0.5)
masks = (pred[0]['masks'] > 0.5).squeeze().detach().cpu().numpy()
print("this is masks")
print(masks)
pred_class = [COCO_INSTANCE_CATEGORY_NAMES[i] for i in list(pred[0]['labels'].numpy())]
pred_boxes = [[(i[0], i[1]), (i[2], i[3])] for i in list(pred[0]['boxes'].detach().numpy())]
masks = masks[:pred_t + 1]
pred_boxes = pred_boxes[:pred_t + 1]
pred_class = pred_class[:pred_t + 1]
return masks, pred_boxes, pred_class
def random_colour_masks(image):
colours = [[0, 255, 0], [0, 0, 255], [255, 0, 0], [0, 255, 255], [255, 255, 0], [255, 0, 255], [80, 70, 180],[250, 80, 190], [245, 145, 50], [70, 150, 250], [50, 190, 190]]
r = np.zeros_like(image).astype(np.uint8)
g = np.zeros_like(image).astype(np.uint8)
b = np.zeros_like(image).astype(np.uint8)
randcol = colours[random.randrange(0, 10)]
r[image == 1] = randcol[0]
g[image == 1] = randcol[1]
b[image == 1] = randcol[2]
coloured_mask = np.stack([r, g, b], axis=2)
print("randcol",randcol)
return coloured_mask, randcol
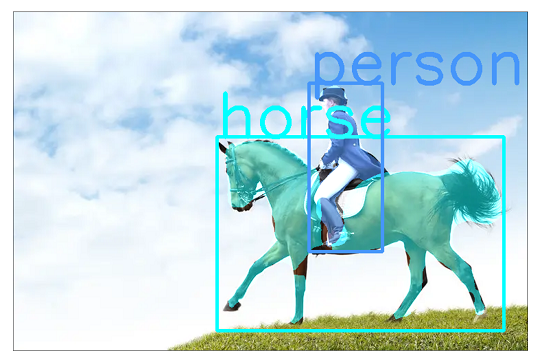
def instance_segmentation_api(img_path, threshold=0.5, rect_th=3, text_size=3, text_th=5): # 进行目标检测
masks, boxes, pred_cls = get_prediction(img_path, threshold) # 调用模型
print("已加载COCO标签类数:", len(COCO_INSTANCE_CATEGORY_NAMES))
img = cv2.imread(img_path)
img = cv2.cvtColor(img, cv2.COLOR_BGR2RGB)
for i in range(len(masks)):
rgb_mask, randcol = random_colour_masks(masks[i]) # 使用随机颜色为模型的掩码区进行填充。
img = cv2.addWeighted(img, 1, rgb_mask, 0.5, 0)
# 元组里面有小数,需要转化为整数 否则报错
T1,T2 = boxes[i][0],boxes[i][1]
x1 = int(T1[0])
y1 = int(T1[1])
x2 = int(T2[0])
y2 = int(T2[1])
cv2.rectangle(img, (x1,y1), (x2,y2), color=randcol, thickness=rect_th)
# # putText各参数依次是:图片,添加的文字,左上角坐标,字体,字体大小,颜色黑,字体粗细
cv2.putText(img, pred_cls[i], (x1,y1), cv2.FONT_HERSHEY_SIMPLEX, text_size, randcol, thickness=text_th)
plt.figure(figsize=(20, 30))
plt.imshow(img)
plt.xticks([])
plt.yticks([])
plt.show()
# 显示模型结果
instance_segmentation_api('./models_2/mask.jpg')