El artículo está basado en face_recognition + OpenCV (los grandes son realmente increíbles, adóralos)
Resuma la experiencia y los obstáculos encontrados.
referencia:
https://github.com/ageitgey/face_recognition/blob/master/README_Simplified_Chinese.md
https://github.com/ageitgey/face_recognition/blob/master/examples/facerec_from_webcam_faster.py
https://gist.github.com/ageitgey/629d75c1baac34dfa5ca2a1928a7aeaf
Reconocimiento facial
Vi un poderoso proyecto de código abierto en Git Hub: face_recognition, puedes consultar el contenido específico aquí:
https://github.com/ageitgey/face_recognition/blob/master/README_Simplified_Chinese.md
Configuración del entorno:
La recomendación oficial es
- Python 3.3+ o Python 2.7
- macOS o Linux
- Windows no cuenta con soporte oficial para nosotros, pero puede funcionar
1. Instalar reconocimiento facial
Antes de instalar face_recognition, necesita instalar dlib y las dependencias relacionadas de Python. Antes de instalar dlib, necesita instalar cmake (un poco confuso...)
instalación de cmake:
Primero vaya al sitio web oficial para descargar su versión correspondiente: Descargar | CMake
Después de descargarlo, instálelo, luego abra el software y busque Herramientas > Cómo instalar para uso con línea de comandos en la barra de herramientas.
El software te mostrará varios métodos de instalación, el que yo elegí es:
sudo "/Applications/CMake.app/Contents/bin/cmake-gui" --installIngrese este comando en la terminal y estará bien;
Instalación de dlib: (Referenciahttps://gist.github.com/ageitgey/629d75c1baac34dfa5ca2a1928a7aeaf)
git clone https://github.com/davisking/dlib.gitIngrese los siguientes códigos en secuencia
cd dlib
mkdir build
cd build
cmake ..
cmake --build .
Una vez completada la instalación, puede instalar face_recognition.
pip3 install face_recognition2. Verifique que la instalación sea exitosa
Aquí usamos un fragmento de código para probar, crear una nueva carpeta img y crear dos carpetas nuevas en img, llamadas know y desconocido respectivamente.
Luego vaya a recopilar algunos materiales faciales, aquí uso Taylor Swfit y Tim Cook, coloco los materiales recopilados en el archivo know y le doy el nombre correspondiente (para simplificar y facilitar la comprensión), los archivos debajo del archivo konw son para Telling. La máquina quién es es para que la máquina aprenda.

El archivo desconocido contiene algunas imágenes de prueba. La computadora no sabe quién es este archivo y necesita que la computadora lo juzgue.

Coloque el archivo en el directorio raíz e ingrese en la terminal:
face_recognition img/know img/unknow
generará algo similar a
img/unknow/anne.jpeg,unknown_person
img/unknow/TS.jpeg,taylorSwift
img/unknow/xlz.jpeg,unknown_person
img/unknow/TM.jpg,timCook
img/unknow/Zuckerberg.jpeg,unknown_person
unknow_person representa una persona no reconocida, es decir, una persona que no está en el archivo conocido.
Se reconoce al que tiene el nombre y es la persona correspondiente al expediente conocido.
Esto significa que nuestra instalación fue exitosa, a continuación realizaremos el reconocimiento facial en tiempo real.
3. Detección de rostros en tiempo real
Fuente del código: https://github.com/ageitgey/face_recognition/blob/master/examples/facerec_from_webcam_faster.py
Instale cv2, que es opencv
pip install opencv-pythonInstalar biblioteca numerosa
pip install numpyLuego crea un nuevo archivo: face_recog.py
Básicamente simplemente copia el código aquí.
import face_recognition
import cv2
import numpy as np

# This is a demo of running face recognition on live video from your webcam. It's a little more complicated than the
# other example, but it includes some basic performance tweaks to make things run a lot faster:
#   1. Process each video frame at 1/4 resolution (though still display it at full resolution)
#   2. Only detect faces in every other frame of video.

# PLEASE NOTE: This example requires OpenCV (the `cv2` library) to be installed only to read from your webcam.
# OpenCV is *not* required to use the face_recognition library. It's only required if you want to run this
# specific demo. If you have trouble installing it, try any of the other demos that don't require it instead.

# Get a reference to webcam #0 (the default one)
video_capture = cv2.VideoCapture(0)

# Load a sample picture and learn how to recognize it.
timCook_image = face_recognition.load_image_file("face_cv2/img/know/timCook.jpg")
timCook_face_encoding = face_recognition.face_encodings(timCook_image)[0]

# Load a second sample picture and learn how to recognize it.
taylor_image = face_recognition.load_image_file("face_cv2/img/know/taylorSwift.jpeg")
taylor_face_encoding = face_recognition.face_encodings(taylor_image)[0]

# Create arrays of known face encodings and their names
known_face_encodings = [
    timCook_face_encoding,
    taylor_face_encoding
]
known_face_names = [
    "TimCook",
    "TaylorSwift"
]

# Initialize some variables
face_locations = []
face_encodings = []
face_names = []
process_this_frame = True

while True:
    # Grab a single frame of video
    ret, frame = video_capture.read()

    # Resize frame of video to 1/4 size for faster face recognition processing
    small_frame = cv2.resize(frame, (0, 0), fx=0.25, fy=0.25)

    # Convert the image from BGR color (which OpenCV uses) to RGB color (which face_recognition uses)
    rgb_small_frame = small_frame[:, :, ::-1]

    # Only process every other frame of video to save time
    if process_this_frame:
        # Find all the faces and face encodings in the current frame of video
        face_locations = face_recognition.face_locations(rgb_small_frame)
        face_encodings = face_recognition.face_encodings(rgb_small_frame, face_locations)

        face_names = []
        for face_encoding in face_encodings:
            # See if the face is a match for the known face(s)
            matches = face_recognition.compare_faces(known_face_encodings, face_encoding)
            name = "Unknown"

            # # If a match was found in known_face_encodings, just use the first one.
            # if True in matches:
            #     first_match_index = matches.index(True)
            #     name = known_face_names[first_match_index]

            # Or instead, use the known face with the smallest distance to the new face
            face_distances = face_recognition.face_distance(known_face_encodings, face_encoding)
            best_match_index = np.argmin(face_distances)
            if matches[best_match_index]:
                name = known_face_names[best_match_index]

            face_names.append(name)

    process_this_frame = not process_this_frame


    # Display the results
    for (top, right, bottom, left), name in zip(face_locations, face_names):
        # Scale back up face locations since the frame we detected in was scaled to 1/4 size
        top *= 4
        right *= 4
        bottom *= 4
        left *= 4

        # Draw a box around the face
        cv2.rectangle(frame, (left, top), (right, bottom), (0, 0, 255), 2)

        # Draw a label with a name below the face
        cv2.rectangle(frame, (left, bottom - 35), (right, bottom), (0, 0, 255), cv2.FILLED)
        font = cv2.FONT_HERSHEY_DUPLEX
        cv2.putText(frame, name, (left + 6, bottom - 6), font, 1.0, (255, 255, 255), 1)

    # Display the resulting image
    cv2.imshow('Video', frame)

    # Hit 'q' on the keyboard to quit!
    if cv2.waitKey(1) & 0xFF == ord('q'):
        break

# Release handle to the webcam
video_capture.release()
cv2.destroyAllWindows()
Ejecute el comando en la terminal: (En la parte de llamar a la cámara, tengo un problema aquí. Cuando el programa se ejecuta en texto sublime3, se bloqueará, pero no hay problema en la ejecución de la terminal. Puede ser que hay un problema con mi configuración)
python3 face_recog.pySi el programa se inicia correctamente, puede utilizar su teléfono móvil para buscar algunas fotografías de Taylor o Tim y apuntarlas a la cámara para probarlas.
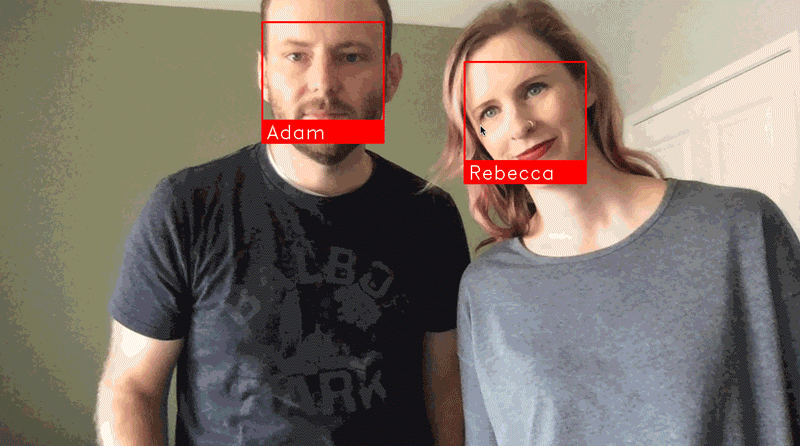
(Fuente de la imagen: https://github.com/ageitgey/face_recognition/blob/master/README_Simplified_Chinese.md )
O guarde directamente sus propias fotos en know y modifique esta parte del código:
video_capture = cv2.VideoCapture(0)

# 加载第一个样本照片
timCook_image = face_recognition.load_image_file("face_cv2/img/know/timCook.jpg")
timCook_face_encoding = face_recognition.face_encodings(timCook_image)[0]

# 加载第二个样本照片
taylor_image = face_recognition.load_image_file("face_cv2/img/know/taylorSwift.jpeg")
taylor_face_encoding = face_recognition.face_encodings(taylor_image)[0]

# 加载你自己的照片
your_image = face_recognition.load_image_file("face_cv2/img/know/your.jpg")
your_face_encoding = face_recognition.face_encodings(your_image)[0]

# Create arrays of known face encodings and their names
known_face_encodings = [
    timCook_face_encoding,
    taylor_face_encoding,
    your_face_encoding
]
known_face_names = [
    "TimCook",
    "TaylorSwift",
    "yourName"
]
Salga del programa y presione "q" para crear
Si no entiendes algo o cometiste algún error, puedes enviarme un mensaje privado o dejar un comentario para aprender y mejorar juntos.
Si hay alguna infracción en el artículo, comuníquese conmigo a tiempo para eliminar los cambios.