Chapter IX: SSH no secret login configuration
9.1SSH no secret login configuration
- Configuration ssh
(. 1) The basic syntax
ssh ip address of another computer
Host key verification failed solutions when ssh connection (2)
[zhangyong@hadoop104 opt] $ ssh 192.168.153.105
The authenticity of host '192.168.1.105 (192.168.1.105)' can't be established.
RSA key fingerprint is cf:1e:de:d7:d0:4c:2d:98:60:b4:fd:ae:b1:2d:ad:06.
Are you sure you want to continue connecting (yes/no)?
Host key verification failed.
(3) Solution as follows: Direct Input Yes
2. No key configuration
(1) Free density log principle;
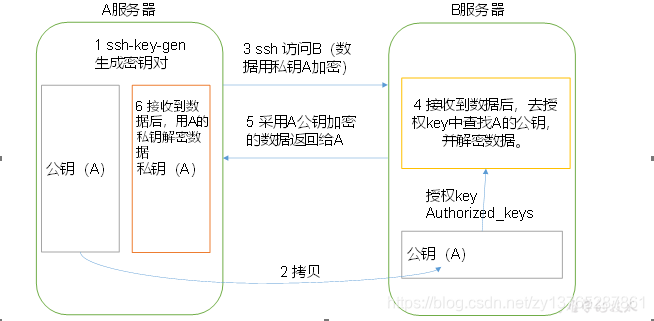
(2) to generate public and private keys:
[zhangyong@hadoop104 .ssh]$ ssh-keygen -t rsa
Then hit (three carriage return), it generates two files id_rsa (private key), id_rsa.pub (public key)
(3) copies of the public key to the target machine to avoid dense log
[zhangyong@hadoop104 .ssh]$ ssh-copy-id hadoop104
[zhangyong@hadoop104 .ssh]$ ssh-copy-id hadoop105
[zhangyong@hadoop104 .ssh]$ ssh-copy-id hadoop106
Note:
also need to be adopted on hadoop104 root account, configure it no secret log on to hadoop104, hadoop105, hadoop106;
also need zhangyong account configured on hadoop103 no secret about log on to hadoop104, hadoop105, on hadoop106 server.
3. .ssh folder (~ / .ssh) file interpretation function
| known_hosts | Ssh public records accessed the computer (public key) |
|---|---|
| id_rsa | Generated private key |
| id_rsa.pub | Generated public key |
| authorized_keys | Store authorization nice no secret login server's public key |
Cluster rallied 9.2
- Configuration slaves
/opt/module/hadoop-3.1.2/etc/hadoop/slaves
[zhangyong@hadoop102 hadoop]$ vi slaves
Add the following in the file:
hadoop104
hadoop105
hadoop106
Note: Do not allow the end of the contents of the file, add the spaces, empty lines are not allowed in the file.
Synchronize all node configuration file
[zhangyong@hadoop104 hadoop]$ xsync slaves
- Start the cluster
(1) If the cluster is the first time you start, you need to format NameNode (Note Before formatting, be sure to stop all namenode and datanode last start of the process, and then delete the data and log data)
[zhangyong@hadoop104 hadoop-3.1.2]$ bin/hdfs namenode -format
(2) Start HDFS
[zhangyong@hadoop104 hadoop-3.1.2]$ sbin/start-dfs.sh
[zhangyong@hadoop104 hadoop-3.1.2]$ jps
4166 NameNode
4482 Jps
4263 DataNode
[zhangyong@hadoop104 hadoop-3.1.2]$ jps
3218 DataNode
3288 Jps
[zhangyong@hadoop104 hadoop-3.1.2]$ jps
3221 DataNode
3283 SecondaryNameNode
3364 Jps
(3) Start YARN
[zhangyong@hadoop105 hadoop-3.1.2]$ sbin/start-yarn.sh
Note: NameNode and ResourceManger if not the same machine can not start YARN on NameNode, should start on the machine ResouceManager YARN located.
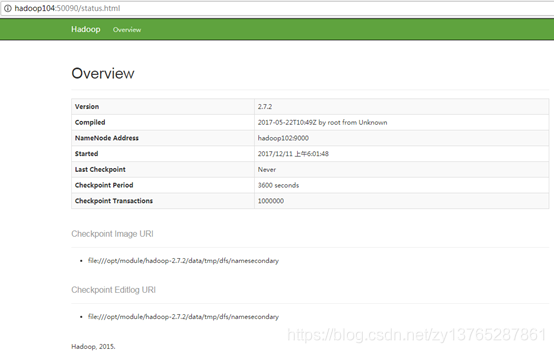
(4) Web end view SecondaryNameNode
(A) entered in the browser: HTTP: // hadoop106: 50090 / status.html
(b) view SecondaryNameNode information.
3. Cluster basic tests
(1) to upload files to the cluster
upload small files
[zhangyong@hadoop104 hadoop-3.1.2]$ hdfs dfs -mkdir -p /user/zhangyong/input
[zhangyong@hadoop104 hadoop-3.1.2]$ hdfs dfs -put wcinput/wc.input /user/zhangyong/input
上传大文件
[zhangyong@hadoop104 hadoop-3.1.2]$ bin/hadoop fs -put
 /opt/software/hadoop-3.1.2.tar.gz  /user/zhangyong/input
9.3 cluster start / stop mode summary
- Individually each service component start / stop
(1) respectively, start / stop assembly HDFS
hadoop-daemon.sh start/stop namenode/datanode/secondarynamenode
(2) Start / Stop YARN
yarn-daemon.sh start/stop resourcemanager/nodemanager
- Each module start / stop (ssh configuration is a precondition) used separately
(1) the entire start / stop HDFS
start-dfs.sh  启动
stop-dfs.sh   停止
(2) the overall start / stop YARN
start-yarn.sh    启动
stop-yarn.sh     停止
(3) overall start / stop history
mr-jobhistory-daemon.sh start historyserver    启动
mr-jobhistory-daemon.sh stop historyserver    停止
