LSV load balancing cluster
Address translation mode (NAT)
Nat mode in a cluster, LSV load balancing scheduler is internet access to all nodes in the gateway server
Its external network port address and most of the entire cluster VIP address, the scheduler is the entire company gateway
any request must go through the scheduler, including response
1. Configure experimental environment
A scheduler is centos7 IP 192.168.100.102 second network card IP 192.168.200.254 external network port
of a network adapter card is a second block VM1 VM2
Two centos7 is a web server nodes are IP 192.168.100.103 | 192.168.100.104
are VM1
A centos7 is NFS storage server IP 192.168.100.105 VM1
Win7 is a test machine outside the network IP 192.168.200.66 VM2
Use Xshell connection, and a good standard of each name, or error-prone
Configuring load balancer
192.168.100.102 first enters the scheduler, the external network port and configured to 192.168.200.254 ip
forget to restart the card
1) Open the route forwarding
[CentOS7-02 the root @ ~] # Vim /etc/sysctl.conf (after entering a new line, add the following) [the root CentOS7-02 @ ~] # sysctl -p
net.ipv4.ip_forward = 1
2) Installation and configuration tool load load distribution policy
to mount the discs, and arranged yum source
[root @ CentOS7-02 ~] # yum the install the ipvsadm -Y
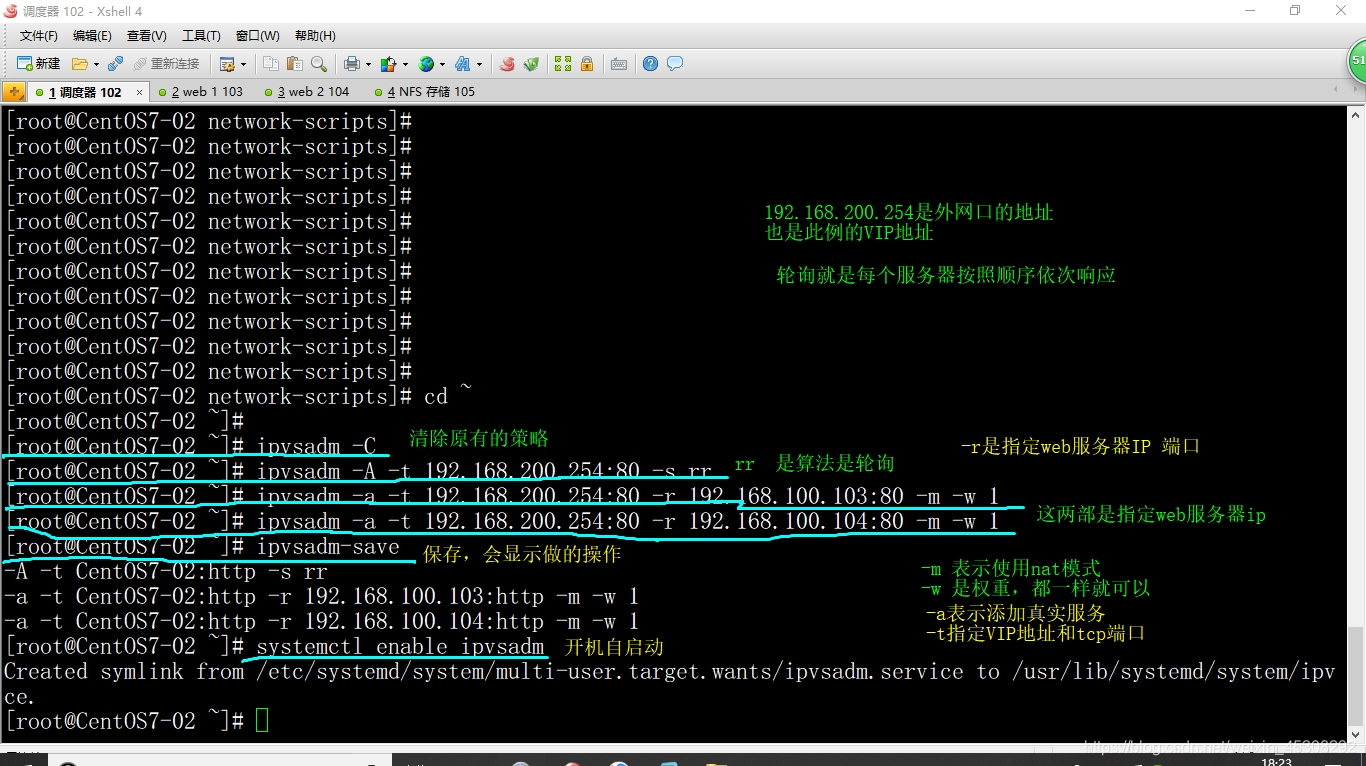
following command is not well understood, the following figure I are explained in detail in
[root @ ~ CentOS7-02] # the ipvsadm -C
[CentOS7-02 the root @ ~] # the ipvsadm -A -s -t 192.168.200.254:80 RR
[CentOS7-02 the root @ ~] # the ipvsadm -a -t 192.168.200.254:80 192.168.100.103:80. 1 -w -m -R & lt
[CentOS7-02 the root @ ~] # the ipvsadm -m -a -t 192.168.200.254:80 -R & lt 192.168.100.104:80. 1 -w
[the root ~ @ CentOS7-02 ] # the ipvsadm-Save
[CentOS7-02 the root @ ~] # systemctl enable the ipvsadm
3. Configure NFS shared storage server
Enter 192.168.100.105
. 1) associated with the installation package
[centos7-05 the root @ ~] # yum -Y-utils NFS the install the rpcbind
[centos7-05 the root @ ~] # systemctl enable the rpcbind
[centos7-05 the root @ ~] # systemctl enable nfs
2) Set the shared directory, and set sharing permissions
[centos7-05 the root @ ~] # mkdir -p / WWW
[centos7-05 the root @ ~] # CD / WWW /
[the root @ centos7-05 WWW] # Vim index.html
N F S
below this one is set sharing permissions
[root @ centos7-05 the WWW] # vim / etc / Exports save and exit, as explained below / www is just a web directory, rw for read write, sync represent synchronous writes, of course, if do not want to write, you can become rw ro
/www 192.168.100.0/24(rw,sync,no_root_squash)
If you want to give permission to a single host can write, note that this just goes to show command, do not write the file
/www 192.168.100.3(ro) 192.168.100.4(rw)
3) Start the NFS service program
[root @ centos7-05 the WWW] # systemctl Start the rpcbind
[root @ centos7-05 the WWW] # systemctl Start nfs
[root @ centos7-05 the WWW] # netstat -anpt | grep rpc
4) Check the unit posted an NFS shared directory
[root @ centos7-05 the WWW] # showmount -e
Export list for centos7-05:
/www 192.168.100.0/24
Verification will be carried out in a web server, the next step will be how I configure the web server verification
Configuring the web server
Note that all of the following operations are carried out every two web services
1) necessary to install the httpd package services and access NFS shared
first in 192.168.100.103, 192.168.100.104 on the server to mount CD-ROM, and configure yum source
installed httpd service and open
[root @ centos7-03 ~] # yum -y the httpd the install
[centos7-03 the root @ ~] # systemctl Start the httpd
install the necessary packages and open,
[centos7-03 the root @ ~] # yum the install the rpcbind -Y-NFS utils
[centos7-03 the root @ ~] # systemctl enable the rpcbind
[root @ centos7-03 ~] # systemctl Start the rpcbind
query share
[root @ centos7-04 ~] # showmount -e 192.168.100.105
2) manually mount the NFS share
[@ centos7-03 the root HTML] # Mount 192.168.100.105:/www / var / WWW / HTML /
[@ centos7-03 the root HTML] # CAT / var / WWW / HTML / index. html here has been mounted on, remember two web servers must mount
N F S
3) start the automatic loading
[@ centos7-03 the root HTML] # Vim / etc / fstab
192.168.100.105:/www /var/www/html nfs defaults,_netdev 0 0
4) Configuration two web server gateway is 192.168.100.102
[root @ centos7-03 HTML] # vim / etc / sysconfig / Network-scripts / the ifcfg-ens33
change it inside GATEWAY items, and restart the card
[root @ centos7- ~ 04] # systemctl restart Network
5. Test LSV cluster
Win7 into the external network tester configured IP, and the outer Gateway at network port scheduler ip 192.168.200.254
Browser access
http://192.168.200.254/ external network IP
following two web page server will display, on success

Configuration Mode DR
DR mode does not use a scheduler to corporate gateway, but the routing device, but the scheduler task assignment request access
The response of the web page, without the scheduler, directly through the network equipment to respond, not likely to cause obstruction
and that all nodes use the VIP address
1. Configure experimental environment
Experimental environment can still use what I have nat experimental environment, require only a slight change can be
if you want to re-configuration can also be
The second card I above experimental environment deleted scheduler 102, the piece is vm2
And the vm win7 client changed vm1, ip 192.168.100.66 instead
Configuring load balancer
1) virtual IP address (VIP)
by way of a virtual interface binding VIP address ens33, in response to access to the cluster
VIP lab environment can define your own address, I have here is 192.168.100.222
[CentOS7-02 the root @ ~] # CD / etc / sysconfig / Network-scripts /
[the root @ CentOS7-02 Network-scripts] # RM-ens37 the ifcfg -rf
[@ CentOS7-02 the root-Network scripts] # CP in ifcfg- the ifcfg-ens33 ens33: 0
[root @ CentOS7-02 Network-scripts] # vi the ifcfg-ens33: 0 (change it on the line, other do not move)
first delete the UUID configuration items, and then the following configuration items into the following
NAME="ens33:0"
DEVICE="ens33:0"
IPADDR="192.168.100.222"
[root @ CentOS7 ~ -02] # systemctl the restart Network
[CentOS7-02 the root @ ~] # the ifconfig ens33: 0
ens33:0: flags=4163<UP,BROADCAST,RUNNING,MULTICAST> mtu 1500
inet 192.168.100.222 netmask 255.255.255.0 broadcast 192.168.100.255
ether 00:0c:29:51:97:d3 txqueuelen 1000 (Ethernet)
2) adjust / proc parameter in response
to the DR cluster mode, the load balancer and LVS for each node need public VIP address, linux kernel should close the redirection parameters
[CentOS7-02 the root @ ~] # Vim / etc / sysctl. conf
delete the original net.ipv4.ip_forward = 1
to add the following to save and exit [root @ CentOS7-02 ~] # sysctl -p
net.ipv4.conf.all.send_redirects = 0
net.ipv4.conf.default.send_redirects = 0
net.ipv4.conf.ens33.send_redirects = 0
3) Configure the load allocation policy
[CentOS7-02 the root @ ~] # the ipvsadm -C (remove the original policy)
[the root CentOS7-02 @ ~] # the ipvsadm -A -s -t 192.168.100.222:80 RR
[the root @ CentOS7 ~ -02] # the ipvsadm -a -t 192.168.100.222:80 -R & lt 192.168.100.103. 1 -g -w
[CentOS7-02 the root @ ~] # the ipvsadm -a -t 192.168.100.222:80 -R & lt 192.168.100.104 - -w. 1 G
[CentOS7-02 the root @ ~] # the ipvsadm-Save
-g: indicates that this is the DR mode,
-w: weight
[the root CentOS7-02 @ ~] # systemctl enable the ipvsadm
3. Configure node server (Web)
If you are doing a separate DR mode, you need to install the package nat mode I described above, according to my above experiments web host configured, and then down to do
Then configure NFS storage, and mount to the local, because I have done above, do not show up, if you are single do, you can do that is above 105 server according to my above NFS storage server
I am following all operations are done in two web servers, 103,104, exactly the same operation, I will only show one do when you do both
1) virtual IP address (VIP)
using the DR mode, the server node also needs to be configured VIP address, this address is the source address in response to do web
[centos7-03 the root @ ~] # CD / etc / sysconfig / Network-scripts /
[Network-scripts centos7-03 the root @] # CP the ifcfg the ifcfg-LO-LO: 0
[@ centos7-03 the root-Network scripts] # Vim the ifcfg-LO: 0
according to the FIG change I
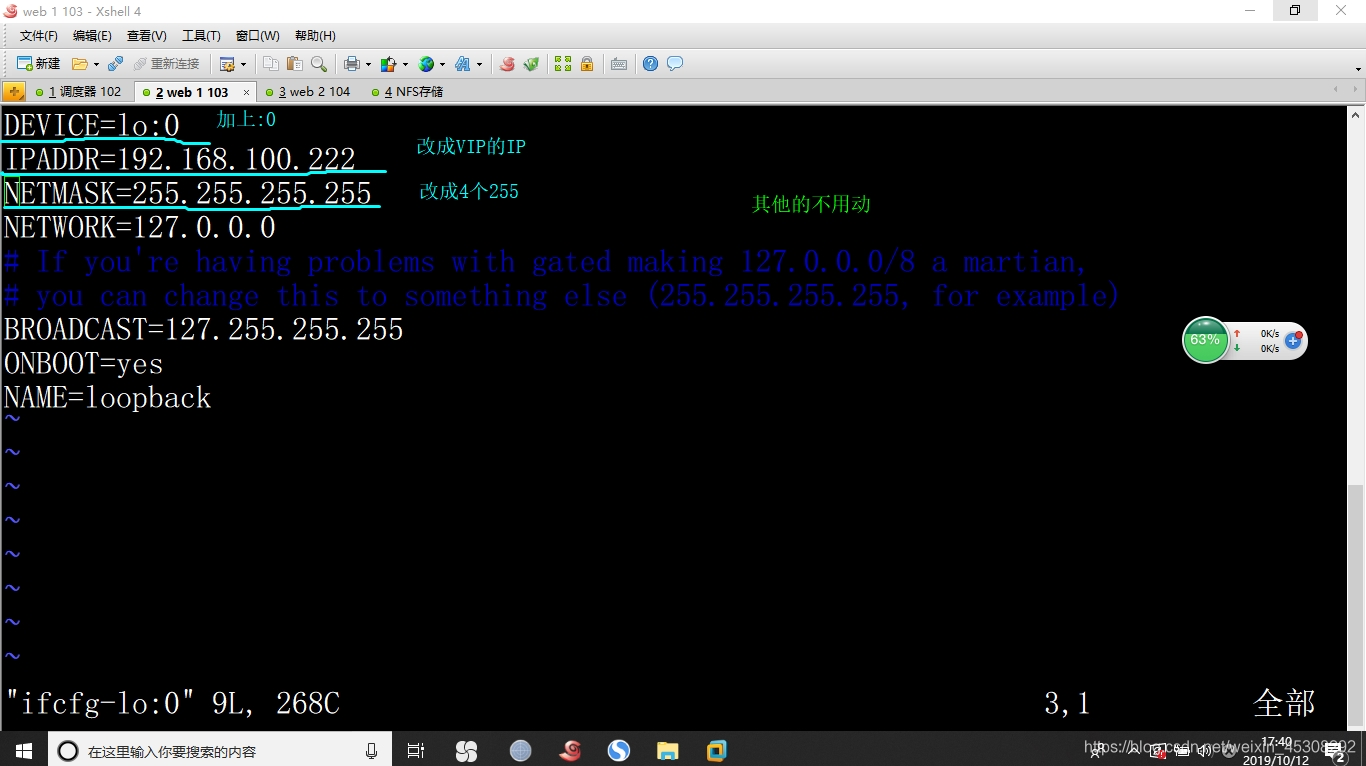 [root @ centos7-03 ~] # systemctl the restart Network
[centos7-03 the root @ ~] # the ifconfig native add a route recorded in the data limits the VIP locally, to avoid confusion of communication [centos7-03 the root @ ~] # Vim /etc/rc.local [root @ centos7-03 ~] # route the Add -host 192.168.100.222 dev LO: 0
lo:0: flags=73<UP,LOOPBACK,RUNNING> mtu 65536
inet 192.168.100.222 netmask 255.255.255.255
loop txqueuelen 1 (Local Loopback)
/sbin/route add -host 192.168.100.222 dev lo:0
2) adjust / proc response parameters
[centos7-03 the root @ ~] # Vim /etc/sysctl.conf (add the following)
net.ipv4.conf.all.arp_ignore = 1
net.ipv4.conf.all.arp_announce = 2
net.ipv4.conf.default.arp_ignore = 1
net.ipv4.conf.default.arp_announce = 2
net.ipv4.conf.lo.arp_ignore = 1
net.ipv4.conf.lo.arp_announce = 2
[the root centos7-03 @ ~] # sysctl -p
3) install httpd, then mount the NFS Share
4) and then start the httpd service
[root @ centos7-03 ~] # systemctl Start httpd
5) Repeat the above steps, the configuration server 104web
4. Test LVS cluster
One might ask, why are within the network, the network is also a test,
In fact, as long as the middle even a router, the router doing nat convert converted to a public IP address on the network VIP
Because it involves a network, where the direct use of network test
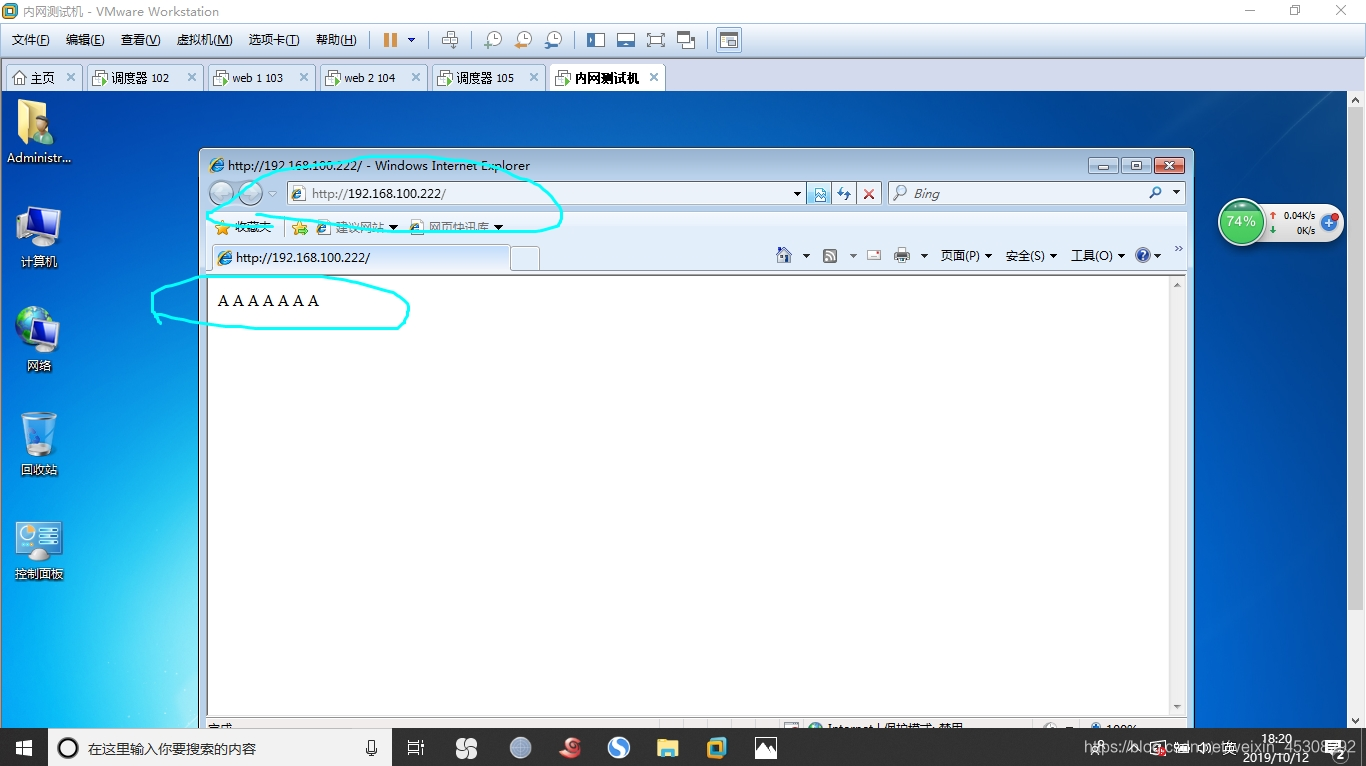
Enter win7 client vm and remember to change ip, and turn off the firewall
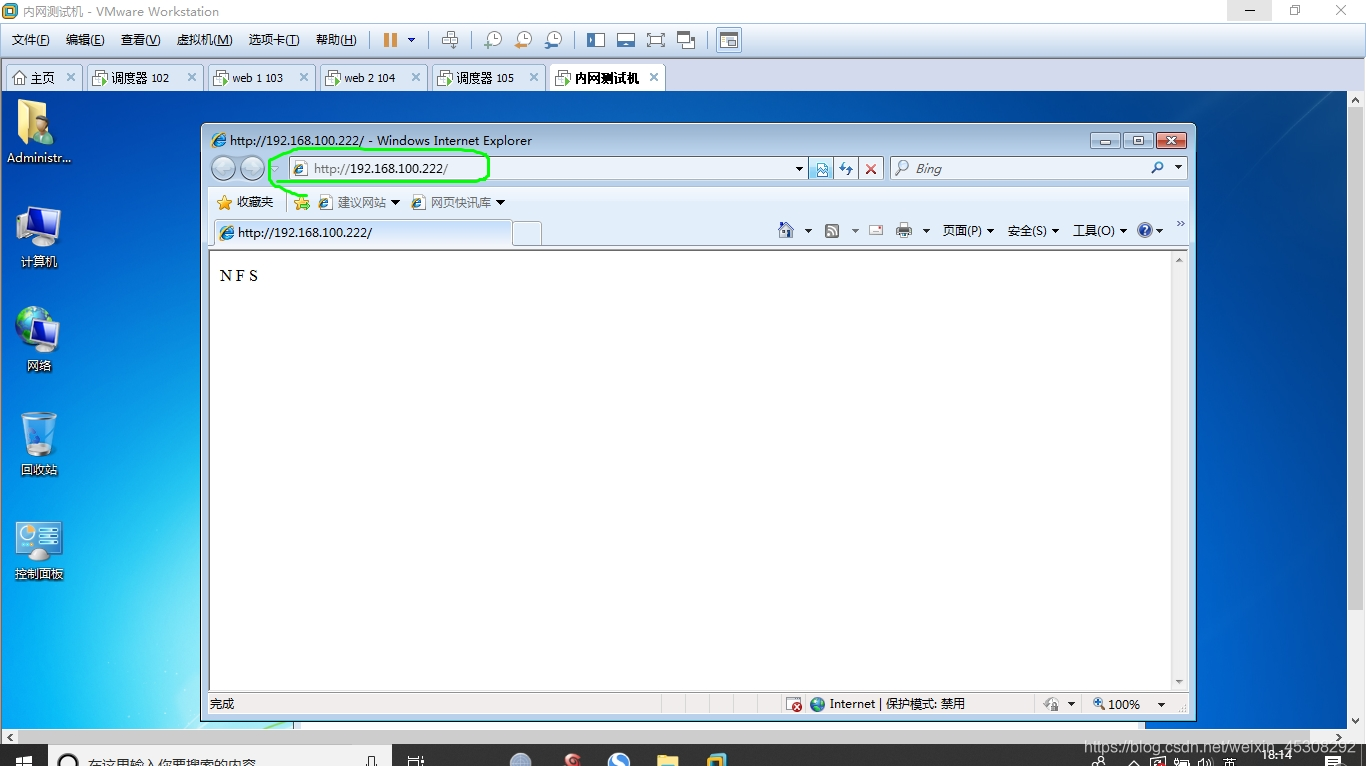
Browser access http://192.168.100.222/ (VIP address)
Of course, if you think this is not accurate, you can change the look NFS storage of web pages, then refresh
enter 192.168.100.105 shared memory,
[root @ centos7-05 ~] # vim /www/index.html
A A A A A A A
Enter client refresh a few times, or close your browser reopen access to the VIP address, as follows