Load-balancing clusters (Load Balance Cluster)
To improve the responsiveness of the applications, additional processing access requests as possible, to reduce the delay for the target, to obtain high concurrency, load distribution high load (LB) LB overall performance depends on the master node split algorithm
Workload scheduling technology cluster has three operating modes
- Address Translation (NAT paper only mode)
- IP tunnel
- Direct Routing
NAT mode
NAT (Network AddressTranslation)
- Referred to as the NAT mode, similar to the structure of the private network firewall, load balancer as a gateway for all server node, that is, as a client to access the entrance, as well as access nodes in response to export client
- Private IP address of the server node, and a load balancer located in the same physical network, security is better than the other two methods
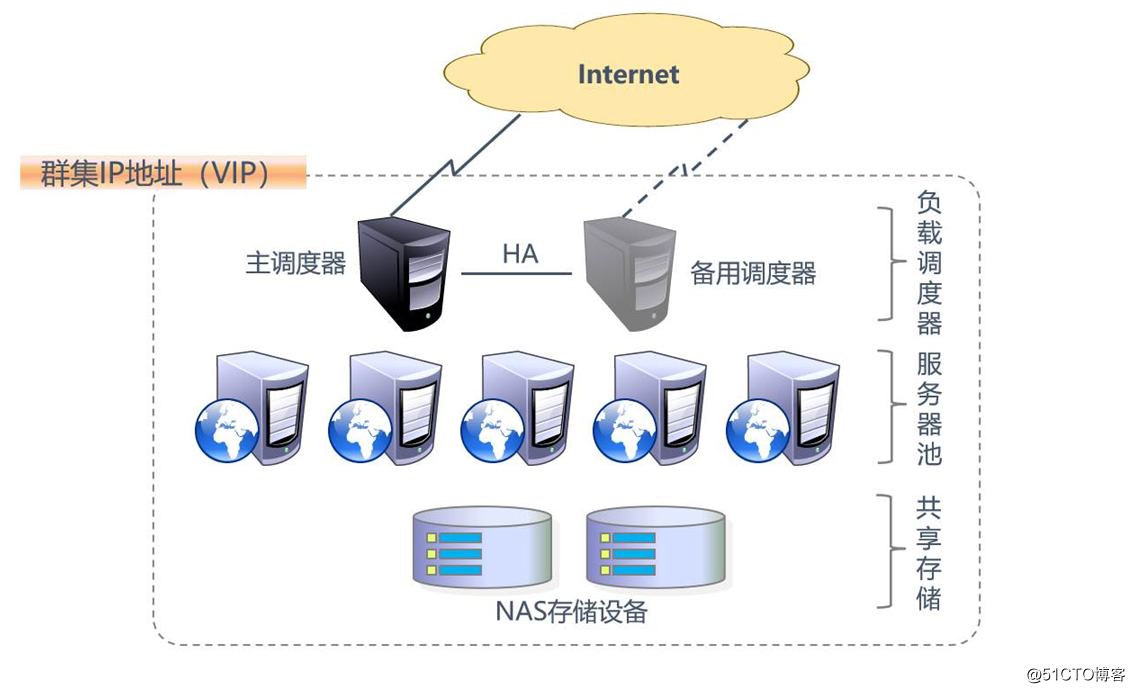
Load balancing cluster architecture
Structural load balancing
- A first layer, a scheduler load (Load Balancer or Director)
- The second layer, the server pool (Server Pool)
- The third layer, shared memory (Share Storage)
LVS load scheduling algorithm
Polling (Round Robin)
The access request received in turn in the order assigned to each node in the cluster (real server) uniformly treat each server, regardless of the actual number of connections and the server system load
WRR (Weighted Round Robin)
- The processing capacity of real servers in turn allocate access requests received, the query scheduler may automatically load each node and dynamically adjusts its weight
- Ensure strong server processing power to take on more traffic
Least Connection (Least Connections)
Allocated according to the number of connections the real server is established, access will receive priority in the allocation requests to the node with the fewest number of connections
Weighted least connections (Weighted Least Connections)
- In the big difference in performance server node, the weights may be re-adjusted automatically real server
- Higher weights node will assume a greater proportion of the activities connected load
Experimental operation
lab environment
调度服务器(centos7):
      外(ens36):12.0.0.1
      内(ens33):192.168.200.1
web服务器1(centos7):192.168.200.110
web服务器2(centos7):192.168.200.120
存储服务器(centos7):192.168.200.130
client客户端(win10):12.0.0.12
1, the storage server to verify whether the installation related services
[root@localhost ~]# rpm -q nfs-utils
nfs-utils-1.3.0-0.48.el7.x86_64   #已安装
[root@localhost ~]# rpm -q rpcbind
rpcbind-0.2.0-42.el7.x86_64   #已安装
[root@localhost ~]#
2, the two were to verify whether the installation httpd web server service, if not, install
第一台:
[root@localhost ~]# rpm -q httpd
未安装软件包 httpd
[root@localhost ~]# yum install httpd -y
.................//省略安装过程
[root@localhost ~]#

第二台:
[root@localhost ~]# rpm -q httpd
未安装软件包 httpd
[root@localhost ~]# yum install httpd -y
.................//省略安装过程
[root@localhost ~]#
3, verify whether there are scheduling server management tool, if not, install
[root@localhost ~]# rpm -q ipvsadm
未安装软件包 ipvsadm
[root@localhost ~]# yum install ipvsadm -y
.................//省略安装过程
[root@localhost ~]#
A configured scheduling server
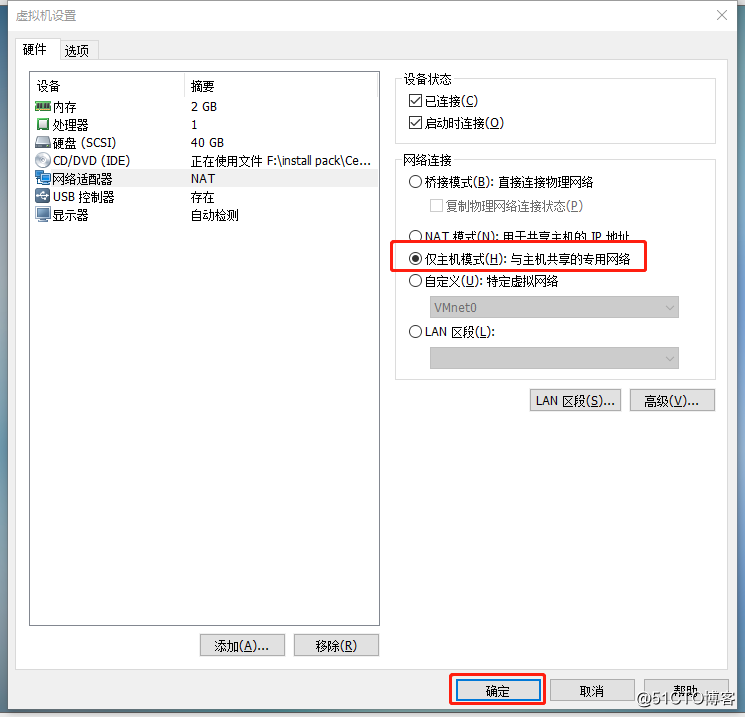
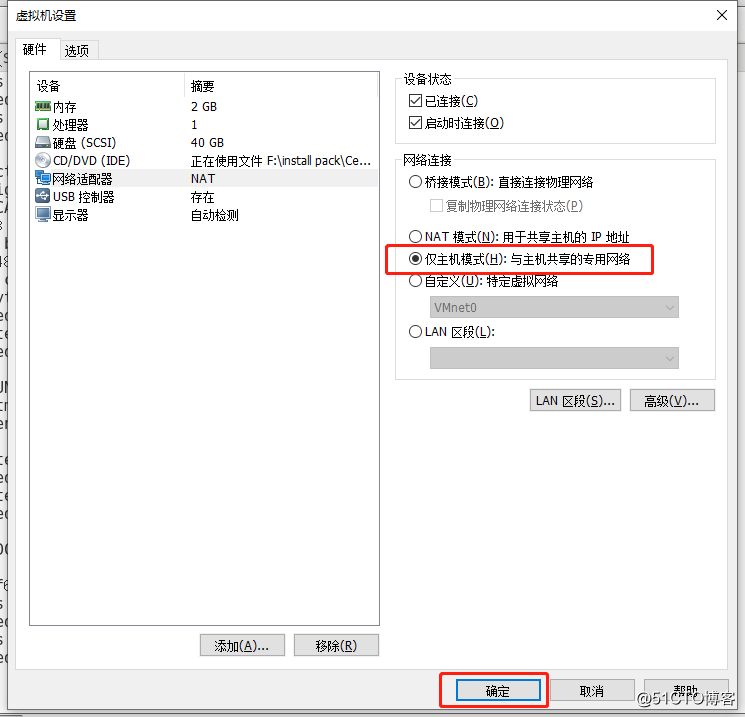
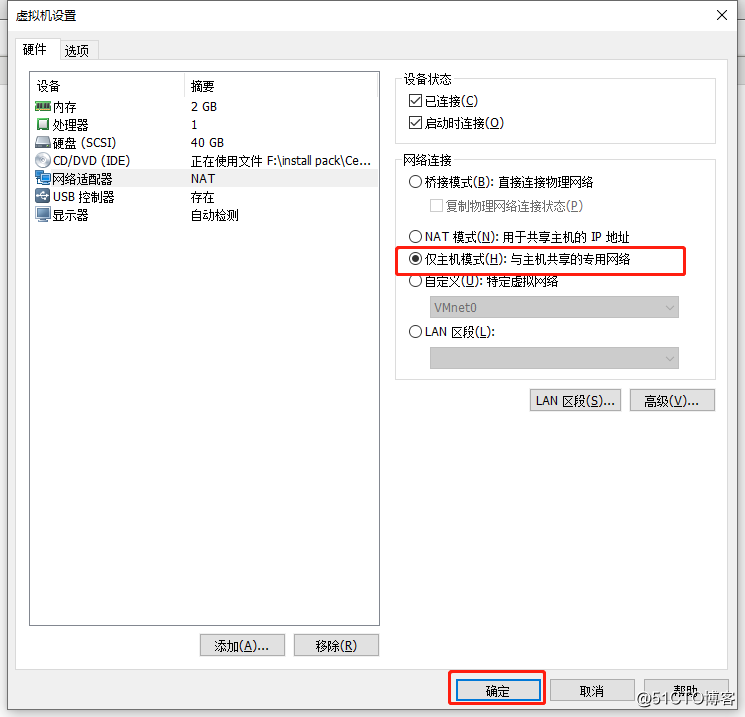
1, the network mode is configured to only the host server
2, configure the storage server, a fixed IP address
[root@localhost ~]# vim /etc/sysconfig/network-scripts/ifcfg-ens33
TYPE=Ethernet
PROXY_METHOD=none
BROWSER_ONLY=no
BOOTPROTO=static   #dhcp改为static
DEFROUTE=yes
IPV4_FAILURE_FATAL=no
IPV6INIT=yes
IPV6_AUTOCONF=yes
IPV6_DEFROUTE=yes
IPV6_FAILURE_FATAL=no
IPV6_ADDR_GEN_MODE=stable-privacy
NAME=ens33
UUID=09073596-a7cf-404c-a098-28c3ff58c44b
DEVICE=ens33
ONBOOT=yes
IPADDR=192.168.200.130   #IP地址
NETMASK=255.255.255.0   #子网掩码
GATEWAY=192.168.200.1   #网关
[root@localhost ~]# systemctl restart network   #重启网络服务
[root@localhost ~]# ifconfig    #查看网卡信息,ip设置成功
ens33: flags=4163<UP,BROADCAST,RUNNING,MULTICAST>  mtu 1500
        inet 192.168.200.130  netmask 255.255.255.0  broadcast 192.168.200.255
        inet6 fe80::5134:22f5:842b:5201  prefixlen 64  scopeid 0x20<link>
        ether 00:0c:29:0d:f1:75  txqueuelen 1000  (Ethernet)
        RX packets 818  bytes 69866 (68.2 KiB)
        RX errors 0  dropped 0  overruns 0  frame 0
        TX packets 319  bytes 44103 (43.0 KiB)
        TX errors 0  dropped 0 overruns 0  carrier 0  collisions 0
3, turn off the firewall, open storage sharing service
[root@localhost ~]# systemctl stop firewalld.service    #关闭防火墙
[root@localhost ~]# setenforce 0   #关闭增强性安全功能
[root@localhost ~]#
[root@localhost ~]# systemctl start nfs.service   #开启nfs服务
[root@localhost ~]# systemctl start rpcbind   #开启rpcbind服务
[root@localhost ~]#
4, modify the configuration file / etc / exports
[root@localhost ~]# vim /etc/exports
/usr/share *(ro,sync)   #共享目录给所有用户,权限制度
/opt/abc/ 192.168.200.0/24(rw,sync)   #共享目录到固定网段用户,权限读写
/opt/xyz/ 192.168.200.0/24(rw,sync)   #共享目录到固定网段用户,权限读写
5, create a shared directory, and grant permissions
[root@localhost ~]# cd /opt/
[root@localhost opt]# ls
rh
[root@localhost opt]# mkdir abc xyz   #创建目录
[root@localhost opt]# ll
总用量 0
drwxr-xr-x. 2 root root 6 11月 26 17:33 abc
drwxr-xr-x. 2 root root 6 3月  26 2015 rh
drwxr-xr-x. 2 root root 6 11月 26 17:33 xyz
[root@localhost opt]# chmod 777 abc xyz   #授权
[root@localhost opt]# ll
总用量 0
drwxrwxrwx. 2 root root 6 11月 26 17:33 abc
drwxr-xr-x. 2 root root 6 3月  26 2015 rh
drwxrwxrwx. 2 root root 6 11月 26 17:33 xyz
[root@localhost opt]#
6, reload the configuration
[root@localhost opt]# exportfs -rv
exporting 192.168.200.0/24:/opt/xyz
exporting 192.168.200.0/24:/opt/abc
exporting *:/usr/share
[root@localhost opt]#
Two, web server configuration 1
1, at the web server for network mode only host 1
2, a fixed IP address
[root@localhost ~]# vim /etc/sysconfig/network-scripts/ifcfg-ens33
TYPE=Ethernet
PROXY_METHOD=none
BROWSER_ONLY=no
BOOTPROTO=static   #dhcp改为static
DEFROUTE=yes
IPV4_FAILURE_FATAL=no
IPV6INIT=yes
IPV6_AUTOCONF=yes
IPV6_DEFROUTE=yes
IPV6_FAILURE_FATAL=no
IPV6_ADDR_GEN_MODE=stable-privacy
NAME=ens33
UUID=3ceed540-b04c-48d6-a4f7-79951f09ea1d
DEVICE=ens33
ONBOOT=yes
IPADDR=192.168.200.110   #IP地址
NETMASK=255.255.255.0   #子网掩码
GATEWAY=192.168.200.1   #网关
[root@localhost ~]# systemctl restart network   #重启网络服务
[root@localhost ~]# ifconfig    #查看网卡信息,ip设置成功
ens33: flags=4163<UP,BROADCAST,RUNNING,MULTICAST>  mtu 1500
        inet 192.168.200.110  netmask 255.255.255.0  broadcast 192.168.200.255
        inet6 fe80::3e1d:31ba:f66a:6f80  prefixlen 64  scopeid 0x20<link>
        ether 00:0c:29:27:1c:3f  txqueuelen 1000  (Ethernet)
        RX packets 12581  bytes 15759224 (15.0 MiB)
        RX errors 0  dropped 0  overruns 0  frame 0
        TX packets 6118  bytes 501343 (489.5 KiB)
        TX errors 0  dropped 0 overruns 0  carrier 0  collisions 0
3, turn off the firewall, and open the http service
[root@localhost ~]# systemctl stop firewalld.service    #关闭防火墙
[root@localhost ~]# setenforce 0   #关闭增强性安全功能
[root@localhost ~]# systemctl start httpd.service    #开启http服务
[root@localhost ~]# netstat -ntap | grep 80   #查看端口
tcp6       0      0 :::80                   :::*                    LISTEN      50076/httpd
[root@localhost ~]#
4, see the NFS service to share information
[root@localhost ~]# showmount -e 192.168.200.130
Export list for 192.168.200.130:
/usr/share *
/opt/xyz   192.168.200.0/24
/opt/abc   192.168.200.0/24
[root@localhost ~]#
5, NFS mount the shared directory, and see whether the success of the mount
[root@localhost ~]# mount.nfs 192.168.200.130:/opt/abc /var/www/html/   #挂载
[root@localhost ~]# df -h   #查看挂载信息
文件系统                  容量  已用  可用 已用% 挂载点
/dev/sda2                  20G  3.4G   17G   17% /
devtmpfs                  898M     0  898M    0% /dev
tmpfs                     912M     0  912M    0% /dev/shm
tmpfs                     912M   18M  895M    2% /run
tmpfs                     912M     0  912M    0% /sys/fs/cgroup
/dev/sda5                  10G   37M   10G    1% /home
/dev/sda1                 6.0G  174M  5.9G    3% /boot
tmpfs                     183M  4.0K  183M    1% /run/user/42
tmpfs                     183M   40K  183M    1% /run/user/0
192.168.200.130:/opt/abc   20G  3.3G   17G   17% /var/www/html   #挂载成功
[root@localhost ~]#
6, create a home directory on a mounted file, and storage servers to see if the file was successfully created
web服务器1:
[root@localhost ~]# echo "this is abc web" > /var/www/html/index.html   #创建首页文件
[root@localhost ~]#

存储服务器:
[root@localhost opt]# cd abc/
[root@localhost abc]# ls
index.html    #创建成功
[root@localhost abc]#
Three, web server configuration 2
1, at the web server for network mode only host 2
2, a fixed IP address
[root@localhost ~]# vim /etc/sysconfig/network-scripts/ifcfg-ens33
TYPE=Ethernet
PROXY_METHOD=none
BROWSER_ONLY=no
BOOTPROTO=static   #将dhcp改为static
DEFROUTE=yes
IPV4_FAILURE_FATAL=no
IPV6INIT=yes
IPV6_AUTOCONF=yes
IPV6_DEFROUTE=yes
IPV6_FAILURE_FATAL=no
IPV6_ADDR_GEN_MODE=stable-privacy
NAME=ens33
UUID=8ecd53ce-afdb-46f8-b7ff-b2f428a3bc8f
DEVICE=ens33
ONBOOT=yes
IPADDR=192.168.200.120   #IP地址
NETMASK=255.255.255.0   #子网掩码
GATEWAY=192.168.200.1   #网关
[root@localhost ~]# systemctl restart network   #重启网络服务
[root@localhost ~]# ifconfig    #查看网卡信息,ip设置成功
ens33: flags=4163<UP,BROADCAST,RUNNING,MULTICAST>  mtu 1500
        inet 192.168.200.120  netmask 255.255.255.0  broadcast 192.168.200.255
        inet6 fe80::c776:9d00:618:88f2  prefixlen 64  scopeid 0x20<link>
        ether 00:0c:29:eb:34:07  txqueuelen 1000  (Ethernet)
        RX packets 13713  bytes 15997026 (15.2 MiB)
        RX errors 0  dropped 0  overruns 0  frame 0
        TX packets 5590  bytes 452930 (442.3 KiB)
        TX errors 0  dropped 0 overruns 0  carrier 0  collisions 0
3, turn off the firewall, and open the http service
[root@localhost ~]# systemctl stop firewalld.service    #关闭防火墙
[root@localhost ~]# setenforce 0   #关闭增强性安全功能
[root@localhost ~]# systemctl start httpd.service    #开启http服务
[root@localhost ~]# netstat -ntap | grep 80   #查看端口
tcp6       0      0 :::80                   :::*                    LISTEN      50572/httpd
[root@localhost ~]#
4, see the NFS service to share information
[root@localhost ~]# showmount -e 192.168.200.130
Export list for 192.168.200.130:
/usr/share *
/opt/xyz   192.168.200.0/24
/opt/abc   192.168.200.0/24
[root@localhost ~]#
5, NFS mount the shared directory, and see whether the success of the mount
[root@localhost ~]# mount.nfs 192.168.200.130:/opt/xyz /var/www/html/   #挂载
[root@localhost ~]# df -h   #查看挂载信息
文件系统                  容量  已用  可用 已用% 挂载点
/dev/sda2                  20G  3.4G   17G   17% /
devtmpfs                  898M     0  898M    0% /dev
tmpfs                     912M     0  912M    0% /dev/shm
tmpfs                     912M   18M  895M    2% /run
tmpfs                     912M     0  912M    0% /sys/fs/cgroup
/dev/sda5                  10G   37M   10G    1% /home
/dev/sda1                 6.0G  174M  5.9G    3% /boot
tmpfs                     183M  4.0K  183M    1% /run/user/42
tmpfs                     183M   40K  183M    1% /run/user/0
192.168.200.130:/opt/xyz   20G  3.3G   17G   17% /var/www/html   #挂载成功
[root@localhost ~]#
6, create a home directory on a mounted file, and storage servers to see if the file was successfully created
web服务器2:
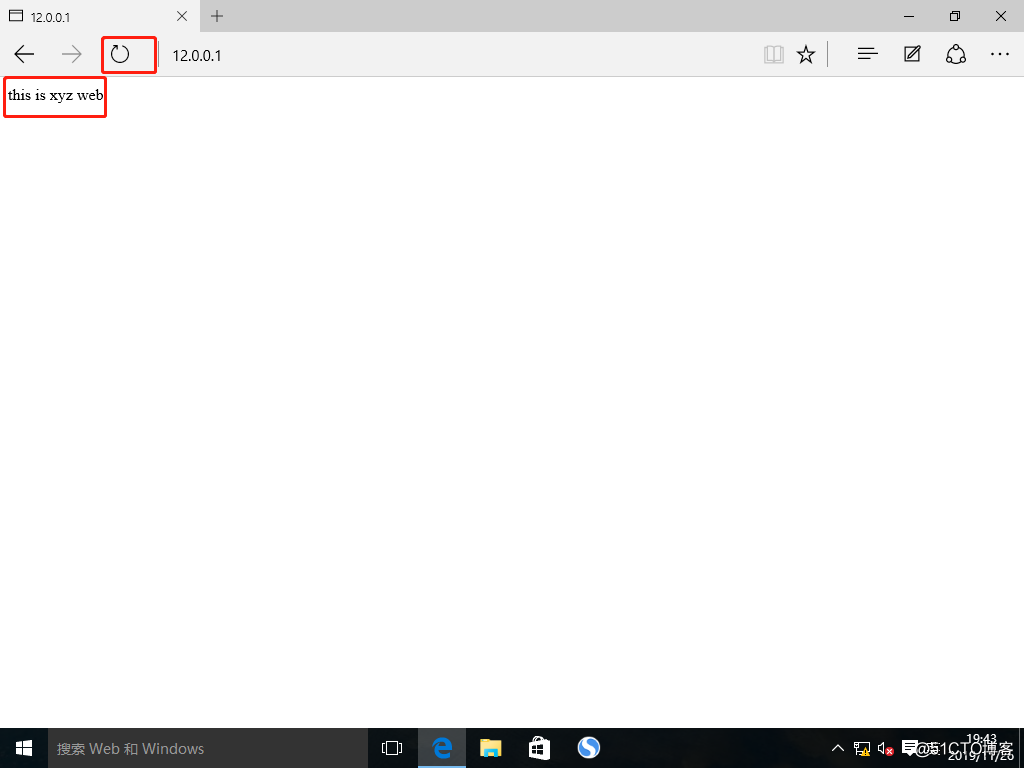
[root@localhost ~]# echo "this is xyz web" > /var/www/html/index.html #创建首页文件
[root@localhost ~]#
存储服务器:
[root@localhost abc]# cd ../xyz/
[root@localhost xyz]# ls
index.html #创建成功
[root@localhost xyz]#Fourth, the scheduling server configuration
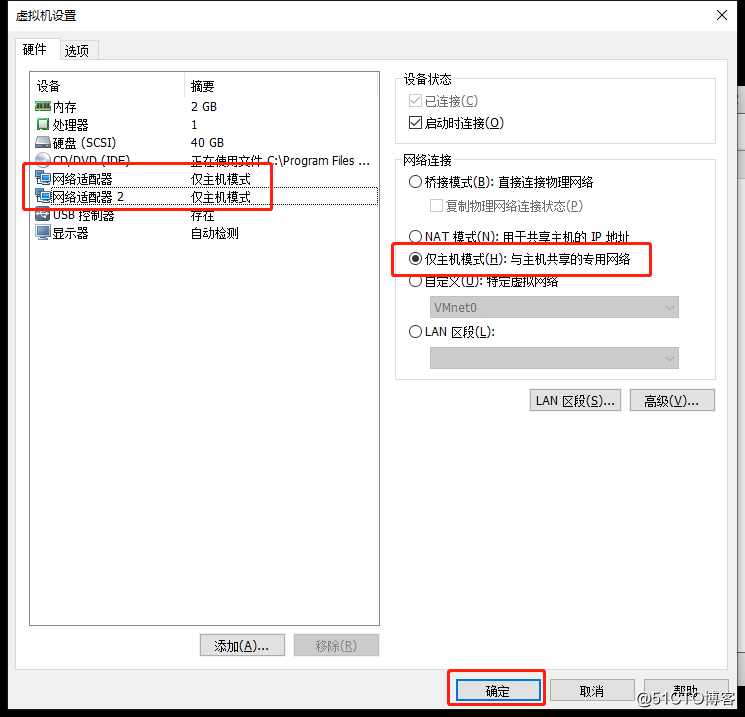
1, to schedule server add a network card, the network mode, two network cards are changed only host
2, modify ens33 card profile, set a fixed IP
[root@localhost ~]# vim /etc/sysconfig/network-scripts/ifcfg-ens33
TYPE=Ethernet
PROXY_METHOD=none
BROWSER_ONLY=no
BOOTPROTO=static   #将dhcp改为static
DEFROUTE=yes
IPV4_FAILURE_FATAL=no
IPV6INIT=yes
IPV6_AUTOCONF=yes
IPV6_DEFROUTE=yes
IPV6_FAILURE_FATAL=no
IPV6_ADDR_GEN_MODE=stable-privacy
NAME=ens33
UUID=c96bc909-188e-ec64-3a96-6a90982b08ad
DEVICE=ens33
ONBOOT=yes
IPADDR=192.168.200.1   #IP地址
NETMASK=255.255.255.0   #子网掩码
3, modify ens36 card configuration file, set a fixed IP
[root@localhost ~]# cd /etc/sysconfig/network-scripts/
[root@localhost network-scripts]# cp ifcfg-ens33 ifcfg-ens36   #复制一份ens33的配置文件作为ens36配置文件
[root@localhost network-scripts]# vim ifcfg-ens36
TYPE=Ethernet
PROXY_METHOD=none
BROWSER_ONLY=no
BOOTPROTO=static   #将dhcp改为static
DEFROUTE=yes
IPV4_FAILURE_FATAL=no
IPV6INIT=yes
IPV6_AUTOCONF=yes
IPV6_DEFROUTE=yes
IPV6_FAILURE_FATAL=no
IPV6_ADDR_GEN_MODE=stable-privacy
NAME=ens36   #ens33改为ens36,并删除UUID
DEVICE=ens36   #ens33改为ens36
ONBOOT=yes
IPADDR=12.0.0.1   #IP地址
NETMASK=255.255.255.0   #子网掩码
Whether 4, restart the network services, check the IP configuration is successful
[root@localhost network-scripts]# systemctl restart network   #重启网络服务
[root@localhost network-scripts]# ifconfig    #查看网卡信息
ens33: flags=4163<UP,BROADCAST,RUNNING,MULTICAST>  mtu 1500
        inet 192.168.200.1  netmask 255.255.255.0  broadcast 192.168.200.255
        inet6 fe80::28ad:c7f1:25e8:8708  prefixlen 64  scopeid 0x20<link>
        ether 00:0c:29:95:9b:1b  txqueuelen 1000  (Ethernet)
        RX packets 11757  bytes 12899133 (12.3 MiB)
        RX errors 0  dropped 0  overruns 0  frame 0
        TX packets 4731  bytes 325771 (318.1 KiB)
        TX errors 0  dropped 0 overruns 0  carrier 0  collisions 0

ens36: flags=4163<UP,BROADCAST,RUNNING,MULTICAST>  mtu 1500
        inet 12.0.0.1  netmask 255.255.255.0  broadcast 12.0.0.255
        inet6 fe80::10ce:358b:94ed:c4e9  prefixlen 64  scopeid 0x20<link>
        ether 00:0c:29:95:9b:25  txqueuelen 1000  (Ethernet)
        RX packets 130  bytes 10117 (9.8 KiB)
        RX errors 0  dropped 0  overruns 0  frame 0
        TX packets 178  bytes 30232 (29.5 KiB)
        TX errors 0  dropped 0 overruns 0  carrier 0  collisions 0
5, modify the configuration file /etc/sysctl.conf
[root@localhost ~]# vim /etc/sysctl.conf
net.ipv4.ip_forward=1   #开启路由功能
[root@localhost ~]# sysctl -p   #重新加载/etc/sysctl.conf中配置
net.ipv4.ip_forward = 1
[root@localhost ~]#
6, the NAT configuration
[root@localhost ~]# iptables -t nat -F   #清除nat缓存
[root@localhost ~]# iptables -F   #清除规则
[root@localhost ~]# iptables -t nat -A POSTROUTING -o ens36 -s 192.168.200.0/24 -j SNAT --to-source 12.0.0.1
#配置NAT转换
[root@localhost ~]#
7, open ipvsadm service
[root@localhost ~]# modprobe ip_vs   #启动模块
[root@localhost ~]# cat /proc/net/ip_vs   #查看服务信息
IP Virtual Server version 1.2.1 (size=4096)
Prot LocalAddress:Port Scheduler Flags
  -> RemoteAddress:Port Forward Weight ActiveConn InActConn
[root@localhost ~]# ipvsadm --save > /etc/sysconfig/ipvsadm   #保存服务配置
[root@localhost ~]# systemctl start ipvsadm.service    #开启服务
[root@localhost ~]#
8, add ipvsadm service script and execute
[root@localhost ~]# cd /opt/   #切换目录
[root@localhost opt]# vim nat.sh   #编辑脚本
#!/bin/bash
ipvsadm -C   #清除内核虚拟服务器表中的所有记录
ipvsadm -A -t 12.0.0.1:80 -s rr   #增加一台新的虚拟服务器
ipvsadm -a -t 12.0.0.1:80 -r 192.168.200.110:80 -m   #在虚拟服务器中增加一台新的真实服务器。
ipvsadm -a -t 12.0.0.1:80 -r 192.168.200.120:80 -m   #在虚拟服务器中增加一台新的真实服务器。
ipvsadm   #开启服务
[root@localhost opt]# source nat.sh    #执行脚本
IP Virtual Server version 1.2.1 (size=4096)
Prot LocalAddress:Port Scheduler Flags
  -> RemoteAddress:Port           Forward Weight ActiveConn InActConn
TCP  localhost.localdomain:http rr
  -> 192.168.200.110:http         Masq    1      0          0
  -> 192.168.200.120:http         Masq    1      0          0
[root@localhost opt]#

ipvsadm相关可选项含义:
-A:在内核的虚拟服务器列表中添加一条新的虚拟服务器记录。也就是增加一台新的虚拟服务器。虚拟服务器地址由三元组唯一定义:IP地址,端口号和协议。虚拟服务器也可以由防火墙标记定义。
-C:清除内核虚拟服务器表中的所有记录。
-a:在内核虚拟服务器表的一条记录里添加一条新的真实服务器记录。也就是在一个虚拟服务器中增加一台新的真实服务器。
-t:说明虚拟服务器提供的是tcp 的服务。
-s:将TCP连接和UDP数据报分配给真实服务器的算法。
-m:使用伪装(网络访问转换或NAT)。
rr:轮询,调度器通过”轮询”调度算法将外部请求按顺序轮流分配到集群中的真实服务器上,它均等地对待每一台服务器,而不管服务器上实际的连接数和系统负载。
wrr:加权轮询,调度器通过”加权轮询”调度算法根据真实服务器的不同处理能力来调度访问请求。这样可以保证处理能力强的服务器处理更多的访问流量。调度器可以自动问询真实服务器的负载情况,并动态地调整其权值。
lc:最少连接,当有新的作业到达时,调度器选择一个当前作业量较少的真实服务器,并把新到达的作业分配给它。如果集群系统的真实服务器具有相近的系统性能,采用”最小连接”调度算法可以较好地均衡负载。
wlc:加权最小连接,将更多的作业分配给作业较少且相对于权重较高(Ci / Wi)的服务器。这是默认值。
Fifth, the test cluster load balancing NAT mode
1, modified win10 host network host only mode

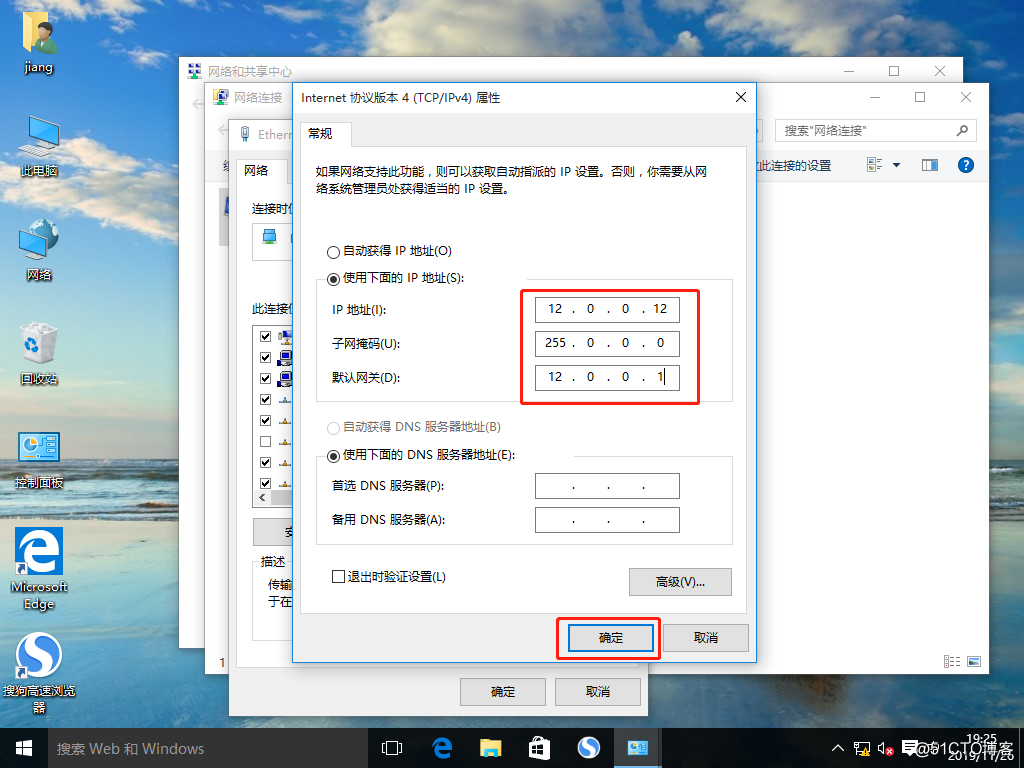
2, modify the host IP address win10
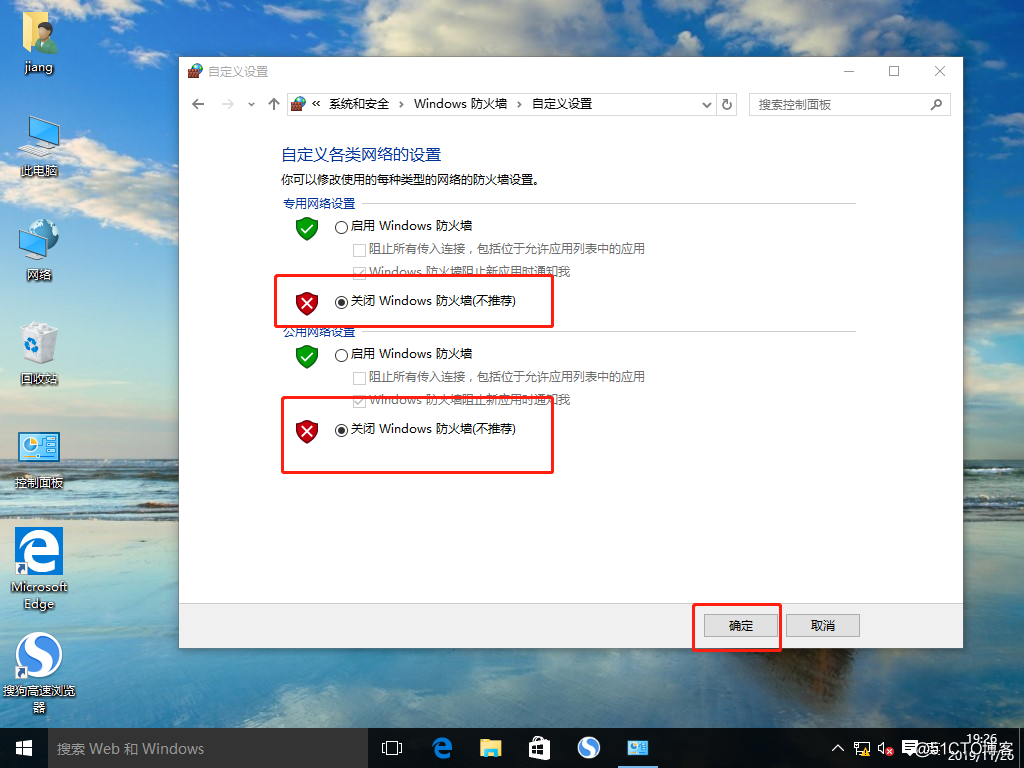
3, close win10 host firewall
4, the IP address used to access the host win10: 12.0.0.1
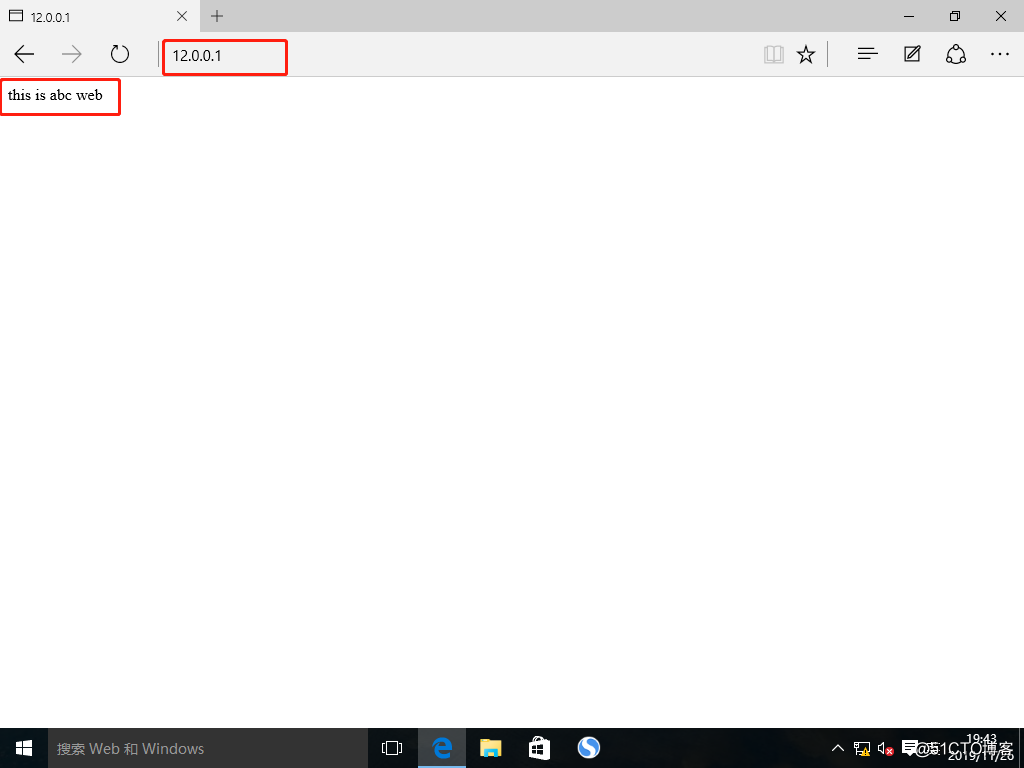
5, refresh your browser again, thanks to the polling algorithm to another home page