Preface:
This article explains, raspberry pie for a no display, no keyboard, no mouse, only have cell phones, computers and has a good burn raspbian-stretch system raspberry pie 3B + players, how remote login, and then you can process Desktop connection.
tool:
1, phone (local area network aims to open a hot spot, and let the computer Raspberry Pi can be in a the same local area network)
2, the computer (iPad, mobile phones and other tools can be connected remotely)
3, raspberry pie 3B + (already burn a raspbian-stretch system image)
Let's get started!
The first step: Preparations
System image has been burned to the SD card. Detailed steps to see raspberry pie seller to the information you send, will not go into detail.
Step 2: Create a blank file and ssh wpa_supplicant.conf
Open the text editor wpa_supplicant.conf,enter the following configurations can use multiple network {} to configure multiple wifi:
country=GB
ctrl_interface=DIR=/var/run/wpa_supplicant GROUP=netdev
update_config=1
network={
    ssid = " my name replaced WiFi, do not remove the quotation marks, can not have Chinese "
    PSK = " will replace my WiFi password, do not remove the quotation marks "
    priority = will be replaced by digital I, on behalf of the larger the number the higher the priority
}
Here, you can set the ssid name of your phone hotspot, psk set the phone hotspot password.
The third step: ssh blank file and boot disk files into wpa_supplicant.conf SD card
Step 4: Enable phone hot start raspberry pie
The SD card into the raspberry pie, and then power-up. If a hot spot is started, and the case ssid and psk properly configured, a minute or so, you will be able to see a thing on your phone connection hot spots, which indicates that Raspberry Pi has been successfully configured friends
Step Five: Get raspberry pie id address
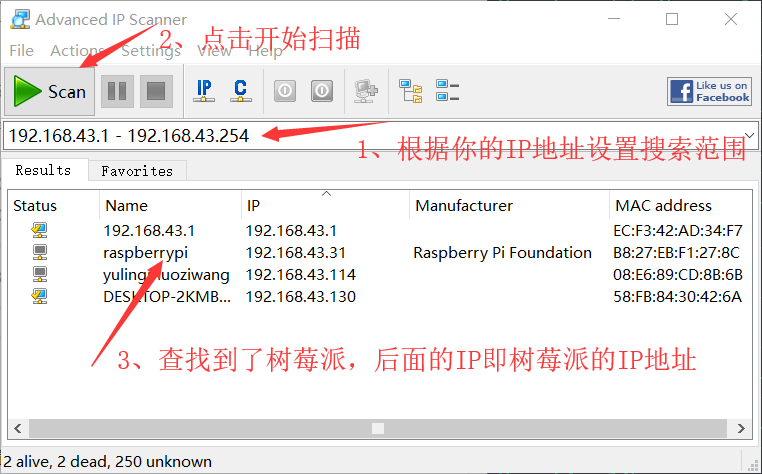
The computer can also connect to your mobile hotspot, and then use the information in ipscan22.exe seller tools, scan ip address within the LAN. Specific operation is as follows:
1, first right-click the network icon in the lower right corner of your computer, click open the "Network and Internet" settings
2, sliding wheel, found at the following view network properties , then click
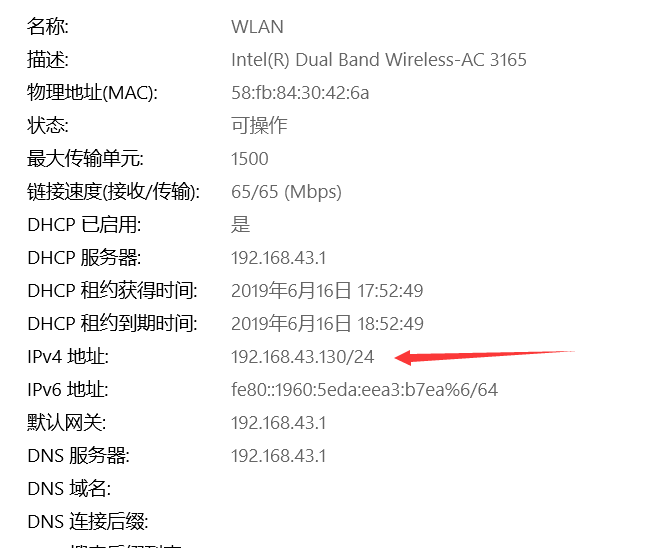
3, check the computer's ipv4 address, as FIG.
4, open ipscan22.exe software settings are as follows:
Step five: SSH remote login
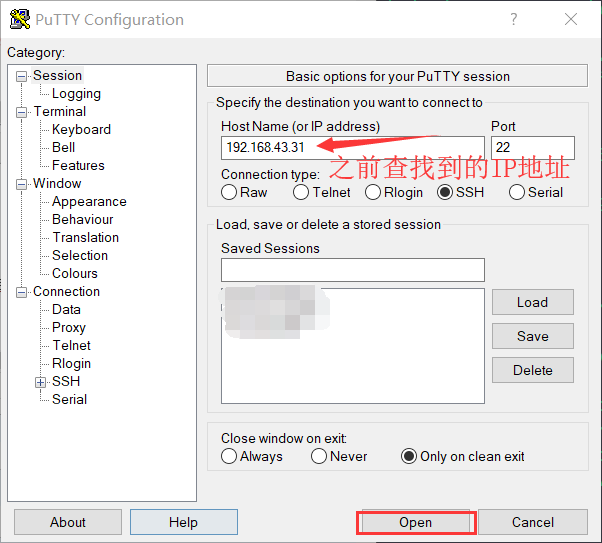
Now everything is ready, only a strong wind. Open our putty (or other can SSH remote login software), as shown below:
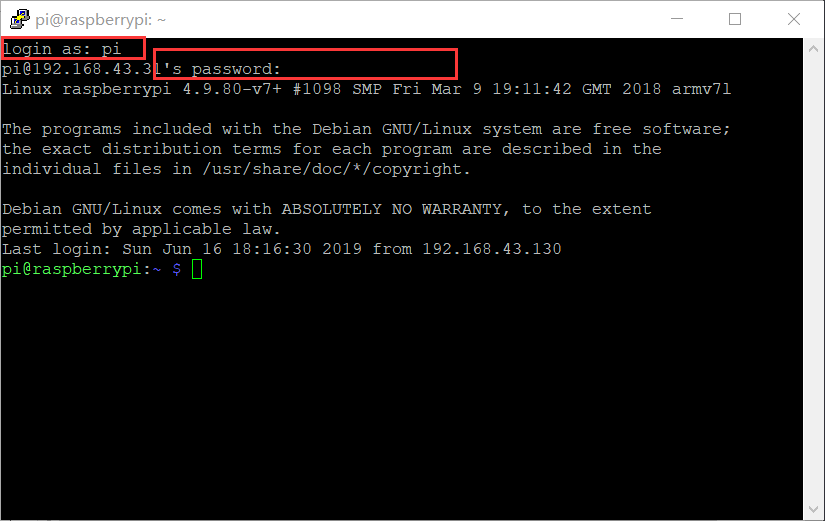
Enter your user name and password: Default user is pi, the password is raspberry, press enter to log successful ~
Step Six: Some configuration initial login raspberry pie
1, install vim
Anyway, still vim with the habit ah, looks comfortable
网上的教程很多,这里推荐其中一篇,不再详细赘述。【raspberry】安装vim并配置
2、换源,并进行树莓派的内部配置
参考一篇写的很好的博文,在此不再详细赘述。一劳永逸配置树莓派
远程桌面可以使用windows自带的mstsc,也可以使用vnc。先介绍第一种方式
第七步:安装xdrp
输入以下命令:
sudo apt-get update
sudo apt-get upgrade
sudo apt-get install xrdp
第八步:通过xdrp进行远程桌面登录
在windows下的运行界面输入mstsc来打开远程桌面

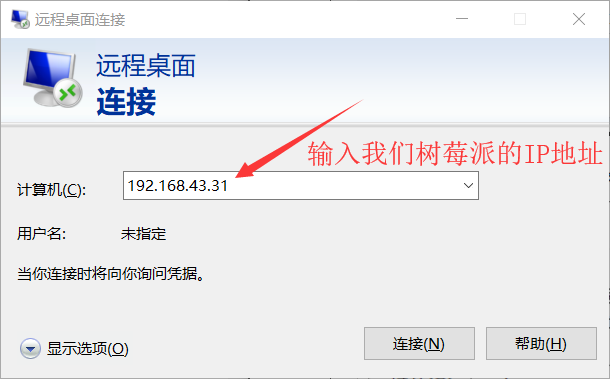
然后连接,输入用户名和密码即可
如若树莓派操作系统安装xrdp后,在windows里用mstsc打开对应的IP地址,登录的过程中出现如下错误(IP地址,用户名,密码正确的情况下)

解决的办法是在树莓派里安装如下模块:
sudo apt-get install tightvncserver
接着reboot重启,重新连接即可。
第九步:通过VNC进行远程桌面登录
参考链接:使用vnc访问树莓派