
With the evolution of big data technology and the increasing demand for information security, the continuous expansion of data scale has brought severe challenges to data operation and maintenance work. Faced with the heavy management pressure caused by massive data, operation and maintenance personnel face efficiency bottlenecks, and rising labor costs make it no longer practical to rely solely on expanding the operation and maintenance team to solve problems.
It can be seen that intelligence, efficiency and convenience are the inevitable directions for the development of operation and maintenance. The inspection report function launched by Kangaroo Cloud is precisely to comply with this goal and is committed to providing optimized solutions.
What is an inspection report?
Inspection report refers to the process of conducting a comprehensive inspection of a certain system or equipment and organizing the inspection results and suggestions into a report. Inspection reports are usually used to evaluate the operating status and performance of systems or equipment, providing reference for identifying problems, optimizing systems, improving efficiency, and reducing failure rates.
This article will elaborate on the various functional features of the inspection report and its implementation plan, providing a practical reference for users with such needs.
Inspection report implementation function
● Custom layout
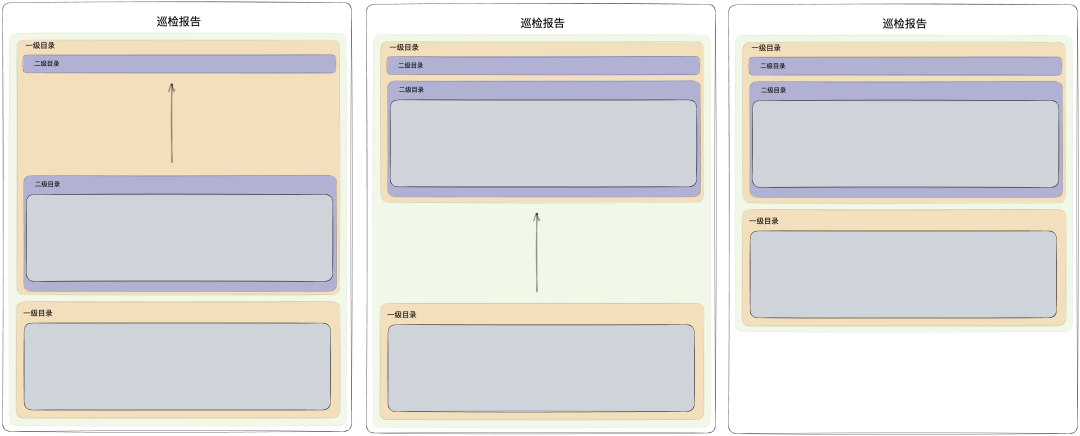
· The panels in the report can be dragged and dropped to change the layout
· Limit the dragging area during the dragging process. Dragging is only allowed within the same parent level. Cross-directory movement is not allowed. Directory level changes are not allowed, such as moving a first-level directory to another first-level directory. Become a secondary directory
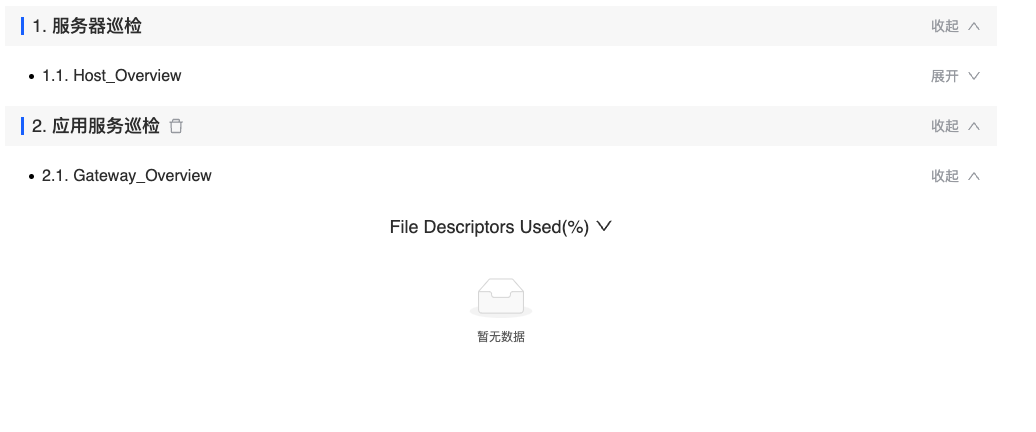
● The directory can be shrunk and expanded
· The directory supports shrinking and expanding. When shrinking, all sub-panels are hidden, and when expanded, all sub-panels are displayed.
· When moving a directory, the subpanel will follow the move
· After changing the directory, the directory panel on the right will be updated simultaneously.
· Generate catalog number
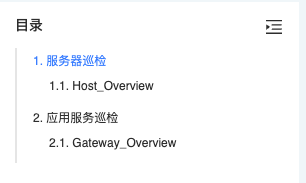
● Directory tree on the right
· Generate catalog number
· Support anchor scrolling
· Support expansion and contraction
· Linked with the report on the left
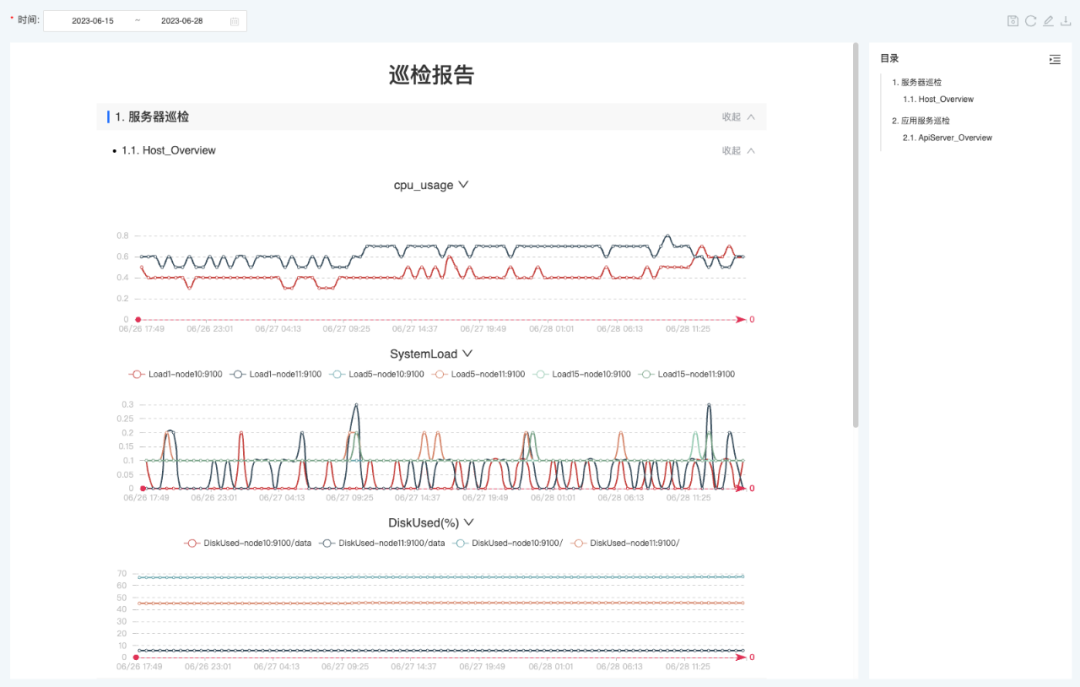
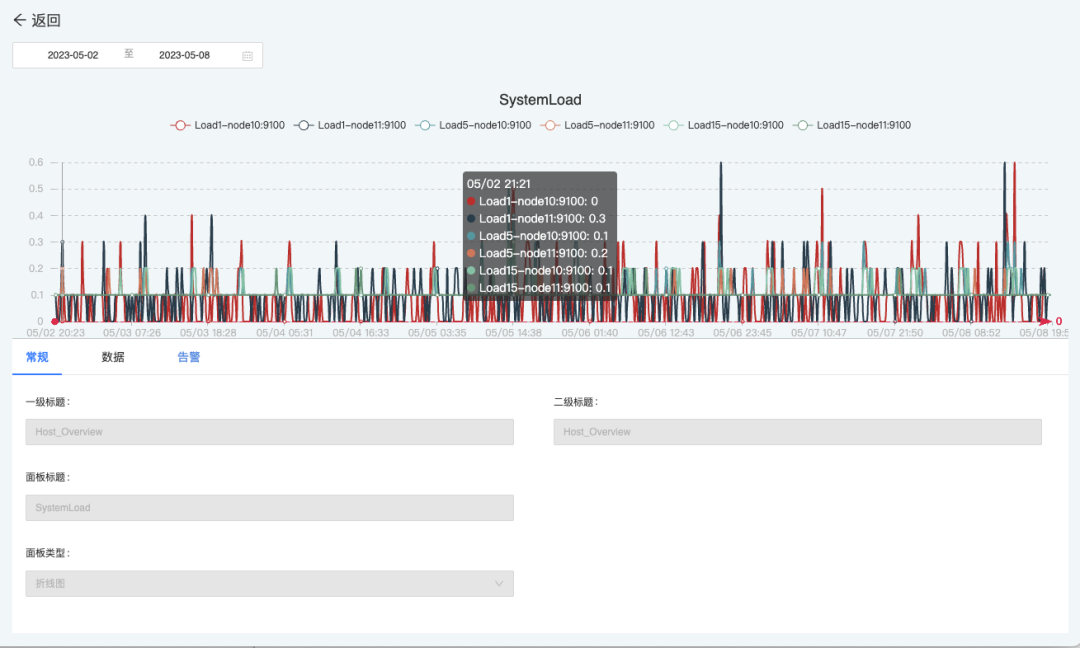
● Data panel
· Get indicator data based on date range
· Display indicator information in the form of charts
· View details, delete
· Request design for each panel to support refresh requests

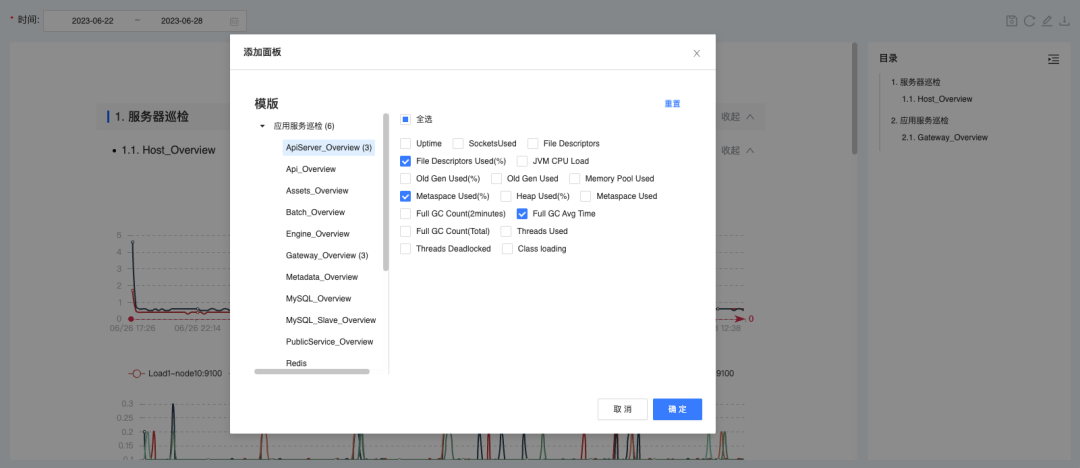
●Panel import
· Count the number of panels selected in the catalog
· When importing a new panel, the existing layout cannot be destroyed, and the new panel can only follow the old panel.
· When importing an existing panel, data comparison needs to be performed . If there are data changes, the latest data needs to be obtained again.
● Save
Before saving, all operations related to the layout are temporary, including importing panels. Only after clicking Save will the current data be submitted to the backend for saving.
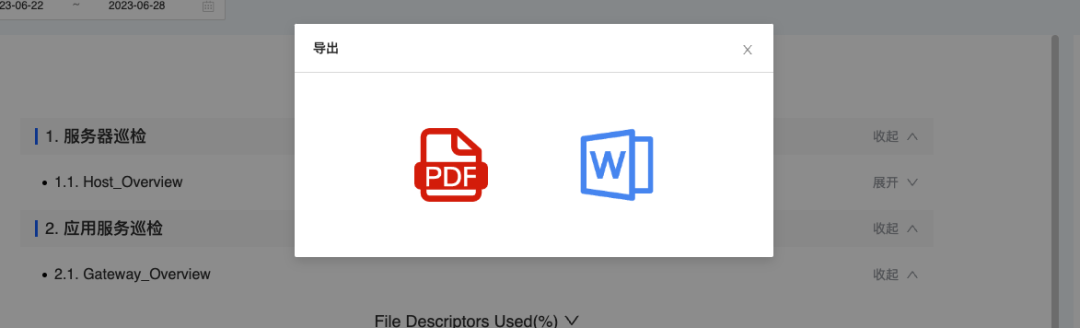
● Supports pdf and word export
Inspection report implementation plan
So, how is this set of inspection report functions implemented? The following will introduce each aspect of data structure design , component design , directory, panel, etc.
Data structure design
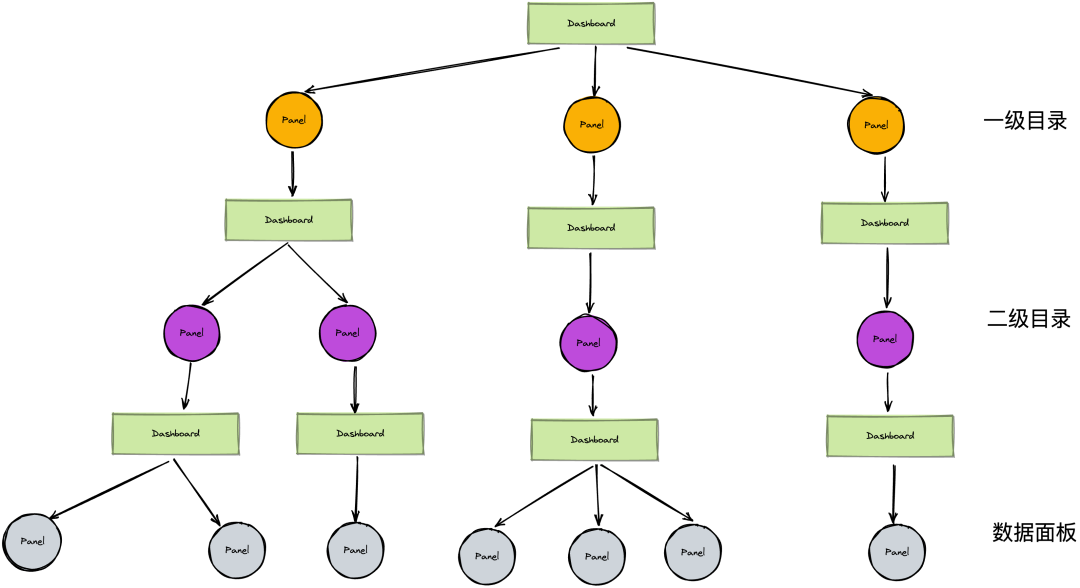
Let’s first look at the diagram using a flat structure:
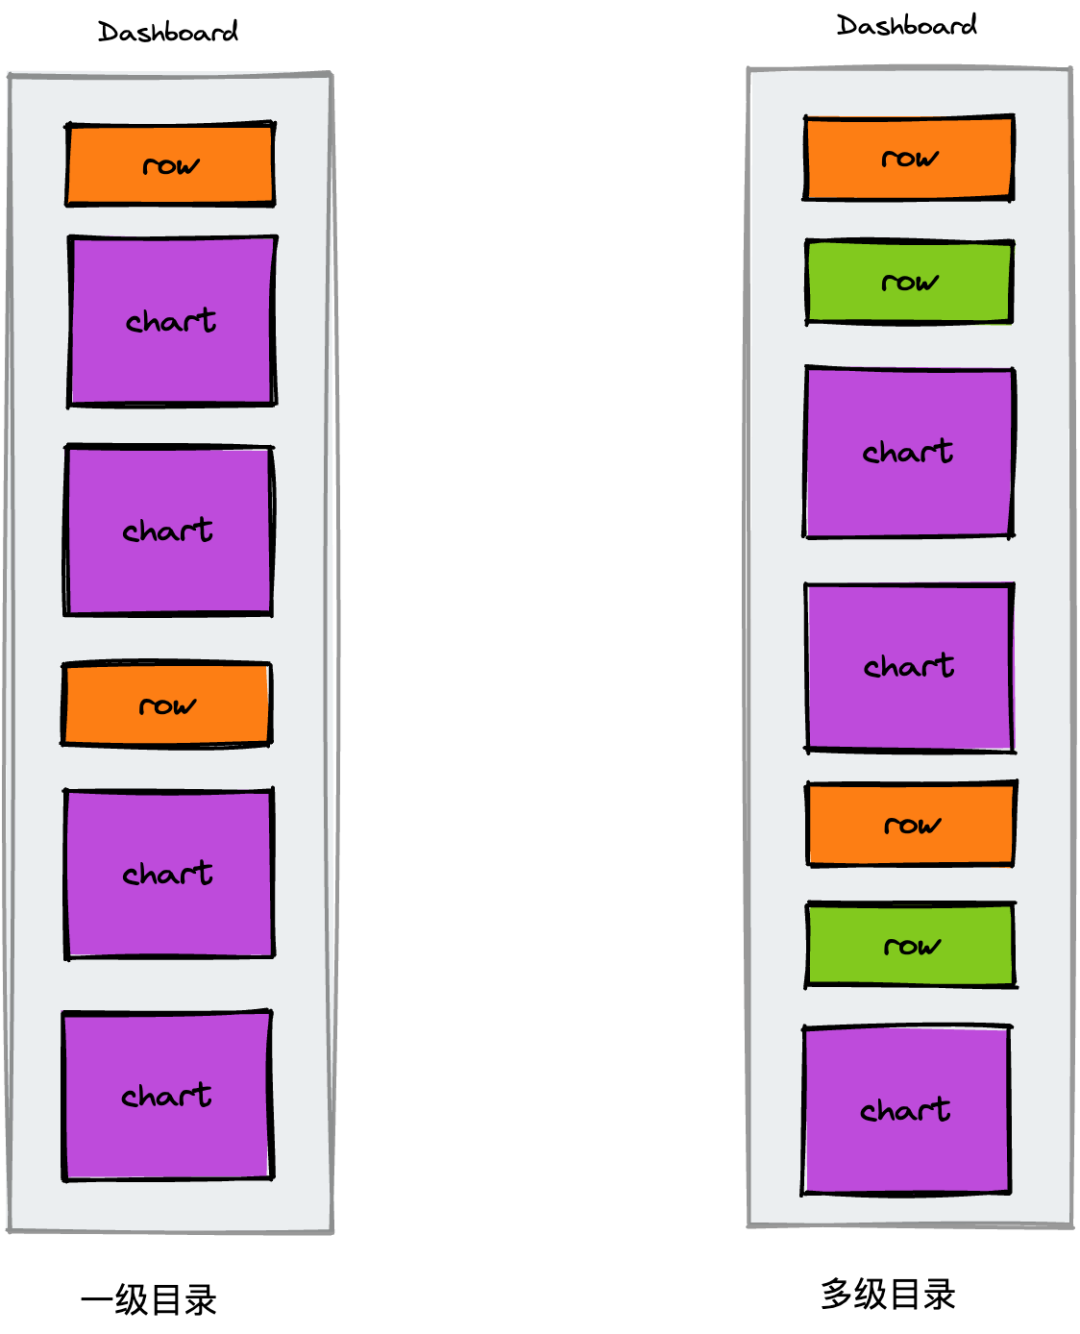
In a flat structure, you only need to find the next row panel to determine the child . The same is true for multi-level directories, but the first-level directory requires additional processing.
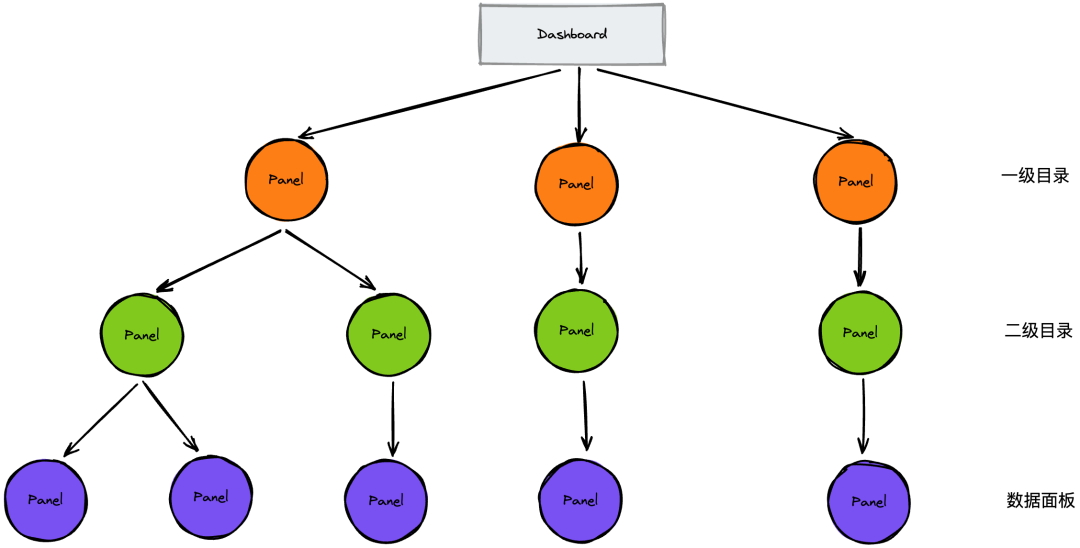
Although the flat structure is relatively simple to implement, in order to meet specific needs, that is, to limit the drag and drop of directories. Restricting the directory requires a relatively clear panel hierarchical relationship. Obviously, the tree data structure can describe the hierarchical structure of a data very appropriately and clearly.
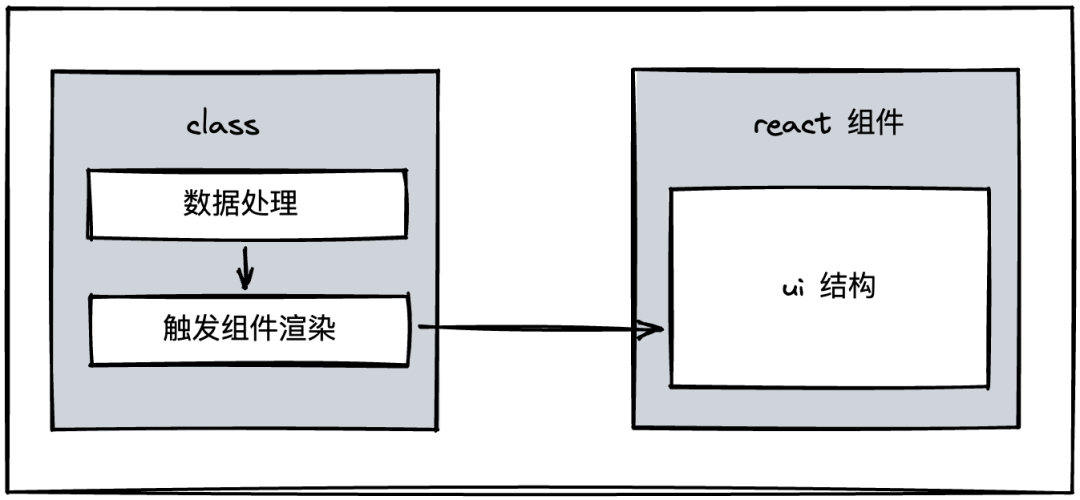
Component design
It is different from traditional component programming. In terms of implementation, rendering and data processing are separated and divided into two parts:
· React component: mainly responsible for page rendering
· Class: Responsible for data processing
DashboardModel
class DashboardModel {
    id: string | number;
    panels: PanelModel[]; // 各个面板
    // ...
}
PanelModel
class PanelModel {
    key?: string;
    id!: number;
    gridPos!: GridPos; // 位置信息
    title?: string;
    type: string;
    panels: PanelModel[]; // 目录面板需要维护当前目录下的面板信息
    // ...
}
Each Dashboard component corresponds to a DashboardModel , and each Panel component corresponds to a PanelModel .
React components are rendered based on the data in the class instance. After the instance is produced, it will not be easily destroyed or the reference address will be changed. This prevents React components that rely on instance data for rendering from triggering update rendering.
We need a way to manually trigger the update rendering of the component after the data in the instance changes.
● Component rendering control
Since we used the Hooks component before, unlike the Class component, the component can be triggered by calling the forceUpdate method.
There is a new feature in react18, useSyncExternalStore , which allows us to subscribe to external data. If the data changes, it will trigger the rendering of the component.
In fact, the principle of useSyncExternalStore triggering component rendering is to maintain a state internally. When the state value is changed, it causes the rendering of external components.
Based on this idea, we simply implemented a useForceUpdate method that can trigger component rendering .
export function useForceUpdate() {
    const [_, setValue] = useState(0);
    return debounce(() => setValue((prevState) => prevState + 1), 0);
}
Although useForceUpdate is implemented, in actual use, the event needs to be removed when the component is destroyed. UseSyncExternalStore has been implemented internally and can be used directly.
useSyncExternalStore(dashboard?.subscribe ?? (() => {}), dashboard?.getSnapshot ?? (() => 0));

useSyncExternalStore(panel?.subscribe ?? (() => {}), panel?.getSnapshot ?? (() => 0));
According to useSyncExternalStore usage, subscribe and getSnapshot methods are added respectively .
class DashboardModel {  // PanelModel 一样
    count = 0;

    forceUpdate() {
        this.count += 1;
        eventEmitter.emit(this.key);
    }

    /**
     * useSyncExternalStore 的第一个入参,执行 listener 可以触发组件的重渲染
     * @param listener
     * @returns
     */
    subscribe = (listener: () => void) => {
        eventEmitter.on(this.key, listener);
        return () => {
            eventEmitter.off(this.key, listener);
        };
    };

    /**
     * useSyncExternalStore 的第二个入参,count 在这里改变后触发diff的通过。
     * @param listener
     * @returns
     */
    getSnapshot = () => {
        return this.count;
    };
}
When the data is changed and the rendering of the component needs to be triggered, just execute forceUpdate.
panel
●Panel dragging
The more popular drag-and-drop plug-ins on the market include the following:
· react-beautiful-dnd
· react-dnd
· react-grid-layout
After comparison, it was found that react-grid-layout is very suitable for the drag and drop function of the panel. react-grid-layout itself is simple to use, and there is basically no threshold to get started. Finally, I decided to use react-grid-layout. Detailed instructions can be found at this link: https://github.com/react-grid-layout/react-grid-layout
After the panel layout is changed, the onLayoutChange method of react-grid-layout is triggered to get the latest position data of all panels after layout.
const onLayoutChange = (newLayout: ReactGridLayout.Layout[]) => {
    for (const newPos of newLayout) {
        panelMap[newPos.i!].updateGridPos(newPos);
    }
    dashboard!.sortPanelsByGridPos();
};
PanelMap is a map, the key is Panel.key, and the value is the panel, which is ready when our component is rendered.
const panelMap: Record<PanelModel['key'], PanelModel> = {};
To update the panel layout data, you can accurately locate the corresponding panel through PanelMap, and further call its updateGridPos method to perform the layout update operation.
At this point, we have only completed the data update of the panel itself, and we also need to execute the sortPanelsByGridPos method of the dashboard to sort all panels.
class DashboardModel {
    sortPanelsByGridPos() {
        this.panels.sort((panelA, panelB) => {
            if (panelA.gridPos.y === panelB.gridPos.y) {
                return panelA.gridPos.x - panelB.gridPos.x;
            } else {
                return panelA.gridPos.y - panelB.gridPos.y;
            }
        });
    }
    // ...
}
●Panel drag range
The current dragging range is the entire dashboard, which can be dragged at will. Green is the draggable area of the dashboard , and gray is the panel. as follows:
If restrictions are needed, it needs to be changed to the structure as shown below:
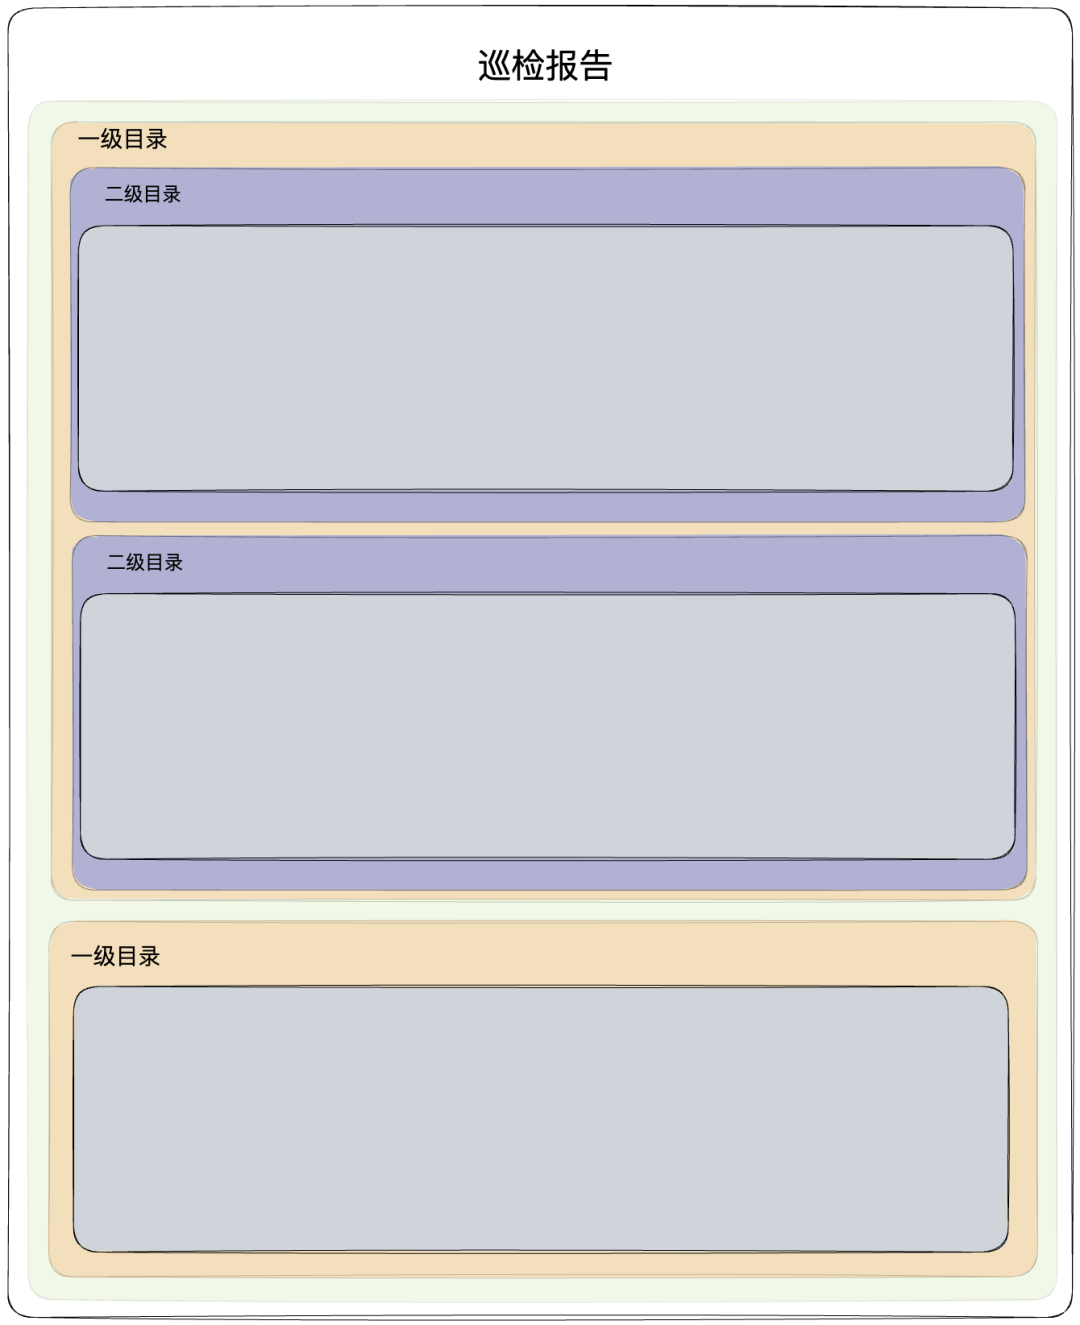
On the basis of the original, it is divided into directories. Green is the overall movable area, yellow is the first-level directory block, which can be dragged in the green area. When dragging, the entire yellow block is used for dragging, and purple is the second-level directory. Blocks can be dragged within the current yellow area and cannot be separated from the current yellow block. Gray panels can only be dragged in the current directory.
Need to be transformed based on the original data structure:

class PanelModel {
    dashboard?: DashboardModel; // 当前目录下的 dashboard
    // ...
}
● Import design of panel
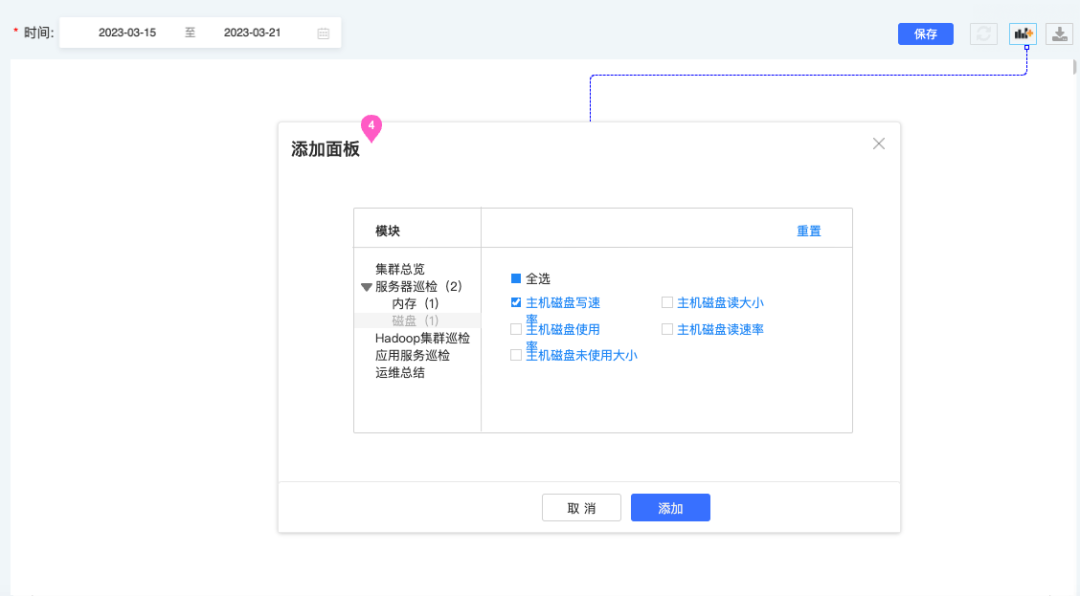
The data returned by the backend is a tree with three levels. After we get it, we maintain the data into three Maps: ModuleMap, DashboardMap and PanelMap.
import { createContext } from 'react';

export interface Module { // 一级目录
    key: string;
    label: string;
    dashboards?: string[];
    sub_module?: Dashboard[];
}

export interface Dashboard { // 二级目录
    key: string;
    dashboard_key: string;
    label: string;
    panels?: number[];
    selectPanels?: number[];
    metrics?: Panel[];
}

export interface Panel {
    expr: Expr[]; // 数据源语句信息
    label: string;
    panel_id: number;
}

type Expr = {
    expr: string;
    legendFormat: string;
};

export const DashboardContext = createContext({
    moduleMap: new Map<string, Module>(),
    dashboardMap: new Map<string, Dashboard>(),
    panelMap: new Map<number, Panel>(),
});
When we render the module, we traverse the ModuleMap and find the secondary directory through the dashboards information in the Module.
Set the first-level directory to be unselectable in the interaction. When the second-level directory is selected, the relevant panels are found through the panels of the secondary directory Dashboard and rendered to the right area.
For the operations of these three Maps, they are maintained in useHandleData and exported:
{
    ...map, // moduleMap、dashboardMap、panelMap
    getData, // 生成巡检报告的数据结构
    init: initData, // 初始化 Map
}
●Panel selection backfill
When entering panel management, the selected panels need to be backfilled. We can obtain the information of the current inspection report through getSaveModel and store the corresponding selected information in selectPanels.
Now we only need to change the value in selectPanels to select the corresponding panel.
● Panel selection reset
Traverse the DashboardMap directly and reset each selectPanels.
dashboardMap.forEach((dashboard) => {
    dashboard.selectPanels = [];
});
● Panel insertion
After we select the panel, there are several situations when inserting the selected panel:
· The panel that originally existed in the inspection report is also selected this time. The data will be compared when inserting. If the data changes, it needs to be requested and rendered based on the latest data source information.
· The panels that originally existed in the inspection report are not selected this time. When inserting, the unselected panels need to be deleted.
· The newly selected panel will be inserted at the end of the corresponding directory when inserting
Adding a new panel requires, similar to directory shrinking , except:
· Directory shrinking targets only one directory, while inserting targets the entire directory.
· Directory shrinking bubbles up directly from the child nodes, while insertion starts from the root node and inserts downwards. After the insertion is completed, the layout is updated based on the latest directory data.
class DashboardModel {
    update(panels: PanelData[]) {
        this.updatePanels(panels); // 更新面板
        this.resetDashboardGridPos(); // 重新布局
        this.forceUpdate();
    }

    /**
     * 以当前与传入的进行对比,以传入的数据为准,并在当前的顺序上进行修改
     * @param panels
     */
    updatePanels(panels: PanelData[]) {
        const panelMap = new Map();
        panels.forEach((panel) => panelMap.set(panel.id, panel));

        this.panels = this.panels.filter((panel) => {
            if (panelMap.has(panel.id)) {
                panel.update(panelMap.get(panel.id));
                panelMap.delete(panel.id);
                return true;
            }
            return false;
        });

        panelMap.forEach((panel) => {
            this.addPanel(panel);
        });
    }

    addPanel(panelData: any) {
        this.panels = [...this.panels, new PanelModel({ ...panelData, top: this })];
    }

    resetDashboardGridPos(panels: PanelModel[] = this.panels) {
        let sumH = 0;
        panels?.forEach((panel: any | PanelModel) => {
            let h = ROW_HEIGHT;
            if (isRowPanel(panel)) {
                h += this.resetDashboardGridPos(panel.dashboard.panels);
            } else {
                h = panel.getHeight();
            }

            const gridPos = {
                ...panel.gridPos,
                y: sumH,
                h,
            };
            panel.updateGridPos({ ...gridPos });
            sumH += h;
        });

        return sumH;
    }
}

class PanelModel {
    /**
     * 更新
     * @param panel
     */
    update(panel: PanelData) {
        // 数据源语句发生变化需要重新获取数据
        if (this.target !== panel.target) {
            this.needRequest = true;
        }

        this.restoreModel(panel);

        if (this.dashboard) {
            this.dashboard.updatePanels(panel.panels ?? []);
        }

        this.needRequest && this.forceUpdate();
    }
}
● Panel request
needRequest controls whether the panel needs to make a request. If it is true, the request will be made the next time the panel is rendered, and the processing of the request is also placed in the PanelModel.
import { Params, params as fetchParams } from '../../components/useParams';

class PanelModel {
    target: string; // 数据源信息

    getParams() {
        return {
            targets: this.target,
            ...fetchParams,
        } as Params;
    }

    request = () => {
        if (!this.needRequest) return;
        this.fetchData(this.getParams());
    };

    fetchData = async (params: Params) => {
        const data = await this.fetch(params);
        this.data = data;
        this.needRequest = false;
        this.forceUpdate();
    };

    fetch = async (params: Params) => { /* ... */ }
}
Our data rendering components generally have a deep level, and external parameters such as time intervals are required when making requests. These parameters are maintained in the form of global variables and useParams. The upper component uses change to modify parameters, and the data rendering component makes requests based on the thrown params.
export let params: Params = {
    decimal: 1,
    unit: null,
};

function useParams() {
    const change = (next: (() => Params) | Params) => {
        if (typeof next === 'function') params = next();
        params = { ...params, ...next } as Params;
    };

    return { params, change };
}

export default useParams;
● Panel refresh
Search downward from the root node to find the leaf node and trigger the corresponding request.
class DashboardModel {
    /**
     * 刷新子面板
     */
    reloadPanels() {
        this.panels.forEach((panel) => {
            panel.reload();
        });
    }
}

class PanelModel {
    /**
     * 刷新
     */
    reload() {
        if (isRowPanel(this)) {
            this.dashboard.reloadPanels();
        } else {
            this.reRequest();
        }
    }

    reRequest() {
        this.needRequest = true;
        this.request();
    }
}
● Deletion of panels
To delete a panel, we only need to remove it under the corresponding Dashboard. After deletion, the current Dashboard height will be changed. This process is consistent with the directory shrinkage below.
class DashboardModel {
    /**
     * @param panel 删除的面板
     */
    removePanel(panel: PanelModel) {
        this.panels = this.filterPanelsByPanels([panel]);

        // 冒泡父容器,减少的高度
        const h = -panel.gridPos.h;
        this.top?.changeHeight(h);

        this.forceUpdate();
    }

    /**
     * 根据传入的面板进行过滤
     * @param panels 需要过滤的面板数组
     * @returns 过滤后的面板
     */
    filterPanelsByPanels(panels: PanelModel[]) {
        return this.panels.filter((panel) => !panels.includes(panel));
    }
    // ...
}
● Save the panel
After communicating with the backend, the current inspection report data structure is independently maintained by the frontend, and finally a string is given to the backend. Get the current panel data and convert it with JSON.
The information acquisition process of the panel starts from the root node, traverses to the leaf nodes , and then starts from the leaf nodes and returns upward layer by layer, which is the process of backtracking.
class DashboardModel {
    /**
     * 获取所有面板数据
     * @returns
     */
    getSaveModel() {
        const panels: PanelData[] = this.panels.map((panel) => panel.getSaveModel());
        return panels;
    }
    // ...
}

// 最终保存时所需要的属性,其他的都不需要
const persistedProperties: { [str: string]: boolean } = {
    id: true,
    title: true,
    type: true,
    gridPos: true,
    collapsed: true,
    target: true,
};

class PanelModel {
    /**
     * 获取所有面板数据
     * @returns
     */
    getSaveModel() {
        const model: any = {};

        for (const property in this) {
            if (persistedProperties[property] && this.hasOwnProperty(property)) {
                model[property] = cloneDeep(this[property]);
            }
        }
        model.panels = this.dashboard?.getSaveModel() ?? [];

        return model;
    }
    // ...
}
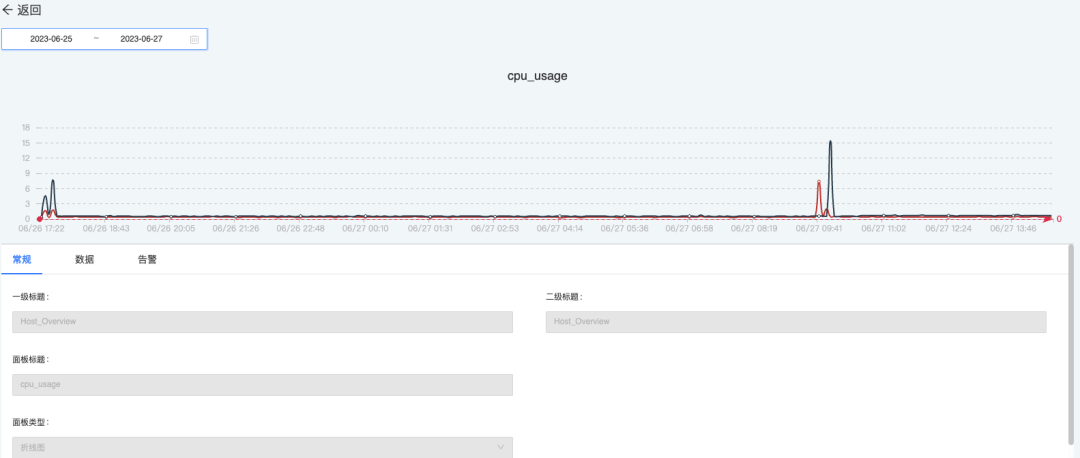
● Panel details display
When viewing the panel, you can modify the time, etc. These operations will affect the data in the instance, and you need to distinguish the original data from the data in the details.
By regenerating a PanelModel instance from the original panel data, any operation on this instance will not affect the original data.
const model = panel.getSaveModel();
const newPanel = new PanelModel({ ...model, top: panel.top }); // 创建一个新的实例
setEditPanel(newPanel); // 设置为详情
On the dom, the details page uses absolute positioning and covers the inspection report.
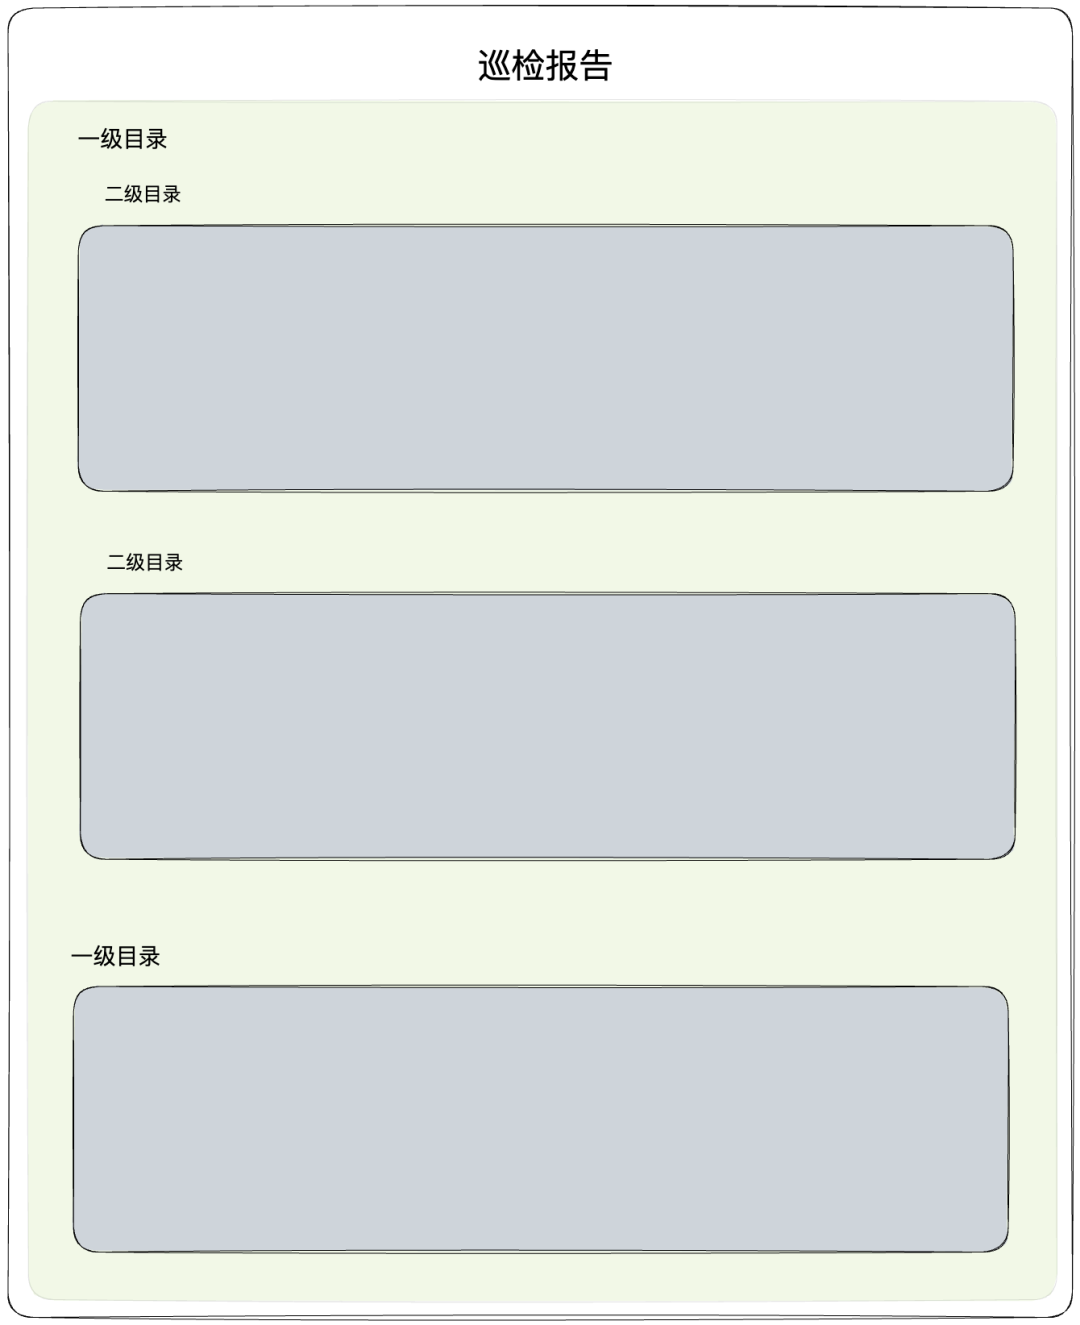
Table of contents
● Directory shrink and expand
Maintain a collapsed property for the directory panel to control the hiding and display of the panel.
class PanelModel {
    collapsed?: boolean; // type = row
    // ...
}

// 组件渲染
{!collapsed && <DashBoard dashboard={panel.dashboard} serialNumber={serialNumber} />}
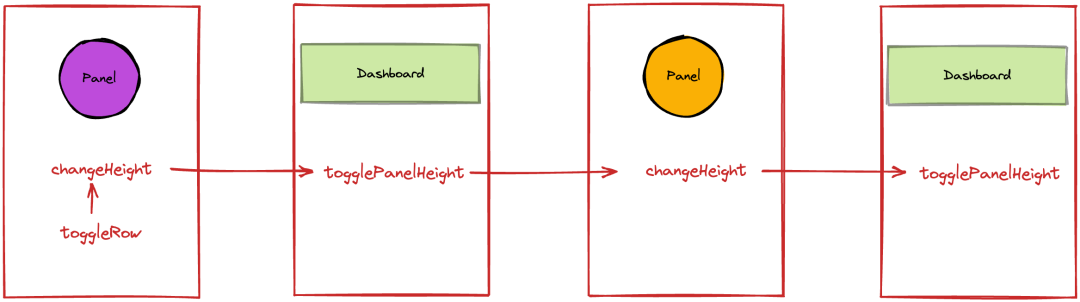
When you shrink and expand the directory, it will change its height. Now you need to synchronize this changed height to the upper-level dashboard.
What the upper level needs to do is similar to the processing of our control directory. As follows, control the shrinkage of the first secondary directory :
When changes occur to the panel, the superior panel needs to be notified and corresponding operations performed.
Add a top to get the parent instance .
class DashboardModel {
    top?: null | PanelModel; // 最近的 panel 面板

    /**
     * 面板高度变更,同步修改其他面板进行对应高度 Y 轴的变更
     * @param row 变更高度的 row 面板
     * @param h 变更高度
     */
    togglePanelHeight(row: PanelModel, h: number) {
        const rowIndex = this.getIndexById(row.id);

        for (let panelIndex = rowIndex + 1; panelIndex < this.panels.length; panelIndex++) {
            this.panels[panelIndex].gridPos.y += h;
        }
        this.panels = [...this.panels];

        // 顶级 dashBoard 容器没有 top
        this.top?.changeHeight(h);
        this.forceUpdate();
    }
    // ...
}

class PanelModel {
    top: DashboardModel; // 最近的 dashboard 面板

    /**
     * @returns h 展开收起影响的高度
     */
    toggleRow() {
        this.collapsed = !this.collapsed;
        let h = this.dashboard?.getHeight();
        h = this.collapsed ? -h : h;
        this.changeHeight(h);
    }

    /**
     *
     * @param h 变更的高度
     */
    changeHeight(h: number) {
        this.updateGridPos({ ...this.gridPos, h: this.gridPos.h + h }); // 更改自身面板的高度
        this.top.togglePanelHeight(this, h); // 触发父级变更
        this.forceUpdate();
    }
    // ...
}
Organize processes and bubbling types, all the way to the top-level Dashboard. Expansion and contraction are the same.
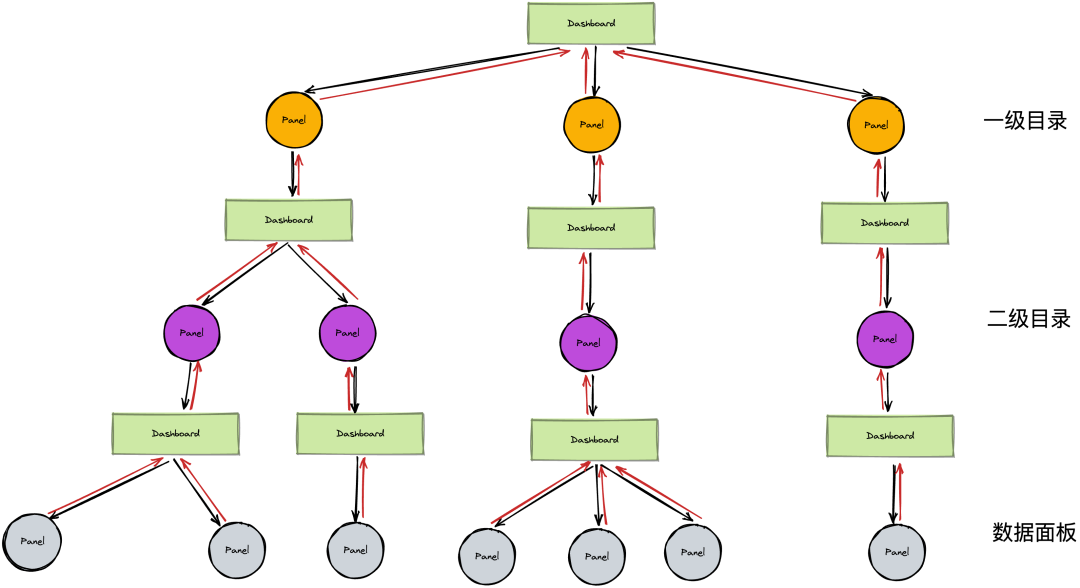
● Right directory rendering
Anchor point/serial number
· The anchor point uses Anchor + id to select the component
· Serial numbers are generated based on each rendering
Use publish and subscribe to manage rendering
Whenever the dashboard changes the layout, the directory on the right needs to be updated synchronously, and any panel may need to trigger the update of the directory on the right.
If we maintain the rendering events of the corresponding components within the instance, there are two problems:
· It is necessary to distinguish, for example, when refreshing the panel, there is no need to trigger the rendering of the directory on the right
· How each panel subscribes to the rendering events of the directory on the right
Finally, the publish-subscriber model was adopted to manage events.
class EventEmitter {
    list: Record<string, any[]> = {};

    /**
     * 订阅
     * @param event 订阅事件
     * @param fn 订阅事件回调
     * @returns
     */
    on(event: string, fn: () => void) {}

    /**
     * 取消订阅
     * @param event 订阅事件
     * @param fn 订阅事件回调
     * @returns
     */
    off(event: string, fn: () => void) {}

    /**
     * 发布
     * @param event 订阅事件
     * @param arg 额外参数
     * @returns
     */
    emit(event: string, ...arg: any[]) {
}
eventEmitter.emit(this.key); // 触发面板的订阅事件

eventEmitter.emit(GLOBAL); // 触发顶级订阅事件,就包括右侧目录的更新
pdf/word export
PDF export is implemented by html2Canvas + jsPDF. It should be noted that when the image is too long, the PDF will segment the image, and the content area may be segmented. We need to manually calculate the height of the panel to see if it exceeds the current document. If it exceeds the height, we need to split it in advance and add it to the next page. Try to split the directory panel and data panel together as much as possible.
Word export is implemented by html-docx-js. It needs to retain the structure of the directory and add a summary under the panel. This requires us to convert the images for each panel separately.
The idea of implementation is to traverse panels . To find the directory panel, insert it using h1 and h2 tags. If it is a data panel, maintain a ref attribute in the data panel, which allows us to get the DOM information of the current panel and perform image conversion based on this. , and in base64 format (word only supports base64 image insertion).
write at the end
The current version of the inspection report is still in its infancy and is not in its final form. With subsequent iterative upgrades, we will gradually add multiple functions including summary explanations.
After being implemented in the current way, if the UI interface needs to be adjusted in the future, only relevant UI components need to be modified in a targeted manner, such as adding pie charts, tables, etc. For changes at the data interaction level, you only need to enter DashboardModel and PanelModel to make necessary updates. In addition, for specific scenarios, we can also flexibly extract special classes for processing to ensure that the entire iteration process is more modular and efficient.
"Dutstack Product White Paper" download address: https://www.dtstack.com/resources/1004?src=szsm
"Data Governance Industry Practice White Paper" download address: https://www.dtstack.com/resources/1001?src=szsm
For those who want to know or consult more about big data products, industry solutions, and customer cases, visit the Kangaroo Cloud official website: https://www.dtstack.com/?src=szkyzg
Linus took it upon himself to prevent kernel developers from replacing tabs with spaces. His father is one of the few leaders who can write code, his second son is the director of the open source technology department, and his youngest son is an open source core contributor. Robin Li: Natural language will become a new universal programming language. The open source model will fall further and further behind Huawei: It will take 1 year to fully migrate 5,000 commonly used mobile applications to Hongmeng. Java is the language most prone to third-party vulnerabilities. Rich text editor Quill 2.0 has been released with features, reliability and developers. The experience has been greatly improved. Ma Huateng and Zhou Hongyi shook hands to "eliminate grudges." Meta Llama 3 is officially released. Although the open source of Laoxiangji is not the code, the reasons behind it are very heart-warming. Google announced a large-scale restructuring