Table of contents
Preface
During the competition last year, I studied the mmdetection framework in depth. This year, I had a project and I was anxious to see the effect. I reinstalled mm on the A100 server and found that it was already version 3.X. Some functions had been changed, so I recorded it again.
Install mmcv
pip install -U openmim
mim install mmengine
mim install "mmcv>=2.0.0"
Install mmdetection
git clone https://github.com/open-mmlab/mmdetection.git
cd mmdetection
pip install -v -e .
# "-v" means verbose, or more output
# "-e" means installing a project in editable mode,
# thus any local modifications made to the code will take effect without reinstallation.
Verify installation
mim download mmdet --config rtmdet_tiny_8xb32-300e_coco --dest .
python demo/image_demo.py demo/demo.jpg rtmdet_tiny_8xb32-300e_coco.py --weights rtmdet_tiny_8xb32-300e_coco_20220902_112414-78e30dcc.pth --device cpu
The following picture appears, which proves that the installation is successful.

data set
The data set uses a data set for cloth defect detection.
Convert to COCO
First convert the downloaded label file to COCO format
import json
from tqdm import tqdm
import cv2, os
from glob import glob
from collections import defaultdict

base_dirs = ['/home/xray/guangdong1_round1/', ]


mp = {

    "破洞": 1, "水渍": 2, "油渍": 2, "污渍": 2,  "三丝": 3, "结头": 4, "花板跳": 5, "百脚": 6, "毛粒": 7,
      "粗经": 8, "松经": 9, "断经": 10, "吊经": 11, "粗维": 12, "纬缩": 13, "浆斑": 14, "整经结": 15, "星跳": 16, "跳花": 16,
      "断氨纶": 17, "稀密档": 18, "浪纹档": 18, "色差档": 18, "磨痕": 19, "轧痕": 19, "修痕":19, "烧毛痕": 19, "死皱": 20,
      "云织": 20, "双纬": 20, "双经": 20, "跳纱": 20, "筘路": 20, "纬纱不良": 20
      }


def make_coco_traindataset(images2annos, name='train'):

    idx = 1
    image_id = 20190000000
    images = []
    annotations = []

    for im_name in tqdm(images2annos):

#         im = cv2.imread(base_dir + 'defect_Images/' + im_name)
#         h, w, _ = im.shape
        h, w = 1000, 2446
        image_id += 1
        image = {

    'file_name': im_name, 'width': w, 'height': h, 'id': image_id}
        images.append(image)

        annos = images2annos[im_name]
        for anno in annos:
            bbox = anno[:-1]
            seg = [bbox[0], bbox[1], bbox[0], bbox[3],
                   bbox[2], bbox[3], bbox[2], bbox[1]]

            bbox = [bbox[0], bbox[1], bbox[2] - bbox[0], bbox[3] - bbox[1]]
            anno_ = {

    'segmentation': [seg], 'area': bbox[2] * bbox[3], 'iscrowd': 0, 'image_id': image_id,
                   'bbox': bbox, 'category_id': anno[-1], 'id': idx, 'ignore': 0}
            idx += 1
            annotations.append(anno_)

    ann = {

    }
    ann['type'] = 'instances'
    ann['images'] = images
    ann['annotations'] = annotations
    category = [{

    'supercategory':'none', 'id': id, 'name': str(id)} for id in range(1, 21)]
    ann['categories'] = category
    json.dump(ann, open(base_dir + '{}.json'.format(name),'w'))

for idx, base_dir in enumerate(base_dirs, 1):
    annos = json.load(open(base_dir + 'Annotations/anno_train.json'))
    images2annos = defaultdict(list)
    for anno in annos:
        images2annos[anno['name']].append(anno['bbox'] + [mp[anno['defect_name']]])
    make_coco_traindataset(images2annos, 'train' + str(idx))
Divide training set, validation set and test set
The paddleX tool is used for division, and the ratio is 7:2:1
Install PaddlePaddle
python -m pip install paddlepaddle-gpu==2.2.2 -i https://mirror.baidu.com/pypi/simple
Install PaddleX
pip install paddlex -i https://mirror.baidu.com/pypi/simple
Partition the data set
paddlex --split_dataset --format COCO --dataset_dir D:/MyDataset --val_value 0.2 --test_value 0.1
Modify the corresponding file
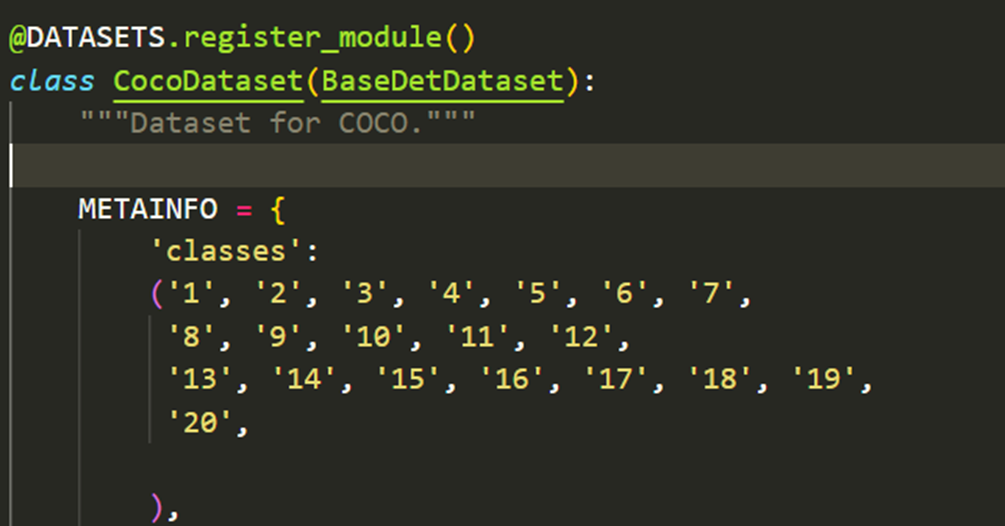
Modify coco.py
Path /mmdetection/mmdet/
dataset/coco.py Modify the category to your own category name.
re-install
Execute the following command again for the modification to take effect.
pip install -v -e .
Modify model file
ctrl+F searches for num_classes and changes it to the number of categories in your own data set. No background is required.
train
python tools/train.py \
    ${CONFIG_FILE} \
    [optional arguments]
test
Test images with ground truth
Save test results to a folder
python tools/test.py \
    configs/rtmdet/rtmdet_l_8xb32-300e_coco.py \
    checkpoints/rtmdet_l_8xb32-300e_coco_20220719_112030-5a0be7c4.pth \
    --show-dir faster_rcnn_r50_fpn_1x_results
Test images without ground truth
Batch testing
Todo
Error collection
Verification installation prompt error: 'NoneType' object has no attribute 'copy'
File “/home/yrx/miniconda3/envs/openmmlab/lib/python3.8/site-packages/mmengine/dist/utils.py”, line 401, in wrapper
return func(*args, **kwargs)
File “/home/yrx/miniconda3/envs/openmmlab/lib/python3.8/site-packages/mmengine/visualization/visualizer.py”, line 551, in draw_texts
self.ax_save.text(
File “/home/yrx/miniconda3/envs/openmmlab/lib/python3.8/site-packages/matplotlib/cbook/deprecation.py”, line 358, in wrapper
return func(*args, **kwargs)
File “/home/yrx/miniconda3/envs/openmmlab/lib/python3.8/site-packages/matplotlib/axes/_axes.py”, line 770, in text
t.update(effective_kwargs)
File “/home/yrx/miniconda3/envs/openmmlab/lib/python3.8/site-packages/matplotlib/text.py”, line 177, in update
super().update(kwargs)
File “/home/yrx/miniconda3/envs/openmmlab/lib/python3.8/site-packages/matplotlib/artist.py”, line 1006, in update
ret = [_update_property(self, k, v) for k, v in props.items()]
File “/home/yrx/miniconda3/envs/openmmlab/lib/python3.8/site-packages/matplotlib/artist.py”, line 1006, in
ret = [_update_property(self, k, v) for k, v in props.items()]
File “/home/yrx/miniconda3/envs/openmmlab/lib/python3.8/site-packages/matplotlib/artist.py”, line 1003, in _update_property
return func(v)
File “/home/yrx/miniconda3/envs/openmmlab/lib/python3.8/site-packages/matplotlib/text.py”, line 1224, in set_fontproperties
self._fontproperties = fp.copy()
AttributeError: ‘NoneType’ object has no attribute ‘copy’
Solution:
pip uninstall matplotlib
Reinstall the latest version of
pip install matplotlib
ValueError: need at least one array to concatenate
Solution: Modify the category corresponding to the coco.py file
Downgrade the protobuf package
If you cannot immediately regenerate your protos, some other possible workarounds are: 1. Downgrade the protobuf package to 3.20.x or lower. 2. Set PROTOCOL_BUFFERS_PYTHON_IMPLEMENTATION=python (but this will use pure-Python parsing and will be much slower).
Solution:
Uninstall the original
version and reinstall the lower version
pip uninstall protobuf
pip install protobuf==3.20.0