Hello everyone, I am Dadao Zhang.
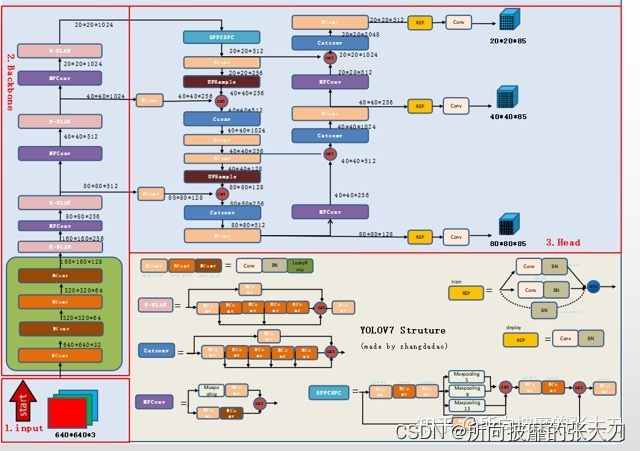
The positive and negative sample matching strategy of yolov7 is mentioned above, here we mainly train our own data set from 0.
If you want to use the ppt in the article, please follow the official account to add WeChat in the background , receive it, and remark "ppt".
First of all, Dadao completes the labeling of the data set on the windows computer, and completes the training of the model in the linux ubuntu system. There is no requirement for Windows system computers, and the computer for training should preferably have a GPU (you can also train under the CPU without a GPU, that is, the speed is impressive)
By default, everyone already has a conda environment, if not, please refer to
(under windows:
https://blog.csdn.net/fan18317517352/article/details/123035625
Under linux:
https://blog.csdn.net/u011262253/article/details/88828229 )
1. Data annotation
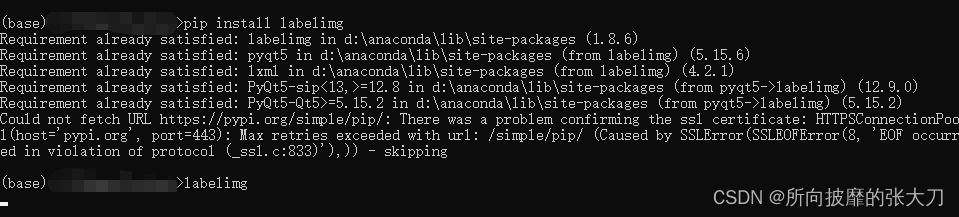
In the window environment, enter cmdand install labelimg(labelme is also available, but the label file of labelme is in json format, and the subsequent data preprocessing methods are different)
pip install labelimg
After installing labelimg, enter in cmd labelimg
to enter the labelimg interface:

For the specific use of labelimg, please refer to this article:
The marked data folder is similar to this:
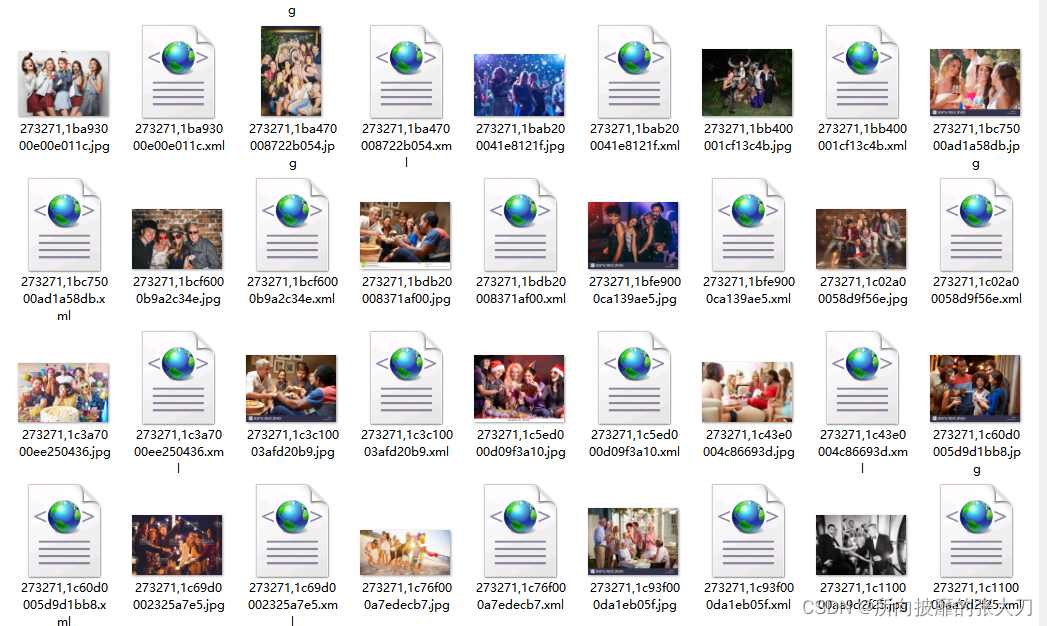
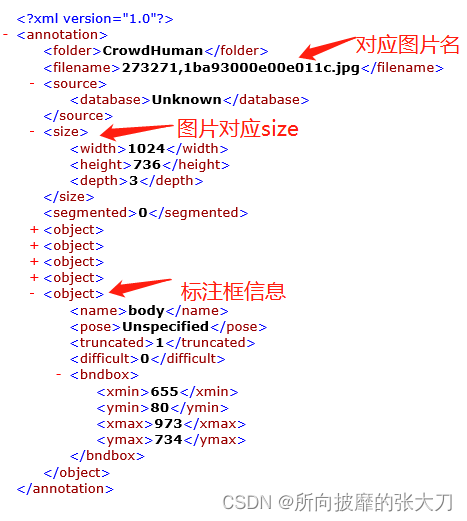
where xml is the marked file, and the content format is as follows:
2. Environment installation
Download the source code on the yolov7 github official website. It is recommended to download the official code that has been tagged . The latest code may be updated all the time. There are two ways to download the source code, one is: click to download as shown in the figure; the

other is: through git clone . (Git needs to be installed, and the installation of git is different on windows and linux. It is recommended that Du Niang search and install it.)

The first method is recommended for Xiaobai. After all, our goal is to train the algorithm, and the simpler the process, the better. For developers who want to devote themselves to more professional development, the second method is recommended.
After downloading yolov7, because it is going to be trained on the linux server, it is necessary to copy the code and data to the linux server. There are two ways to copy ( one is xftp, the other is through the scp command , no You can use Baidu yourself).
Assume that you have put the code and data on linux, and the anconda environment has been installed on linux.

First create a virtual environment through conda:
conda create -n yolov7 python=3.7
After creating a python3.7-based environment, enter the virtual environment:
conda activate yolov7
In tag0.1, yolov7 has not uploaded requirement.txt, because yolov7 is written based on the code base of yolov5 (the code style is the same), you can download requirement.txt in yolov5, put it under yolov7, and install the environment:
pip install -r requirement.txt
So far, the environment of yolov7 is successfully installed, use
pip list
Check the installation status of the environment:

3. Data preprocessing
First divide the data into two folders Annotationsand JPEGImages:

put the xml file in Annotations, and put the corresponding Image in JPEGImages. It is necessary to change the label data in the VOC format in the xml file to yolo格式data, and place the data in the labels folder. The code for converting the format is as follows:
# -*- coding: utf-8 -*-
import xml.etree.ElementTree as ET
import pickle
import os
from os import listdir, getcwd
from os.path import join
import random

classes =  ['person']


def clear_hidden_files(path):
    dir_list = os.listdir(path)
    for i in dir_list:
        abspath = os.path.join(os.path.abspath(path), i)
        if os.path.isfile(abspath):
            if i.startswith("._"):
                os.remove(abspath)
        else:
            clear_hidden_files(abspath)

def convert(size, box):
    dw = 1./size[0]
    dh = 1./size[1]
    x = (box[0] + box[1])/2.0
    y = (box[2] + box[3])/2.0
    w = box[1] - box[0]
    h = box[3] - box[2]
    x = x*dw
    w = w*dw
    y = y*dh
    h = h*dh
    return (x,y,w,h)

def convert_annotation(image_id):
    out_file = open('labels/%s.txt' % image_id, 'w')
    in_file = open('Annotations/%s.xml' %image_id)
    tree = ET.parse(in_file)
    root = tree.getroot()
    size = root.find('size')
    w = int(size.find('width').text)
    h = int(size.find('height').text)
    print(w, h)

    for obj in root.iter('object'):
        difficult = obj.find('difficult').text
        cls = obj.find('name').text
        if cls not in classes or int(difficult) == 1:
            continue

        cls_id = classes.index(cls)
        xmlbox = obj.find('bndbox')
        b = (float(xmlbox.find('xmin').text), float(xmlbox.find('xmax').text), float(xmlbox.find('ymin').text), float(xmlbox.find('ymax').text))
        bb = convert((w,h), b)
        out_file.write(str(cls_id) + " " + " ".join([str(a) for a in bb]) + '\n')
    in_file.close()
    out_file.close()

wd = os.getcwd()

annotation_dir = os.path.join(wd, "Annotations/")
if not os.path.isdir(annotation_dir):
        os.mkdir(annotation_dir)
clear_hidden_files(annotation_dir)
image_dir = os.path.join(wd, "images/")
if not os.path.isdir(image_dir):
        os.mkdir(image_dir)
clear_hidden_files(image_dir)

train_file = open(os.path.join(wd, "2007_train.txt"), 'w')
val_file = open(os.path.join(wd, "2007_val.txt"), 'w')
train_file.close()
val_file.close()

if not os.path.exists('labels'):
    os.makedirs('labels')
train_file = open(os.path.join(wd, "2007_train.txt"), 'a')
val_file = open(os.path.join(wd, "2007_val.txt"), 'a')

list = os.listdir(image_dir) # list image files
probo = random.randint(1, 100)
print (len(list))
for i in range(0, len(list)):
    path = os.path.join(image_dir,list[i])
    if os.path.isfile(path):
        image_path = image_dir + list[i]
        voc_path = list[i]
        (nameWithoutExtention, extention) = os.path.splitext(os.path.basename(image_path))
        (voc_nameWithoutExtention, voc_extention) = os.path.splitext(os.path.basename(voc_path))
        annotation_name = nameWithoutExtention + '.xml'
        annotation_path = os.path.join(annotation_dir, annotation_name)
   #  print (annotation_path)
    probo = random.randint(1, 100)
    print("Probobility: %d" % probo)
    if(probo <=90): # random choice train or test
        if os.path.exists(annotation_path):
            train_file.write(image_path + '\n')
            convert_annotation(nameWithoutExtention)

    else:
        if os.path.exists(annotation_path):
            val_file.write(image_path + '\n')
train_file.close()
val_file.close()
The above code converts the xml in voc format to yolo format:
 the first value is the label of the label box, and the next four digits (x, y, w, h) are the position of the label box , which are relative to the position of the entire picture , the reason for this processing is that the yolo series input to the network is a fixed-size image, and such a relative position facilitates the preprocessing of the image label.
At the same time, the above code also randomly divides the entire data set into a training set and a verification set at a ratio of 9:1, which are stored in the 2007_train.txt and 2007_val.txt files respectively:

Then the entire data set level is as follows:

the red box is finally used for yolov7 training Marked files and folders, so far the data part has been processed.
4. Training configuration
After downloading yolov7, also download the pre-training model corresponding to the model to be trained . If I want to train the yolov7 model, download yolov7.pt (the model can be trained without pre-training, but the convergence speed and accuracy may be compromised.)

Add a data set configuration file , such as my task is pedestrian detection, configuration file for data/person.yaml:
# COCO 2017 dataset http://cocodataset.org

# download command/URL (optional)
# download: bash ./scripts/get_coco.sh

# train and val data as 1) directory: path/images/, 2) file: path/images.txt, or 3) list: [path1/images/, path2/images/]
train: /data2/all/2007_train.txt  # 118287 images
val: /data2/all/2007_val.txt  # 5000 images
# https://competitions.codalab.org/competitions/20794

# number of classes
nc: 1

# class names
names: [ 'person' ]
Modify the network configuration file cfg/deploy/yolov7.yaml , mainly to modify the parameters in the first few lines, and change nc to the number of categories that you need to train. Others do not need to be changed. The anchor settings are the same as yolov5. The anchors here are The anchor clustering value of the coco data set, if it is too different from the training data, the anchor will be re-clustered and calculated.
# parameters
nc: 1  # number of classes
depth_multiple: 1.0  # model depth multiple
width_multiple: 1.0  # layer channel multiple

# anchors
anchors:
  - [12,16, 19,36, 40,28]  # P3/8
  - [36,75, 76,55, 72,146]  # P4/16
  - [142,110, 192,243, 459,401]  # P5/32
There is also data/hyp.scratch.yaml , the hyperparameter part of the training model. It is recommended not to change it during the first training, and update iteratively after subsequent optimization.
Finally, configure the parameters in train.py:

the main modified parts are weight(pre-training model path), cfg(network configuration path), data(dataset configuration path), hyp (hyperparameter configuration path), epochs(number of training rounds) , batch_size(several pictures are trained together, this is related to the performance and number of gpus), img_size(the size of the picture input to the network needs to be a multiple of 32), device(the gpu or cpu specified during training) some other parameters will be adjusted during parameter adjustment When used, the meaning of the basic parameters is the same as that of yolov5.
5. Training and Testing
After configuring the training parameters, you can start training:
python train.py
Under normal circumstances, you can train directly in this way. Sometimes when there are multiple cards or the torch version is not high, there will be a situation where only one card can be used. Just in case, it is recommended to use the following command to start training:
python -m torch.distributed.launch --nproc_per_node 4 train.py
4 means I used 4 cards for training.

After the training is completed, there are corresponding training logs and results under runs/train:

Among them, there are last.pt and best.pt in weight, train_batch, and pictures that are put into the network after pre-processing in jpg:

In test_batch.jpg, put the picture results of 2007_val.txt prediction:

and some indicators of model evaluation: PR曲线(used to calculate the map), the reason why the recall of the PR curve does not reach 1 is that the confidence threshold is not taken 全阈值, that is, it does not change from 0.01 or Starting from 0.001, but starting from 0.3:

F1_score曲线(用于找到模型的最佳score阈值), the best score threshold in this article is 0.341:

confusion matrix:

model prediction is configured for detect.py:

the main modified parts are:
weight(training model path)
source(test image folder path)
conf_thres(confidence threshold)
iou_thres(IOU Threshold)
device(gpu or cpu specified during prediction)
view-img(Whether to display the forecast results in real time during forecasting, not recommended)
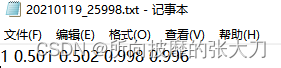
save-txt(Save the prediction result as txt)
save-conf(Whether to save confidence when saving as txt)
nosave(whether to save the prediction result as a picture)
classes(only test a certain category)
Some other parameters will be used when tuning parameters, and the meaning of the basic parameters is the same as that of yolov5.
The above is the whole process of yolov7 from data set construction to training and testing. When actually working on a project, it builds training and testing sets, trains and tests, analyzes error sets, trains and tests again, and updates iterations.