Table of contents
3. Modify the corresponding configuration file
(1) Modify voc.data and voc.names
(2) Modify the yolov3.cfg configuration file
The process of compiling and installing DarkNet (detailed explanation without GPU)
Two IP Camera+YOLOV3 for target detection (the phone camera is used as a computer camera)
hint:
If the reader has not used the CMake tool to compile the darknet source code, then please read the above article " Windows platform uses the CMake tool to compile darknet and the installation process + yolov3 + image detection + camera detection + video detection + mobile phone as a camera detection (detailed explanation ) ";
If the darknet has been compiled on the windows platform, you can directly perform the following operations.
The following entire process structure diagram:

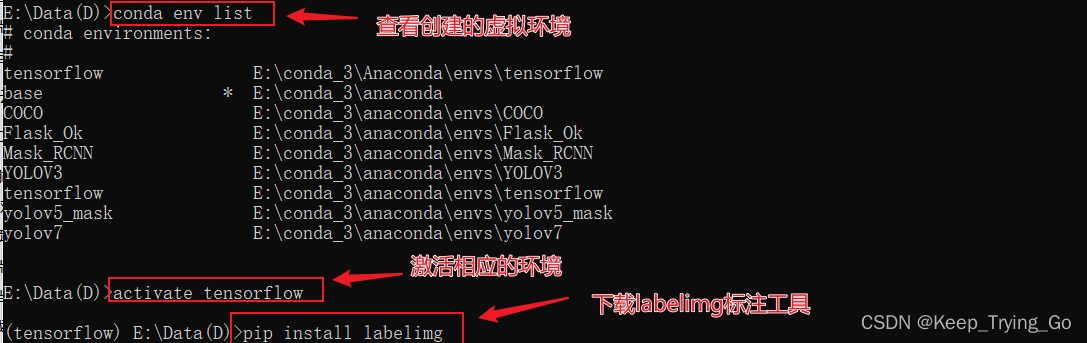
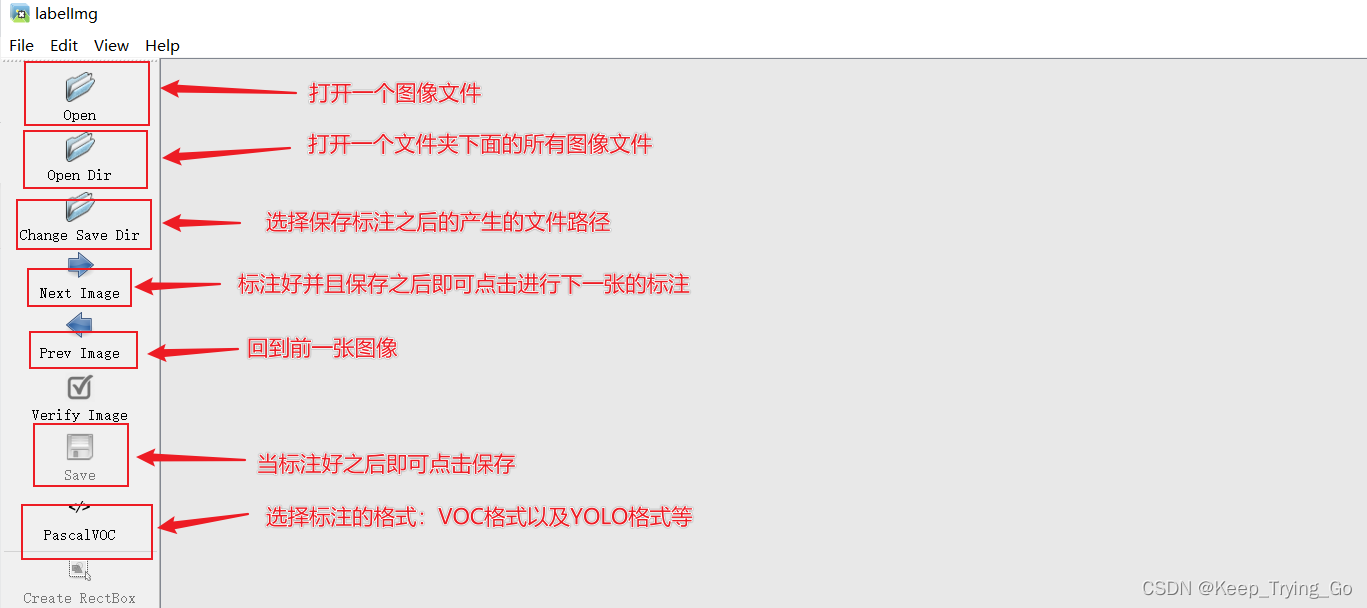
1. Prepare annotation tools
(1) Image labeling tool: pip install labelimg
(2) Open the labeling tool: labelimg (after activating the corresponding virtual environment in the command window of windows)
(3) Select the image folder to be marked;
2. Dataset preparation
(1) Download the dataset
Link: https://pan.baidu.com/s/18R30A4NtFJ2vpLEIk8I1-w
Extraction code: b61kTip: The above downloaded datasets have already been processed, but if readers want to label their own datasets, it is recommended that the storage structure of the files be as follows while labeling the datasets:
- VOCdevkit
- VOC2007
- Annotations (the XML file obtained after storing the marked image)
- ImageSets (.txt files containing paths to store images)
- Main
- train.txt
- test.txt
- val.txt
- JPEGImages (the location where the corresponding marked image is stored. jpg)
- labels (the file generated after the program that processed the data set, which contains the txt file corresponding to each image, the .txt file contains: [class ,cx,cy,w,h])
- 2007_test.txt (contains the absolute path of the image used for the test set)
- 2007_train.txt (contains the absolute path of the image used for the training set)
- 2007_val.txt (contains the absolute path of the images used in the validation set)
- train.all.txt (contains the absolute paths of all images)
- train.txt (contains absolute paths to images used for training and validation)
Tip: Why suggest readers to place the data set according to the above structure, mainly because the path given in the program processing the data set is as shown in the above style, and the above format is also relatively clear.

(2) Processing datasets
Tip: The code looks a bit long, but don't be afraid readers, the key points are explained and it is easy to understand. The following part of the code is already given, the path is:
import os
import pickle
import random
import numpy as np
from PIL import Image
from os.path import join
from os import listdir, getcwd
import xml.etree.ElementTree as ET

import cv2

# sets=[('2012', 'train'), ('2012', 'val'), ('2007', 'train'), ('2007', 'val'), ('2007', 'test')]

# classes = ["aeroplane", "bicycle", "bird", "boat", "bottle", "bus", "car", "cat", "chair", "cow", "diningtable", "dog", "horse", "motorbike", "person", "pottedplant", "sheep", "sofa", "train", "tvmonitor"]
sets =('2007', 'train'), ('2007', 'val'), ('2007', 'test')
classes = ['face']

#将数据的格式转换为中心坐标以及图像的高宽[cx,cy,w,h]
def convert(size, box):
    dw = 1./(size[0])
    dh = 1./(size[1])
    x = (box[0] + box[1])/2.0 - 1
    y = (box[2] + box[3])/2.0 - 1
    w = box[1] - box[0]
    h = box[3] - box[2]
    x = x*dw
    w = w*dw
    y = y*dh
    h = h*dh
    return (x,y,w,h)

"""
读者XML文件下的相关信息,比如标注的图像中物体的高宽以及图像的尺寸等信息
注意:XML中的得到的框[xmin,ymin,xmax,ymax]表示图像中物体的左上角坐标(xmin,ymin)
和右下角坐标(xmax,ymax);但是需要将数据的格式转换为中心坐标以及图像的高宽[cx,cy,w,h]
"""
def convert_annotation(year, image_id):
    in_file = open('VOCdevkit/VOC%s/Annotations/%s.xml'%(year, image_id))
    out_file = open('VOCdevkit/VOC%s/labels/%s.txt'%(year, image_id), 'w')
    tree=ET.parse(in_file)
    root = tree.getroot()
    size = root.find('size')
    w = int(size.find('width').text)
    h = int(size.find('height').text)

    for obj in root.iter('object'):
        difficult = obj.find('difficult').text
        cls = obj.find('name').text
        if cls not in classes or int(difficult)==1:
            continue
        cls_id = classes.index(cls)
        xmlbox = obj.find('bndbox')
        b = (float(xmlbox.find('xmin').text), float(xmlbox.find('xmax').text), float(xmlbox.find('ymin').text), float(xmlbox.find('ymax').text))
        bb = convert((w,h), b)
        out_file.write(str(cls_id) + " " + " ".join([str(a) for a in bb]) + '\n')


"""
读取文件ImageSets/Main/train.txt,ImageSets/Main/val.txt,ImageSets/Main/test.txt
中的图像的名称,以此来图像的路径+图像名称构成图像的完整路径,读取图像。
"""
def VOC2007():
    wd = getcwd()

    for year, image_set in sets:
        if not os.path.exists('VOCdevkit/VOC%s/labels/'%(year)):
            os.makedirs('VOCdevkit/VOC%s/labels/'%(year))
        image_ids = open('VOCdevkit/VOC%s/ImageSets/Main/%s.txt'%(year, image_set)).read().strip().split()
        list_file = open('%s_%s.txt'%(year, image_set), 'w')
        for image_id in image_ids:
            list_file.write('%s/VOCdevkit/VOC%s/JPEGImages/%s.jpg\n'%(wd, year, image_id))
            convert_annotation(year, image_id)
        list_file.close()

    os.system("cat 2007_train.txt 2007_val.txt 2012_train.txt 2012_val.txt > train.txt")
    os.system("cat 2007_train.txt 2007_val.txt 2007_test.txt 2012_train.txt 2012_val.txt > train.all.txt")

"""
缩放图像的大小到指定图像大小
"""
def resizeImage():
    """
    :return:
    """
    imgPath = r"E:\tempImage"
    imgs_list = os.listdir(imgPath)
    for img_name in imgs_list[:200]:
        img_path = os.path.join(imgPath,img_name)
        img = cv2.imread(img_path)
        newimg = cv2.resize(src = img,dsize=(416,416))
        cv2.imwrite(filename='../myDataset/VOC2007/JPEGImages/'+str(img_name),img = newimg)
    cv2.destroyAllWindows()

"""
由于ImageSets/Main下面并没有存在一下文件
ImageSets/Main/train.txt,ImageSets/Main/val.txt,ImageSets/Main/test.txt
所以需要根据图像,将图像数据集划分为训练集,验证集,测试集,并且将这些数据集的名称存放入
train.txt,val.txt,test.txt文件中
"""
def ImageSets():
    train_val_ratio = 0.8
    val_ratio = 0.1
    test_ratio = 0.1
    xmlfilepath = 'VOCdevkit/VOC2007/Annotations'
    mainPath = 'VOCdevkit/VOC2007/ImageSets/Main'
    if not os.path.exists(mainPath):
        os.makedirs(mainPath)

    xml_list = os.listdir(xmlfilepath)
    total_num = len(xml_list)
    #按其文件名的顺序进行读取
    xml_list.sort(key=lambda x:int(x.split('.')[0]))
    total_range = range(total_num)
    n_train = int(total_num * train_val_ratio)
    n_val = int(total_num * val_ratio)
    n_test = int(total_num * test_ratio)

    # trainPath = os.path.join('VOCdevkit/VOC2007/ImageSets/Main','train')
    # valPath = os.path.join('VOCdevkit/VOC2007/ImageSets/Main','val')
    # testPath = os.path.join('VOCdevkit/VOC2007/ImageSets/Main','test')
    # if not os.path.exists(trainPath):
    #     os.mkdir(trainPath)
    # if not os.path.exists(valPath):
    #     os.mkdir(valPath)
    # if not os.path.exists(testPath):
    #     os.mkdir(testPath)

    train = open('VOCdevkit/VOC2007/ImageSets/Main/train.txt', 'w')
    test = open('VOCdevkit/VOC2007/ImageSets/Main/test.txt', 'w')
    val = open('VOCdevkit/VOC2007/ImageSets/Main/val.txt', 'w')

    for xml_idx in total_range[:n_train]:
        xml_name = xml_list[xml_idx]
        file = xml_name.split('.')[0]+'\n'
        train.write(file)
    for xml_idx in total_range[n_train:n_train + n_val]:
        xml_name = xml_list[xml_idx]
        file= xml_name.split('.')[0]+'\n'
        val.write(file)
    for xml_idx in total_range[n_train+ n_val:total_num]:
        xml_name = xml_list[xml_idx]
        file = xml_name.split('.')[0]+'\n'
        test.write(file)

    train.close()
    test.close()
    val.close()

"""
由于在训练的过程遇到过一个错误,导致不需要8位深的图像转换为24位深的图像
"""
def changeDepthBit():
    path8 = r'VOCdevkit/VOC2007/JPEGImages'
    newpath24 = r'VOCdevkit/VOC2007/ImageDepth24'

    files8 = os.listdir(path8)
    files8.sort(key=lambda x:int(x.split('.')[0]))
    for img_name in files8:
        imgpath = os.path.join(path8,img_name)
        img = Image.open(imgpath).convert('RGB')
        file_name, file_extend = os.path.splitext(img_name)
        dst = os.path.join(newpath24, file_name + '.jpg')
        img.save(dst)


if __name__ == '__main__':
    # resizeImage()
    # ImageSets()
    # VOC2007()
    changeDepthBit()
    pass
3. Modify the corresponding configuration file
(1) Modify voc.data and voc.names
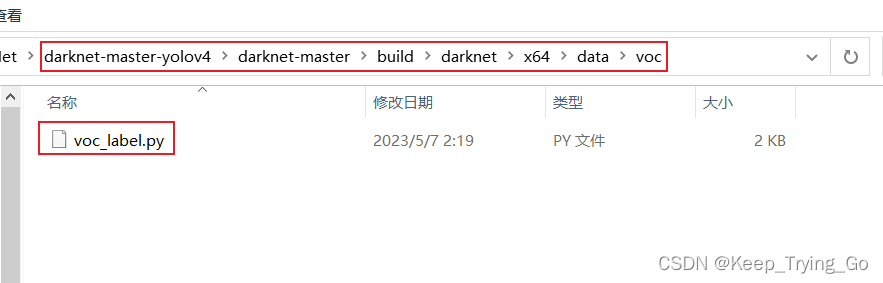
Tip: Copy voc.data and voc.names under darknet-master-yolov4\darknet-master\build\darknet\x64\data path to the file directory of your own project.
Modify voc.data:

Modify voc.names:

(2) Modify the yolov3.cfg configuration file
Detailed explanation of the meaning of each parameter in the yolo configuration file

max_batches modification principle: change the line max_batches to (classes*2000, but not less than the number of training images, and not less than 6000), if you trained 3 classes, then femax_batches=6000.
Tip: There are three changes that need to be made for a modification like the above, and the one given above is only the first. The places that need to be modified are after yolo and after convolutional.
4. Download the weight file
5. Training dataset
(1) Training starts
darknet.exe detector train data/voc.data cfg/yolov3.cfg preTrain/darknet53.conv.74
- date/voc.date
- cfg/yolov3.cfg
- preTrain/darknet53.conv.74

(2) Training results

(3) Test results
Tip: Readers can use the code linked below to test:
https://mydreamambitious.blog.csdn.net/article/details/125520487
Or just use the commands used in the introduction about darknet compilation to test.
"""
@Author : Keep_Trying_Go
@Major  : Computer Science and Technology
@Hobby  : Computer Vision
@Time   : 2023/5/24 8:40
"""

import os
import cv2
import numpy as np

#创建窗口
# cv2.namedWindow(winname='detect',flags=cv2.WINDOW_AUTOSIZE)
# cv2.resizeWindow(winname='detect',width=750,height=600)

#读取YOLO-V3权重文件和网络配置文件
net=cv2.dnn.readNet(model='backup/yolov3_final.weights',config='cfg/yolov3.cfg')

#设置置信度阈值和非极大值抑制的阈值
Confidence_thresh=0.2
Nms_thresh=0.35
#读取coco.names文件中的类别
with open('data/voc.names','r') as fp:
    classes=fp.read().splitlines()

#yolo-v3检测
def detect(frame):
    #获取网络模型
    model=cv2.dnn_DetectionModel(net)
    #设置网络的输入参数
    model.setInputParams(scale=1/255,size=(416,416))
    #进行预测
    class_id,scores,boxes=model.detect(frame,confThreshold=Confidence_thresh,
                 nmsThreshold=Nms_thresh)
    #返回预测的类别和坐标
    return class_id,scores,boxes


#实时的检测
def detect_time():
    #开启摄像头 'video/los_angeles.mp4' or 'video/soccer.mp4'
    cap=cv2.VideoCapture(0)

    while cap.isOpened():
        OK,frame=cap.read()
        if not OK:
            break

        frame=cv2.flip(src=frame,flipCode=2)
        # frame=cv2.resize(src=frame,dsize=(416,416))
        #进行预测
        class_ids,scores,boxes=detect(frame)
        #绘制矩形框
        for (class_id,box) in enumerate(boxes):
            (x,y,w,h)=box
            class_name = classes[class_ids[class_id]]
            confidence = scores[class_id]
            confidence=str(round(confidence,2))
            cv2.rectangle(img=frame,pt1=(x,y),pt2=(x+w,y+h),
                          color=(0,255,0),thickness=2)
            text=class_name+' '+confidence
            cv2.putText(img=frame,text=text,
                        org=(x,y-10),fontFace=cv2.FONT_HERSHEY_SIMPLEX,
                        fontScale=1.0,color=(0,255,0),thickness=2)

        cv2.imshow('detect',frame)
        key=cv2.waitKey(1)
        if key==27:
            break

    cap.release()
#单张图片的检测
def signal_detect(image_path='data/2141.png'):
    frame=cv2.imread(image_path)
    frame = cv2.resize(src=frame, dsize=(416, 416))
    # 进行预测
    class_ids, scores, boxes = detect(frame)
    # 绘制矩形框
    for (class_id, box) in enumerate(boxes):
        (x, y, w, h) = box
        class_name = classes[class_ids[class_id]]
        confidence = scores[class_ids[class_id]]
        confidence = str(round(confidence, 2))
        cv2.rectangle(img=frame, pt1=(x, y), pt2=(x + w, y + h),
                      color=(0, 255, 0), thickness=2)
        text = class_name + ' ' + confidence
        cv2.putText(img=frame, text=text,
                    org=(x, y - 10), fontFace=cv2.FONT_HERSHEY_SIMPLEX,
                    fontScale=1.0, color=(0, 255, 0), thickness=2)

    cv2.imshow('detect', frame)
    cv2.waitKey(0)

cv2.destroyAllWindows()


if __name__ == '__main__':
    print('Pycharm')
    # signal_detect()
    detect_time()