SSL is a pki-based security protocol. If you want a website to have an SSL secure connection function, you must apply for an SSL certificate (web server certificate) from the certificate authority CA for the website. The certificate contains the public key and the validity period of the certificate. , the CA that issued this certificate, the CA’s digital signature and other data. After the website has an SSL certificate, the client and the website can communicate through an SSL secure connection.
1. Installation of root CA
Whether it is email protection or SSL website secure connection, you must apply for a certificate before you can use the public key and private key to perform data encryption and authentication operations. The organization responsible for issuing certificates is called the Certification Authority (CA). Below I will demonstrate how to install the CA certificate authority.

| Windows server 2008 R2 | 192.168.47.1 |
|---|---|
| Windows XP | 192.168.47.3 |
Preparation to test the connectivity of client and server machines (I installed CA WEB on the same server)
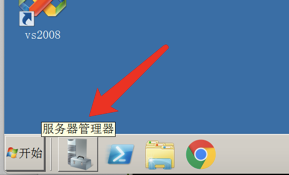
Open Server Manager on the server

Select Role>Select Add Role

Select the two services we want to install, Active Directory Certificate Services and WEB Server,
and check them to proceed to the next step.

Proceed to the next step after reading by default

When selecting the role service, remember to check the Certificate Authority WEB registration, otherwise the certificate application will not be published on the web, which must be used later in the certificate application operation.

The current server is not in the domain and is an independent server, so you can only choose to install an independent CA. Of course, domain members can also follow independent CAs (enterprise CAs will be discussed later)

Select root CA

Select Create a new private key

Default encryption configuration with no other requirements

Here you can customize the name of the CA according to your own requirements.

Choose the validity period of the certificate according to the requirements. I default to five years.

Database storage location, default

Configure WEB server (IIS)

Selected by default

Confirm installation selection to start installation

Wait for installation to complete

The installation is complete

Run certsrv.msc to open the certificate authority.

At this point, it means that the certificate service is installed successfully.

In the browser, enter http://localhost/certsrv Certificate Authority web application page
If the CA and WEB are separate, you need to manually trust the certificate authority
2. SSL website certificate
We must apply for an SSL certificate for the website so that the website can have the capability of SSL secure connection. If the website is to provide services to external network (Internet) users, please apply for a certificate from a commercial CA. Below I will demonstrate how to apply for a certificate for my own website and complete the setup of the SSL website.

First, I changed the web authority port to 8080 and
then the access address was changed to http://192.168.47.1:8080/certsrv

Address after changing the port

Use Notepad to edit a web page of my own and create an html file named index under the C drive. Save it as and save it in the web folder. Change the file type to All Files and select the html web page file.

Go back to IIS and choose to add a website. The physical path points to the web folder I just created.
Launch the website immediately after
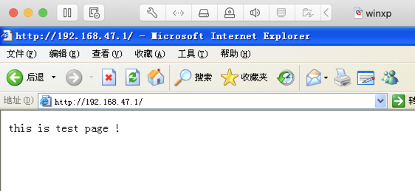
Go to the XP client and use the browser to access 192.168.47.1, and you can see that my web page has been published.
Next, start applying for a certificate for the web server

First apply for a web server certificate, select Server Certificate > Create Certificate Application > Fill in the application information
and select Next

The bit length is used to specify the bit length of the website's public key. The longer it is, the higher the security will be, but the performance will be reduced. Generally, the default is 1024 bits.
Next step

Here I choose C:\Users\Administrator\Desktop\webzs.txt to save the file name and location of the certificate application file, which can be customized. But the location must be remembered clearly. It will be used in the following steps to apply for a server certificate.

encoding file

Enter http://192.168.47.1:8080/certsrv to start applying for a certificate

Select Advanced Certificate Application Here

Copy all the base64 encoded content in the certificate application file just saved on the desktop and submit the application.

The application for a certificate has been suspended. The independent CA will not issue it automatically and we need to issue it manually.

During operation, enter certsrv.msc to open the certificate authority. Click on the pending application to see that the application just now is suspended. Just select issuance here.
Because independent CAs will not automatically issue certificates, we need to manually issue certificates ourselves, while enterprise CAs will automatically issue certificates.

After issuance, return to the home page and select to view the status of pending certificate applications.

View the saved application certificate to see that the certificate has been issued.
Download it to a local custom location.

Go to IIS and continue to return to the server certificate and select Complete Certificate Application. Select the certificate you just downloaded.

After completion, you can see the certificate we issued.
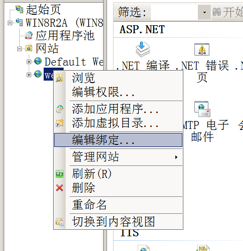
Go back to your website management and select Edit Binding to complete the final certificate binding.

After entering, select Add and change the http type to https port 443. For the certificate, select the certificate we just applied for.

Finally, we deleted the http binding and left only the https one.

Select SSL settings

Check Require SSL and choose Ignore for Client Certificates. Don’t ask for a certificate this time.
After selecting, apply the operation in the upper right corner.

Restart the server

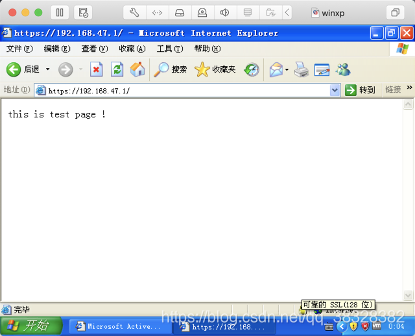
Go back to the XP client and visit https://192.168.47.1. It means that it is already SSL encrypted.

After selecting Yes, you can see our webpage. You can see the picture with a lock in the lower right corner showing that SSL is reliable. Next I will demonstrate the need to provide certificates to access the web.

Go back to the IIS server and set up the website SSL to provide the required client certificate.

When I visit again, it is mandatory to provide a digital certificate to verify identity.

Visit our certificate application webpage on the xp client at http://192.168.47.1:8080/certsrv and choose to apply for a certificate

Select the web browser certificate, fill in the required information and submit it

The certificate application is pending. Go to the server certificate authority to issue it.

Open certsrv.msc, see the pending application and choose to issue the certificate

After issuance, return to the home page to check the status of the pending certificate application.

Certificate has been issued

Click to install this certificate

When you go to visit again, the certificate you just installed can be selected. Confirm and click to start the visit.
After providing the digital certificate, you can access it normally! Now is the result of requiring certificate access.
This ends the installation step.