Related code: react-demo-02
Create login page
The login template that comes with the framework template is relatively complex and does not meet our login needs, so we need to create a login page ourselves.
Createsrc/pages/Login/index.tsx
import React from 'react';
// 使用函数组件创建 虽然采用了typescript语法 ,但可以先像 js一样写代码.
const Login = ()=>{
return (
<div>
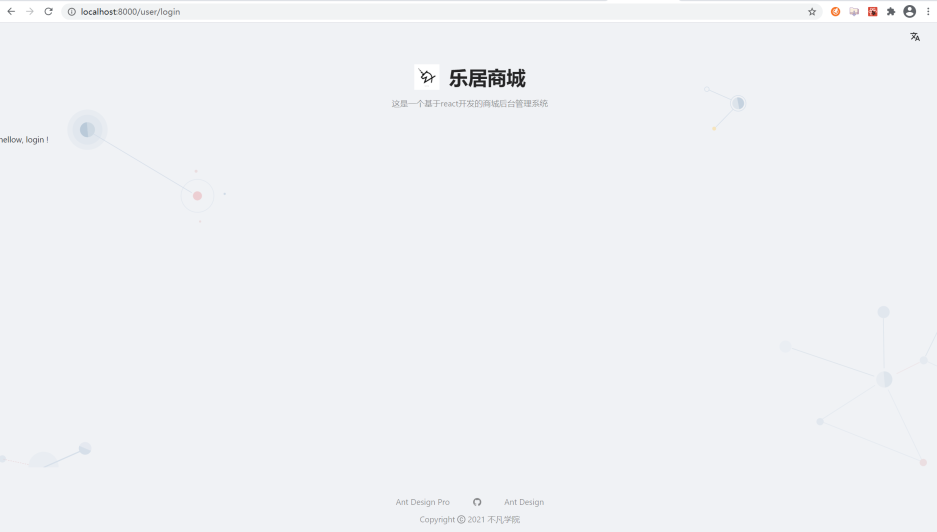
hellow, login !
</div>
)
}
export default Login;Modify routing file config/routes.ts
{
    path: '/',
    component: '../layouts/BlankLayout',
    routes: [
      {
        path: '/user',
        component: '../layouts/UserLayout',
        routes: [
          {
            name: 'login',
            path: '/user/login',
            //===>  这里使用刚才创建的组件替换默认登录组件.  /index.tsx 可以省略不写
            component: './Login',
          },
        ],
      },
Modify layouts/UserLayout.tsx component display information
import { GithubOutlined } from '@ant-design/icons';
...
<div className={styles.container}>
        <div className={styles.lang}>
          <SelectLang />
        </div>
        <div className={styles.content}>
          <div className={styles.top}>
            <div className={styles.header}>
              <Link to="/">
                <img alt="logo" className={styles.logo} src={logo} />
                <span className={styles.title}>乐居商城</span>
              </Link>
            </div>
            <div className={styles.desc}>
              /* 国际化配置映射 */
              <FormattedMessage id="pages.layouts.userLayout.title" defaultMessage="默认信息" />
            </div>
          </div>
          {children}
        </div>
                /* 自定义底部
            # https://procomponents.ant.design/components/layout/#footer
        */
        <DefaultFooter
          copyright={`${new Date().getFullYear()} 不凡学院`}
          links={[
            {
              key: 'Ant Design Pro',
              title: 'Ant Design Pro',
              href: 'https://pro.ant.design',
              blankTarget: true,
            },
            {
              key: 'github',
              title: <GithubOutlined />,
              href: 'https://gitee.com/bufanxy/react-learn-demos',
              blankTarget: true,
            },
            {
              key: 'Ant Design',
              title: 'Ant Design',
              href: 'https://ant.design',
              blankTarget: true,
            },
          ]}
        />
</div>
access http://localhost:8000/user/login
Create form
You can refer to the ant design document to create a form component. The src/pages/Login/index.tsx
style used here is less , which is a css precompiler like sass. Through modular introduction, it can be called directly in jsx. Note: Use camel case naming for attributes in jsx . Different from ordinary html specifications.
import React from 'react';
import { Form, Input, Button } from 'antd';
import styles from './index.less';

const Login  = ()=>{
  // 提交表单且数据验证成功后回调事件
  const onFinish = v=>{
    console.log('v',v);
  }
  // 提交表单且数据验证失败后回调事件
  const onFinishFailed = v=>{
    console.log('ev',v);
  }

  return (
    <Form
      className={styles.main}
      labelCol = {

   {span: 8}}
      wrapperCol = {

   {span: 16}}
      onFinish= {onFinish}
      onFinishFailed = {onFinishFailed}
    >
      <Form.Item
        label="用户名"
        name="username"
        rules={[
          {required: true ,message: '用户名不能为空!'}
        ]}
      >
        <Input/>
      </Form.Item>
      <Form.Item
        label="密码"
        name="password"
        rules={[
          {required: true, message: '密码不能为空!'}
        ]}
      >
        <Input.Password/>
      </Form.Item>
      <Form.Item
        wrapperCol={
          {
            offset: 8,
            span: 16
          }
        }
      >
        <Button type="primary" htmlType="submit">登录</Button>
      </Form.Item>
    </Form>
  )
}

export default Login;

// ./index.less
 .main{
    width: 400px;
    margin: 100px auto;
    }
Using ant design, we can easily implement the layout of the login page. How to call the interface? Don't worry, there is a big difference here from the vue project. We need to first understand the logical layering of the project.