Install ROS on Ubuntu 20.04
Excerpt
There are two ways to install ubuntu, one is to install the ubuntu system, the other is to install a virtual machine under windows, and install ubuntu in the virtual machine. The following is to install ubuntu for dual systems (installing ubuntu with a virtual machine will be very stuck and has many bugs, unless the computer configuration is excellent, it is not recommended to use a virtual machine to install ubuntu...
There are two ways to install ubuntu, one is to install the ubuntu system, the other is to install a virtual machine under windows, and install ubuntu in the virtual machine. The following is to install ubuntu for dual systems (installing ubuntu with a virtual machine will be very stuck and has many bugs, unless the computer configuration is excellent, otherwise it is not recommended to use a virtual machine to install ubuntu)
1. Configure Linux Tsinghua mirror source
1.1 Introduction
When we download many basic tools, we basically request foreign servers. For domestic users, this is undoubtedly a very bad experience. The slow download speed and request failure often become the biggest troubles for many beginners who are new to Linux.
Fortunately, there are stable, high-speed and free mirror websites in China. We can enjoy these excellent website resources by modifying the system configuration files.
清华源:https://pypi.tuna.tsinghua.edu.cn/simple/
阿里云:https://mirrors.aliyun.com/pypi/simple
中科大:https://pypi.mirrors.ustc.edu.cn/simple/
1.2 Start configuration
Here I take Ubuntu 20.04LTS as an example to configure Tsinghua source
First enter Tsinghua University open source software mirror station ( https://mirrors.tuna.tsinghua.edu.cn )
Select your own system in the list, here I choose Ubuntu , click the question mark pattern behind

After entering, choose your own system version 20.04LTS
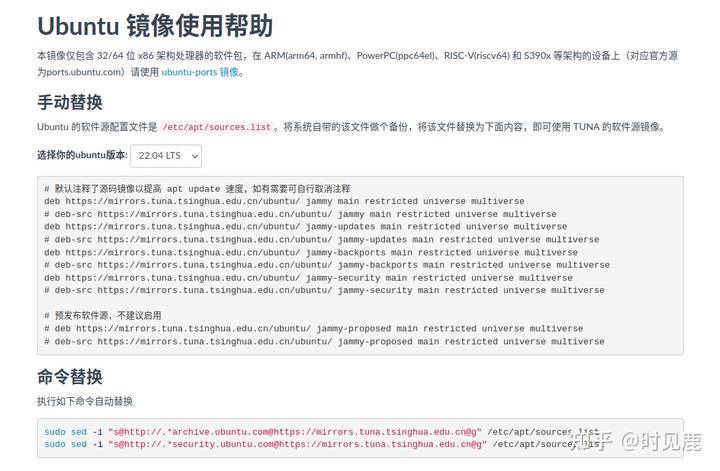
Then the content of the sources.list file you need will be generated in the text box , open the Ubuntu terminal, and enter the following command
sudo apt update

# 将 sources.list 拷贝到桌面,留个备份,防止修改以后出现问题,备份在主目录下
cp /etc/apt/sources.list ~/Desktop

# 打开 sources.list 进行编辑
sudo gedit /etc/apt/sources.list
After opening the file, replace all the content in it with the content in the text box in the previous web page, for example
# 默认注释了源码镜像以提高 apt update 速度,如有需要可自行取消注释
deb https://mirrors.tuna.tsinghua.edu.cn/ubuntu/ jammy main restricted universe multiverse
# deb-src https://mirrors.tuna.tsinghua.edu.cn/ubuntu/ jammy main restricted universe multiverse
deb https://mirrors.tuna.tsinghua.edu.cn/ubuntu/ jammy-updates main restricted universe multiverse
# deb-src https://mirrors.tuna.tsinghua.edu.cn/ubuntu/ jammy-updates main restricted universe multiverse
deb https://mirrors.tuna.tsinghua.edu.cn/ubuntu/ jammy-backports main restricted universe multiverse
# deb-src https://mirrors.tuna.tsinghua.edu.cn/ubuntu/ jammy-backports main restricted universe multiverse
deb https://mirrors.tuna.tsinghua.edu.cn/ubuntu/ jammy-security main restricted universe multiverse
# deb-src https://mirrors.tuna.tsinghua.edu.cn/ubuntu/ jammy-security main restricted universe multiverse

# 预发布软件源,不建议启用
# deb https://mirrors.tuna.tsinghua.edu.cn/ubuntu/ jammy-proposed main restricted universe multiverse
# deb-src https://mirrors.tuna.tsinghua.edu.cn/ubuntu/ jammy-proposed main restricted universe multiverse
Then save and close, so that Tsinghua source is configured!
2.1 Start the installation: configure the public key
In the previous operation, we have completed the configuration of the domestic source, which will make our subsequent installs smooth. However, one more preparation is required, which is to configure the public key .
The public key is a security mechanism of the Ubuntu system, and the public key is configured to be trusted by the system.
sudo apt-key adv --keyserver 'hkp://keyserver.ubuntu.com:80' --recv-key C1CF6E31E6BADE8868B172B4F42ED6FBAB17C654
2.2 System update
Update your system to make sure your Debian packages and indexes are up to date.
2.3 Install ROS
Pay attention to your own Ubuntu version, mine is 20.04 and the corresponding ROS version is noetic
# Ubuntu 20.04
sudo apt install ros-noetic-desktop-full

# Ubuntu 18.04
sudo apt install ros-melodic-desktop-full
I encountered a very sandy problem here, E: Unable to locate the software package ros-noetic-desktop-full , it was invalid after changing the source to Alibaba Cloud, and entered two more command lines:
sudo sh -c 'echo "deb http://packages.ros.org/ros/ubuntu $(lsb_release -sc) main" > /etc/apt/sources.list.d/ros-latest.list'
sudo apt-key adv --keyserver 'hkp://keyserver.ubuntu.com:80' --recv-key C1CF6E31E6BADE8868B172B4F42ED6FBAB17C654
Then run sudo apt install ros-noetic-desktop-full, success!
Well, it was indeed possible to download normally at that time, but the speed was very slow in the end, so I went back to the dormitory to sleep, and the next day I went to the work station and reported an error again.
E: Sub-process /usr/bin/dpkg returned an error code (1)
Enter the following command to successfully resolve:
Now rename the info folder
sudo mv /var/lib/dpkg/info /var/lib/dpkg/info.bk
Create a new info folder
sudo mkdir /var/lib/dpkg/info
installation repair
sudo apt-get update
sudo apt-get install -f
After performing the previous step, generate some files under the info folder, and now move all these files to the info.bk folder
sudo mv /var/lib/dpkg/info/* /var/lib/dpkg/info.bk
Delete the newly created info folder
sudo rm -rf /var/lib/dpkg/info
Restore the original info folder and modify the name
sudo mv /var/lib/dpkg/info.bk /var/lib/dpkg/info
and then execute
sudo apt install ros-noetic-desktop-full
success!

2023.7.25 update:
E: The software package ros-noetic-desktop-full cannot be located. It may also be a problem with the software source. You can try Tsinghua University or Alibaba Cloud first.
3. Configure ROS
3.1 Initialize rosdep
sudo rosdep init && rosdep update
Error sudo is reported again here : rosdep: command not found

Solution:
Enter sudo rosdep init alone to display
ERROR: default sources list file already exists: /etc/ros /rosdep/sources.list.d/20-default.listPlease delete if you wish to re-initialize

Then enter the command
sudo rm /etc/ros/rosdep/sources.list.d/20-default.list

Then enter the command sudo rosdep update to display a timeout, and enter sudo rosdep init again and find that a new error has been reported
ERROR: cannot download default sources list from:https : //raw.githubusercontent.com/ros/rosdistro/master/rosdep/sources.list.d/20-default.listWebsite may be down.

Enter the following command:
Then add the following content to the opened hosts file , then save and exit
199.232.28.133 raw.githubusercontent.com
Then enter the sudo rosdep init command to try and solve it successfully. Then continue to enter sudo rosdep update, and find that a timeout error is still reported, and then specifically check the error reported by rosdep update, as follows:
ERROR: default sources list file already exists: /etc/ros /rosdep/sources.list.d/20-default.listPlease delete if you wish to re-initialize

Since the website requested by rosdep update is raw.githubusercontent.com , for most people, the reason for the command error is timed out. The general method on the Internet is to modify the request address of /etc/ros/rosdep/sources.list.d/20-default.list. But I can't solve the problem by this method myself, and timed out still appears when requesting raw.githubusercontent.com in the error report.
I have tried many methods, and I will not talk about the particularly complicated ones. There are two methods:
- One is to modify the connection network, try changing several networks, such as changing to a mobile phone hotspot, but this method is a metaphysical problem, which is a waste of time, and most desktops are not equipped with wireless network cards, you need to add them yourself;
- One is to modify rosdep to rosdepc, because rosdepc uses domestic sources, and rosdep initialization fails because it uses github, which cannot be accessed in China. The installation steps are as follows:
(Here, it is definitely the best solution for rosdep update to report timeout errors!)
Install rosdepc
If it shows that there is no pip, you can try pip3.
sudo pip3 install rosdepc
If pip3 has not
sudo apt-get install python3-pip
sudo pip install rosdepc
use
sudo rosdepc init
rosdepc update
There should be no problem at this point, continue to the next step, victory is in sight!
3.2 Environment variable settings
It's easy to make mistakes here, just copy and paste
Pay attention to modify the directory name corresponding to your own version
echo "source /opt/ros/noetic/setup.bash" >> ~/.bashrc
source ~/.bashrc
3.3 install rosinstall
sudo apt install python3-rosinstall python3-rosinstall-generator python3-wstool build-essential
3.4 Testing ROS
Open the first terminal window and run roscore
If the following figure appears, it proves that the operation is successful

Open a second terminal window and enter:
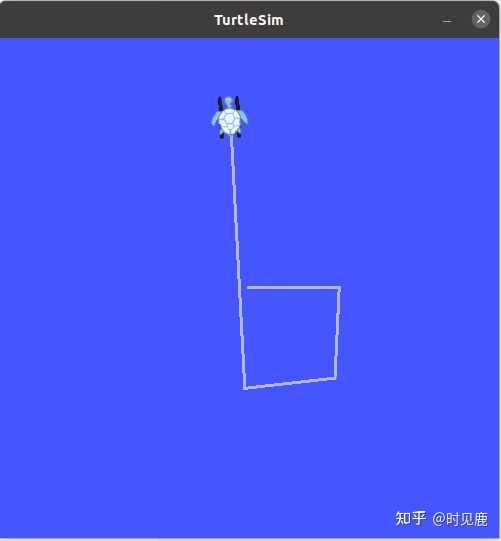
rosrun turtlesim turtlesim_node
When a window with a turtle appears, it proves that the operation is successful (the type of turtle generated each time is random)

Open a third terminal window and enter:
rosrun turtlesim turtle_teleop_key

After such a prompt appears, we use the mouse to focus on the third terminal window, and then we can control the little turtle by pressing the ↑ ↓ ← → keys.
3.5 Installation complete
At this point, congratulations, you have completed the installation, configuration and operation of ROS.
ps: I have installed ubuntu and ros no less than 10 times since the beginning of this year, but I still haven’t encountered any errors. Ubuntu itself is extremely easy to report errors. Different devices report different errors, so don’t use the latest version of ubuntu ! At the beginning, using ubuntu and ros is really a mentality, be patient, and finally you will find that it is actually quite simple~