If we want to perform a certain task at a certain time in the background of the system, or perform a certain task at regular intervals, we can use celery to complete it.
Table of contents
Create a background administrator account
Install
install celery
pip install celeryInstall django_celery_beat
The system uses scheduled tasks in the background, and additional packages need to be installed:
pip install django_celery_beatcelery configuration
register application
First register the application in settings.py:
INSTALLED_APPS = [
    'django.contrib.admin',
    'django.contrib.auth',
    'django.contrib.contenttypes',
    'django.contrib.sessions',
    'django.contrib.messages',
    'django.contrib.staticfiles',
    'myapp',
    'django_celery_beat'
]
celery configuration
Create the celery.py file in the project directory
The content is as follows:
from celery import Celery
from django.conf import settings
import os


# 为celery设置环境变量
os.environ.setdefault('DJANGO_SETTINGS_MODULE', 'project.settings')

# 创建应用
app = Celery('project')

# 配置应用
app.conf.update(
    # 配置broker, 这里我们用redis作为broker
    BROKER_URL='redis://127.0.0.1:6379/1',

    # 使用项目数据库存储任务执行结果
    CELERY_RESULT_BACKEND='django-db',

    # 配置定时器模块,定时器信息存储在数据库中
    CELERYBEAT_SCHEDULER='django_celery_beat.schedulers.DatabaseScheduler',

)

# 设置app自动加载任务
# 从已经安装的app中查找任务
app.autodiscover_tasks(lambda: settings.INSTALLED_APPS)
Modify __init__.py
Modify the __init__.py file in the project directory and add the following content:
from .celery import app as celery_app

__all__ = ['celery_app']
table migration
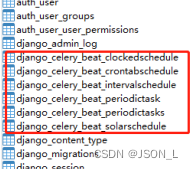
Since the timer information is stored in the database, it is necessary to generate the corresponding table migration file,
Then execute the migration operation to create a table corresponding to diango_celery_beat:
Execute the migration
python manage.py migrate django_celery_beatConsole running screenshot

Add data table
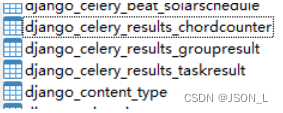
Install django-celery-results
To save the records of celery tasks to the database, you need to install django-celery-results.
Excuting an order
pip install -U django-celery-resultsregister application
INSTALLED_APPS = [
    'django.contrib.admin',
    'django.contrib.auth',
    'django.contrib.contenttypes',
    'django.contrib.sessions',
    'django.contrib.messages',
    'django.contrib.staticfiles',
    'myapp',
    'django_celery_beat',
    'django_celery_results',
]
create table
python manage.py migratedatabase add table
if an error occurs
(1071, 'Specified key was too long; max key length is 1000 bytes')
Solution
Add in settings.py
DJANGO_CELERY_RESULTS_TASK_ID_MAX_LENGTH = 191
Create a background administrator account
If no administrator account has been created, execute the following command:
python manage.py createsuperuser
Create task file
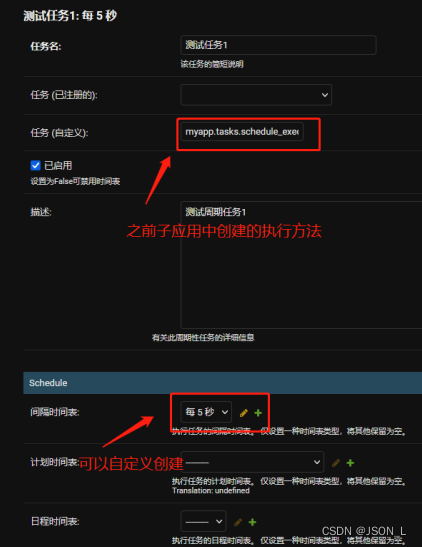
Create a tasks.py file in the sub-application directory and set the execution method:
from celery import shared_task
import time


# 用于定时执行的任务
@shared_task
def schedule_execute():
    print("我每隔5秒钟时间执行一次....")
add task
Log in to the management background Admin:
We can log in to the background Admin of the website to add corresponding tasks.
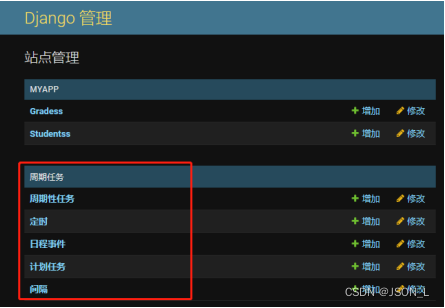
Because the language is configured, it is displayed as Chinese. Periodic tasks, scheduled tasks, calendar events, scheduled tasks, and intervals can all be set for scheduled tasks.
periodic task
Start a scheduled task
celery -A project beat -l infoThe task will be executed every 5 seconds, if storage is configured,
Then the result of each task execution will also be saved in the corresponding database.
Summarize
The main steps are: install the three-party class library, add scheduled tasks in the background, and start the celery queue from the command line.