1. The difference between VS Code and VS and its download website
2. Click Downloads on the website, select the corresponding system to download VS Code
3. Install the VS Code installer and set the installation options
4. Common configurations (settings) of VS Code
1. VS Code interface color setting
2, VS code Chinese interface
3, setting automatic saving
4, installation extension (Extension)
5, running (run) configuration and program code running result display
6, User, Workspace, Folder settings
7, uninstall and copy configuration
The latest VS Code installation detailed tutorial
1. The difference between VS Code and VS and its download site
Visual Studio Code (VS Code) is a free, open source, high-performance, lightweight code editor (Code Editor) provided by Microsoft, which can run on Windows, macOS and Linux desktops. VS Code has built-in support for JavaScript, TypeScript, and Node.js. By installing corresponding extensions (Extension), VS Code also supports programming languages such as C, C++, C#, Java, Python, PHP, Go, and .NET. VS Code Supports development operations such as syntax highlighting, smart code completion, custom hotkeys, debugging, task running, version control, etc., but VS Code aims to provide developers with a code editor for fast code writing and debugging, not a complete code editor. IDE (Integrated Development Environment, integrated development environment) tools.
IDE is a tool that provides a development environment for programming languages. It integrates code writing functions, analysis functions, compilation functions, debugging functions, etc., and its functions are more abundant and powerful than Code Editor. Visual Studio (VS) is an IDE tool provided by Microsoft, which can run on Windows and macOS desktops. VS provides a series of functions such as quick navigation, writing, repairing, debugging, probing, diagnosis, testing, version control, etc., which can help developers quickly develop applications. It supports C, C++, C#, Java, Python, PHP, Go, Programming languages such as JavaScript. However, VS is generally charged, and only the VS community version is free.
Although VS Code is positioned as an editor, it is of course different from a txt text editor. After installing the corresponding extension (Extension), VS Code is more powerful than the IDE that comes with some programming languages (such as the IDLE development environment tool that comes with python). . Moreover, by installing the corresponding extensions, VS Code can adapt to different programming languages.
In terms of functions, the VS integrated development environment tool is more powerful than the VS Code code editor, but the former needs to be charged, and the latter is free. The VS Code code editor can be regarded as a simplified version of the VS integrated development environment tool. This simplified structure also improves its running speed, and the functions of VS Code can basically meet the code development needs of developers, and can be competent C, C++, C#, Java, Python, PHP, Go, .NET and other programming languages are developed for free, so VS Code is also a very popular code development tool.
Here we mainly introduce the installation process of VS Code. For the VS Code download website, see the red link in Table 1-1.
Table 1-1 VS Code and VS download website
| VS Code download site |
|
| VS download site |
2. Click Downloads on the website and select the corresponding system to download VS Code
Open the red link in Table 1-1 above, and we can see that there are two Downloads locations on the page, as shown in Figure 2-1.
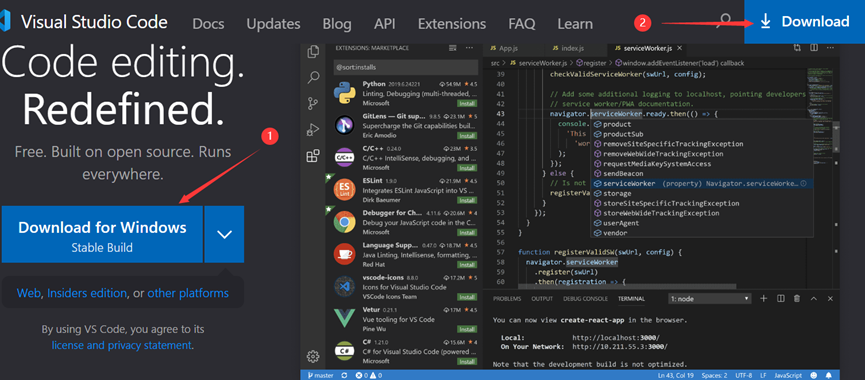
Figure 2-1 VS Code page
The place indicated by the red arrow on the left side of Figure 2-1 is the VS Code installation program installed by the user account (User) of the 64-bit Windows system that downloads the latest stable version (stable) by default, such as: VSCodeUserSetup-x64-1.79.2. exe.
The Windows operating system allows the creation of multiple account users, each account has its own permissions, and the administrator account
Administrator has the highest access authority and has the authority to access other accounts. After the VS Code downloaded above is installed, only the user account can log in to use the installed VS Code, and other non-administrator accounts have no right to log in to the operating system.
Click ① under the red arrow ![]() , and the pop-up menu has the corresponding installation programs of VS Code for each operating system, but the types of VS Code installation programs are limited, including stable version (stable) and internal test version (insiders). stable is a relatively complete and stable version that has been tested. Insiders are still in internal testing and may not be perfect.
, and the pop-up menu has the corresponding installation programs of VS Code for each operating system, but the types of VS Code installation programs are limited, including stable version (stable) and internal test version (insiders). stable is a relatively complete and stable version that has been tested. Insiders are still in internal testing and may not be perfect.
We can click Downloads on the right side of Figure 2-1 indicated by the red arrow ②, and the entered page is shown in Figure 2-2, which provides a comprehensive selection of different types of VS Code programs for each operating system. This is the stable version (stable) that has passed the test.

Figure 2-2 VS Code programs of different operating systems and hardware systems
Figure 2-2 shows the different types of VS Code installation programs corresponding to the windows, Linux, and MacOS operating systems. Figure 2-2 The red box is the default type of installer, for example: windows is the VS Code installer installed by the user account (User) of the latest stable version (stable) of the 64-bit windows system according to the user's operating system version. The Apple system macOS is the default universal version (Universal) VS Code installer. For the universal version , the installer will automatically detect the user's processor and adapt it when installing.
(1) Windowsoperating system
- User Installer、System Installers
In the Windows system, the administrator account Administrator has the highest access authority and has the authority to access other accounts, while personal accounts do not have mutual access authority.
User Installer is the VS Code installation program installed by the current account (User) of windows. If the current account is a personal account, other non-administrator accounts have no right to log in to the operating system.
System Installers is an executable program that installs VS Code with administrator privileges. Install VS Code with administrator privileges, and other Windows accounts can use VS Code after logging in to the system.
Both User Installer and System Installers are installation files in .exe format.
- .zip
The .zip option corresponds to a VS Code .zip format compressed package, which can be used directly after decompression. This is used directly after decompression, without generating a registry. The .exe file will generate the registry after installation.
- CLI
The CLI option corresponds to a code command-line interface (command-line interface), that is, the command window of VS Code, which is convenient for text command operations.
- x64 、x86 、Arm64 、Arm32
The parameters of x64, x86, Arm64, and Arm32 are related to the hardware cpu.
x64 refers to a 64- bit operating system based on a 64-bit processor, and the downloaded program is suitable for a 64-bit operating system. Right-click My Computer and left-click Properties in the menu to view the hardware configuration of your computer. The type of operating system of your computer is shown in the red box in Figure 2-3 below.
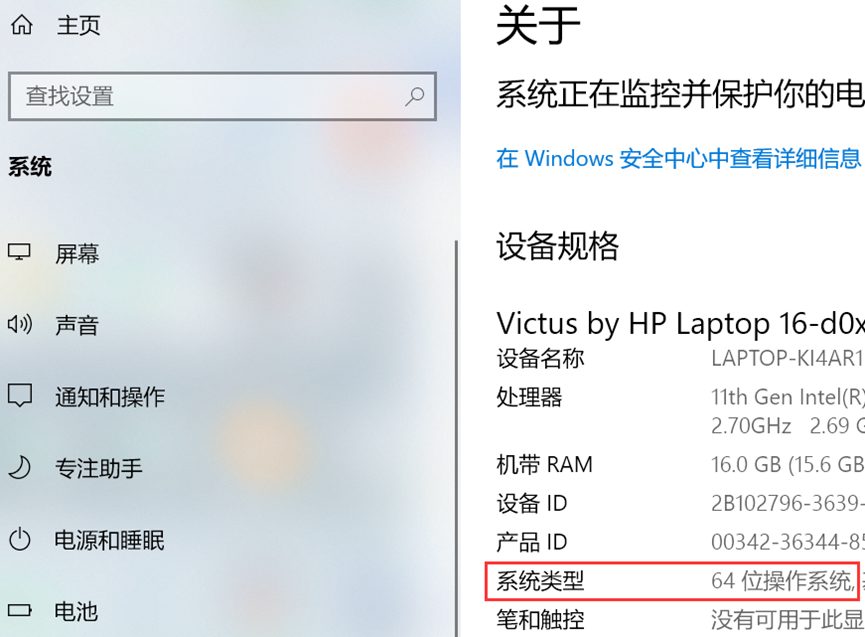
Figure 2-3 Computer specifications
x86 refers to a 32-bit operating system, based on a 32-bit processor, and the downloaded program is suitable for a 32-bit operating system.
Arm64 is the processor architecture in the AArch64 state, and the downloaded program is suitable for the processor of the Arm64 system launched by ARM, which is based on a 64-bit processor.
Arm32 is the processor architecture in AArch32 state, the downloaded program is suitable for the processor of the Arm32 system launched by ARM Company, based on the 32-bit processor. The VS Code file download suitable for Arm32 system processors is not provided here, and the linux system to be mentioned below provides downloads.
The above options correspond to the corresponding VS Code files of this type of processor.
(2) Linuxoperating system
- .deb、.rpm、.tar.gz
.deb, .rpm, .tar.gz are three different file formats. Different file formats may be suitable for different operating systems, for example: .exe files are suitable for the windows operating system, but not for the Apple system macOS.
Linux from Debian or Ubuntu supports the .deb format, and Linux from Red Hat, Fedora or SUSE supports the .rpm format.
.tar.gz is a compressed package, similar to .zip compressed package, but the .tar.gz format is suitable for Linux operating system and MacOSX system (system based on UNIX core).
The above options correspond to the corresponding VS Code files.
- Snap
Snap is a modern application packaging format. Linux supports snap format software packages. You can download the snap format software packages of VS Code in the online application store Snap Store.
- CLI、x64、x86、Arm64、Arm32
The meanings of CLI, x64, x86, Arm64, and Arm32 are the same as above, but here they correspond to the corresponding VS Code under the Linux operating system.
(3) Apple system macOS
- .zip、CLI
The meanings of .zip and CLI are the same as above, except that it corresponds to the corresponding VS Code under the macOS Apple operating system.
- Universal
The Universal option is the universal version of VS Code for macOS . For the universal version ( Universal ) , it is suitable for all processors. When the installer is installed, it will automatically detect the user's processor and adapt it.
- Apple silicon
The Apple silicon option is VS Code for Mac computers with Apple's self-developed M-series CPU (Apple Silicon chip).
- Intel chip
The Intel chip option is VS Code for Mac computers with Intel CPUs.
Above, we introduced different types of VS Code installers for each operating system, which correspond to different rights management, file formats, or processor characteristics. We can choose the corresponding VS Code installer according to our own needs.
3. VS Code installer installation and installation option settings
Here, we take the installation of VS Code under the windows operating system as an example. We download the VS Code corresponding to the System Installers→x64 option of the windows operating system, that is, select the VS Code.exe installer with administrator privileges and a 64-bit operating system, and click the location shown in the red box in Figure 3-1 to download Corresponding VS Code.
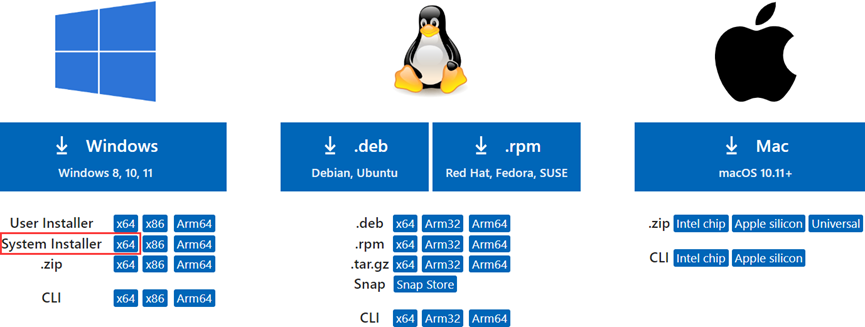
Figure 3-1 Various types of VS Code programs
(1) Run VSCode Setup
Run the VSCode installer downloaded above, and the installation interface shown in Figure 3-2 below will appear.
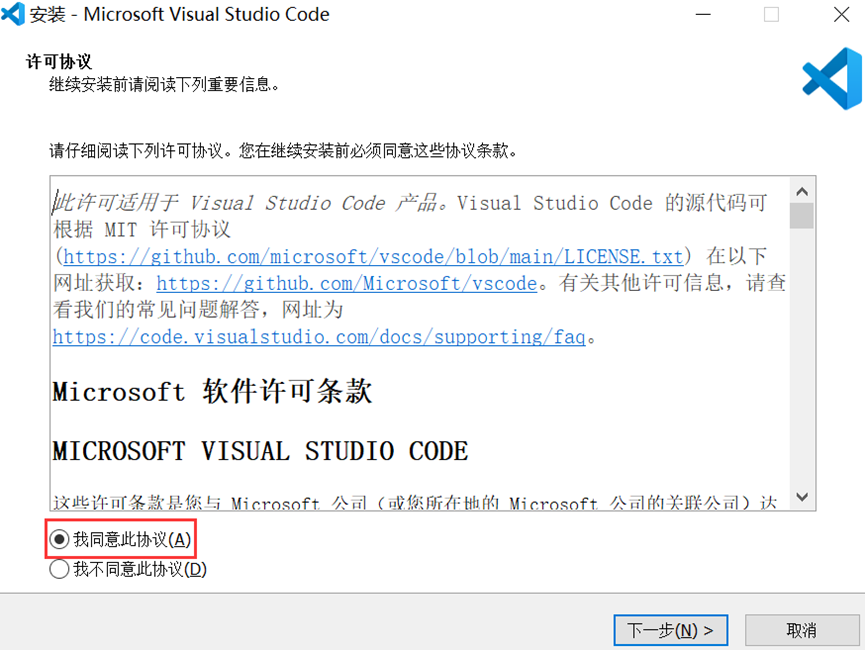
Figure 3-2 VS Code installation
After agreeing, click Next in Figure 3-2 to enter the VS Code installation location setting interface shown in Figure 3-3.
(2) Installation location setting
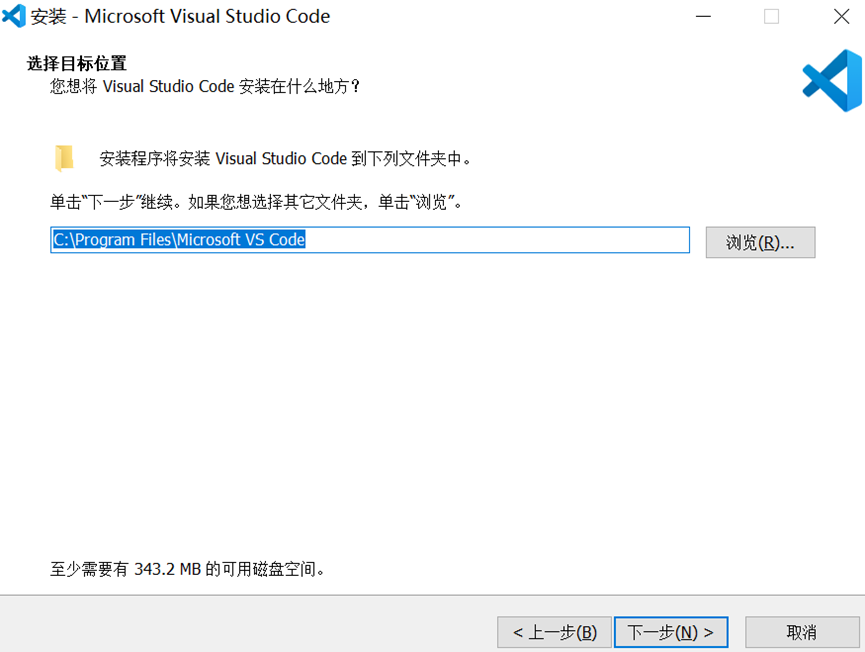
Figure 3-3 VS Code installation location
You can customize the installation path of VS Code. After the settings are complete, click Next to enter the interface for creating shortcuts in the start menu of VS Code as shown in Figure 3-4.
(3) Folder settings for VS Code shortcuts in the start menu
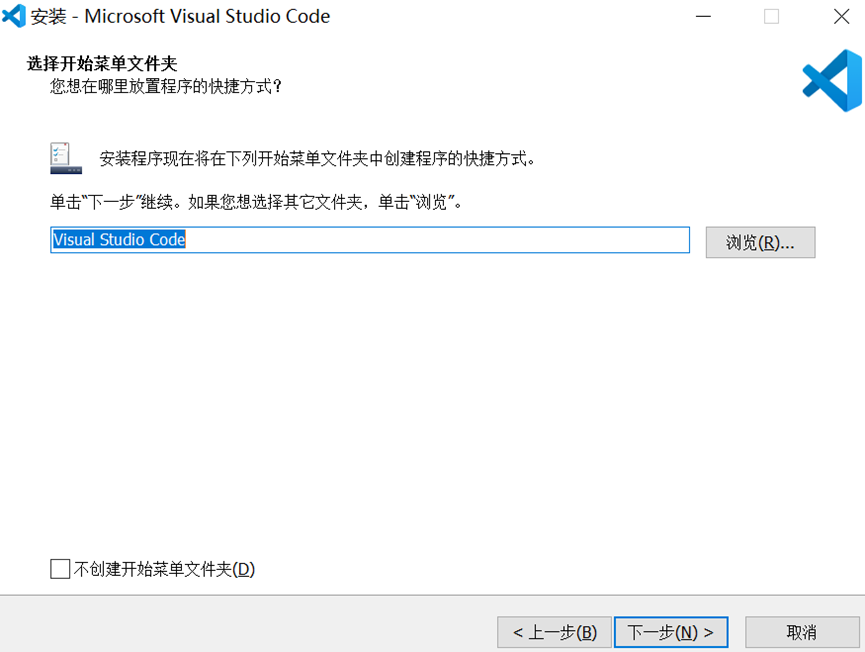
Figure 3-4 The VS Code shortcut folder in the start menu
The default Visual Studio Code folder in Figure 3-4, the Visual Studio Code folder in the computer start menu will generate a VS Code shortcut. Here you can use the default Visual Studio Code folder, click Next to enter the VS Code installation option setting interface shown in Figure 3-5.
(4) Installation option settings
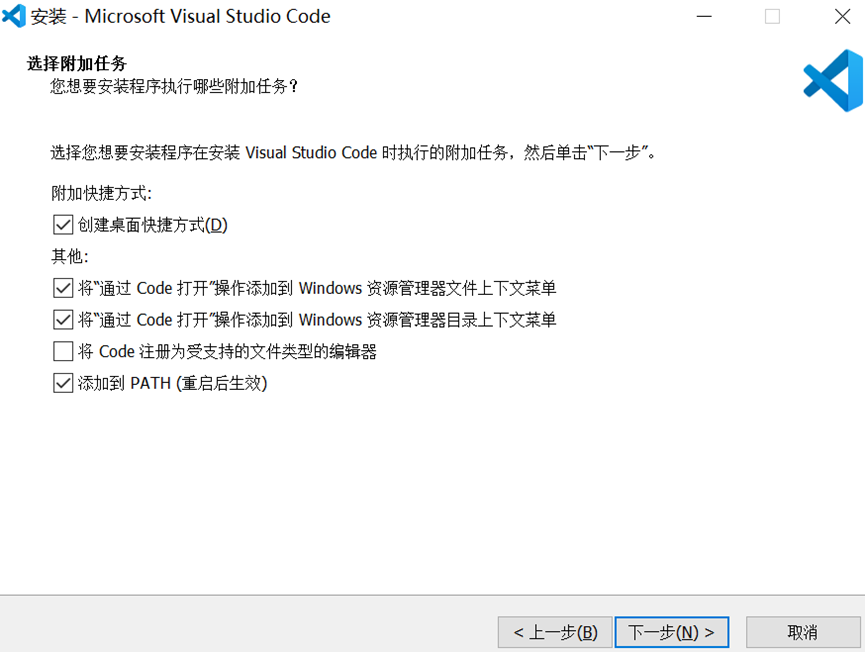
Figure 3-5 VS Code installation option settings
- Create a desktop shortcut
Check this option to create a VS Code shortcut icon on the desktop.
- Add "Open by code " action to Windows Explorer file context menu
Check this option, and the option "Open by code" will appear in the pop-up menu with the right mouse button. When we right-click a file, we can open the file by selecting the "Open by code" option in the pop-up menu.
- Add "Open by code " action to Windows Explorer directory context menu
Check this option, and the option "Open by code" will appear in the pop-up menu with the right mouse button. When we right-click a folder, we can open the folder by selecting the "Open by code" option in the pop-up menu.
Checking these two items actually creates an option of "Open by code" in the pop-up menu of the right mouse button, which is convenient for directly opening files or folders through this option.
- Register Code as an editor for supported file types
You can leave it unchecked. If you check it, VS Code will open files such as .txt and .py by default.
- Add to PATH (take effect after restart)
Check this item to add VS Code to the system path of windows to facilitate the automatic recognition of the operating system. This item will take effect after restarting the computer. This item can realize adding VS Code as an environment variable of the system.
An environment variable is an object with a specific name in the operating system that contains information that one or more applications will use. When the system is required to run a program without telling it the full path where the program is located, the system will not only look for the program under the current directory, but also go to the path specified in path to find runnable variables .
After checking the options in Figure 3-5, click Next to enter the VS code ready-to-install interface shown in Figure 3-6.
(5) Installation

Figure 3-6 VScode ready to install
Click Install in Figure 3-6 to enter the VSCode installation progress interface shown in Figure 3-7.

Figure 3-7 VS Code installation progress
Figure 3-7 After the installation progress is completed, the VS Code installation is complete and the prompt interface of whether to run Visual Studio Code will appear as shown in Figure 3-8.
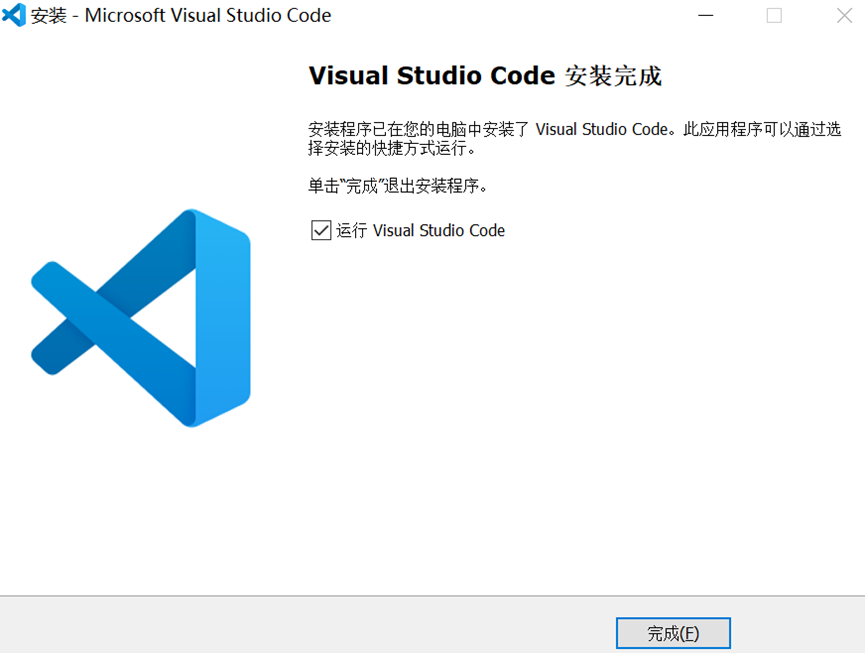
Figure 3-8 VS Code installation complete
Four, VS Code common configuration ( settings )
After installation, start and run vscode, and the interface shown in Figure 4-1 will appear.
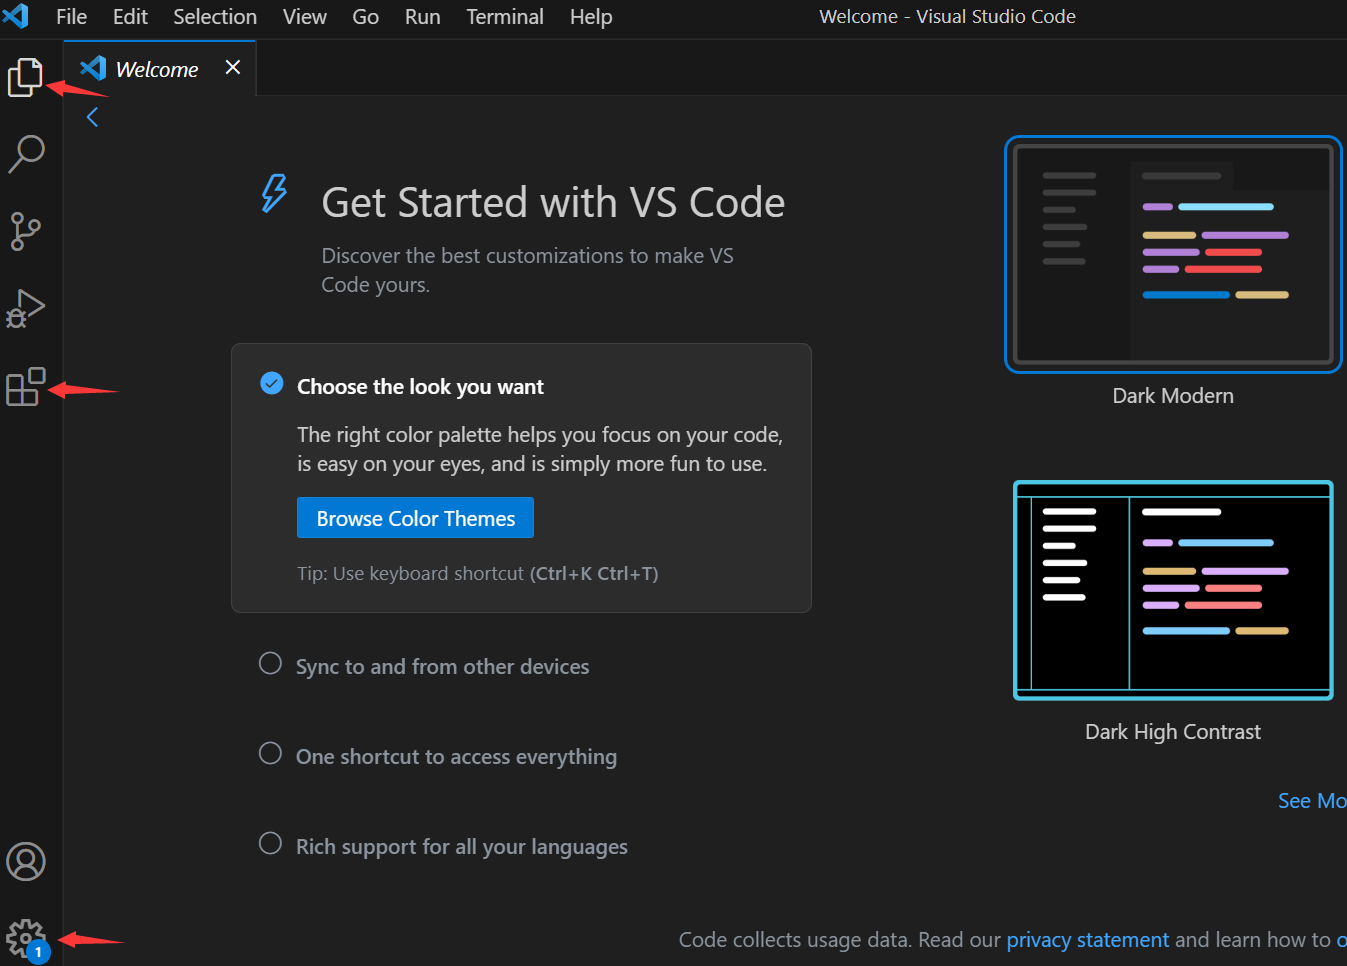
Figure 4-1 VS Code window
The VS Code code editor is very similar to other IDE (Integrated Development Environment) tools. Many options in the development tool interface will appear repeatedly in different positions, mainly for our convenience. For example: the icon pointed to by the red arrow in Figure 4-1 above ![]() can open the extension search box after clicking, or it can be
can open the extension search box after clicking, or it can be ![]() opened in the Extensions option in the icon To extend the search box, you can also open the extended search box in the title bar File→Preferences→Extensions. This multiple ways to achieve a function is for our convenience.
opened in the Extensions option in the icon To extend the search box, you can also open the extended search box in the title bar File→Preferences→Extensions. This multiple ways to achieve a function is for our convenience.
Another example is that the icon on the upper left of Figure 4-1 ![]() has the function of operating the file, and there are also options for operating the file in the title bar File, such as: open or create a folder, file, etc.
has the function of operating the file, and there are also options for operating the file in the title bar File, such as: open or create a folder, file, etc.
Below we introduce several commonly used function settings in vscode. There may be many ways to set a function, but we will not show them one by one.
1. VS Code interface color setting
We can ![]() set the color theme of the VS Code interface through Themes→Color Theme in the settings icon pointed by the red arrow in Figure 4-1. Of course, it can also be set in the title bar File→Preferences→Theme→Color Theme. The setting effects of these two places are basically the same, and the same reason is not listed below.
set the color theme of the VS Code interface through Themes→Color Theme in the settings icon pointed by the red arrow in Figure 4-1. Of course, it can also be set in the title bar File→Preferences→Theme→Color Theme. The setting effects of these two places are basically the same, and the same reason is not listed below.
The VS Code interface defaults to the Dark Modern color theme. Figure 4-2 is set to the Light Modern color theme. In the options, you can choose a window color theme that suits you.
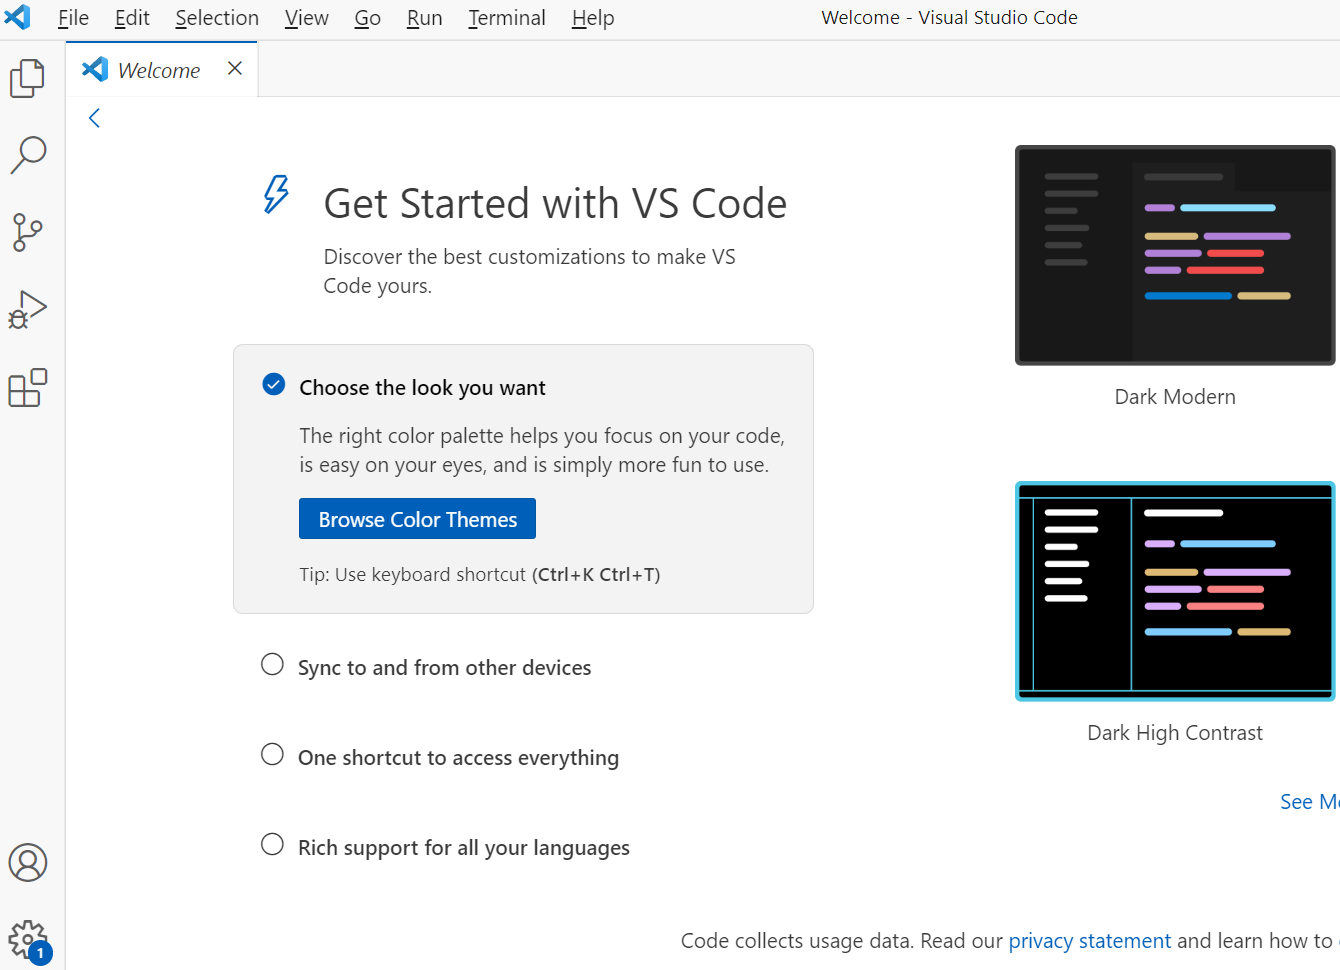
Figure 4-2 VS Code white theme window
2. VS code Chinese interface
Search for Chinese in the extension box, select the Chinese (Simplified) (Simplified Chinese) Language extension, and reopen VS code after installation to realize the VS code of the Chinese interface. If it is still in English after restarting, click File→command palette in the title bar of VS Code, or use the shortcut key Ctr+Shift+P to open the command palette (command palette), enter Configure Display Language in the command palette window, and then select Simplified Chinese. Press the ESC key to exit the command palette (command palette).
3. Set auto save
Generally speaking, after using other IDE (integrated development environment) tools to write code, you can run the code immediately, because IDE automatically saves the code by default, but VS Code saves it manually by default, so when we open the file and write the code , you must first click the save option in VS Code to save the written code, and then you can click the run option in VS Code, so that the code can run normally, otherwise, an exception may occur due to unsaved code. To save the written code automatically, we can click the ![]() Settings option in the settings icon pointed by the red arrow in Figure 4-3, and the User configuration of Settings appears on the right.
Settings option in the settings icon pointed by the red arrow in Figure 4-3, and the User configuration of Settings appears on the right.

Figure 4-3 Settings option
The first one in Figure 4-3 is the Auto Save setting, which is off by default and does not automatically save. In the drop-down menu we can choose afterDelay. afterDelay is to save the file after a delay (default 1000 milliseconds), that is, to save at a fixed time. This delay is equivalent to saving in time. After setting, we run the code after writing, which is equivalent to running the current code. Otherwise, it is easy to appear that the currently running code actually It is the last saved code, not the currently written code.
If you choose onWindowsChange, this means that when the software window loses focus, the unsaved editor will be automatically saved, that is, when we switch windows, vscode will automatically save it.
It is recommended to set automatic saving, which can reduce the problems caused by forgetting to save and run the program code (it is easy to appear that the currently running code is actually the last saved code, not the currently written code).
4. Install the extension
Several commonly used settings are listed above. Since vscode is a simplified IDE, many functions need to install corresponding extensions to realize their functions. For example: the following will talk about the running settings. After installing vscode, if the relevant extensions are not installed, even if the machine has already installed a certain programming language, vscode cannot automatically call the compiler of this programming language, and does not provide a call to the compiler. Therefore, the program code cannot be run, but you can install extensions or add some files to additionally implement the function of calling the compiler, so that vscode can run the program code.
Extensions (Extension) and plug-ins (Plug-in) are usually used to load software.
Plug-in (Plug-in) depends on the system platform (hardware system, operating system). The use of plug-in is closely related to the system platform. Plug-in is generally installed and implanted in the software to provide a packaged auxiliary function for the software. function call.
Relatively speaking, extension (Extension) is closely related to software. Extension refers to a broader concept. Extension includes plug-ins. In some contexts, there is no difference between the two, but the names are different.
The extension of VS Code provides additional functions. Different extensions represent different functions. We can install corresponding extensions to realize the running of code or improve the efficiency of code development. Click the icon on the left side of Figure 4-4 below ![]() , and the extended search box indicated by the red arrow appears.
, and the extended search box indicated by the red arrow appears.
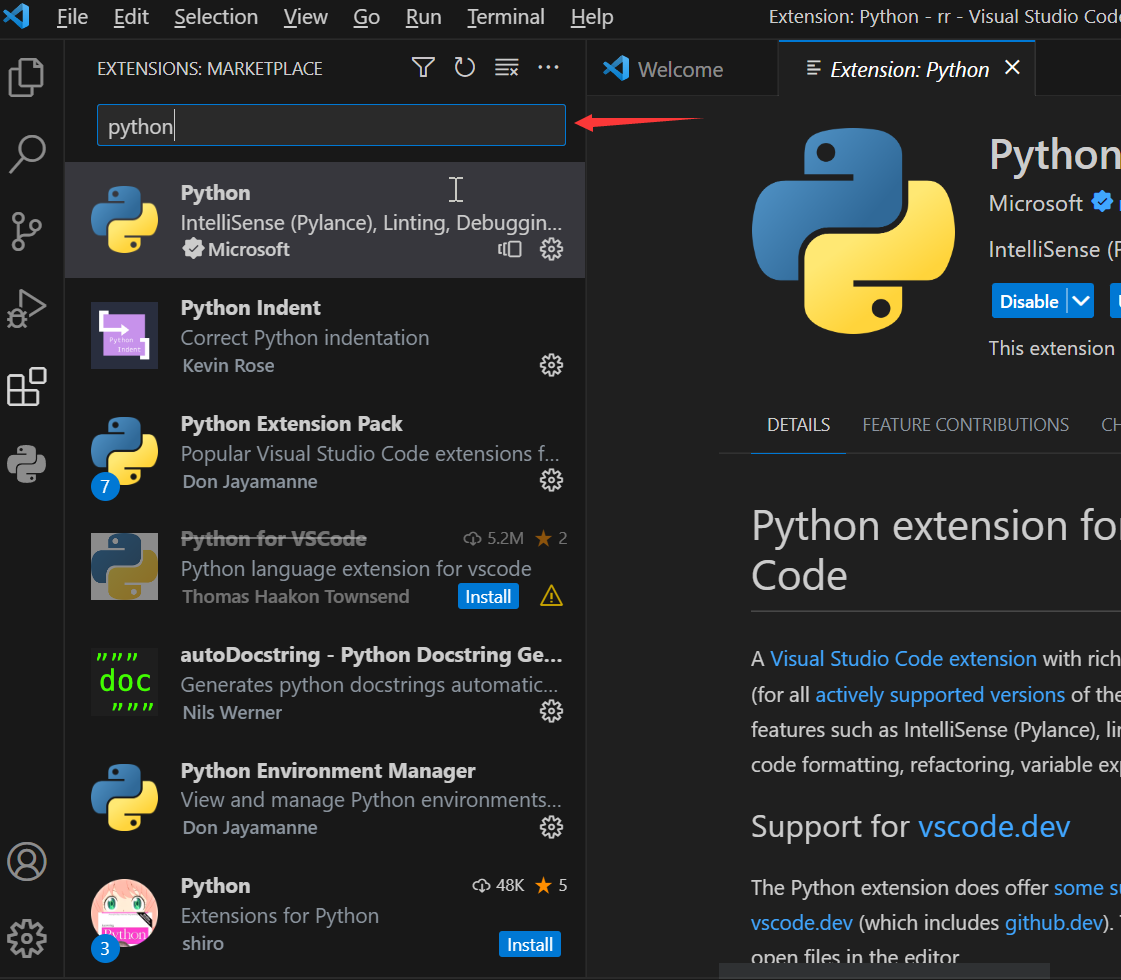
Figure 4-4 Extended search box
Enter the programming language in the search box in Figure 4-4, and the corresponding extension will be displayed below the search box. Click an extension, and the information of the extension will be displayed on the right, including the function introduction of the extension. Below we introduce the running settings, which will involve the installation of extensions, which will not be shown here in detail.
5. The configuration of running (run) and the display of program code running results
(1) Run (run) configuration
Debug (debugging) is the demonstration process of the operation and value of the program code, so that we can dynamically perceive the implementation effect of the code. Debugging involves invoking the compiler.
To debug (debug) in VScode, we need to install this programming language or operating environment (for example: Node.js) on the machine, and set its environment variables in windows (convenient to be called), which is actually installed A compiler of a certain language, and set the compiler as an environment variable of windows (convenient to be called). Because only the compiler can execute the program, please refer to
Compiler and C/C++ Compiler Installation (c+ Installation) for discussion on this aspect . In order to simplify the name, we will collectively refer to the installation of the programming language or the operating environment as the installation of the compiler.
After VScode is installed, the run option provided by its interface window is generally related to debugging (debug). To run (run) the program code of a certain programming language, it is not only necessary to install the language compiler, but also to set up the compiler in windows. Environment variables (convenient to be called), also need to have a file with debugging function of this programming language.
However, VScode has built-in support for Node.js running debugging, that is, it supports debugging JavaScript and any other language that can be converted to JavaScript (such as: TypeScript), and does not support debugging of other programming languages (debug). To achieve debugging of other programming languages, you need Install extensions with debugging functions, for example: to run C/C++ programs, you need to install C/C++ extensions with debugging functions.
The run-related options indicated by the red arrow in Figure 4-5 support Node.js debugging by default. As long as Node.js is installed, VScode can use the run-related options indicated by the red arrow in Figure 4-5. (Note, to install Node.js, the operation will call it, otherwise, the prompt Can't find Node.js binary "node": path does not exist. Make sure Node.js is installed and your PATH, or set the "runtimeExecutable " in your launch.json).
But for other programming languages, even if this programming language is installed, if VScode does not install the debugging function file related to this programming language, it cannot be run through the options related to run provided by the interface window (as shown in Figure 4-5 Indicated by the red arrow in the middle), an exception similar to "You don't have an extension for debugging C, Should we find a C extension in the marketplace?" will be prompted.

Figure 4-5 The default run options of vscode
For this programming language, we can install the corresponding extension with debugging (debug) function to activate the debug-related operation (run) in Figure 4-5. Debugging involves invoking the compiler, so extensions with debug capabilities naturally also support run.
Here we do not introduce the installation of extensions with debugging (debug) functions. We introduce the Code Runner extension. After installing this extension, it can run C, C++, Java, JavaScript, PHP, Python, Perl, Perl 6, Ruby, Go, Lua, Groovy, PowerShell and other programming languages, but does not have debugging (debug) Function.
In windows, after vscode installs the Code Runner extension, as long as the language compiler is installed on the computer and the environment variables of this compiler are set in windows, vscode can run the program code of this programming language (it will be called automatically according to the environment variables The compiler of this programming language), but this kind of operation (run) is not the default operation of vscode (for example: the option related to run pointed by the red arrow in Figure 4-5), but after installing the Code Runner extension, A run code option is automatically generated to run the program code. After installing the Code Runner extension, the icon of run code appears at the position of the red arrow on the toolbar of Vscode in Figure 4-6. If ![]() we create an empty file, open the file, right-click the edit box (editing area), and the pop-up menu appears run code option, the button indicated by the red arrow in Figure 4-6 can run the code.
we create an empty file, open the file, right-click the edit box (editing area), and the pop-up menu appears run code option, the button indicated by the red arrow in Figure 4-6 can run the code.
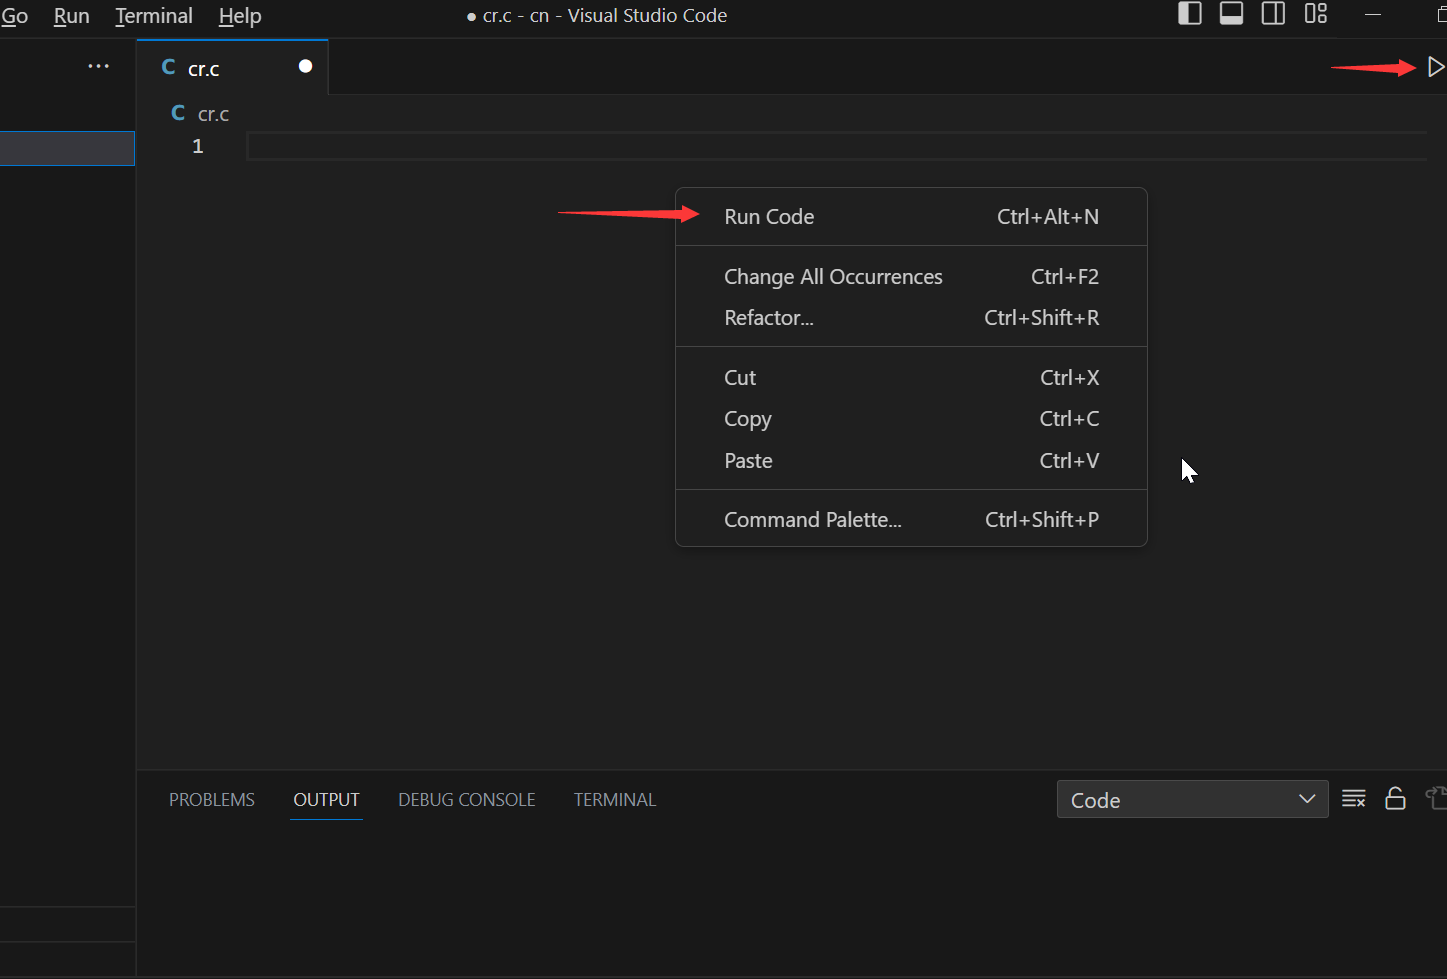
Figure 4-6 The run option generated after installing the Code Runner extension
After installing the Code Runner extension, you still cannot use the default run options of vscode in Figure 4-5 (because the Code Runner extension cannot generate the debug function), and you can only use the run indicated by the red arrow in Figure 4-6 key, it will automatically invoke the compiler.
Therefore, if we simply run the program on the windows platform without considering the debugging function, usually we need to install this programming language and set its environment variables in windows, install vscode, and then install the Code Runner extension in vscode, these three After the installation is complete, you can run the program code.
(2) Program code running
According to the above analysis, let's create a code file and use the Code Runner extension to run the program code.
Click the icon in Figure 4-7 ![]() , and a window will appear, which can open or create files. Figure 4-7 opens the cn folder, put the mouse into the pop-up window, and the icons pointed by the arrows will appear. Click these icons to create files and folders, and you can also select related options in the title bar File to create and open.
, and a window will appear, which can open or create files. Figure 4-7 opens the cn folder, put the mouse into the pop-up window, and the icons pointed by the arrows will appear. Click these icons to create files and folders, and you can also select related options in the title bar File to create and open.
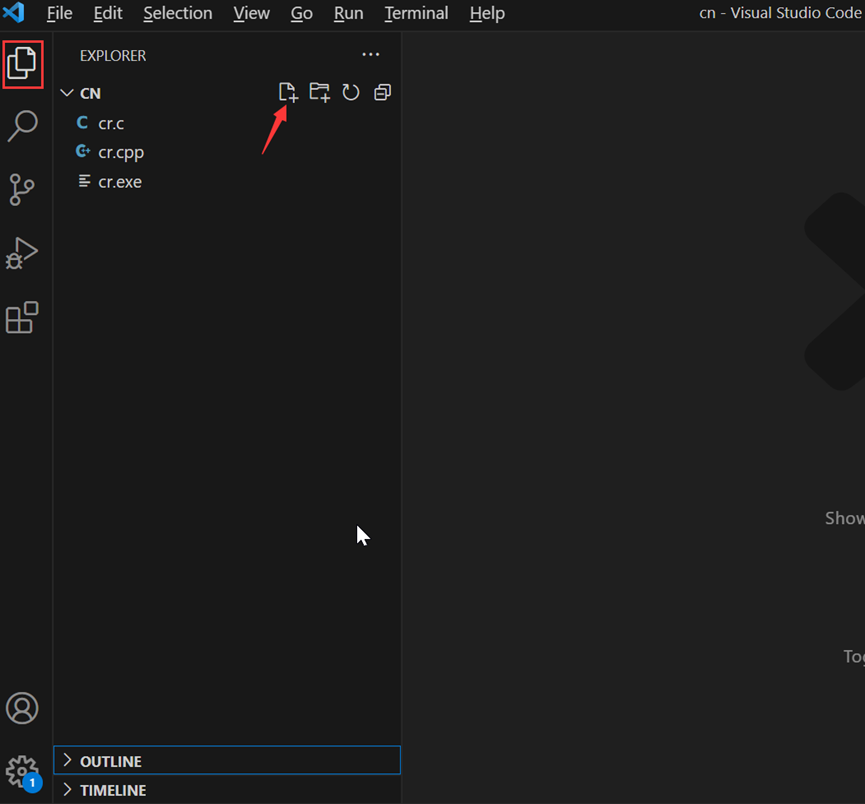
Figure 4-7 VS Code creates files
After installing the Code Runner extension, we can use vscode to open a folder (used to store project files). We can create a new file, the file format (file suffix) is the format of the programming language (you can also write code in a .txt text file, and change it to the format of the programming language when saving), then you can write code in this file and save it Then you can use the run code option to run the code. Enter the following code in the created file, as shown in Figure 4-8.
#include<stdio.h>
int main(void)
{   //求最大公约数,辗转相除法。
	int a,b;
	scanf("%d%d",&a,&b);
	int c;
	if (a<b)
	{   c=a;
		a=b;
		b=c;
	}
	while (c = a%b)
	{
		a = b;
		b = c;
	}
	printf("%d\n", b);
	return 0;
}
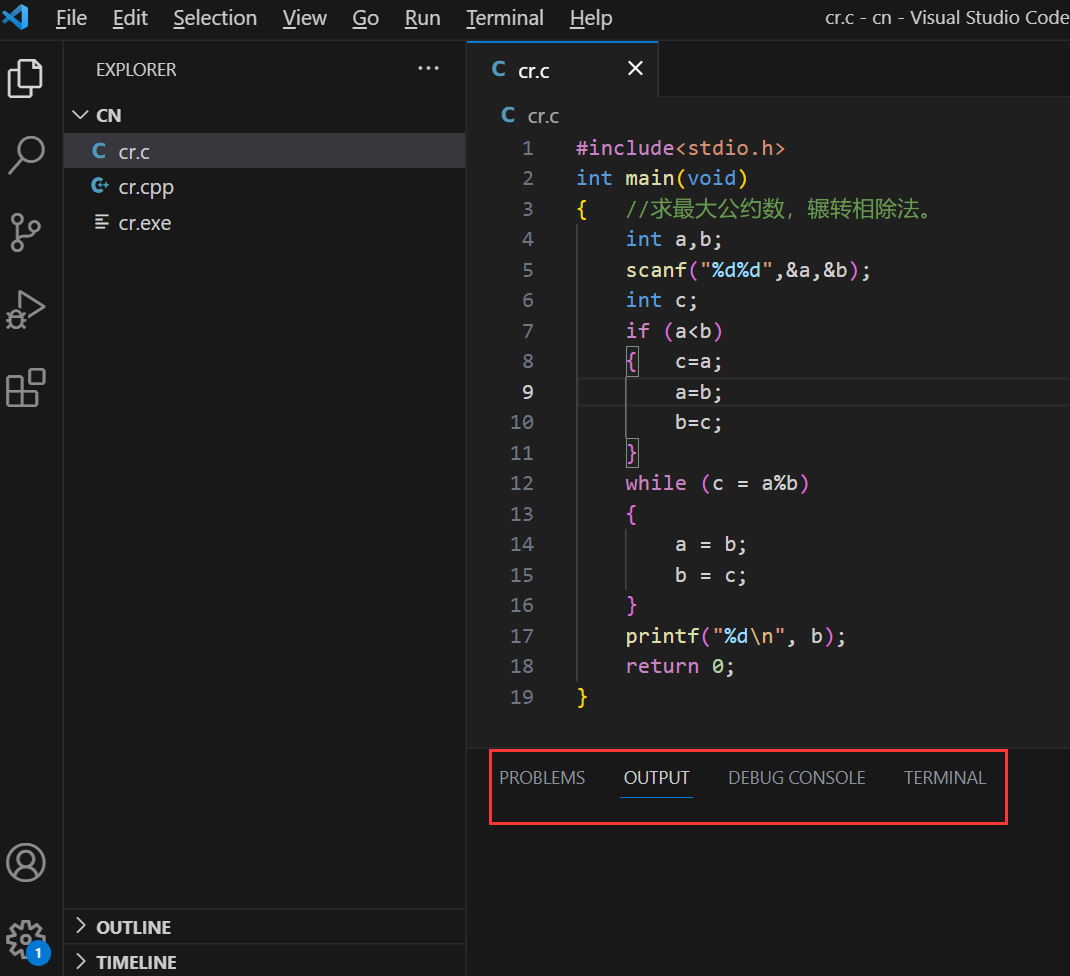
Figure 4-8 VS Code file code editing
The code in Figure 4-8 above needs to input data when it is running, and the output of the run code generated by the extension of Code Runner is in OUTPUT by default. This OUTPUT interactive window can only be used for output, not for input. We need to change it to TERMINAL (terminal), the following will talk about several interactive windows in the red box in Figure 4-8.
(3) PROBLEMS , OUTPUT , DEBUG CONSOLE , TERMINAL ( terminal)
The default run options of vscode shown in Figure 4-5, the running results are displayed in the terminal TERMINAL, and the run options generated after installing the Code Runner extension in Figure 4-6, the running results are displayed in OUTPUT by default. And output can only be output, which is the output of the program running, and cannot be used for input, and the terminal (terminal) can be output or input.
After the code run code in Figure 4-8 is run, data needs to be input. Therefore, we can check the option indicated by the red arrow in Figure 4-9 through File→Preferences→Settings→User→Extensions→Run Code configuration (check Select Run In Terminal), and then run the code in Figure 4-8 through the run code, we can input data in the terminal TERMINAL, press Enter, the program gets the input, and returns the result to TERMINAL after execution.
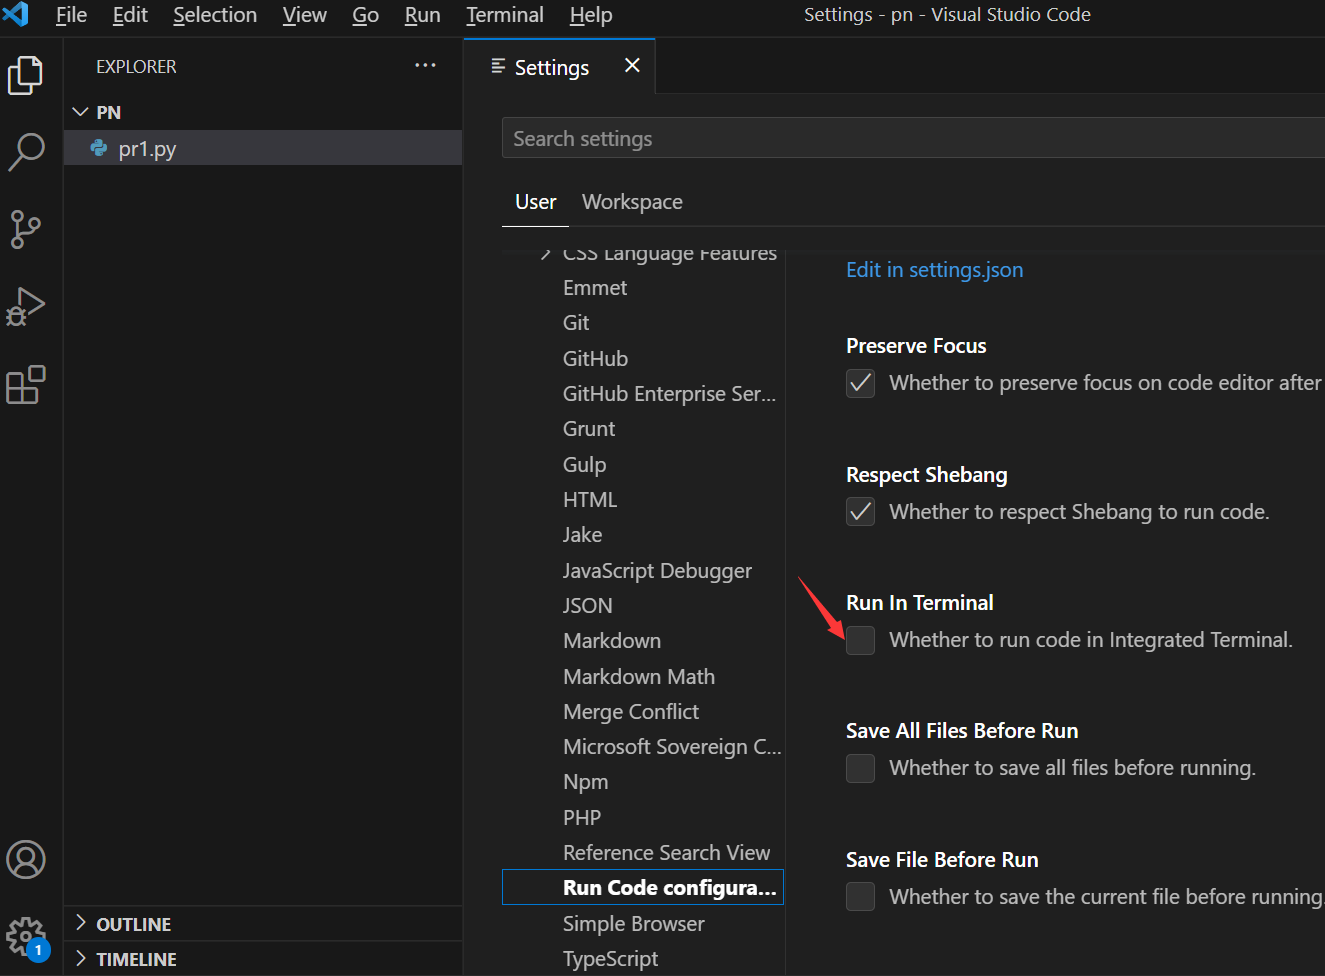
Figure 4-9 Code Runner extension configuration
If we have special requirements for the Code Runner extension, we can set it in Figure 4-9.
With OUTPUT, the result of running the program each time will be kept in the current OUTPUT window, and the OUTPUT window will be automatically cleared when the project is exited. With TERMINAL, every time you open the project and run the program, a current TERMINAL will be created. The results of each running program will be kept in the current TERMINAL window. When you exit the project, this TERMINAL will be kept. When you open the project again, these terminals will be You can delete the past terminal window by keeping it in the area indicated by the red arrow in Figure 4-10.

Figure 4-10 Terminal TERMINAL
In terms of hardware, the terminal is an auxiliary tool for the host, and the console console is an internal part of the host. For example, the keyboard and monitor of the computer can be regarded as the terminal of the host. The log records of computer startup and shutdown will be output to the console. A console, the console console is an internal part of the host. From the perspective of software, in IDE tools (such as: PyCharm, VS Code, etc.), the terminal terminal and the console console are related to input and output, but the terminal terminal focuses on the IDE, which can be the input or output of the program. Operating environment settings, etc., while the console console focuses on the program, focusing on the control of the current program. In some IDEs, the functions of the two overlap (for the convenience of operation), but the emphasis is different. The former is biased towards the macro level, while the latter is biased towards the micro level.
DEBUG CONSOLE is a program control operation window related to debugging. This window can only be set after the extension with debugging (debug) is installed.
PROBLEMS are detected problems related to workspace (workspace, workspace). About the workspace will be introduced below.
6. User , Workspace , Folder settings
After Vscode opens a folder (open Folder), you can use the picture File→Add Folder to Workspace to create a workspace (workspace, workspace). This workspace actually treats several folders as a whole, and is usually used in such Scenario: aa is a project folder, bb is a project folder, we open the aa folder, and then add the bb folder through the Add Folder to Workspace operation, so that aa and bb constitute a workspace, through File→Save Workspace As is saved as a file in .code-workspace format (you can choose to save it to other folders). Later, we use File→Open Workspace From File to open this .code-workspace file, which is equivalent to opening the aa and bb folders at the same time. , which is equivalent to opening these two projects at the same time.
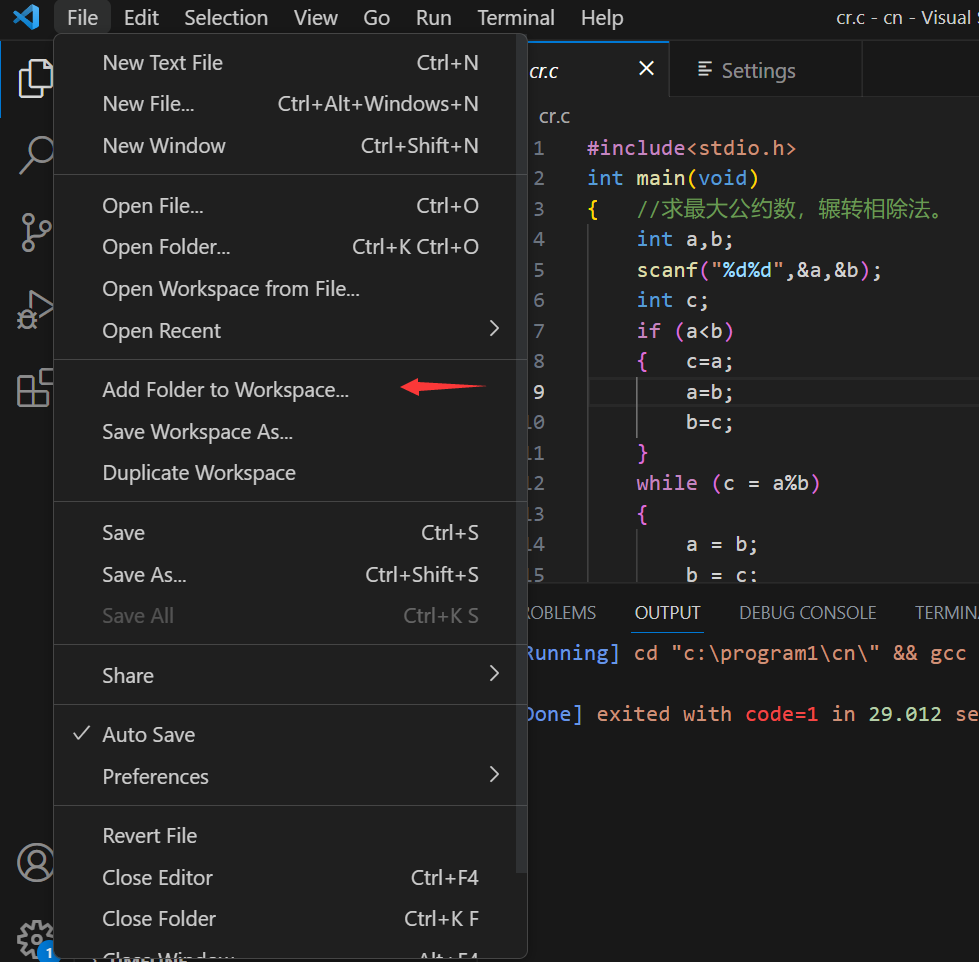
Figure 4-11 Workspace option in the title bar File
This Workspace configuration is convenient for us to open multiple projects at a time. After configuration, we only need to open the .code-workspace file (that is, one VS Code window to open multiple projects), which prevents us from opening multiple VS Code windows. project. As shown in Figure 4-12, it is a workspace named wcp, which consists of two folders, cn and pn (of course, there can be other folders in these folders).
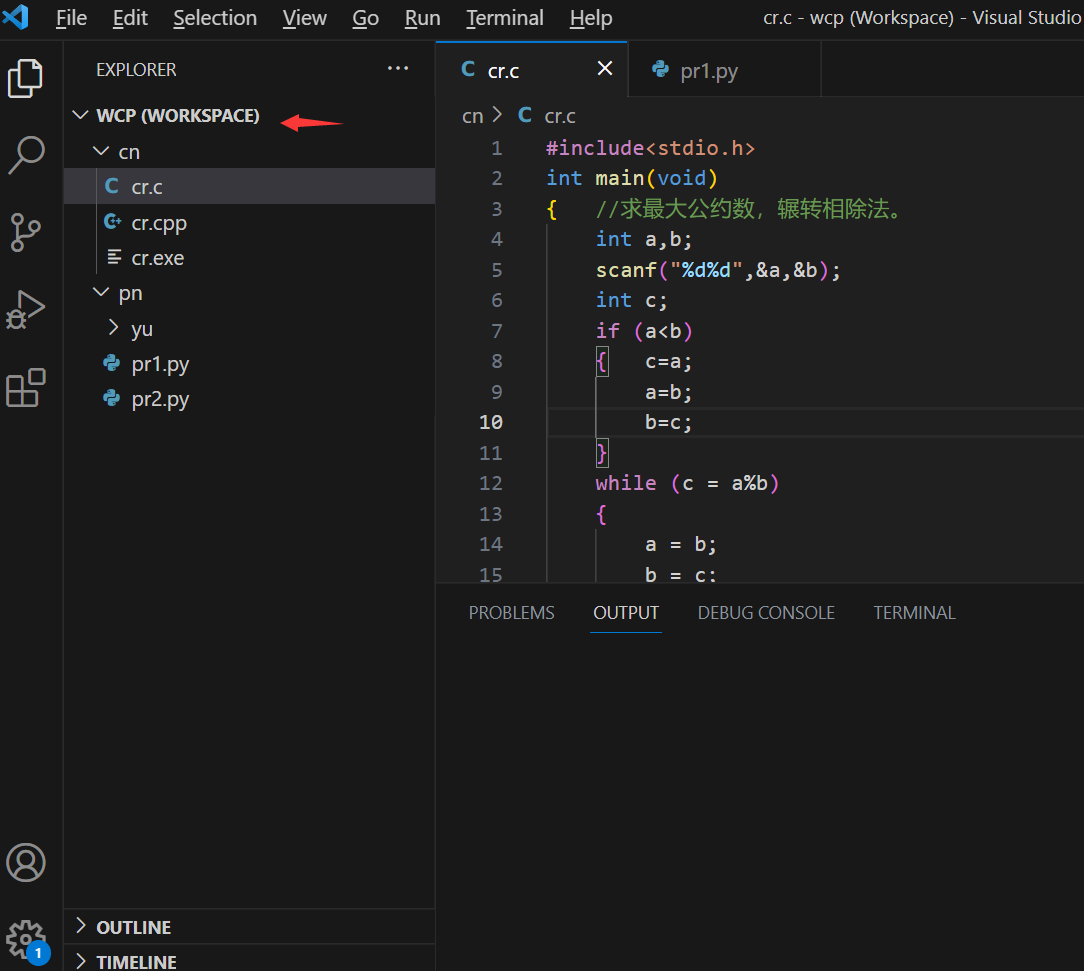
Figure 4-12 wcp Workspace
The cn folder stores c files, the pn folder stores python files, and the full name of wcp is actually the wcp.code-workspace file. We only need to use File→Open Workspace From File to open the wcp.code-workspace file, and the vscode window will As shown in Figure 4-12.
In addition, we can set these multiple projects through the workspace, and these settings are only valid for these projects. We open the wcp.code-workspace file (as shown in Figure 4-12), and then select File→Preferences→Settings to display the interface shown in Figure 4-13.
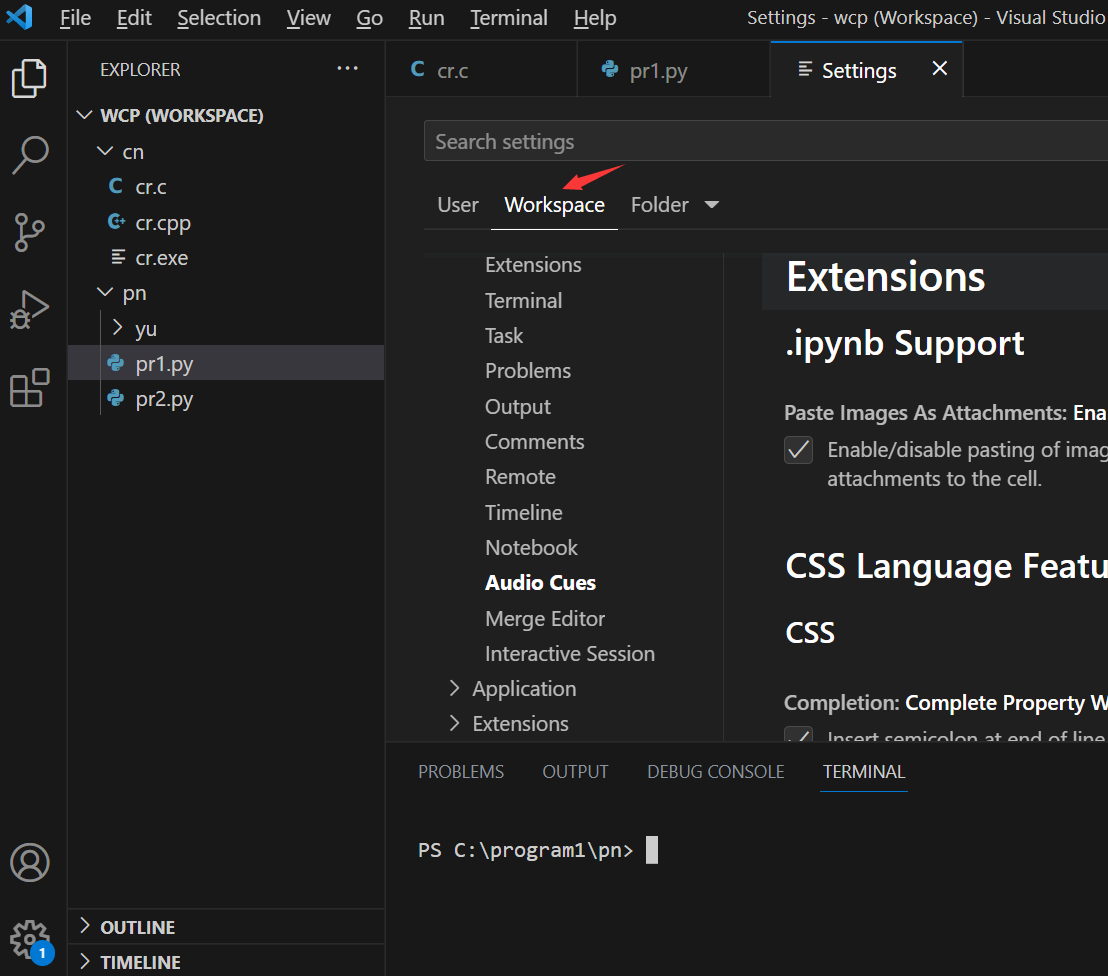
Figure 4-13 Settings
The Settings settings we mentioned earlier refer to User settings, user settings, that is, general settings. Workspace settings (workspace settings) are settings for multiple projects (multiple folders) to form a workspace, and Folder settings are settings for folder projects. Here we choose Workspace settings. User, Workspace, and Folder settings appear in Figure 4-13. Workspace settings (workspace settings) will override User settings, and Folder settings (folder settings) will override User and Workspace settings. That is to say, when we use this Workspace, we use this Workspace setting. When we use this Folder , is to use this Folder setting. We can implement specific settings for multiple projects through Workspace settings to produce the effects we need.
7. Uninstall and copy configuration
(1) Uninstall the extension
To uninstall an extension, click the icon on the left side of Figure 4-14 below ![]() , and select INSTALLED (installed) pointed to by the red arrow on the left in the pop-up menu, and the installed extension will appear. Click an extension, The Uninstall prompt of the extension will appear on the right (shown by the red arrow on the right of Figure 4-14), click Uninstall to uninstall. You can also search for the corresponding extension in the extension search box and click uninstall to uninstall it.
, and select INSTALLED (installed) pointed to by the red arrow on the left in the pop-up menu, and the installed extension will appear. Click an extension, The Uninstall prompt of the extension will appear on the right (shown by the red arrow on the right of Figure 4-14), click Uninstall to uninstall. You can also search for the corresponding extension in the extension search box and click uninstall to uninstall it.
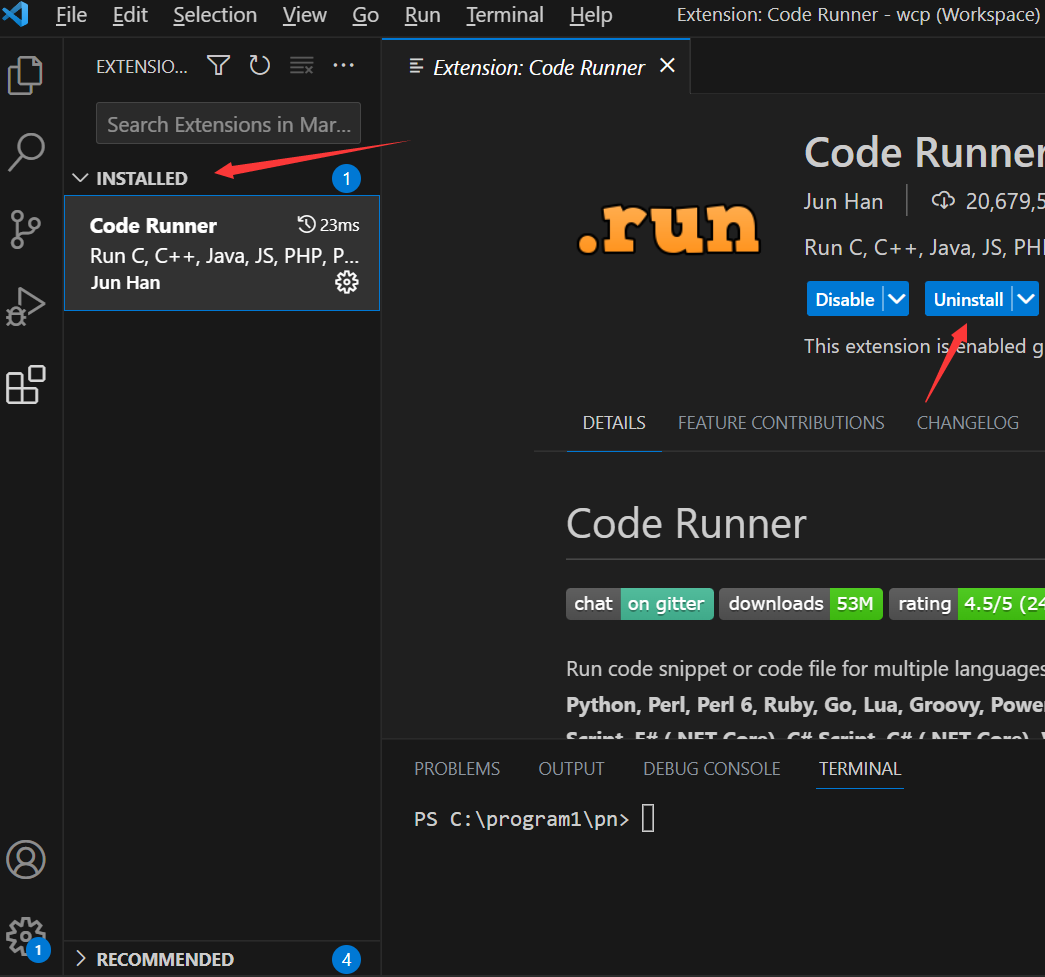
4-14 Extended uninstallation
In addition, after the extension is uninstalled in vscode, the function of the extension can continue to be used (because it has been loaded into the memory and still exists in the memory). At this time, vscode needs to be restarted. Since the extension has been uninstalled, the extension cannot be loaded into the memory after restarting vscode. Extensions cannot be used.
(2) Copy configuration
In the Windows operating system, the extensions installed by VS Code are in the path C:\Users\username\.vscode\extensions by default. This user name is the Windows login account, and you can view or delete extensions in C:\Users. And you can copy the .vscode folder and overwrite the .vscode folder in the above location where VS Code is installed elsewhere, so that you can directly use the previous configuration without configuring it again.
(3) Uninstall VS Code problem
After uninstalling VS Code, and then reinstalling VS Code, the previous configuration information (including opened folders, installed extensions, etc.) still appears, because VSCode was not completely uninstalled before.
If you want to completely uninstall VS Code, you need to manually delete the contents of C:\Users\username\.vscode and C:\Users\username\AppData\Roaming\Code after uninstalling VS Code, you can delete them directly these two directories. After this complete uninstallation, and then installing VSCode, it is equivalent to a new installation, that is, the previous relevant configuration information will not appear.
So far, the installation and basic configuration of vscode is completed, and the installation of the Code Runner extension is also introduced. After the extension is installed, VS Code can run C, C++, Java, JavaScript, PHP, Python, Perl, Perl 6, Ruby, Go, Lua , Groovy, PowerShell and other programming languages, but this extension does not have a debugging (debug) function.
Compiler and C/C++ compiler installation (c+ installation)
https://blog.csdn.net/thefg/article/details/131916203
The latest python installation detailed tutorial:
https://blog.csdn.net/thefg/article/details/128601410