
1. What is Authentication?
- In layman's terms, it is to verify the identity of the current user and prove that "you are yourself" (for example, if you clock in and out every day, you need to punch in with your fingerprint. When your fingerprint matches the fingerprint entered in the system, you will punch in successfully)
- Authentication in the Internet:
- Login with username and password
- Send login link by email
- Mobile phone number to receive verification code
- As long as you can receive the email/verification code, you are the owner of the account by default
2. What is Authorization?
- The user grants a third-party application permission to access certain resources of the user
- When you install the mobile application, the APP will ask whether to grant permissions (access to photo albums, geographic location, etc.)
- When you visit the WeChat applet, when you log in, the applet will ask whether to grant permission (acquire personal information such as nickname, avatar, region, gender, etc.)
- The ways to achieve authorization are: cookie, session, token, OAuth
3. What is Credentials?
The premise of authentication and authorization is that a medium (certificate) is needed to mark the identity of the visitor
In Internet applications, general websites (such as Nuggets) have two modes, visitor mode and login mode. In the tourist mode, you can browse the articles on the website normally. Once you want to like/collect/share the article, you need to log in or register an account. When the user logs in successfully, the server will issue a token (token) to the browser used by the user. This token is used to indicate your identity. Every time the browser sends a request, it will bring this token and you can use it. Features not available in Guest Mode.
4. What is a cookie
- HTTP is a stateless protocol (it has no memory for transaction processing, and the server will not save any session information every time the client and server session is completed): each request is completely independent, and the server cannot confirm the current visit The identity information of the sender, it is impossible to tell whether the sender of the last request is the same person as the sender of this time. Therefore, in order to perform session tracking (know who is accessing me), the server and the browser must actively maintain a state, which is used to inform the server whether the two requests before and after come from the same browser. And this state needs to be realized through cookie or session
- Cookies are stored on the client side: A cookie is a small piece of data sent by the server to the user's browser and stored locally. It will be carried and sent to the server when the browser makes another request to the same server next time.
- Cookies are not cross-domain: Each cookie is bound to a single domain name and cannot be used under other domain names. Shared use between the first-level domain name and the second-level domain name is allowed (depending on the domain).
| Attributes | illustrate |
|---|---|
| name=value | The key-value pair, setting the name of the cookie and the corresponding value, must be of string type. If the value is a Unicode character, the character needs to be encoded. If the value is binary data, it needs to be encoded with BASE64. |
| domain | Specifies the domain name to which the cookie belongs, the default is the current domain name |
| path | Specify the path (routing) under which the cookie will take effect, the default is '/'. |
| If it is set to /abc, only routes under /abc can access the cookie, such as: /abc/read. | |
| maxAge | The expiration time of the cookie, in seconds. If an integer, the cookie expires after maxAge seconds. If it is a negative number, the cookie is a temporary cookie, which will be invalid when the browser is closed, and the browser will not save the cookie in any form. If it is 0, it means delete the cookie. Defaults to -1. - Better than expires. |
| expires | Expiration time, the cookie will become invalid after a certain time point is set. |
| Generally, browser cookies are stored by default. When the browser is closed and the session is ended, the cookie will also be deleted. | |
| secure | Whether the cookie is only transmitted using secure protocols. The security protocols include HTTPS, SSL, etc., and the data is encrypted before being transmitted on the network. The default is false. |
| When the secure value is true, the cookie is invalid in HTTP and only valid in HTTPS | |
| httpOnly | If the httpOnly attribute is set for a cookie, the cookie information cannot be read through the JS script, but the cookie can still be manually modified through the Application, so it can only prevent XSS attacks to a certain extent, not absolutely safe |
Characteristics of Cookies
- The cookie is saved locally in the browser, and it will exist as long as the browser is closed without expiration.
- Under normal circumstances, cookies are not encrypted and can be easily seen by users
- Users can delete or disable cookies
- Cookies can be tampered with
- Cookies can be used in attacks
- The cookie storage is very small, generally 4k in size
- Sending requests automatically bring login information
5. Use of cookies
① Installation
pnpm install cookie-parser --save
② introduction
const cookieParser=require("cookie-parser");
③ Set middleware
app.use(cookieParser());
④ set cookies
res.cookie("name",'zhangsan',{

    maxAge: 1000*60*60, httpOnly: true});
//res.cookie(名称,值,{配置信息})
获取cookie
req.cookies.name;
Here is a basic example:
const express=require("express");
const cookieParser=require("cookie-parser");

var app=express();

//设置中间件
app.use(cookieParser());

app.get("/",function(req,res){


	res.send("首页");
});

//设置cookie
app.get("/set",function(req,res){


    //如果不进行任何设置,有效期默认为1个会话,浏览器关闭即失效
   // res.cookie('isLogin','true');
	res.cookie("userName",'张三',{

    maxAge: 1000*60*60, httpOnly: true});
	res.send("设置cookie成功");
});

//获取cookie
app.get("/get",function(req,res){


	console.log(req.cookies.userName);
	res.send("获取cookie成功,cookie为:"+ req.cookies.userName);
});

app.listen(8080);
When accessing the set route, the cookie will be set, and when the get route is accessed, the set cookie value will be obtained. Of course, you can also continue to obtain the current cookie on other pages to achieve cookie sharing. Both cookie and session can see set-cookie in the response header of the web page
6. About cookie encryption
Cookie encryption is to prevent client users from obtaining cookie plaintext information, which is an important part of data security; generally, we can encrypt cookie information when saving cookies, or set the signed attribute of the option object in res.cookie to true.
const express = require("express");
const cookieParser = require("cookie-parser");

var app = express();
app.use(cookieParser('secret'));//签名 (加密) 要指定秘钥 ,什么名字都星行,列如:"xiaoxuesheng"

app.get("/",function(req,res){


	res.send("主页");
});

//获取cookie
app.use(function(req,res,next){


	console.log(req.signedCookies.name);
	next();
});

//设置cookie
app.use(function(req,res,next){


	console.log(res.cookie("name","zhangsan",{

    httpOnly: true,maxAge: 200000,signed: true}));
	res.end("cookie为:"+req.signedCookies.name);
});

app.listen(8080);
7. Issues to consider when using cookies
- Because it is stored on the client, it is easy to be tampered by the client, and the legality needs to be verified before use
- Do not store sensitive data such as user passwords, account balances
- Use httpOnly to improve security to a certain extent
- Minimize the size of the cookie, the amount of data that can be stored cannot exceed 4kb
- Set the correct domain and path to reduce data transmission
- Cookies cannot cross domains
- A browser can store up to 20 cookies for a website, and browsers generally only allow 300 cookies. The
mobile terminal does not support cookies very well, and the session needs to be implemented based on cookies, so tokens are commonly used on mobile terminals.
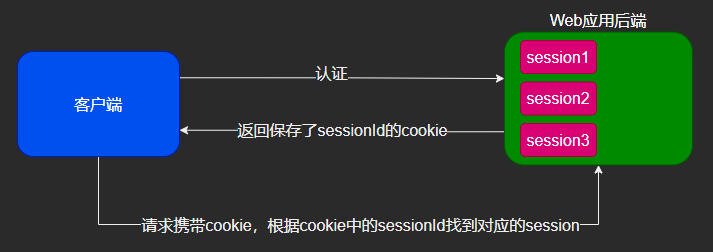
8. What is Session
- What is session? Session is another mechanism for recording client status. The difference is that Cookie is saved in the client browser, while Session is saved on the server. When the client browser accesses the server, the server records the client information on the server in some form. This is Session. When the client browser visits again, it only needs to find the status of the client from the Session. Session is a special cookie. Cookies are stored on the client side, while sessions are stored on the server side.
- Why use session? Since the cookie exists on the client side, and its storage size is limited, the most important thing is that the user can be visible and can modify it at will, which is very unsafe. So how to be safe and convenient to read information globally? So, at this time, a new storage session mechanism: session was born.

Session authentication process:
- When the user requests the server for the first time, the server creates a corresponding Session based on the relevant information submitted by the user.
- When the request returns, the SessionID, the unique identification information of this Session, is returned to the browser
- After the browser receives the SessionID information returned by the server, it will store this information in the cookie, and the cookie will record which domain name the SessionID belongs to
- When the user visits the server for the second time, the request will automatically determine whether there is cookie information under this domain name. If there is cookie information, it will also be automatically sent to the server, and the server will obtain the SessionID from the cookie, and then search for the corresponding Session based on the SessionID If the information is not found, it means that the user has not logged in or the login is invalid. If the Session is found, it proves that the user has logged in and can perform the following operations.
According to the above process, SessionID is a bridge connecting Cookie and Session, and most systems also verify user login status based on this principle.
9. The difference between Cookie and Session
To give an example,
cookies are like going to a barber shop to get a membership card, and next time you go to bring the membership card (set a cookie in the response header, and after changing the domain name, each request header will have a cookie attached to it). Session is like going to a barber shop to do it
. I bought a card, but the card is left there, just remember the card number.
- Security: Session is safer than Cookie, Session is stored on the server side, and Cookie is stored on the client side.
The types of access values are different: Cookie only supports storing string data, and if you want to set other types of data, you need to convert it into a string, and Session can store any data type. - Different validity periods: Cookies can be set to last for a long time. For example, the default login function we often use, Session generally has a short expiration time, and it will expire when the client is closed (by default) or the Session times out.
- The storage size is different: the data saved by a single cookie cannot exceed 4K, and the data that can be stored in a session is much higher than that of a cookie, but when there are too many visits, it will take up too much server resources.
10. Use of Session
① Install express-session
pnpm install express-session --save
② Introduce express-session module
const session=require("express-session");
③ set session
app.use(session(options));
Main method: session(options)
The session storage is set by option, except for the session ID, any data in the session is not stored in the cookie.
parameter
 cookie: {


  // Cookie Options
  // 默认为{ path: '/', httpOnly: true, secure: false, maxAge: null }
   /** maxAge: 设置给定过期时间的毫秒数(date)
  * expires: 设定一个utc过期时间,默认不设置,http>=1.1的时代请使用maxAge代替之(string)
  * path: cookie的路径(默认为/)(string)
  * domain: 设置域名,默认为当前域(String)
  * sameSite: 是否为同一站点的cookie(默认为false)(可以设置为['lax', 'none', 'none']或 true)
  * secure: 是否以https的形式发送cookie(false以http的形式。true以https的形式)true 是默认选项。 但是,它需要启用 https 的网站。 如果通过 HTTP 访问您的站点,则不会设置 cookie。 如果使用的是 secure: true,则需要在 express 中设置“trust proxy”。
  * httpOnly: 是否只以http(s)的形式发送cookie,对客户端js不可用(默认为true,也就是客户端不能以document.cookie查看cookie)
  * signed: 是否对cookie包含签名(默认为true)
  * overwrite: 是否可以覆盖先前的同名cookie(默认为true)*/
  },

  // 默认使用uid-safe这个库自动生成id
  genid: req => genuuid(),

  // 设置会话的名字,默认为connect.sid
  name: 'value',

  // 设置安全 cookies 时信任反向代理(通过在请求头中设置“X-Forwarded-Proto”)。默认未定义(boolean)
  proxy: undefined,

  // 是否强制保存会话,即使未被修改也要保存。默认为true
  resave: true,

  // 强制在每个响应上设置会话标识符 cookie。 到期重置为原来的maxAge,重置到期倒计时。默认值为false。
  rolling: false,

  // 强制将“未初始化”的会话保存到存储中。 当会话是新的但未被修改时,它是未初始化的。 选择 false 对于实现登录会话、减少服务器存储使用或遵守在设置 cookie 之前需要许可的法律很有用。 选择 false 还有助于解决客户端在没有会话的情况下发出多个并行请求的竞争条件。默认值为 true。
  saveUninitialized: true,

  // 用于生成会话签名的密钥,必须项
  secret: 'secret',

  // 会话存储实例,默认为new MemoryStore 实例。
  store: new MemoryStore(),

  // 设置是否保存会话,默认为keep。如果选择不保存可以设置'destory'
  unset: 'keep'
To store or access session data in Api
req.session , just use the request attribute req.session, which stores serialization in the form of JSON, which is very friendly to JS development.
As the following code example:
const express=require("express");
const session=require("express-session");
const MongoStore = require("connect-mongo");

var app=express();

//配置中间件
//session会自带一个httpOnly
app.use(
  session({


    name: 'session-id',
    secret: "this is session", // 服务器生成 session 的签名
    resave: true,     //每次是否都刷新到期时间
    saveUninitialized: true, //强制将为初始化的 session 存储(该session_id是没有用的)
    cookie: {


      maxAge: 1000 * 60 * 10,// 过期时间
      secure: false, // 为 true 时候表示只有 https 协议才能访问cookie
    },
	//自动在mongodb中创建一个数据库存储session,并且过期时间也会同步刷新
    store: MongoStore.create({


      mongoUrl: 'mongodb://127.0.0.1:27017/ds2_session',
      ttl: 1000 * 60 * 10 // 过期时间
  }),
  })
);

// 授权中间件,在这个之后的路由,除了错误处理,都是需要授权的。
app.use((req, res, next) => {


  //排除login相关的路由和接口(因为login就不需要重定向到login了)
  if (req.url.includes("login")) {


    next()
    return
  }
  if (req.session.user) {


    //重新设置以下sesssion
    req.session.mydate = Date.now()//加这个设置才能访问刷新过期时间
    next()
  } else {


    //是接口, 就返回错误码
    //不是接口,就重定向(因为ajax请求是不能重定向的,只能前端接收错误码做处理)
    req.url.includes("api")
      ? res.status(401).json({

     ok: 0 }) : res.redirect("/login")
  }
})

app.use('/login',function(req,res){


	//设置session
	req.session.userinfo='张三';
	res.send("登陆成功!");
});

app.use('/',function(req,res){


	//获取session
	if(req.session.userinfo){


		res.send("hello "+req.session.userinfo+",welcome");
	}else{


		res.send("未登陆");
	}
});

app.listen(8080);

Front-end error handling
update.onclick = () => {


  fetch("/api/user/6257ad33341e112715f25cb5", {


    method: "PUT",
    body: JSON.stringify({


      username: "修改的名字",
      password: "修改的密码",
      age: 1,
    }),
    headers: {


      "Content-Type": "application/json",
    },
  })
    .then((res) => res.json())
    .then((res) => {


      console.log(res);
      //session验证失败会返回ok:0
      if (res.ok === 0) {


        location.href = "/login";
      }
    });
};
11. Other uses of express-session
11.1 Method
① .regenerate(callback)
To regenerate the session, just call this method. Upon completion, a new SID and Session instance are initialized at req.session and the callback is invoked.
② .destroy(callback)
destroys the session and unsets the req.session attribute. When complete, the callback will be invoked.
**③ **. reload(callback)
reloads session data from storage and repopulates req.session object. When complete, the callback will be invoked.
④ .save(callback )****
Save the session back to the store, and replace the content on the store with the content in memory.
This method is called automatically at the end of the HTTP response if the session data has changed.
It is useful to call this method in certain situations, such as redirects, long-lived requests or in WebSockets.
⑤ .touch()
updates the .maxAge property. Usually there is no need to call, since the session middleware will do it for you.
The following demo logs out by destroying the session
app.use('/login',function(req,res){


	//设置session
	req.session.userinfo='张三';
	res.send("登陆成功!");
});

app.use('/loginOut',function(req,res){


	//注销session
	req.session.destroy(function(err){


		res.send("退出登录!"+err);
	});
});

app.use('/',function(req,res){


	//获取session
	if(req.session.userinfo){


		res.send("hello "+req.session.userinfo+",welcome to index");
	}else{


		res.send("未登陆");
	}
});

app.listen(8080);
When we enter the home page, no information is displayed. After entering the login route, the session is automatically set. When we return to the home page, the session information is displayed. After entering the loginOut route, the session information is logged out, and when we return to the home page, it is displayed as hello Zhang San, welcome to index.
11.2 Properties
① .id
Each session has a unique ID associated with it. This property is an alias for req.sessionID and cannot be modified. It was added to make the session ID accessible from the session object.
② .cookie
Each session has a unique cookie object. This allows you to change the session cookie for each visitor. For example, we can req.session.cookie.expiresset to false to make the cookie persist only for the duration of the user agent.
③ .Cookie.maxAge
req.session.cookie.maxAge will return the remaining time in milliseconds, we can also adjust req.session.cookie.expiresthe property, expireswhich is the returned Date()object. In terms of security, it is better to use maxAge. The expiration time is given by the server, and it will disappear automatically after the countdown. And expires is a hard-coded time, it is easy to modify the time of the browser to cheat the expiration date.
④ The .Cookie.originalMaxAge
property returns the original maxAge of the session cookie in milliseconds.
⑤ req.sessionID
To get the ID of a loaded session, access the request property req.sessionID. This is just a read-only value set when loading/creating a session.
11.3 Store
As mentioned earlier, the server will save the session, so where is it saved? There is a store in the configuration session option, if not specified, it will be saved in memory by default using new MemoryStore(). One of the characteristics of memory is that the data will be lost when the power is off or the server is restarted, so usually we can specify other store middleware to save the session, such as file-store, or database redis, etc. If you want to view the default store, you can create a variable in advance. When the store has a name, you can use the store's api to call it later.
const store = new MemoryStore() // 创建个MemoryStore实例
app.use(session({


    ...
    store
}))

app.use((req, res, next) => {


  store.get(req.sessionId, (err, session) => {


    // 这里就可以操作内存中的store数据了。
  })
})
- store.all(callback)
This optional method is used to get all sessions in the store as an array. The first one in the callback is error, and the second one is sessions.
- store.destroy(sid, callback)
This required method is used to destroy/delete a session from storage given a session id (sid). The object of callback is error.
- store.clear([callback])
This method is used to remove all sessions from storage. The callback object is error.
- store.length(callback)
This method is used to get the count of all sessions in the store. The first in the callback is error, and the second is len.
- store.get(sid, callback)
The first parameter of this method is the session ID (sid). The first one in the callback is error, and the second one is session. If not found, there will be no error, but null or undefined will be returned in the session.
- store.set(sid, session, callback)
This method is used to create or modify session and save it in store. The object of callback is error.
- store.touch(sid, session, callback)
This method "touches" the corresponding session with the given session ID (sid) and session. The object of callback is error.
This is primarily used when the store will automatically delete idle sessions and this method is used to signal to the store that a given session is active, potentially resetting the idle timer.
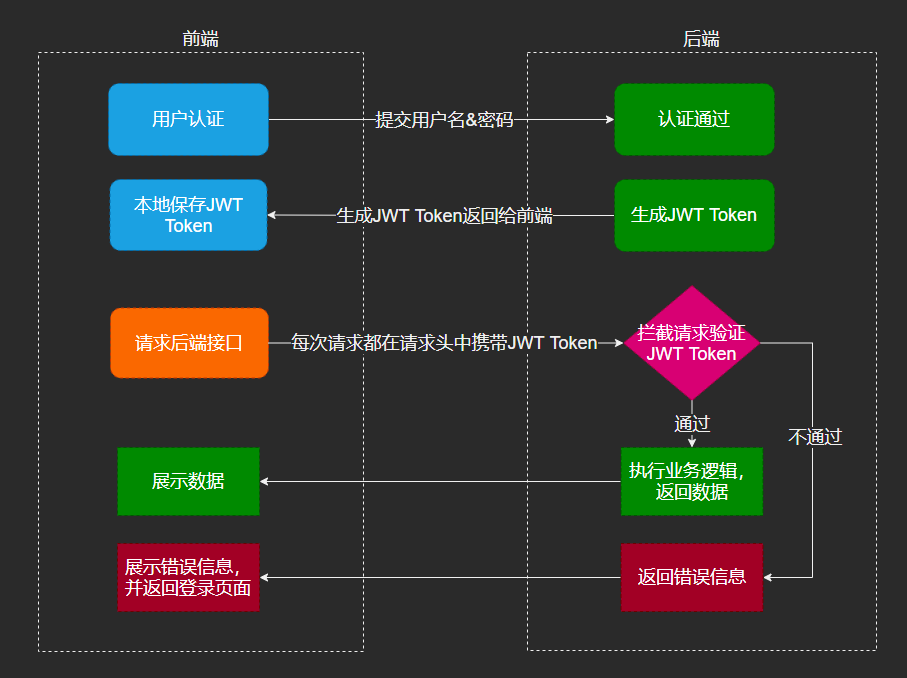
12. What is Token (token)
12.1 Acesss Token
- Resource credentials required to access the resource interface (API)
- The composition of a simple token: uid (the unique identity of the user), time (time stamp of the current time), sign (signature, the first few digits of the token are compressed into a hexadecimal string of a certain length by a hash algorithm)
- Features:
- The server is stateless and scalable
- Support mobile devices
- Safety
- Support for cross-program calls
- Token authentication process:

① The client uses the user name and password to request login
② The server receives the request to verify the user name and password
③ After the verification is successful, the server will issue a token and send the token to the client
④ After the client receives the token, It will be stored, such as in a cookie or in localStorage
⑤ Every time the client requests resources from the server, it needs to bring the token issued by the server
⑥ The server receives the request, and then verifies that the client request contains token, if the verification is successful, the requested data will be returned to the client
- Each request needs to carry the token, and the token needs to be placed in the HTTP Header
- Token-based user authentication is a stateless server-side authentication method, and the server does not need to store token data. Use the calculation time of parsing the token in exchange for the storage space of the session, thereby reducing the pressure on the server and reducing frequent database queries
- The token is completely managed by the application, so it can avoid the same-origin policy
12.2 Refresh Token
-
another kind
token——refresh token -
refresh tokenIt is a token dedicated to refreshing the access token. If there is no refresh token, you can also refresh the access token, but every time you refresh, you need to enter the login user name and password, which will be very troublesome. With the refresh token, this trouble can be reduced, and the client directly uses the refresh token to update the access token without additional operations by the user.

-
Access TokenThe validity period of Accesss Token is relatively short. When the Accesss Token becomes invalid due to expiration, a new Token can be obtained by using the Refresh Token. If the Refresh Token is also invalid, the user can only log in again. -
Refresh TokenAnd the expiration time is stored in the database of the server, and will only be verified when applying for a new Accesss Token, which will not affect the response time of the business interface, and does not need to be kept in memory like the Session to deal with a large number of requests.
12.3 Difference between Token and Session
SessionIt is a mechanism for recording the session state between the server and the client, which makes the server stateful and can record session information. And Token is a token, the resource credential needed to access the resource interface (API). Token makes the server stateless and does not store session information.SessionItTokendoes not contradict with , as an identity authentication Token, the security is better than Session, because each request has a signature and can prevent monitoring and replay attacks, while Session must rely on the link layer to ensure communication security. If you need to implement a stateful session, you can still add Session to save some state on the server side.- The so-called
Sessionauthentication is simply storing User information inSession, because ofSessionIDits unpredictability, it is considered safe for the time being. HoweverToken, if it refers toOAuth Tokenor a similar mechanism, it provides authentication and authorization. Authentication is for users, and authorization is for Apps that。其目的是让某 Apphave the right to access a user's information. HereTokenis unique. It cannot be transferred to other apps, nor can it be transferred to other users.SessionOnly a simple authentication is provided, that is, as long as there is thisSessionID, it is considered to have all the rights of this User. It needs to be kept strictly confidential. This data should only be stored on the site and should not be shared with other websites or third-party apps. So to put it simply: If your user data may need to be shared with a third party, or allow a third party to call the API interface, useToken. If it is always just your own website and your own App, it doesn't matter what you use.
13. What is JWT
13.1 Introduction
- JSON Web Token (JWT for short) is currently the most popular cross-domain authentication solution.
It is an authentication and authorization mechanism. - JWT is an open JSON-based standard (RFC 7519) implemented for passing claims between web application environments. JWT claims are generally used to pass authenticated user identity information between identity providers and service providers, so as to obtain resources from resource servers. For example, it is used for user login.
- JWT can be signed using HMAC algorithm or RSA public/private key. Because of the existence of digital signatures, these transmitted information are trusted.
JWT authentication process:
First, the front-end sends its user name and password to the back-end interface through the web form. This process is generally a POSTrequest. The recommended method is to use SSLencrypted transmission ( HTTPS) to avoid sensitive information from being sniffed. After the backend checks the user name and password successfully, the data containing the user information will be used as the data JWT, Payloadwhich will be coded and spliced JWT Headerseparately and then signed to form a form. It is a similar string backend returns the string as a result of successful login to the frontend. The front-end can save the returned result in the browser, and delete the saved one when logging out. The front-end will put it into the attribute in the request header every time it requests (solution and problem). The back-end checks the front-end and verifies it Validity, such as checking whether the signature is correct, whether it has expired, whether the recipient is yourself, etc. After the verification is passed, the backend parses out the user information contained in it, performs other logical operations (generally obtain permissions based on user information, etc.), and returns result:Base64JWT TokenJWT Tokenlll.zzz.xxxJWT TokenJWT TokenJWT TokenHTTPAuthorizationXSSXSRFJWT TokentokenJWT Token
13.2 Difference between Token and JWT
same:
- Both are tokens for accessing resources
- can record user information
- All make the server stateless
- Only after the authentication is successful, the client can access the protected resources on the server
the difference:
- Token: When the server verifies the Token sent by the client, it also needs to query the database to obtain user information, and then verify whether the Token is valid.
- JWT: Token and Payload are encrypted and stored on the client. The server only needs to use the key to decrypt and verify (the verification is also implemented by JWT itself). There is no need to query or reduce the query database, because JWT self-contains the user information and encrypted data.
14. Why use JWT?
Disadvantages of Traditional Session Authentication
We know that HTTP itself is a stateless protocol, which means that if the user provides a user name and password to our application for user authentication, the HTTP protocol will not record the authenticated state after the authentication is passed, then the next request , the user has to authenticate again, because according to the HTTP protocol, we don't know which user sent the request, so in order for our application to identify which user sent the request, we can only log in after the user succeeds for the first time , store a piece of user login information on the server, this login information will be passed to the browser in the response, telling it to save it as a cookie, so that it can be sent to our application when the next request is made, so that our application can identify the request from Which user, this is the traditional session-based authentication process.
However, traditional session authentication has the following problems:
- The login information of each user will be saved in the session of the server. As the number of users increases, the server overhead will increase significantly.
- Since the session exists in the physical memory of the server, this method will fail in a distributed system. Although the session can be saved in Redis uniformly, this will undoubtedly increase the complexity of the system, and for applications that do not require redis, an additional cache middleware will be introduced in vain
- It is not applicable to non-browser clients, mobile phones, etc., because sessions rely on cookies, and mobile terminals often do not have cookies
- Because session authentication is essentially based on cookies, if cookies are intercepted, users are vulnerable to cross-site request forgery attacks. And if the browser disables cookies, this method will also fail
- It is even more inapplicable in the front-end and back-end separation systems, the back-end deployment is complex, the requests sent by the front-end often reach the back-end through multiple middleware, and the information about the session in the cookie will be forwarded multiple times
- Because it is based on cookies, and cookies cannot cross domains, session authentication cannot cross domains, which is not applicable to single sign-on
Advantages of JWT Authentication
Compared with the traditional session authentication method, the advantages of JWT are:
- Concise: JWT Token has small amount of data and fast transmission speed
- Because JWT Token is stored on the client in JSON encrypted form, so JWT is cross-language, and in principle any web form supports
- There is no need to save session information on the server side, that is to say, it does not depend on cookies and sessions, so there is no disadvantage of traditional session authentication, especially suitable for distributed microservices
- Single sign-on friendly: If you use Session for identity authentication, it is difficult to achieve single sign-on because cookies cannot cross domains. However, if tokens are used for authentication, tokens can be stored in memory anywhere on the client, not necessarily cookies, so there will be no such problems without relying on cookies
- Suitable for mobile applications: If you use Session for identity authentication, you need to save a piece of information on the server side, and this method will rely on Cookie (Cookie is required to save SessionId), so it is not suitable for mobile terminals
Because of these advantages, it is recommended to use JWT token for user authentication no matter whether it is a single application or a distributed application.
15. jwt application
Encapsulation method
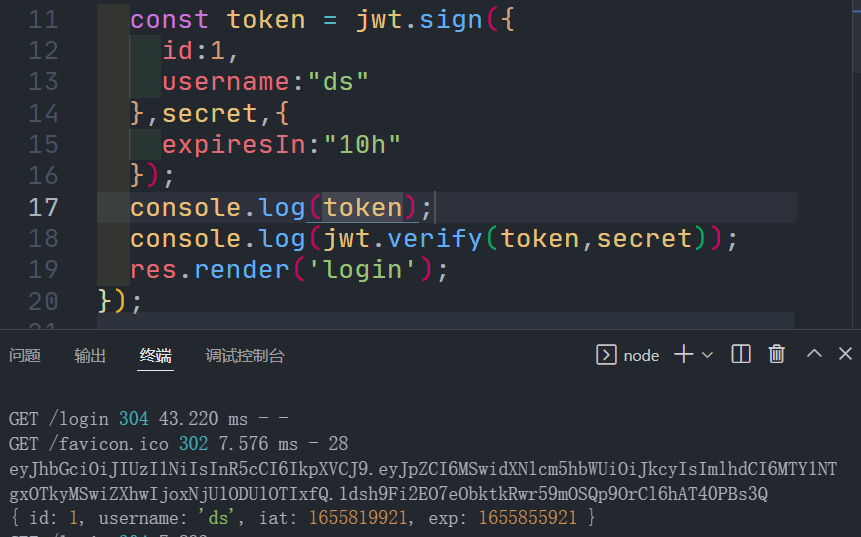
//jsonwebtoken 封装
const jwt = require("jsonwebtoken")
const secret = "dselegent"

const JWT = {


    //生成签名
    //expiresIn是过期时间,例'24h'
	//value是要传入的数据
    generate(value,expiresIn){


        return jwt.sign(value,secret,{

    expiresIn})
    },
    verify(token){


        try{


            return jwt.verify(token,secret)//返回的是解析后的token,原始数据+自带的数据构成的对象
        }catch(e){


            return false//通过上面按个方法会自动解出是否过期,可是会报错,所以用try-catch
        }
    }
}

module.exports = JWT
router/login.js

  async login(req, res, next) {


    const {

     username, password } = req.body;

    let data = await userService.login({

     username, password });//存储数据库
     //因为存储成功返回的data对象并不是简单的对象,不能直接用,只能取出要用的值
    if (data) {


      const token = jwt.generate({


        id:data._id,
        username:data.username
      },"10s")
      res.header("Authorization",token)//将token设置到响应头
      res.send({

    ok: 1});
    }
  }
login.html
<script src="https://cdn.jsdelivr.net/npm/axios/dist/axios.min.js"></script>
<script>
   //拦截器,
   axios.interceptors.request.use(function (config) {


        // console.log("请求发出前,执行的方法")
        // Do something before request is sent
        return config;
    }, function (error) {


        // Do something with request error
        return Promise.reject(error);
    });
    axios.interceptors.response.use(function (response) {


      console.log(response);
        // console.log("请求成功后 ,第一个调用的方法")
        const {

    authorization } = response.headers
        authorization && localStorage.setItem("token",authorization)
        return response;
    }, function (error) {


        return Promise.reject(error);
    });
</script>
    用户名:
    <input id="username" />
  <div>
    密码:
    <input type="password" id="password" />
  </div>
  <div><button id="login">登录</button></div>

<script>
  var username = document.querySelector('#username');
  var password = document.querySelector('#password');
  var login = document.querySelector('#login');

  login.onclick = () => {


    axios.post("/users/login", {


            username: username.value,
            password: password.value,
        }).then(res => {


            console.log(res.data)
            if (res.data.ok === 1) {


                //存储token
                location.href = "/"
            } else {


                alert("用户名密码不匹配")
            }
        })
  };
</script>
Pages that require a token to enter
<script src="https://cdn.jsdelivr.net/npm/axios/dist/axios.min.js"></script>
<script>
  //拦截器,
  axios.interceptors.request.use(function (config) {


     //携带token
    const token = localStorage.getItem("token")
    config.headers.Authorization = `Bearer ${

      token}`
    return config;
  }, function (error) {


    return Promise.reject(error);
  });

  axios.interceptors.response.use(function (response) {


    console.log(response);
    const {

    authorization} = response.headers
    //这里是如果有新的token返回(说明这次发请求的没有过期),就重新设置
    //如果过期了,后端会发错误码,前端处理重定向登录
    authorization && localStorage.setItem("token", authorization)
    return response;
  }, function (error) {


    if(error.response.status===401){


      localStorage.removeItem("token")
      location.href = "/login"
    }
    return Promise.reject(error);
  });
</script>

<body>
<div>
  <div>
    用户名:
    <input id="username" />
  </div>
  <div>
    密码:
    <input type="password" id="password" />
  </div>
  <div>
    年龄:
    <input type="number" id="age" />
  </div>

  <div>
    <button id="loginpost">注册</button>
  </div>
  <div>
    <button id="update">更新</button>
  </div>
  <div>
    <button id="delete">删除</button>
  </div>
</div>

<table border="1">
  <thead>
    <tr>
      <th>名字</th>
      <th>年龄</th>
    </tr>
  </thead>
  <tbody></tbody>
</table>
<script>
  var register = document.querySelector('#loginpost');
  var username = document.querySelector('#username');
  var password = document.querySelector('#password');
  var age = document.querySelector('#age');
  let tbody = document.querySelector('tbody');

  register.onclick = () => {


    axios.post("/users", {


    username: username.value,
    password: password.value,
    age: age.value
  }).then(res => {


    console.log(res.data)
  })
  };

    axios.get("/users?page=1&limit=10").then(res => {


  res = res.data
  var tbody = document.querySelector("tbody")
  tbody.innerHTML = res.map(item => `
  <tr>
      <td>${

      item.username}</td>
      <td>${

      item.age}</td>
    </tr>`).join("")
})
    //退出登录
     exit.onclick = () => {


   localStorage.removeItem("token")
   location.href = "/login"
 }
</script>
token processing middleware
//node中间件校验
app.use((req,res,next)=>{


  // 如果token有效 ,next()
  // 如果token过期了, 返回401错误
  if(req.url==="/login"){


    next()
    return;
  }
	//Authorization会变成authorization
    //链判断运算符如果?前面判断为真就会继续执行后面的,判断为假就不会执行后面
    //这里因为如果没有token,前面是undefined,去使用undefined是会报错的

    //如果有token就验证,没token就通过
    //(直接访问/能通过,但是有个那个页面自动获取数据的axios,在那里就会发送authorization请求头,进入token验证)
  const token = req.headers["authorization"]?.split(" ")[1]
  if(token){


    var payload = JWT.verify(token)
     //验证成功就生成一个新token重置有效时间,
    // 验证失败就返回错误码让前端跳到登录页
    if(payload){


      const newToken = JWT.generate({


        id:payload.id,
        username:payload.username
      },"1d")
      res.header("Authorization",newToken)
      next()
    }else{


      res.status(401).send({

    errCode:"-1",errorInfo:"token过期"})
    }
  }
})