Brief introduction
NOTE: To quickly get started? Only you need to run under Laravel newly installed application
php artisan make:authandphp artisan migrate, these two commands will generate all things registered user login needed, and then access the browserhttp://your-app.test/registercan be.
Laravel implementing login authentication is very simple. In fact, almost everything Laravel have been configured for you. Configuration files are located config/auth.php, which contains the document-friendly option is configured to adjust the behavior of the authentication service.
In the bottom of the code, the authentication component Laravel " Guards " and " Providers " composition, Guard defines how to implement the user authentication with each request, for example, by Laravel session to maintain the stored Session status and guard Cookie.
Provider defines how to get from the persistent store user information, Laravel underlying support by Eloquent and database query builder to get the user in two ways, if needed, you can also define additional Provider .
If you see these terms feel foggy, no need to worry too much, because for most applications, just use the default authentication configuration, do not need to do any changes.
Note: popular point that during the login authentication when do two things, one is the user access data from a database, a user is logged in to save them, Laravel in the underlying implementation, the Provider by access to data, Guard by storing user authentication information, the former major and interact with the database, which is mainly dealing and Session (API exception).
Database considerations
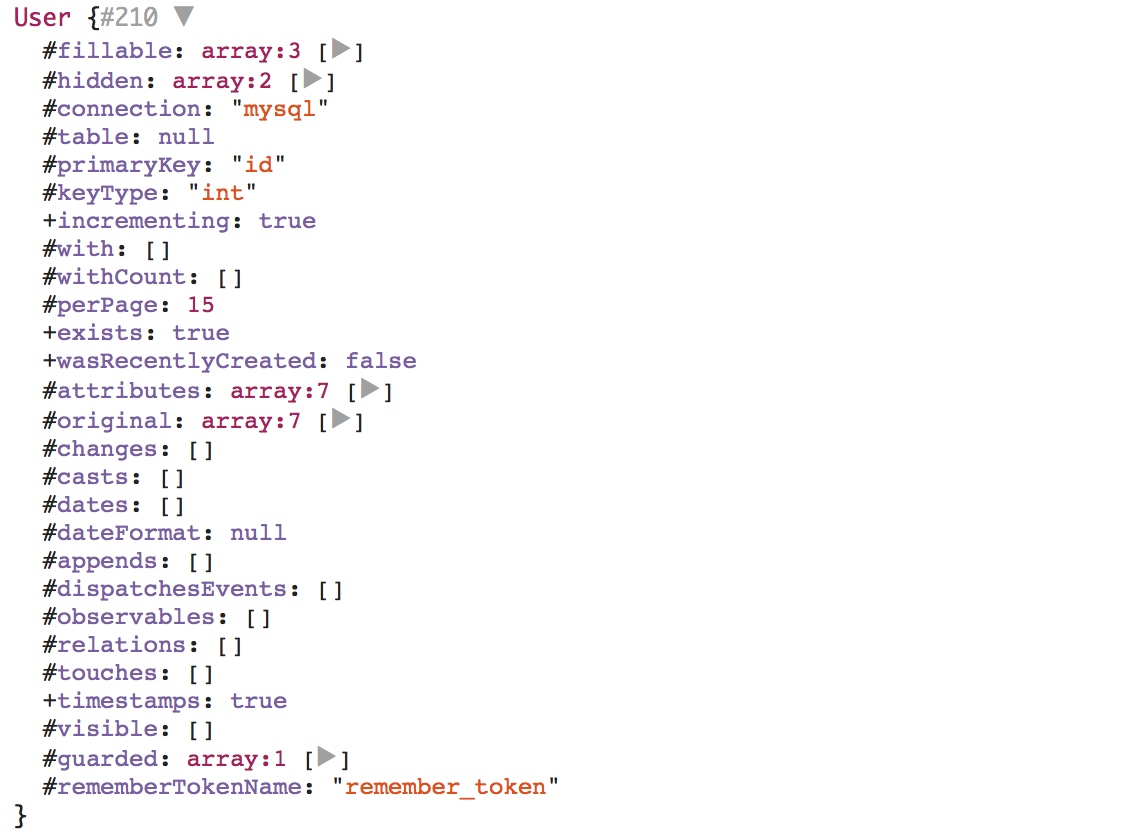
By default, Laravel in app contains a directory Eloquent model App\User, this model can be used with the default Eloquent certified drivers. If your application does not use Eloquent, you can use database certified drivers, the driver uses the Laravel query builder interact with the database.
Is App\User the time to build the database table structure model, to ensure that password the field has a length of at least 60. The default length of the string holder (255) is a good choice.
Also, you need to verify that users the table contains remember_tokenthe field is an empty string can type, field length is 100, when you log storage for application maintenance of "Remember Me" Session token.

Getting Started
Laravel provides several preset authentication controller, located App\Http\Controllers\Auth namespace, RegisterController for new user registration process, LoginController for handling user login authentication, ForgotPasswordController for handling e-mail a link to reset your password, ResetPasswordController reset your password logic, each controller use the trait to introduce the method they need. For many applications, you do not need to modify these controllers:

routing
Laravel can quickly view and generate routes required for the authentication by running the following commands:
php artisan make:auth
Newly installed application to run the command generates layout, registration and log view, and all authentication routing, and generates HomeController a login request for processing applications.
Open routes/web.php route file will find two new lines:
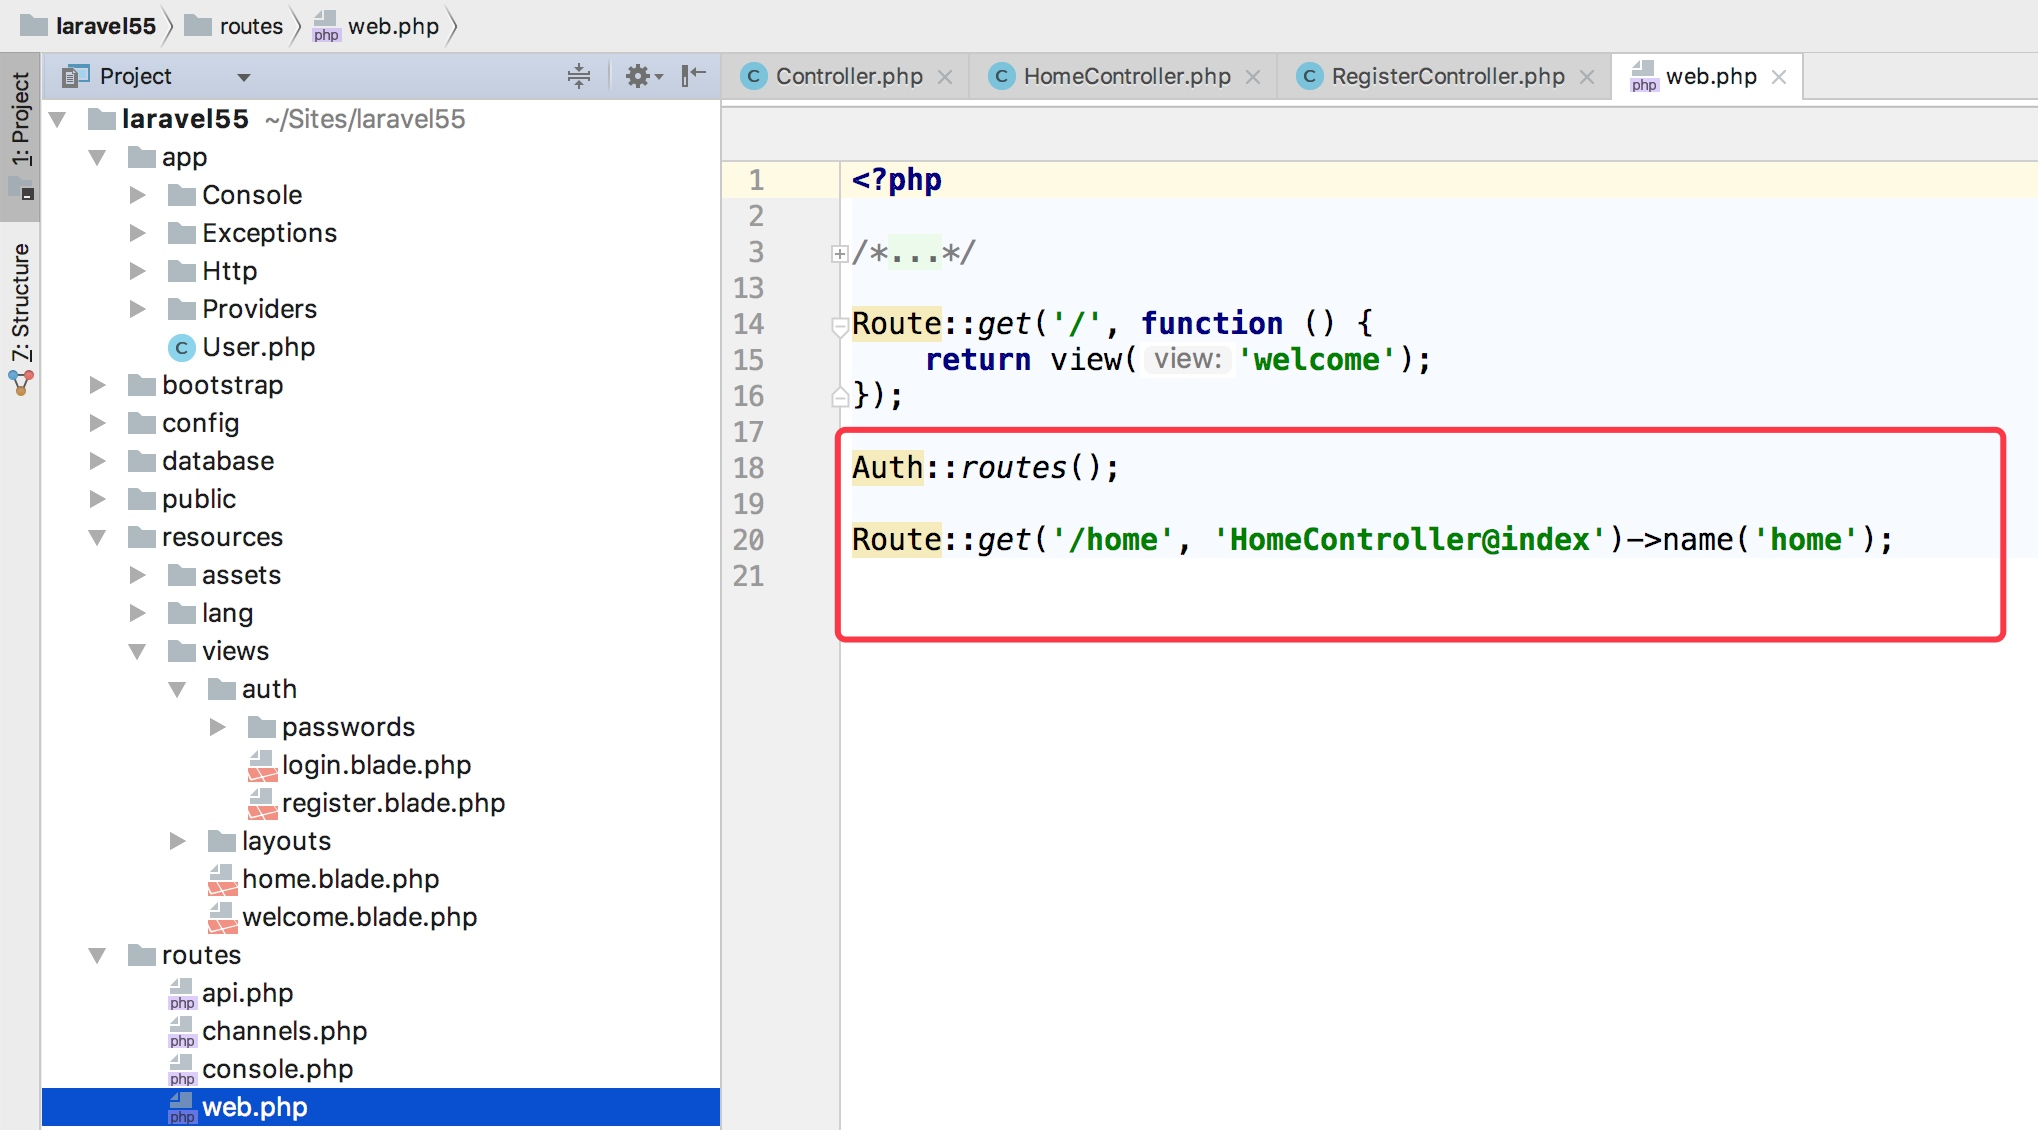
Login Register related routes are defined above Auth::routes() in the method.
注:如果你的应用不需要注册,可以通过移除新创建的
RegisterController控制器并编辑路由定义来禁止注册:Auth::routes(['register' => false]);。
视图
正如上面所提到的,php artisan make:auth 命令会在 resources/views/auth 目录下创建所有认证需要的视图。
make:auth 命令还创建了 resources/views/layouts 目录,该目录下包含了应用的基础布局文件。所有这些视图都使用了 Bootstrap CSS 框架,你也可以根据需要对其进行自定义。
认证
现在你已经为自带的认证控制器设置好了路由和视图,接下来我们来实现新用户注册和登录认证。你可以在浏览器中访问定义好的路由,认证控制器默认已经包含了注册及登录逻辑(通过trait)。
我们先来注册一个新用户,在浏览器中访问 http://blog.test/register,即可进入注册页面:
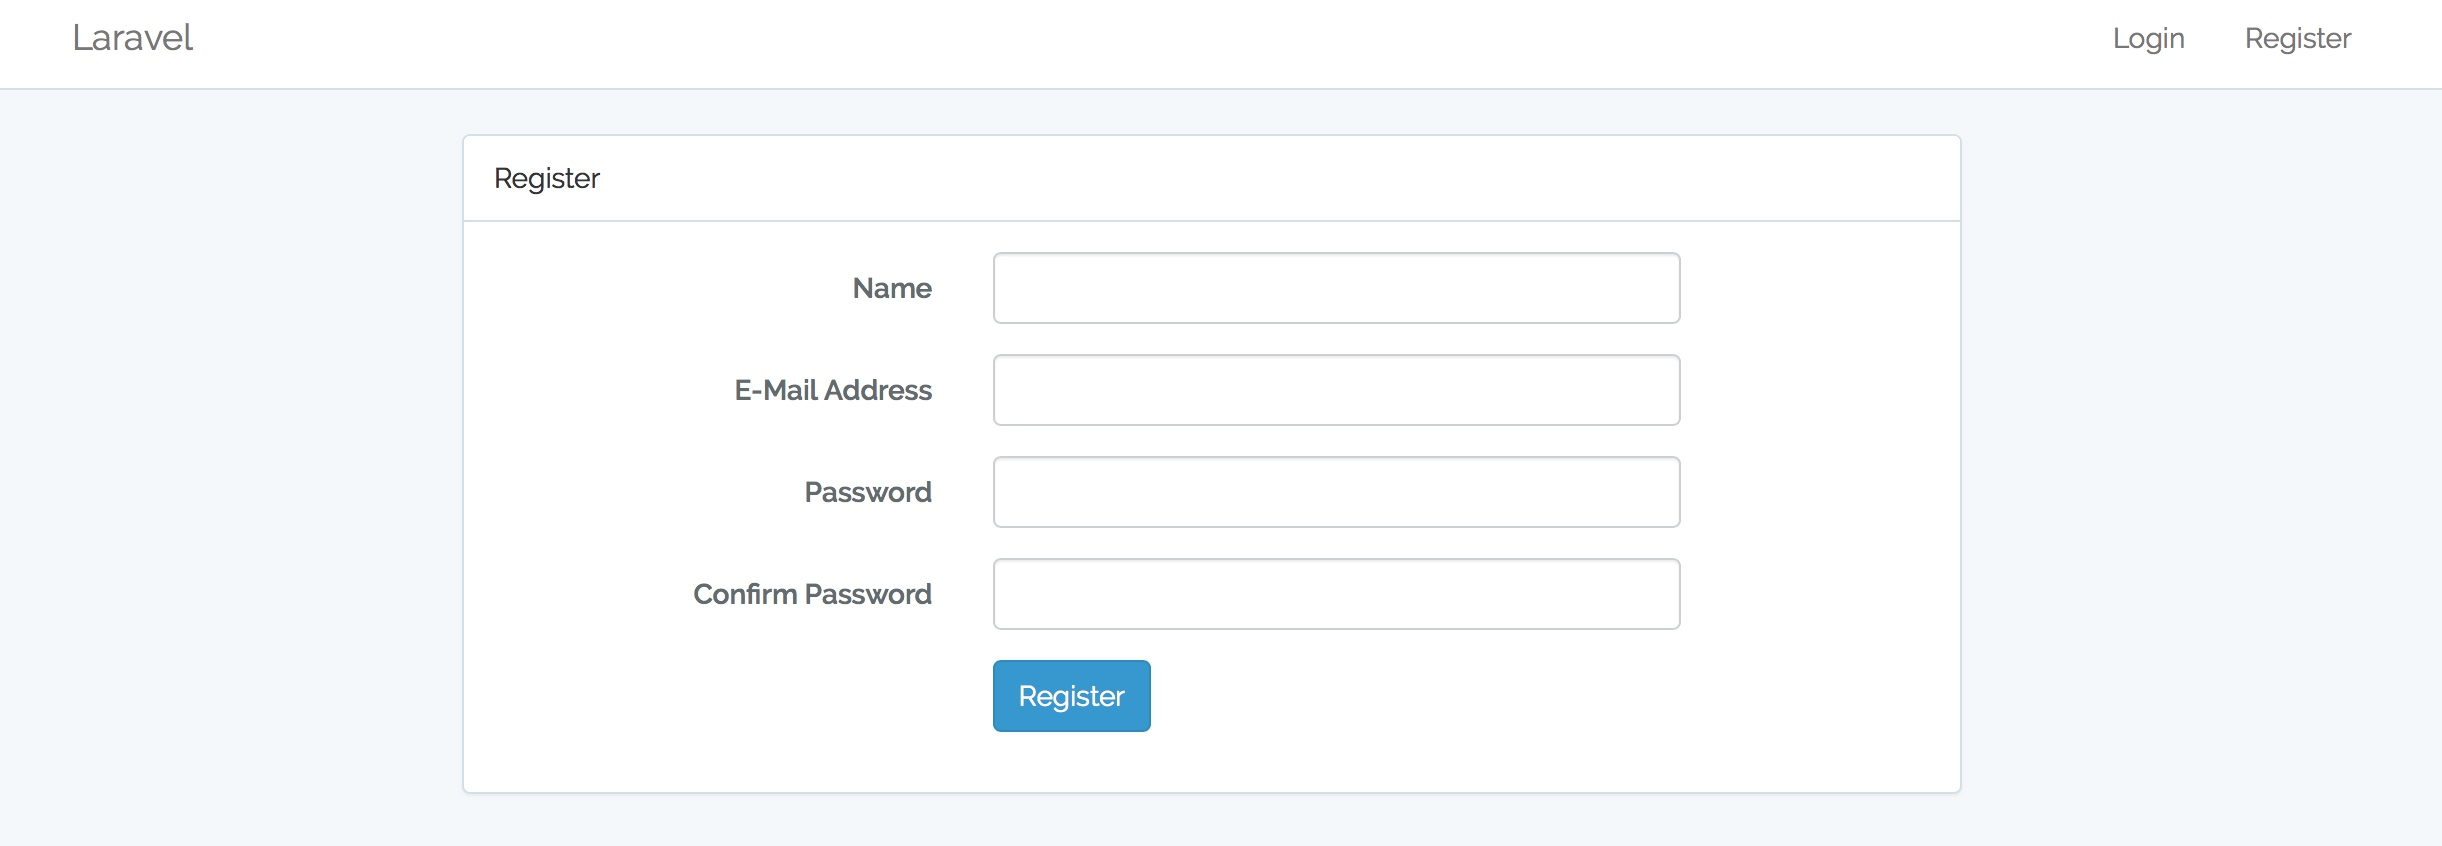
填写表单点击「Register」按钮即可完成注册。注册成功后页面跳转到认证后的页面 http://blog.test/home:

要测试登录功能,可以先退出当前用户,然后访问登录页面 http://blog.test/login:
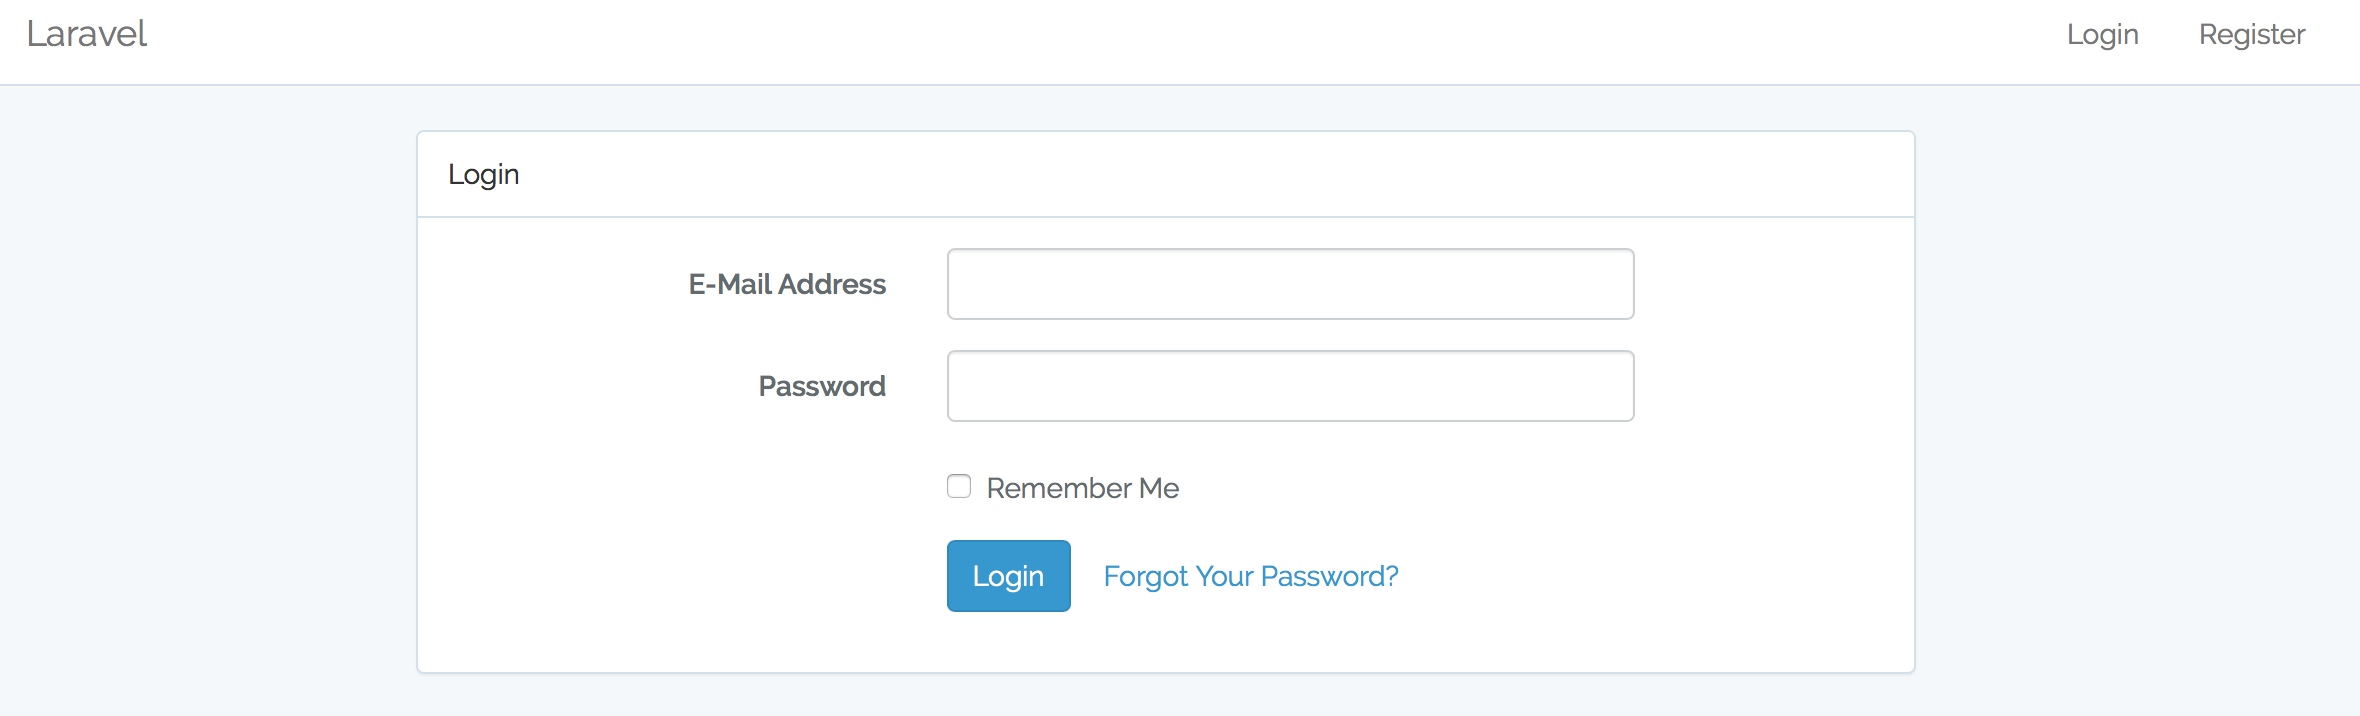
使用我们之前注册的信息登录成功后,同样会跳转到 http://blog.test/home。
自定义路径
我们已经知道,当一个用户成功进行登录认证后,默认将会跳转到 /home,你可以通过在 LoginController、RegisterController 和 ResetPasswordController 中定义 redirectTo 属性来自定义登录认证成功之后的跳转路径:
protected $redirectTo = '/';
接下来,你需要编辑 RedirectIfAuthenticated 中间件的 handle 方法来使用新的重定向 URI。
如果重定向路径需要自定义生成逻辑可以定义一个 redirectTo 方法来取代 redirectTo 属性:
protected function redirectTo()
{
    return '/path';
}
注:
redirectTo方法优先级大于redirectTo属性。
自定义用户名
默认情况下,Laravel 使用 email 字段进行认证,如果你想要自定义认证字段,可以在 LoginController 中定义 username 方法:
public function username()
{
    return 'username';
}
自定义 Guard
你还可以自定义用于实现用户注册登录的“guard”,要实现这一功能,需要在 LoginController、RegisterController 和 ResetPasswordController 中定义 guard 方法,该方法将会返回一个 guard 实例:
use Illuminate\Support\Facades\Auth;

protected function guard()
{
    return Auth::guard('guard-name');
}
需要注意的是,「guard」名称需要在配置文件 config/auth.php 中配置过:
自定义验证/存储
要修改新用户注册所必需的表单字段,或者自定义新用户字段如何存储到数据库,你可以修改 RegisterController类。该类负责为应用验证输入参数和创建新用户。
RegisterController 的 validator 方法包含了新用户注册的验证规则,你可以按需要自定义该方法。
RegisterController 的 create 方法负责使用 Eloquent ORM 在数据库中创建新的 App\User 记录。当然,你也可以基于自己的需要自定义该方法。
获取登录用户
你可以通过 Auth 门面访问认证用户:
use Illuminate\Support\Facades\Auth;

// 获取当前认证用户...
$user = Auth::user();

// 获取当前认证用户的ID...
$id = Auth::id();
此外,用户通过认证后,你还可以通过 Illuminate\Http\Request 实例访问认证用户(类型提示类会通过依赖注入自动注入到控制器方法中):
<?php

namespace App\Http\Controllers;

use Illuminate\Http\Request;

class ProfileController extends Controller{
    /**
     * 更新用户属性.
     *
     * @param  Request  $request
     * @return Response
     */
    public function update(Request $request)
    {
        // $request->user() 返回认证用户实例...
    }
}
上面两种方式返回的结果完全一致:
判断当前用户是否通过认证
要判断某个用户是否登录到应用,可以使用 Auth 门面的 check 方法,如果用户通过认证则返回 true:
use Illuminate\Support\Facades\Auth;

if (Auth::check()) {
    // The user is logged in...
}
注:尽管我们可以使用
check方法判断用户是否通过认证,但是我们通常的做法是在用户访问特定路由/控制器之前使用中间件来验证用户是否通过认证。
路由保护
路由中间件可用于只允许通过认证的用户访问给定路由。Laravel 通过定义在 Illuminate\Auth\Middleware\Authenticate 中的 auth 中间件来实现这一功能。由于该中间件已经在 HTTP kernel 中注册,你所要做的仅仅是将该中间件加到相应的路由定义中:
Route::get('profile', function() {
    // 只有认证用户可以进入...
})->middleware('auth');
当然,如果你也可以在控制器的构造方法中调用 middleware 方法而不是在路由器中直接定义实现同样的功能:
public function __construct(){
    $this->middleware('auth');
}
比如我们的 HomeController 就是这么做的:
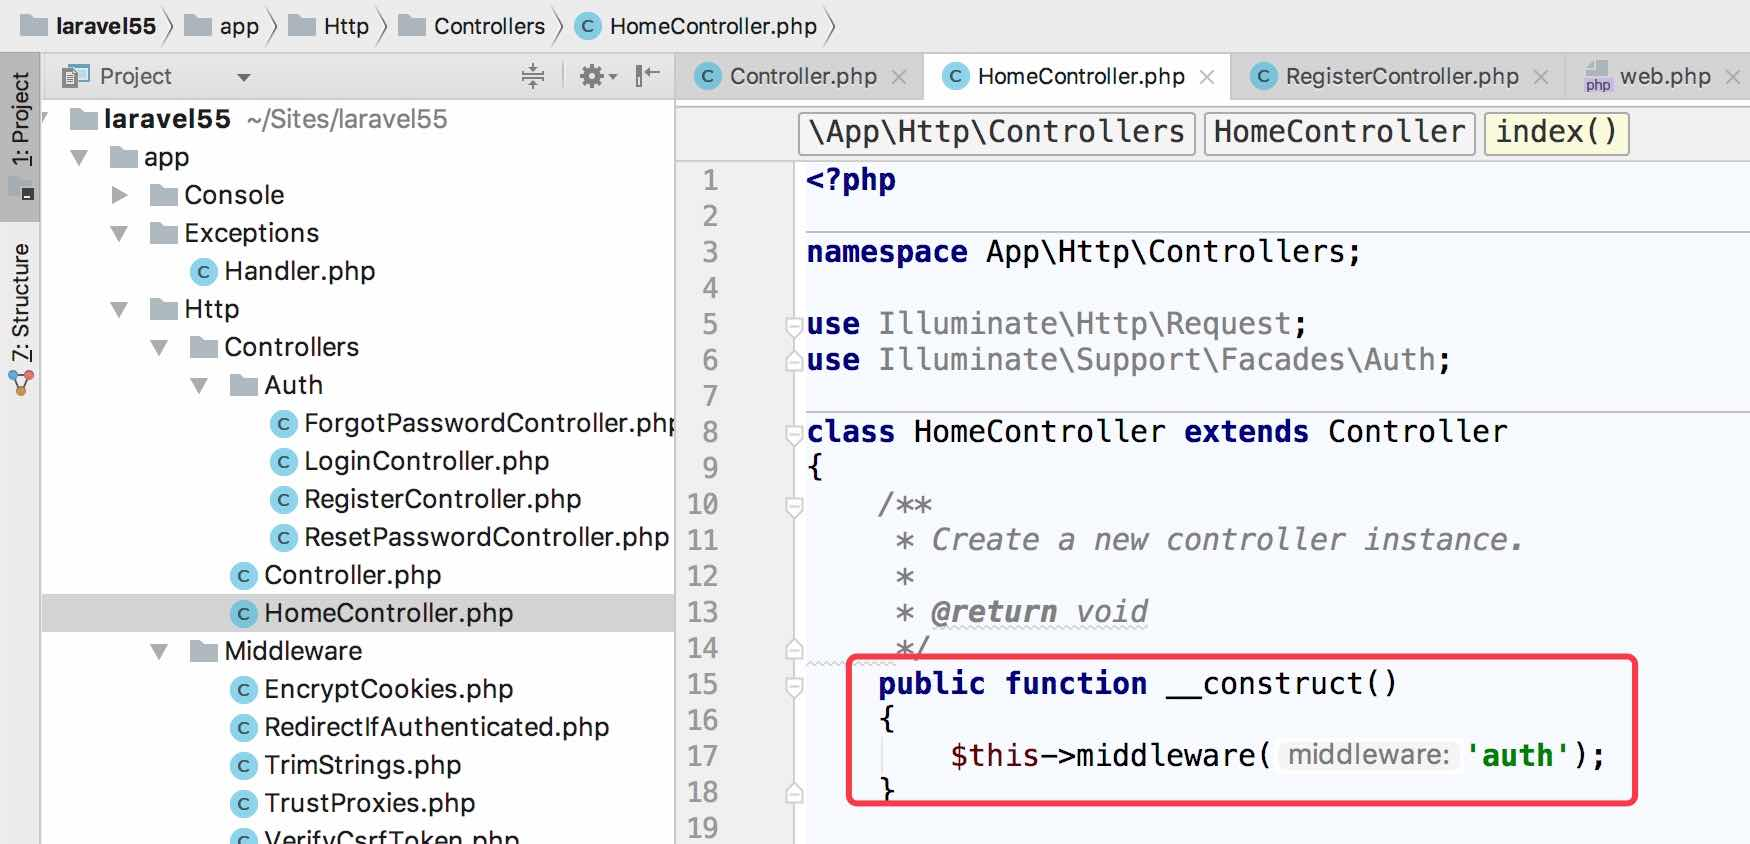
如果我们在没有登录的情况下访问 http://blog.test/home 页面就会重定向到登录页面。
重定向未认证用户
当 auth 中间件判定某个用户未认证,会返回一个 JSON 401 响应,或者,如果不是 Ajax 请求的话,将用户重定向到 login 命名路由(也就是登录页面)。
你可以通过更新 app/Http/Middleware/Authenticate.php 文件中的 redirectTo 函数来改变这一行为:
/**
 * Get the path the user should be redirected to.
 *
 * @param  \Illuminate\Http\Request  $request
 * @return string
 */
protected function redirectTo($request)
{
    return route('login');
}
指定一个 Guard
添加 auth 中间件到路由后,还可以指定使用哪个 guard 来实现认证, 指定的 guard 对应配置文件 config/auth.php 中 guards 数组的某个键 :
public function __construct()
{
    $this->middleware('auth:api');
}
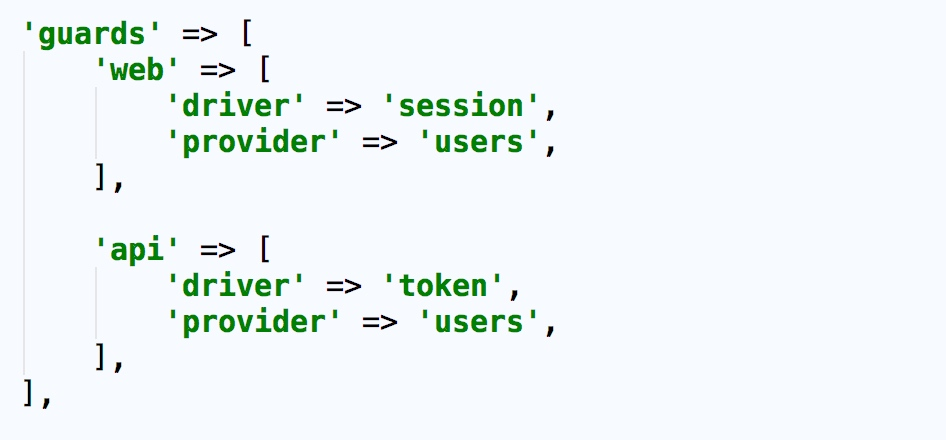
如果没有指定的话,默认 guard 是 web,这也是配置文件中配置的:

登录失败次数限制
如果你使用了 Laravel 自带的 LoginController 类, 就已经启用了内置的 Illuminate\Foundation\Auth\ThrottlesLogins trait 来限制用户登录失败次数。默认情况下,用户在几次登录失败后将在一分钟内不能登录,这种限制基于用户的用户名/邮箱地址+IP地址作为唯一键。
手动认证用户
当然,你也可以不使用 Laravel 自带的认证控制器。如果你选择移除这些控制器,需要直接使用 Laravel 认证类来管理用户认证。别担心,这很简单!
我们可以通过 Auth 门面来访问认证服务,因此我们需要确保在类的顶部导入了 Auth 门面,接下来,让我们看看如何通过 attempt 方法实现登录认证:
<?php

namespace App\Http\Controllers;

use Illuminate\Support\Facades\Auth;

class LoginController extends Controller
{
    /**
     * 处理登录认证
     *
     * @return Response
     * @translator laravelacademy.org
     */
    public function authenticate()
    {
        if (Auth::attempt(['email' => $email, 'password' => $password])) {
            // 认证通过...
            return redirect()->intended('dashboard');
        }
    }
}
attempt 方法接收键/值对作为第一个参数,数组中的值被用于从数据表中查找对应用户。在上面的例子中,将会通过 email 的值作为查询条件去数据库获取对应用户,如果用户被找到,经哈希运算后存储在数据库中的密码将会和传递过来的经哈希运算处理的密码值进行比较。如果两个经哈希运算的密码相匹配,那么将会为这个用户设置一个认证 Session,标识该用户登录成功。感兴趣的同学可以去看下底层源码实现逻辑:
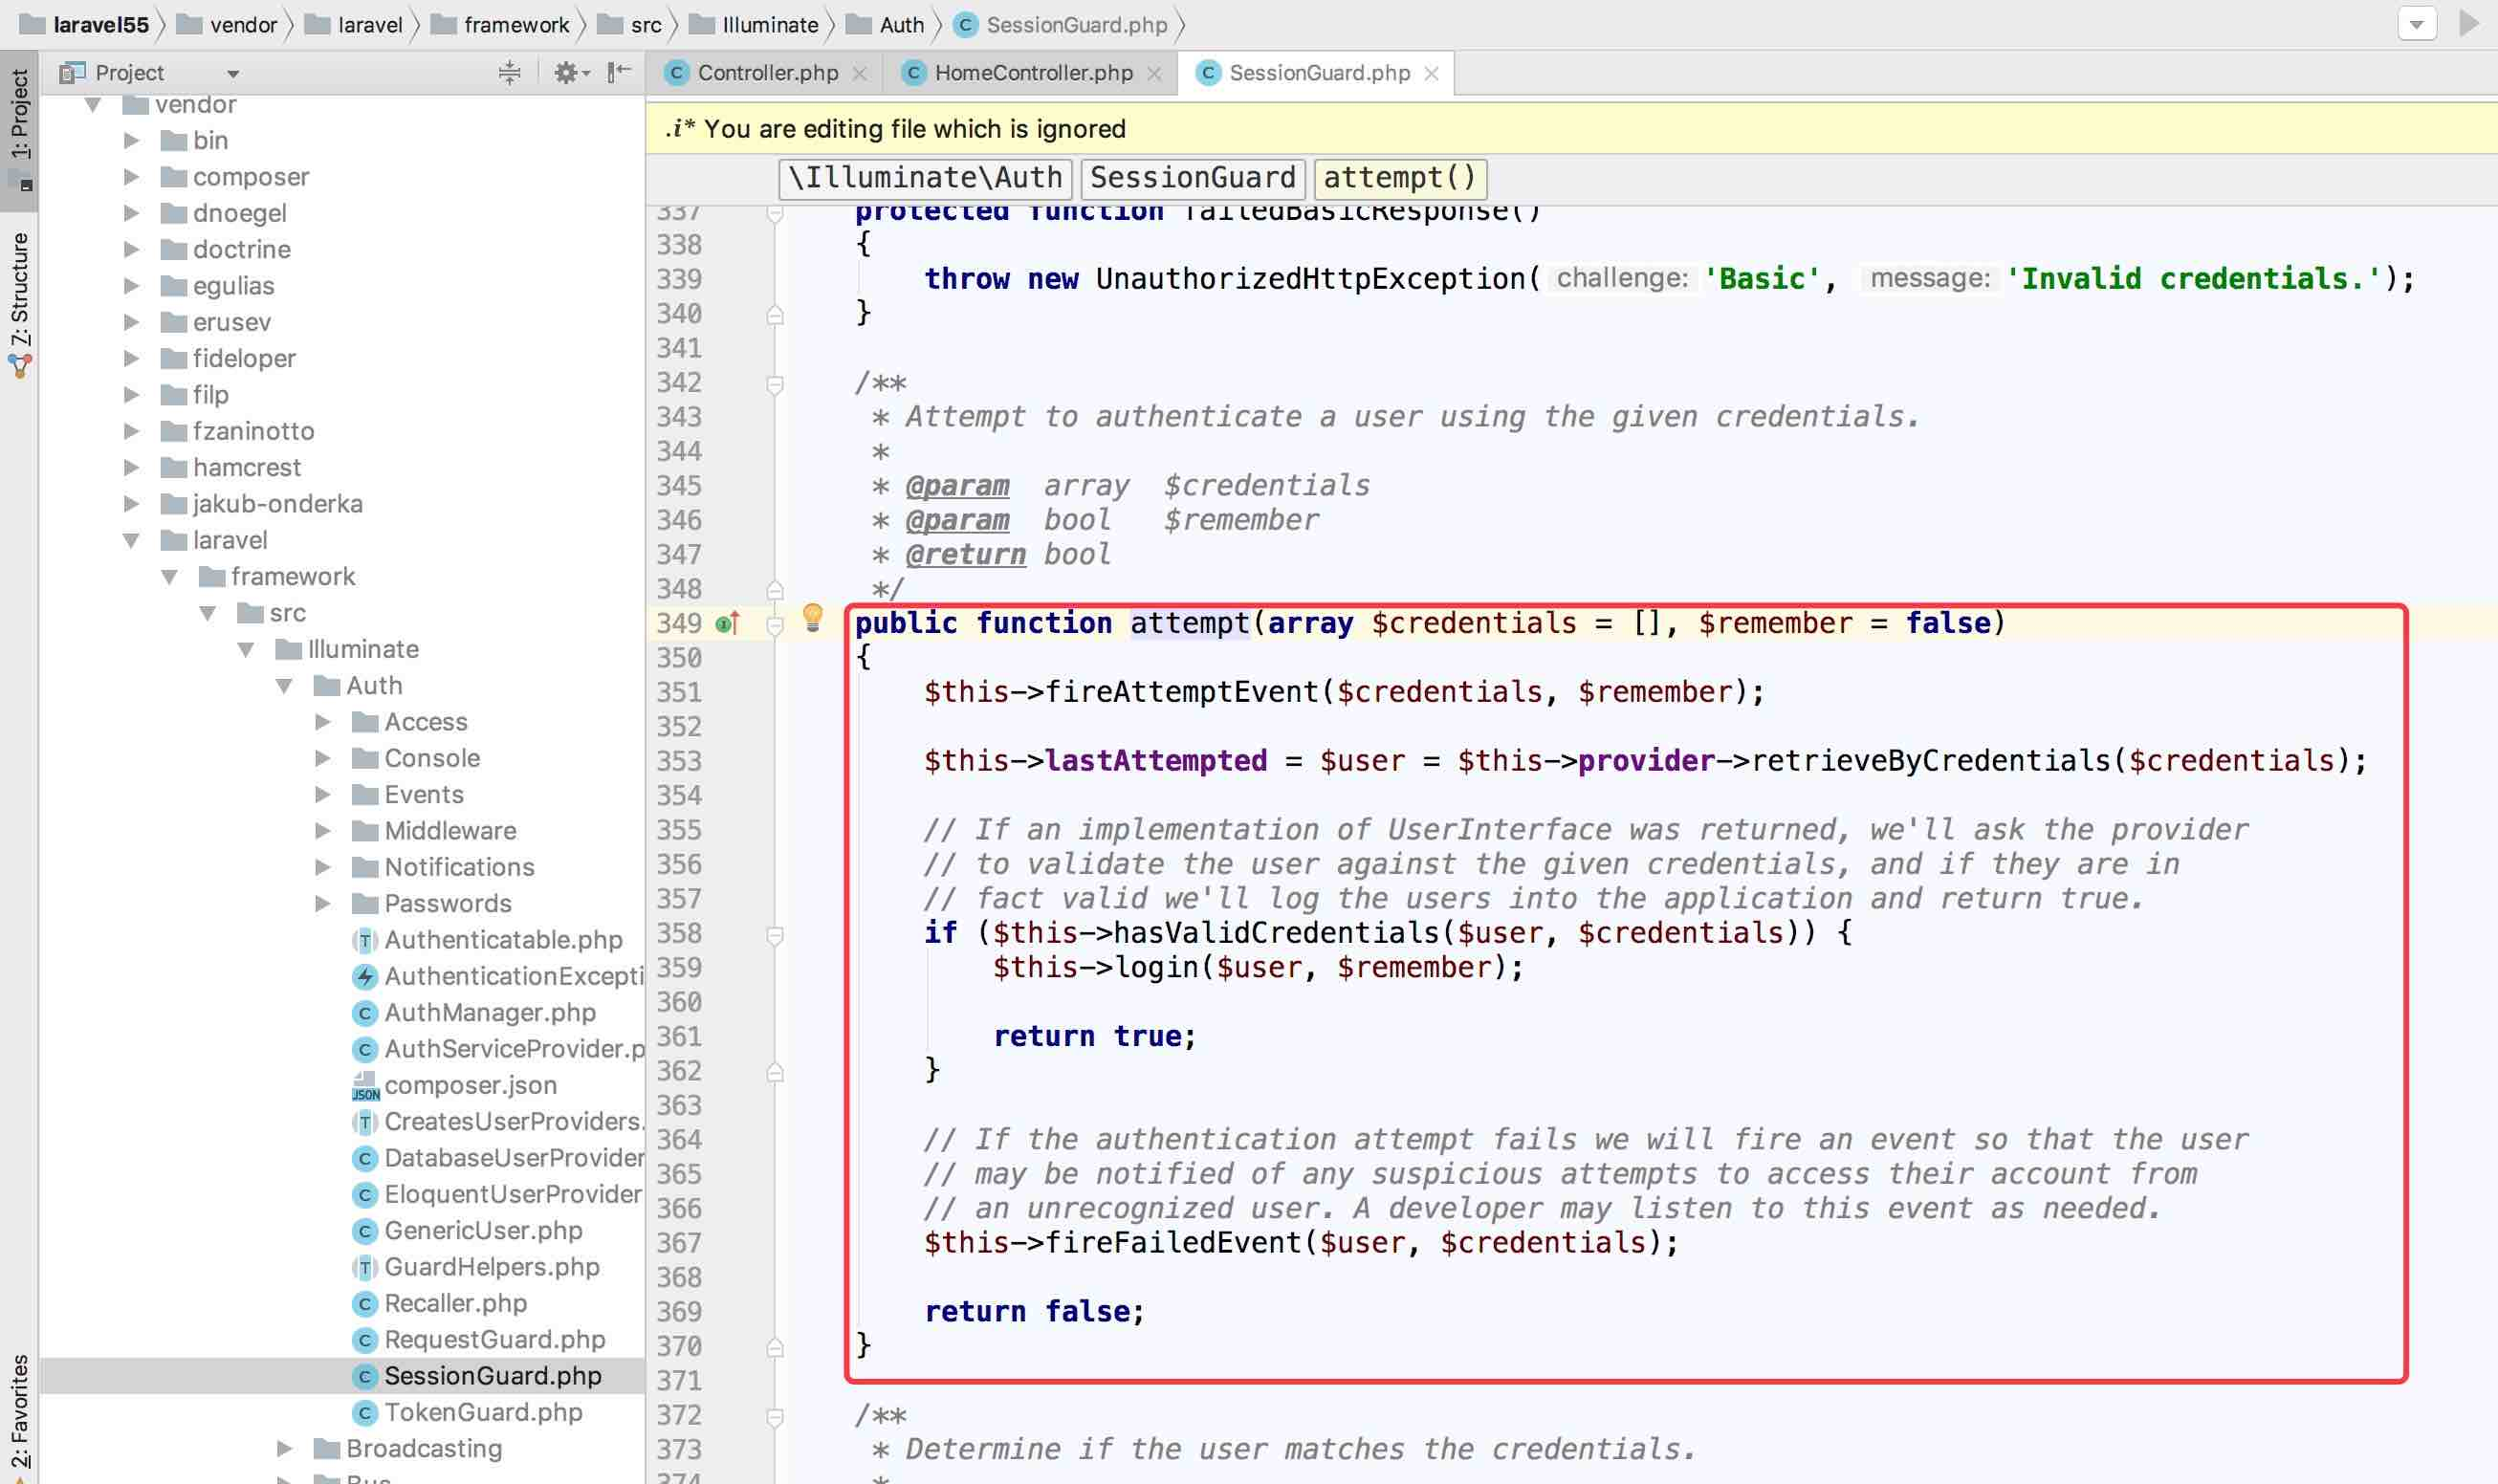
如果认证成功的话 attempt 方法将会返回 true。否则,返回 false。
重定向器上的 intended 方法将用户重定向到登录之前用户想要访问的 URL,在目标 URL 无效的情况下回退 URI 将会传递给该方法。
指定额外条件
如果需要的话,除了用户邮件和密码之外还可以在认证查询时添加额外的条件,例如,我们可以验证被标记为有效的用户:
if (Auth::attempt(['email' => $email, 'password' => $password, 'active' => 1])) {
    // The user is active, not suspended, and exists.
}
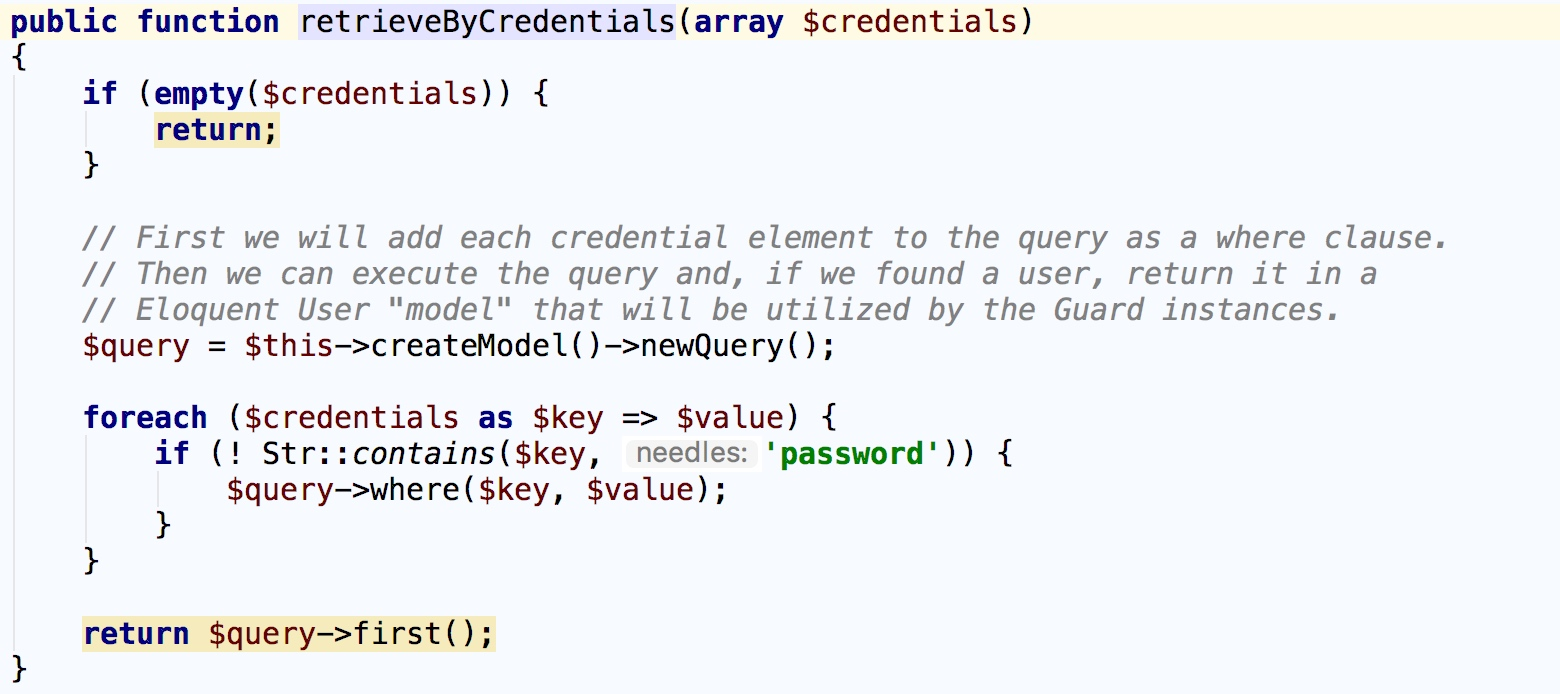
这里的实现原理是在查询用户记录时,只是排除了数组中的密码字段,其他字段都会作为查询条件之一进行筛选:
注:在这些例子中,并不仅仅限于使用
访问指定 Guard 实例
你可以使用 Auth 门面的 guard 方法指定想要使用的 guard 实例,这种机制允许你在同一个应用中对不同的认证模型或用户表实现完全独立的用户认证。
该功能可用于为不同表的不同类型用户(同一个表不同类型用户理论上也可以)实现隔离式登录提供了方便,我们只要为每张表配置一个独立的 guard 就可以了。比如我们除了 users 表之外还有一张 admins 表用于存放后台管理员,要实现管理员的单独登录,就可以这么配置 auth.php 配置文件:
'guards' => [
    'web' => [
        'driver' => 'session',
        'provider' => 'users',
    ],

    'api' => [
        'driver' => 'token',
        'provider' => 'users',
    ],

    'admin' => [
        'driver' => 'session',
        'provider' => 'admins',
    ]
],

'providers' => [
    'users' => [
        'driver' => 'eloquent',
        'model' => App\User::class,
    ],

    'admins' => [
        'driver' => 'eloquent',
        'model' => App\Admin::class,
    ],
],
友情提示:新建的用于登录认证的模型类需要继承
Illuminate\Foundation\Auth\User基类,不然后面就会出现不能认证的窘况。
传递给 guard 方法的 guard 名称对应配置文件 auth.php 中 guards 配置的 admin 键:
if (Auth::guard('admin')->attempt($credentials)) {
    //
}
需要注意的是使用这种方式认证的用户在后续操作需要传递 guard 时也要传递相匹配的 guard,比如上面提到的 auth中间件,对应的调用方式也要调整(在路由中使用也是一样):
$this->middleware('auth:admin');
获取用户时也是一样:
Auth::guard('admin')->user();
退出
要退出应用,可以使用 Auth 门面的 logout 方法,这将会清除用户 Session 中的认证信息:
Auth::logout();
记住用户
如果你想要在应用中提供“记住我”的功能,可以传递一个值为 true 的布尔值作为第二个参数到 attempt 方法(不传的话默认是 false),这样用户登录认证状态就会一直保持直到他们手动退出。当然,你的 users 表必须包含 remember_token 字段,该字段用于存储“记住我”令牌。
if (Auth::attempt(['email' => $email, 'password' => $password], $remember)) {
    // The user is being remembered...
}
注:如果你在使用自带的
LoginController控制器,相应的记住用户逻辑已经通过控制器使用的 trait 实现了。
如果你在使用“记住”用户功能,可以使用 viaRemember 方法来判断用户是否通过“记住我”Cookie进行认证:
if (Auth::viaRemember()) {
    //
}
其它认证方法
认证一个用户实例
如果你需要将一个已存在的用户实例直接登录到应用,可以调用 Auth 门面的 login 方法并传入用户实例,传入实例必须是 Illuminate\Contracts\Auth\Authenticatable 契约的实现,当然,Laravel 自带的 App\User 模型已经实现了该接口:
Auth::login($user);

// 登录并 "记住" 给定用户...
Auth::login($user, true);
当然,你可以指定想要使用的 guard 实例:
Auth::guard('admin')->login($user);
通过 ID 认证用户
要通过用户ID登录到应用,可以使用 loginUsingId 方法,该方法接收你想要认证用户的主键作为参数:
Auth::loginUsingId(1);

// 登录并 "记住" 给定用户...
Auth::loginUsingId(1, true);
一次性认证用户
你可以使用 once 方法只在单个请求中将用户登录到应用,而不存储任何 Session 和 Cookie,这在构建无状态的 API 时很有用:
if (Auth::once($credentials)) {
    //
}
基于 HTTP 的基本认证
HTTP 基本认证能够帮助用户快速实现登录认证而不用设置专门的登录页面,首先要在路由中加上 auth.basic 中间件。该中间件是 Laravel 自带的,所以不需要自己定义:
Route::get('profile', function() {
    // 只有认证用户可以进入...
})->middleware('auth.basic');
中间件加到路由中后,当在浏览器中访问该路由时,会自动提示需要认证信息,默认情况下,auth.basic 中间件使用用户记录上的 email 字段作为「用户名」。
学院君注:这种基本认证除了没有独立的登录表单视图之外底层实现逻辑和正常的登录认证没有区别。
FastCGI 上的注意点
如果你使用 PHP FastCGI,HTTP 基本认证将不能正常工作,需要在 .htaccess 文件加入如下内容:
RewriteCond %{HTTP:Authorization} ^(.+)$
RewriteRule .* - [E=HTTP_AUTHORIZATION:%{HTTP:Authorization}]
无状态的 HTTP 基本认证
你也可以在使用 HTTP 基本认证时不在 Session 中设置用户标识 Cookie,这在 API 认证中非常有用。要实现这个功能,需要定义一个调用 onceBasic 方法的中间件。如果该方法没有返回任何响应,那么请求会继续走下去:
<?php

namespace Illuminate\Auth\Middleware;

use Illuminate\Support\Facades\Auth;

class AuthenticateOnceWithBasicAuth
{
    /**
     * 处理输入请求.
     *
     * @param  \Illuminate\Http\Request  $request
     * @param  \Closure  $next
     * @return mixed
     * @translator laravelacademy.org
     */
    public function handle($request, $next)
    {
        return Auth::onceBasic() ?: $next($request);
    }

}
接下来,将 AuthenticateOnceWithBasicAuth 注册到路由中间件并在路由中使用它:
Route::get('api/user', function() {
    // 只有认证用户可以进入...
})->middleware('auth.basic.once');
退出
如果要手动将用户退出应用,可以使用 Auth 门面上的 logout 方法,该方法会清空用户 Session 中的认证信息:
use Illuminate\Support\Facades\Auth;

Auth::logout();
让其他设备上的 Session 失效
Laravel 还提供了让用户 Session 在除当前设备之外的其他登录设备上失效的机制,要实现这个功能,需要确保 Illuminate\Session\Middleware\AuthenticateSession 中间件在 app/Http/Kernel.php 类的 web 中间件组中存在且没有被注释:
'web' => [
    // ...
    \Illuminate\Session\Middleware\AuthenticateSession::class,
    // ...
],
然后,你可以使用 Auth 门面上的 logoutOtherDevices 方法实现在其他设备「退出」,该方法要求用户提供登录密码:
use Illuminate\Support\Facades\Auth;

Auth::logoutOtherDevices($password);
注:当
logoutOtherDevices方法被调用时,用户在其他设备的 Session 会完全失效,表现在用户界面上就是退出登录了。
添加自定义 Guard 驱动
你可以通过 Auth 门面的 extend 方法定义自己的认证 guard 驱动,该功能需要在某个服务提供者的 boot 方法中实现,由于 Laravel 已经自带了一个 AuthServiceProvider,所以我们将代码放到这个服务提供者中:
<?php

namespace App\Providers;

use App\Services\Auth\JwtGuard;
use Illuminate\Support\Facades\Auth;
use Illuminate\Foundation\Support\Providers\AuthServiceProvider as ServiceProvider;

class AuthServiceProvider extends ServiceProvider
{
    /**
     * 注册任意应用认证/授权服务
     *
     * @return void
     */
    public function boot()
    {
        $this->registerPolicies();

        Auth::extend('jwt', function($app, $name, array $config) {
            // 返回一个Illuminate\Contracts\Auth\Guard实例...
            return new JwtGuard(Auth::createUserProvider($config['provider']));
        });
    }
}
正如你在上面例子中所看到的,传递给 extend 方法的闭包回调需要返回 Illuminate\Contracts\Auth\Guard 的实现实例,该接口包含了自定义认证 guard 驱动需要的一些方法。定义好自己的认证 guard 驱动之后,就可以在配置文件 auth.php 的 guards 配置中使用这个新的 guard 驱动:
'guards' => [
    'api' => [
        'driver' => 'jwt',
        'provider' => 'users',
    ],
],
闭包请求 Guard
实现一个自定义的、基于 HTTP 请求的认证系统最简单的方式就是使用 Auth:viaRequest 方法,该方法允许你通过单个闭包快速定义认证流程。
首先我们需要在 AuthServiceProvider 的 boot 方法中调用 Auth::viaRequest,viaRequest 方法接收一个 guard 名称作为第一个参数,这个名称可以是任意描述自定义 guard 的字符串,传递到该方法第二个参数应该是一个闭包,该闭包接收 HTTP 请求并返回一个用户实例,如果认证失败的话,则返回 null:
use App\User;
use Illuminate\Http\Request;
use Illuminate\Support\Facades\Auth;

/**
 * Register any application authentication / authorization services.
 *
 * @return void
 */
public function boot()
{
    $this->registerPolicies();

    Auth::viaRequest('custom-token', function ($request) {
        return User::where('token', $request->token)->first();
    });
}
定义好自定义 guard 后,就可以在 auth.php 配置文件的配置项 guards 中使用这个 guard 了:
'guards' => [
    'api' => [
        'driver' => 'custom-token',
    ],
],
添加自定义用户提供者
如果你没有使用传统的关系型数据库存储用户信息,则需要使用自己的认证用户提供者来扩展 Laravel。我们使用 Auth 门面上的 provider 方法定义自定义该提供者:
<?php

namespace App\Providers;

use Illuminate\Support\Facades\Auth;
use App\Extensions\RiakUserProvider;
use Illuminate\Support\ServiceProvider;

class AuthServiceProvider extends ServiceProvider
{
    /**
     * 注册任意应用认证/授权服务.
     *
     * @return void
     */
    public function boot()
    {
        $this->registerPolicies();

        Auth::provider('riak', function($app, array $config) {
            // 返回一个Illuminate\Contracts\Auth\UserProvider实例...
            return new RiakUserProvider($app->make('riak.connection'));
        });
    }
}
通过 provider 方法注册用户提供者后,你可以在配置文件 config/auth.php 中切换到新的用户提供者。首先,定义一个使用新驱动的 provider :
'providers' => [
    'users' => [
        'driver' => 'riak',
    ],
],
然后,可以在你的 guards 配置中使用这个提供者:
'guards' => [
    'web' => [
        'driver' => 'session',
        'provider' => 'users',
    ],
],
User Provider 契约
Illuminate\Contracts\Auth\UserProvider 实现只负责从持久化存储系统中获取 Illuminate\Contracts\Auth\Authenticatable 实现,例如 MySQL、Riak 等等。这两个接口允许 Laravel 认证机制继续起作用而不管用户数据如何存储或者何种类来展现。
让我们先看看 Illuminate\Contracts\Auth\UserProvider 契约:
<?php

namespace Illuminate\Contracts\Auth;

interface UserProvider {

    public function retrieveById($identifier);
    public function retrieveByToken($identifier, $token);
    public function updateRememberToken(Authenticatable $user, $token);
    public function retrieveByCredentials(array $credentials);
    public function validateCredentials(Authenticatable $user, array $credentials);

}
retrieveById 方法通常获取一个代表用户的键,例如 MySQL 数据中的自增ID。该方法获取并返回匹配该ID的 Authenticatable 实现。
retrieveByToken 函数通过唯一标识和存储在 remember_token 字段中的“记住我”令牌获取用户。和上一个方法一样,该方法也返回 Authenticatable 实现。
updateRememberToken 方法使用新的 $token 更新 $user 的 remember_token 字段,新令牌可以是新生成的令牌(在登录是选择“记住我”被成功赋值)或者null(用户退出)。
retrieveByCredentials 方法在尝试登录系统时获取传递给 Auth::attempt 方法的认证信息数组。该方法接下来去底层持久化存储系统查询与认证信息匹配的用户,通常,该方法运行一个带“where”条件($credentials[‘username’])的查询。然后该方法返回 Authenticatable 的实现。这个方法不应该做任何密码校验和认证。
validateCredentials 方法比较给定 $user 和 $credentials 来认证用户。例如,这个方法比较 $user->getAuthPassword() 字符串和经 Hash::check 处理的 $credentials['password']。这个方法根据密码是否有效返回布尔值 true 或 false。
Authenticatable 契约
既然我们已经探索了 UserProvider 上的每一个方法,接下来让我们看看 Authenticatable。记住,提供者需要从 retrieveById 和 retrieveByCredentials 方法中返回接口实现:
<?php

namespace Illuminate\Contracts\Auth;

interface Authenticatable {
    public function getAuthIdentifierName();
    public function getAuthIdentifier();
    public function getAuthPassword();
    public function getRememberToken();
    public function setRememberToken($value);
    public function getRememberTokenName();
}
这个接口很简单, getAuthIdentifierName 方法会返回用户的主键字段名称,getAuthIdentifier 方法返回用户“主键”,在后端 MySQL 中这将是自增ID,getAuthPassword 返回经哈希处理的用户密码,这个接口允许认证系统处理任何用户类,不管是你使用的是 ORM 还是存储抽象层。默认情况下,Laravel app 目录下的 User 类实现了这个接口,所以你可以将这个类作为实现例子。
事件
Laravel 支持在认证过程中触发多种事件,你可以在自己的 EventServiceProvider 中监听这些事件:
/**
 * 应用的事件监听器映射.
 *
 * @var array
 */
protected $listen = [
    'Illuminate\Auth\Events\Registered' => [
        'App\Listeners\LogRegisteredUser',
    ],

    'Illuminate\Auth\Events\Attempting' => [
        'App\Listeners\LogAuthenticationAttempt',
    ],

    'Illuminate\Auth\Events\Authenticated' => [
        'App\Listeners\LogAuthenticated',
    ],

    'Illuminate\Auth\Events\Login' => [
        'App\Listeners\LogSuccessfulLogin',
    ],

    'Illuminate\Auth\Events\Failed' => [
    'App\Listeners\LogFailedLogin',
],

    'Illuminate\Auth\Events\Logout' => [
        'App\Listeners\LogSuccessfulLogout',
    ],

    'Illuminate\Auth\Events\Lockout' => [
        'App\Listeners\LogLockout',
    ],

    'Illuminate\Auth\Events\PasswordReset' => [
        'App\Listeners\LogPasswordReset',
    ],
];