Article Directory
- What is a container?
- container interface
- container implementation
- Bean life cycle
- Template Method Design Pattern
- Bean Post Processor
- BeanFactory Post Processor
- Regarding the calling period of the post processor (PostProcessor)
- Aware interface and InitializingBean interface
- initialization and destruction
- Scope
What is a container?
Spring contains and manages the configuration and life cycle of application objects. In this sense, it is a container for carrying objects. You can configure how each of your Bean objects is created. These Beans can create a separate instance or generate a new instance every time they are needed, and how they are related to each other. Build and use.
If a Bean object is handed over to the Spring container for management, then the Bean object should be disassembled in a similar way and stored in the Bean definition. This is equivalent to an operation of decoupling the object, which can be managed more easily by Spring, such as handling circular dependencies and other operations.
After a Bean object is defined and stored, it will be assembled by Spring in a unified way. This process includes Bean initialization, property filling, etc. Finally, we can completely use a Bean instantiated object.
container interface
In this section we will:
- Know what BeanFactory can do?
- What extension functions can ApplicationContext have?
- Event decoupling
There are two well-known container interfaces in Spring, one is the BeanFactory interface and the other is the ApplicationContext interface.
-
BeanFactory 接口, typical functions are:- getBean
-
ApplicationContext 接口, is a subinterface of BeanFactory. It extends the functionality of the BeanFactory interface, such as:- globalization
- Get a set of Resource resources in wildcard mode
- Integrate the Environment environment (through which configuration information from various sources can be obtained)
- Event publishing and monitoring to achieve decoupling between components
When we usually use SpringBoot to run a project, the startup class is similar to this:
public class HmDianPingApplication {


    public static void main(String[] args) {


        SpringApplication.run(HmDianPingApplication.class, args);
    }

}
We use the run method to start a SpringBoot program, which has two parameters:
- Type of startup class
- The command line parameters passed by the main method
This run method actually has a return value, which is our Spring container:
ConfigurableApplicationContext context = SpringApplication.run(A01.class, args);
So what does this ConfigurableApplicationContext have to do with our two container interfaces? We can view the class diagram with Ctrl + Alt + u:

We can see that ConfigurableApplicationContext actually inherits from the ApplicationContext interface, and the ApplicationContext interface inherits from the BeanFactory interface. It is conceivable that the ApplicationContext interface should extend some functions of the BeanFactory interface.
This place we answer a question? What exactly is a BeanFactory?
- It is the parent interface of ApplicationContext
- It is the core container of Spring, and the main ApplicationContext implementations [combine] its functions
- We can look at the following code, the getBean method is directly the method in the called BeanFactory:
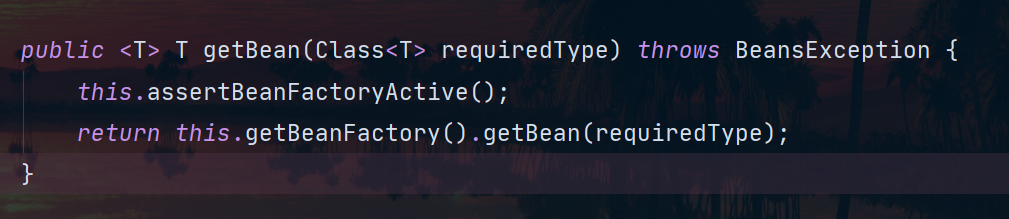
- BeanFactory is a member variable of ApplicationContext
- We can look at the following code, the getBean method is directly the method in the called BeanFactory:
Then we solve the second question: what can BeanFactory do?
We directly look at the abstract method in this interface and find that it is relatively simple:
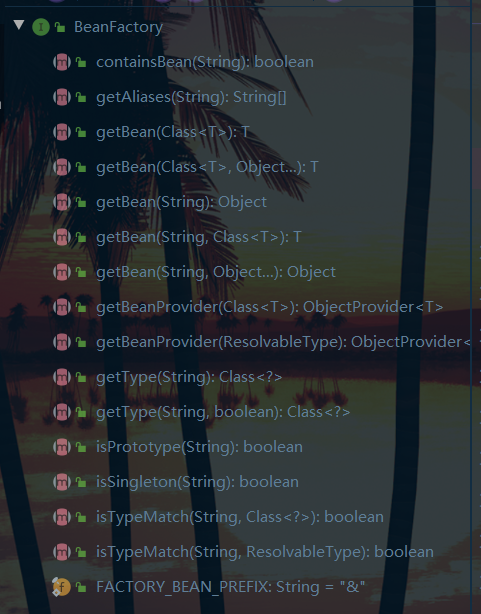
It seems that the getBean method is more useful. In fact, we can't just look at the interface but also look at its implementation. Control inversion, basic dependency injection, and various functions up to the Bean life cycle are provided by its implementation class.
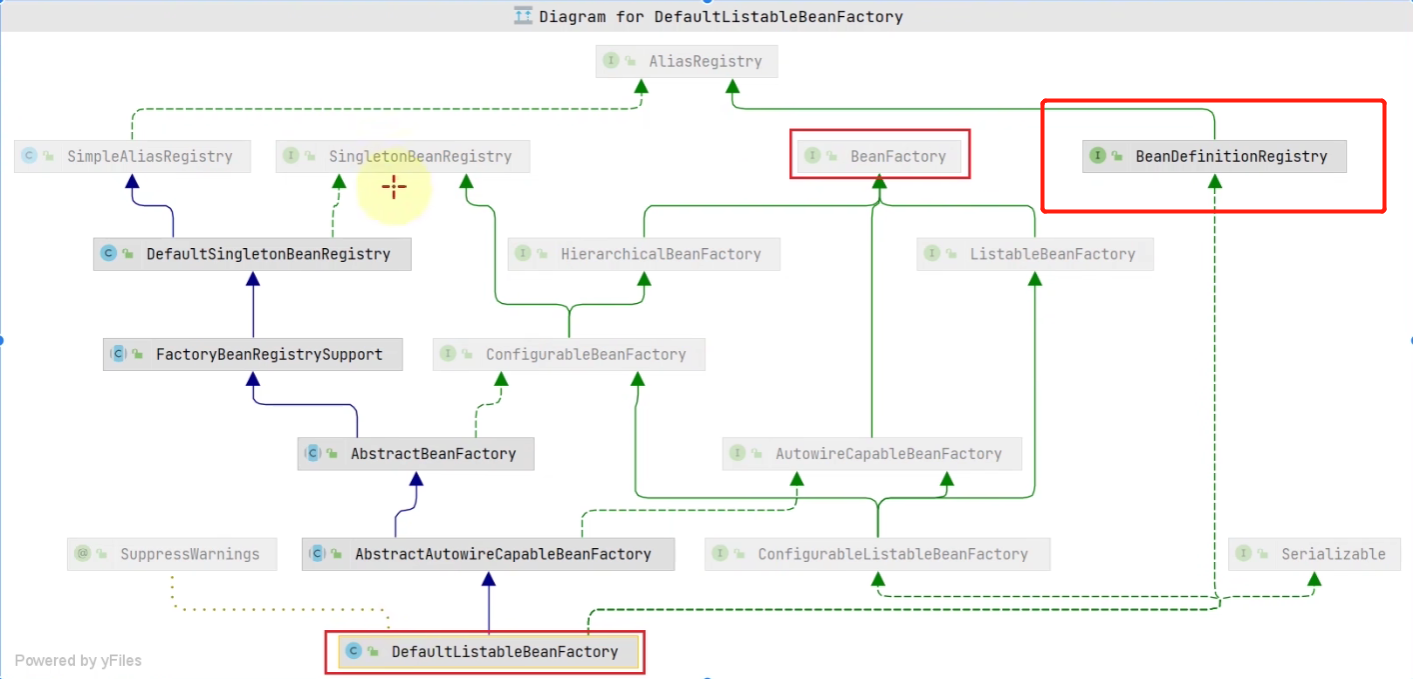
And this implementation class isDefaultListableBeanFactory
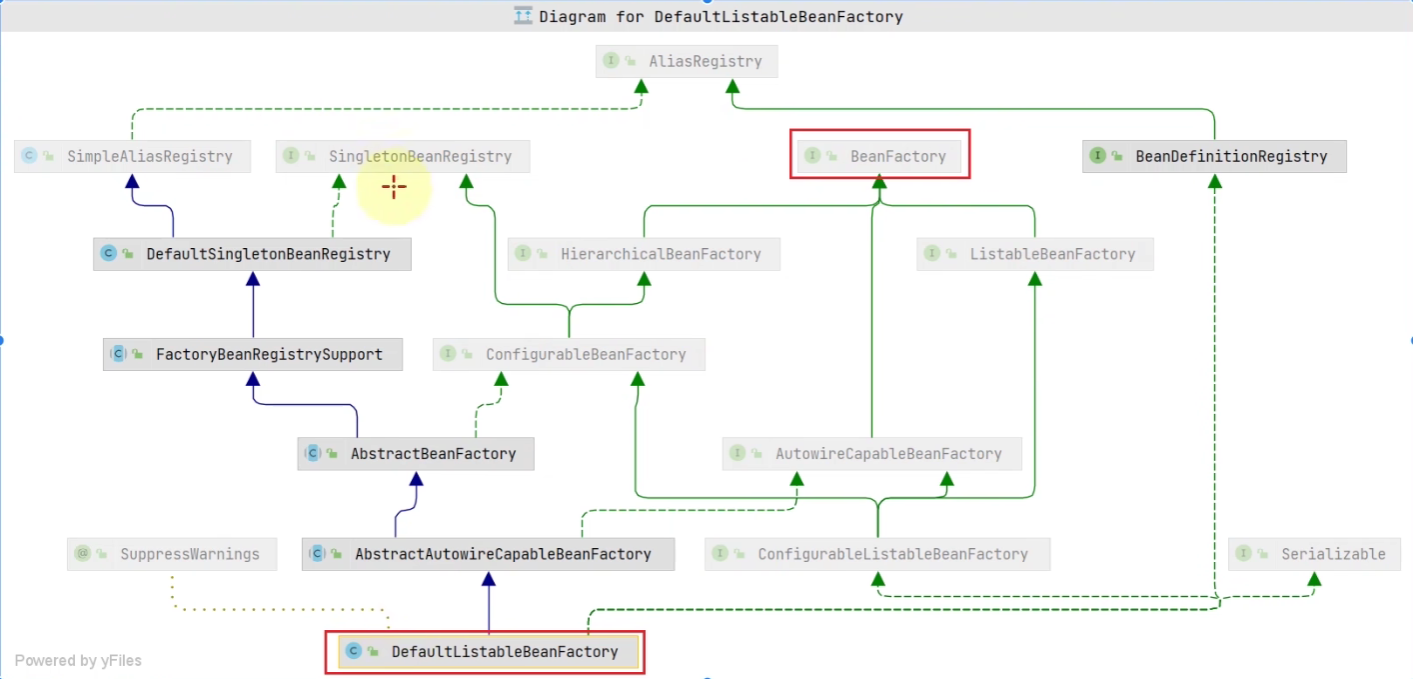
We can find that BeanFactory is only a small part of all the interfaces it implements.
Notice:
DefaultListableBeanFactory itself does not have the function of automatically parsing configuration files for Bean registration (the implementation class of ApplicationContext generally exists).
DefaultListableBeanFactory is a basic implementation of BeanFactory that can:
- Register BeanDefinition
- Dependency Injection on BeanDefinition
- Manage Bean Lifecycle
- Execute the specified callback when the container starts and shuts down
- Delegates to the parent BeanFactory, etc.
However, it does not have the ability to parse configuration files by itself. If you want to use DefaultListableBeanFactory with the configuration file, we need to manually parse the configuration file, and then register the parsed BeanDefinition to DefaultListableBeanFactory.
We can think of DefaultListableBeanFactory as a kitchen, where washing and cooking can be done, but sending dishes to the kitchen does not belong to the functional scope of the kitchen.
DefaultListableBeanFactory can manage all beans, among which we are most familiar with is that it can manage singleton objects, and this function is realized by one of his parent class DefaultSingletonBeanRegistry, he has a member variable singletonObjects to manage all singleton objects:
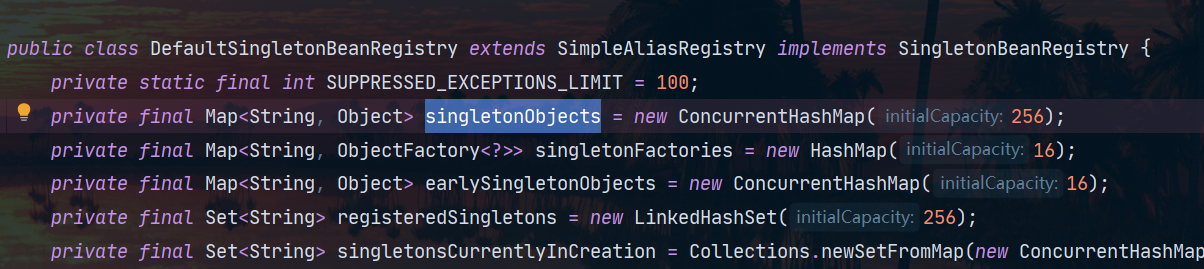
The key is the name of the bean, and the value is the instance of the object. In order to understand this singletonObjects more clearly, let's use reflection to take a look at it. Here we define our own two beans and let's look for them:
Field singletonObjects = DefaultSingletonBeanRegistry.class.getDeclaredField("singletonObjects");
        singletonObjects.setAccessible(true);
        ConfigurableListableBeanFactory beanFactory = context.getBeanFactory();
        Map<String, Object> map = (Map<String, Object>) singletonObjects.get(beanFactory);
        map.entrySet().stream().filter(e -> e.getKey().startsWith("component"))
                .forEach(e -> {


                    System.out.println(e.getKey() + "=" + e.getValue());
                });
Then we solve the last question: What is more about ApplicationContext than BeanFactory?
We can solve this problem by multiple inheritance interface from ApplicationContext:
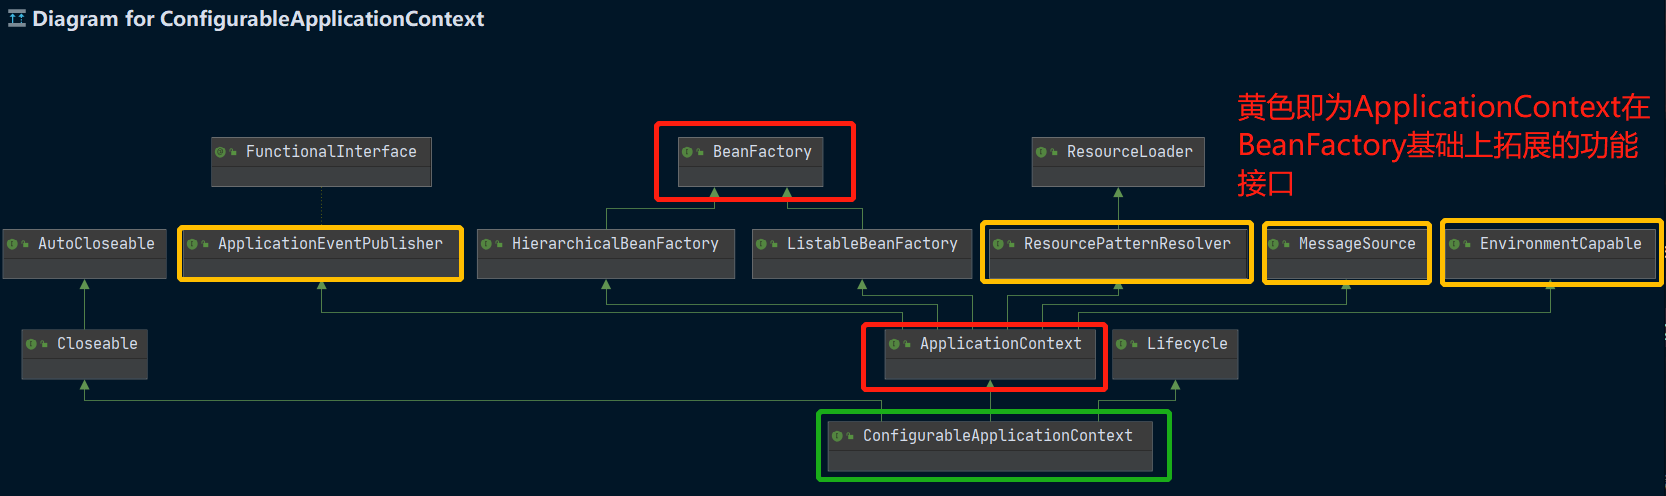
-
MessageSource: An internationalized message accessor, its main function is to parse messages according to Locale to support internationalization


In the future, the Locale information will be obtained from the browser's request header
-
ResourcePatternResolver: A resource pattern resolver, its main function is to resolve resources according to the specified location and pattern.
- Load resource files according to path. It can load resource files under the class path (classpath:), resource files under the file system (file:), URL, etc.
- Ant-style path matching is supported, and wildcards such as ? and * can be used to match multiple resources.
- Resources can be properties files, XML configuration files, pictures, text files, etc.
- If the resource cannot be found, no error will be reported, and null will be returned.
-
Let's take an example:


- classpath means to search from the class path, if it is file, it means to search from the disk directory
- If the file you are looking for is in the jar package, you must add a
*number so that you can find it
-
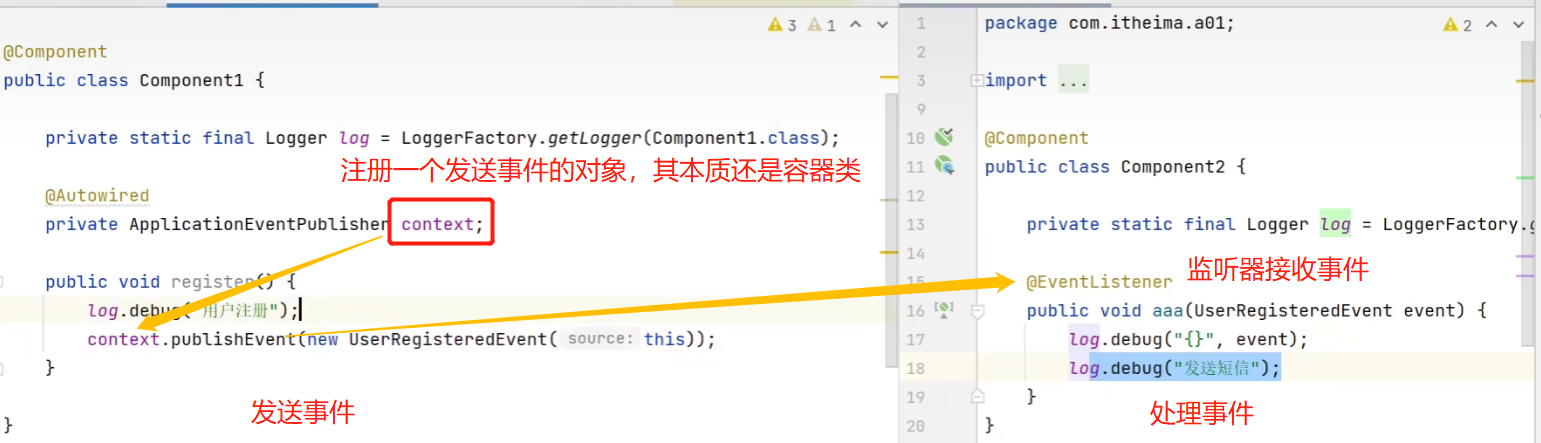
ApplicationEventPublisher: An event publisher interface whose main function is to publish events in Spring applications.
-
Sender: Inherit ApplicationEvent to define an event. Then send it using the container's publishEvent method. source represents the event source of the event.


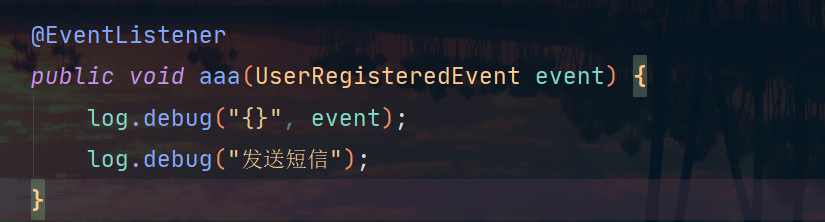
-
Receiver (listener): Any component in Spring can be used as a listener, and what event is sent must be received with the corresponding event type:
-
The role of the event: it provides us with a decoupling method
-
-
EnvironmentCapable: Its main function is to allow components to access Environment to read information such as environment variables, Profile(), configuration files, etc.


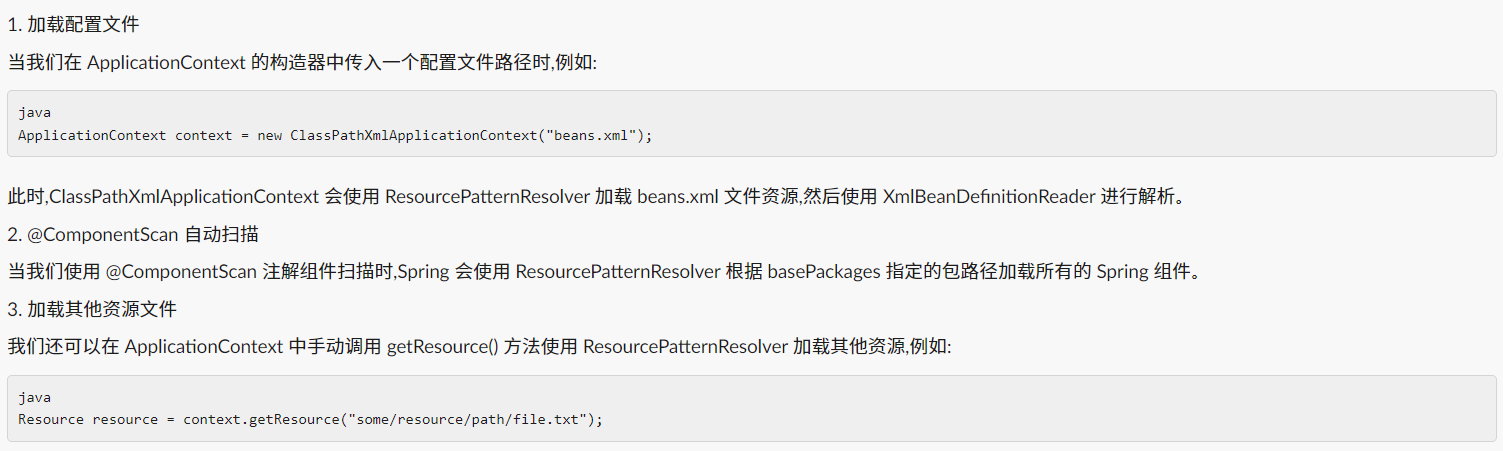
We said earlier that BeanFactory does not have automatic parsing configuration files for Bean registration, but ApplicationContext can, because of this ResourcePatternResolver.
The role of ResourcePatternResolver is to resolve Resource resources according to the specified location pattern. ApplicationContext uses ResourcePatternResolver to load the following resources:
The Resource returned by ResourcePatternResolver represents various resource abstractions, and the ApplicationContext invokes the corresponding Reader according to the Resource type for resource parsing and processing.
So, in summary, ApplicationContext uses ResourcePatternResolver for resource loading, which enables ApplicationContext to load resources from various locations and in various ways, with strong configuration flexibility.
Finally we make a summary:
-
What exactly is BeanFactory
- It is the parent interface of ApplicationContext
- It is the core container of Spring. The main ApplicationContext implementation has [combined] its functions. [Combined] means that an important member variable of ApplicationContext is BeanFactory
-
What can BeanFactory do?
- On the surface only getBean
- In fact, various functions such as inversion of control, basic dependency injection, and the life cycle of the Bean are provided by its implementation class
- In the example, its member variable singletonObjects is viewed through reflection, which contains all singleton beans
-
ApplicationContext is more than BeanFactory
- ApplicationContext combines and extends the functionality of BeanFactory
- Internationalization and wildcard acquisition of a set of Resource resources, integration of the Environment environment, event release and monitoring
- Learn a new way of decoupling between codes, event decoupling
Notice
- If jdk > 8, please add --add-opens java.base/java.lang=ALL-UNNAMED when running, because these versions of jdk do not allow cross-module reflection by default
- Event publishing can also be asynchronous, please refer to @EnableAsync, usage of @Async
container implementation
In this section we will learn about:
- Features of BeanFactory Implementation
- Common implementation and usage of ApplicationContext
- Embedded container, registered DispatcherServlet
Spring has a long history of development, so many materials are still explaining its older implementations. For nostalgic reasons, they are all listed here for your reference.
- DefaultListableBeanFactory is the most important implementation of BeanFactory. It implements functions like inversion of control and dependency injection.
- ClassPathXmlApplicationContext, find XML configuration files from classpath, create container (old)
- FileSystemXmlApplicationContext, find XML configuration file from disk path, create container (old)
- XmlWebApplicationContext, when traditional SSM is integrated, the container based on the XML configuration file (old)
- AnnotationConfigWebApplicationContext, when traditional SSM is integrated, a container based on java configuration classes (old)
- AnnotationConfigApplicationContext, non-web environment container in Spring boot (new)
- AnnotationConfigServletWebServerApplicationContext, servlet web environment container in Spring boot (new)
- AnnotationConfigReactiveWebServerApplicationContext, reactive web environment container in Spring boot (new)
In addition, it should be noted that the following classes with ApplicationContext are all implementations of the ApplicationContext interface, but they are a combination of the functions of DefaultListableBeanFactory, not inherited
BeanFactory container implementation
Here we take DefaultListableBeanFactory as an example to create a container.
When we first created a container object, there were no beans in it, so we need to add some bean definitions to it, and then the container will help us create beans according to the definition, and finally we can get the desired bean through the container。
The bean definition includes the following aspects:
- class: The actual implementation class of the bean. It can be an ordinary class, an abstract class or an interface.
- name: The name of the bean. Used to get bean objects from the container.
- scope: The scope of the bean. Including singleton, prototype, request, session, application, etc.
- constructor arguments: The parameter values of the bean construction method. For dependency injection.
- properties: The property value of the bean. For dependency injection.
- autowire: The autowire method of the bean. Including no, byName, byType, constructor.
- lazy-init: lazy initialization of beans.
- initialization and destruction methods: the bean's initialization method and destruction method.
- depends-on: Other beans that the bean depends on.
Example of a bean definition:
<bean id="helloBean" name="hello" class="com.example.HelloBean" scope="singleton">
    <constructor-arg value="HelloSpring"/>
    <property name="message" value="Hello World"/>
</bean>
This bean definition contains:
- id and name: helloBean and hello
- class: com.example.HelloBean
- scope: singleton
- constructor-arg: Pass the "HelloSpring" argument to the constructor
- property: Sets the "Hello World" value for the message property
When the container starts, a bean instance will be created according to the definition of the bean, that is, execute:
HelloBean bean = new HelloBean("HelloSpring");
bean.setMessage("Hello World");
The created bean instance will be stored in the singleton buffer pool, the key is the name of the bean, and then the bean object can be obtained from the container by name.
So in summary, the bean definition determines the characteristics of the bean, telling Spring what to instantiate, what the dependencies are, what the scope is, how to create the bean, and so on. According to the bean definition, Spring can initialize the bean and insert it into the application.
Let's look at a piece of code:
public class TestBeanFactory {


    public static void main(String[] args) {


    	//创建一个容器类
        DefaultListableBeanFactory beanFactory = new DefaultListableBeanFactory();
        // bean 的定义(class, scope, 初始化, 销毁)
        //这里构建一个bean的定义,指明了类型和Scope
        //genericBeanDefinition就是用来指定类型的
        AbstractBeanDefinition beanDefinition =
                BeanDefinitionBuilder.genericBeanDefinition(Config.class).setScope("singleton").getBeanDefinition();
        //根据定义进行注册,执行bean的名称,创建bean
        beanFactory.registerBeanDefinition("config", beanDefinition);
        //打印一下现在容器中有的bean的定义
        for (String name : beanFactory.getBeanDefinitionNames()) {


            System.out.println(name);
        }
    }

	//这里不能使用非静态内部类,因为它需要外部类的实例才能实例化内部类
    @Configuration
    static class Config {


        @Bean
        public Bean1 bean1() {


            return new Bean1();
        }

        @Bean
        public Bean2 bean2() {


            return new Bean2();
        }
    }


    static class Bean1 {


        private static final Logger log = LoggerFactory.getLogger(Bean1.class);

        public Bean1() {


            log.debug("构造 Bean1()");
        }

        @Autowired
        private Bean2 bean2;

        public Bean2 getBean2() {


            return bean2;
        }
    }

    static class Bean2 {


        private static final Logger log = LoggerFactory.getLogger(Bean2.class);

        public Bean2() {


            log.debug("构造 Bean2()");
        }
    }
}
Tips:
In the above code we can see the registerBeanDefinition method,This method is to register a BeanDefinition into the BeanDefinitionRegistry, that is, to incorporate a bean definition into the management of the Spring IoC container.
BeanDefinitionRegistry is an interface in the Spring container, which defines the method of registering and obtaining BeanDefinition, and you can be used as the big housekeeper of the Bean definition in the container. Its typical implementation is:
- DefaultListableBeanFactory: The most commonly used BeanFactory implementation in Spring, which implements the BeanDefinitionRegistry interface.
- AnnotationConfigApplicationContext: Annotated Spring application context, which uses DefaultListableBeanFactory as a delegate (decorator mode), so it also implements the BeanDefinitionRegistry interface.
The registerBeanDefinition method is a method in the BeanDefinitionRegistry interface, and its definition is:
void registerBeanDefinition(String beanName, BeanDefinition >beanDefinition)
                                    throws BeanDefinitionStoreException;
It receives two parameters:
- beanName: registered bean name
- beanDefinition: BeanDefinition instance used to describe beans
When the registerBeanDefinition method is called, the Spring container will bind the received BeanDefinition instance with the specified beanName and bring it into management. This means that Spring will manage the bean creation, instantiation, configuration and initialization processes.
For example, in AnnotationConfigApplicationContext, we can register a BeanDefinition like this:public static void main(String[] args) { AnnotationConfigApplicationContext ctx = new >AnnotationConfigApplicationContext(); RootBeanDefinition beanDefinition = new >RootBeanDefinition(Person.class); ctx.registerBeanDefinition("person", beanDefinition); ctx.refresh(); Person person = ctx.getBean(Person.class); // ... }Here, we create a RootBeanDefinition that describes the bean of the Person type, and then call the registerBeanDefinition method to register it in the ApplicationContext. After refresh(), the bean is available from the container.
Therefore, the registerBeanDefinition method is a way to register a new bean to the Spring IoC container and bring it under the management of the container. This is a means of dynamically adding bean definitions to the container. Once the bean definition is registered, the container can perform management tasks such as initialization and dependency injection.
According to the results, we found that there is only the definition of config in the container, but according to our common sense, config here is a configuration class. After adding the @Bean annotation in it, our container should also have the definitions of Bean1 and Bean2.
That is to say, the @Configuration annotation on Config, including the @Bean annotation, has not been parsed. In other words, our DefaultListableBeanFactory does not have the ability to parse annotations, and its functions are not complete.
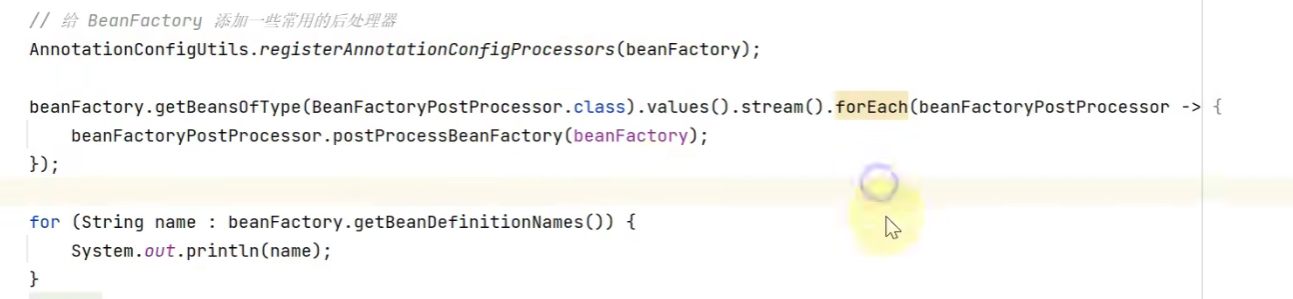
So here we introduce an annotation-related tool class: AnnotationConfigUtils. He has a static method registerAnnotationConfigProcessors (register annotation configuration processor), which can add some commonly used post-processors ( PostProcessor) to BeanFactory (of course not only BeanFactory post-processors, but also Bean post-processors, which will be mentioned later). In fact, it is an expansion of our container functions.
In more detail, the function of the AnnotationConfigUtils.registerAnnotationConfigProcessors method isRegister handlers for handling annotation configuration, these processors will be used to process annotations such as @Configuration, @Import, @ComponentScan, etc.
Specifically, this method registers the following handlers:
-
ConfigurationClassPostProcessor: Used to process @Configuration annotations, resolve classes annotated by @Configuration annotations into one or more BeanDefinition objects, and register them in BeanFactory.
-
AutowiredAnnotationBeanPostProcessor: Used to process @Autowired, @Value and other annotations, and inject the fields or method parameters marked by these annotations into the corresponding Bean instances.
-
CommonAnnotationBeanPostProcessor: Used to process JSR-250 annotations, such as @Resource, @PostConstruct, etc.
-
PersistenceAnnotationBeanPostProcessor: Used to process JPA annotations, such as @PersistenceContext, @Transactional, etc.
By registering these processors, Spring can automatically identify and process various annotation configurations, making it easier to perform operations such as dependency injection and component scanning.
After adding this method, we execute each processor and traverse the container again:
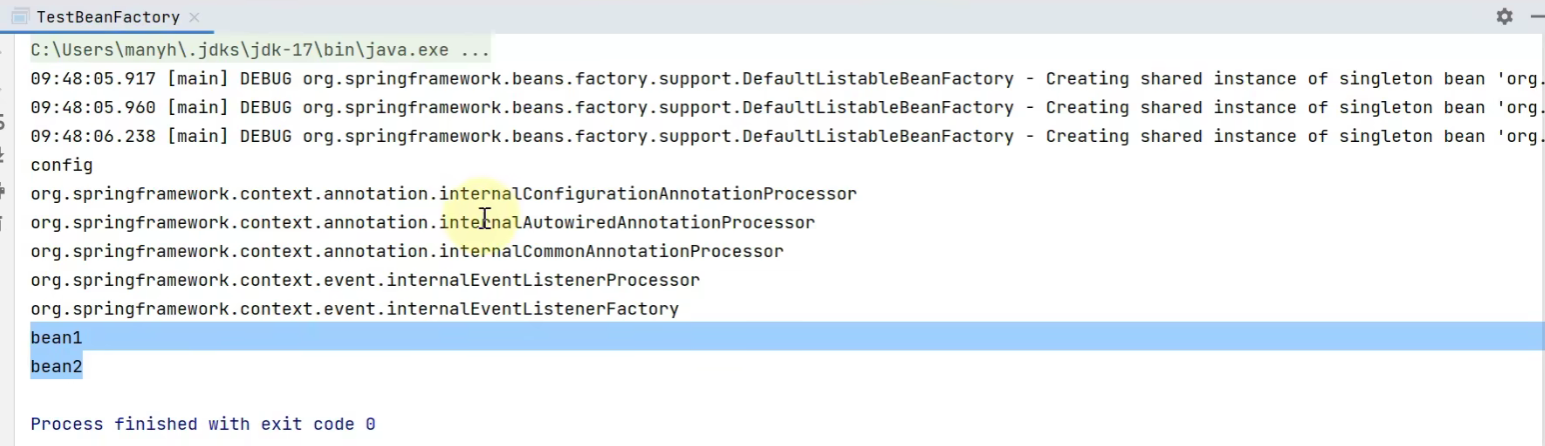
At this time, you can see the two beans we defined in the configuration class.
Pay attention to this place:
@Configuration annotation indicates that this class can be used to configure Spring BeanDefinition. Can be understood as:
- A class marked with @Configuration is equivalent to an XML configuration file
- The method annotated with @Bean in the @Configuration class is equivalent to the <bean> definition in the XML file
But this configuration class itself will not be added to the Spring container
But when we next call the getBean2 method in Bean1, we find that we get null:
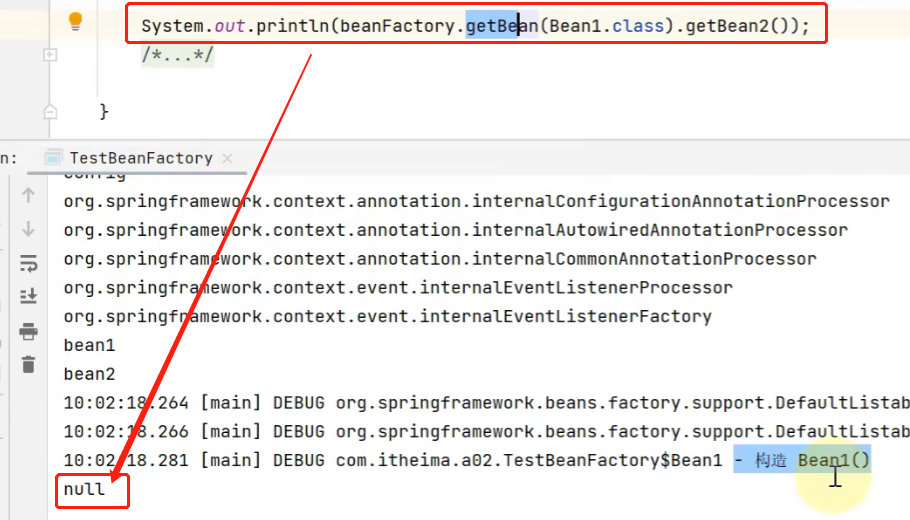
In other words our @Autowired annotation did not take effect. So how do we solve this problem?
Here we are going to introduce a new concept called Bean的后处理器the BeanFactory post-processor, which adds some Bean definitions. The Bean post-processor provides extensions for each stage of the Bean life cycle, such as @Autowired, @Resource...
We call these processors (no need to register, because they have been registered before), and we can find that the bean2 dependency in bean1 has been successfully injected:
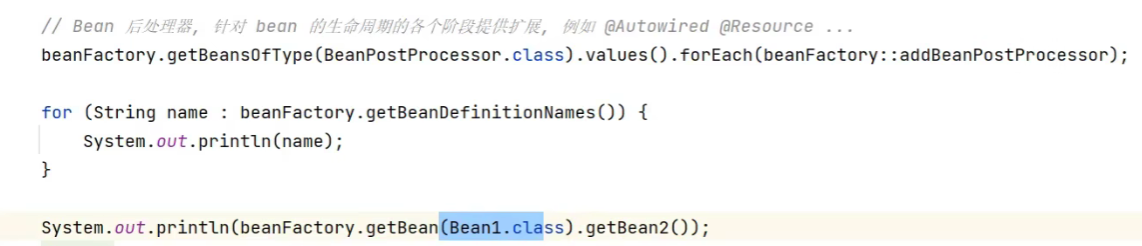
It can be seen that after our BeanFactoryPostProcessor is obtained, we need to execute the postProcessBeanFactory method to work, and the BeanPostProcessor can be directly registered in the container. This is because we cannot accurately execute the method in the bean life cycle, so execute the method in the BeanPostProcessor interface and leave it to the container to do it. ( We will explain later that Spring uses the template method design pattern, and uniformly calls back the BeanPostProcessor interface in the life cycle )
Then we can easily find that our container creates beans in a delayed manner, that is, when they are used. It starts by itself and only holds some bean definitions. But for some singleton objects, we hope to create these objects before getBean. At this time, we can call a method called DefaultListableBeanFactory.preInstantiateSingletons(), which will pre-instantiate all singleton objects.
Here's a small summary:
Things BeanFactory won't do
- Will not actively call the BeanFactory post-processor (there is a refresh method in the ApplicationContext will do)
- Will not actively add Bean post-processors (there is a refresh method in ApplicationContext will do)
- The singleton will not be actively initialized (there is a refresh method in ApplicationContext that will do it)
- Will not parse ${ } and #{ }
It can be seen that BeanFactory is just a basic container, and many of its functions have not been added to the system in advance. And ApplicationContext has done these preparations, which is more friendly to developers
One more thing to note: the bean post-processor will have sorting logic.
Finally, to summarize:
- beanFactory can register a bean definition object through registerBeanDefinition
- We usually use configuration classes, xml, component scanning, etc. to generate bean definition objects and register them in beanFactory
- The bean definition describes the blueprint for the creation of this bean: what is the scope, is it created with a constructor or a factory, what is the initialization and destruction method, etc.
- beanFactory needs to manually call the beanFactory post-processor to enhance it
- For example, by parsing @Bean, @ComponentScan and other annotations to supplement some bean definitions
- beanFactory needs to manually add bean post-processors to provide enhancements to the subsequent bean creation process
- For example, @Autowired, @Resource and other annotations are parsed by the bean post-processor
- The order in which bean post-processing is added will affect the parsing results, see the example of adding @Autowired and @Resource in the video at the same time
- beanFactory needs to manually call the method to initialize the singleton
- beanFactory requires additional setup to resolve ${} and #{}
ApplicationContext container implementation
It has four more classic implementation classes:
    // ⬇️较为经典的容器, 基于 classpath 下 xml 格式的配置文件来创建
    private static void testClassPathXmlApplicationContext() {


    }

    // ⬇️⬇️较为经典的容器, 基于磁盘路径下 xml 格式的配置文件来创建
    private static void testFileSystemXmlApplicationContext() {


    }

    // ⬇️较为经典的容器, 基于 java 配置类来创建
    private static void testAnnotationConfigApplicationContext() {


    }

    // ⬇️较为经典的容器, 基于 java 配置类来创建, 用于 web 环境
    private static void testAnnotationConfigServletWebServerApplicationContext() {


    }
Let's take a look at the first two. They are similar and are based on xml configuration files. One is to load the configuration from the disk path, and the other is to load the configuration from the class path. The usage is as follows:
    // ⬇️较为经典的容器, 基于 classpath 下 xml 格式的配置文件来创建
    private static void testClassPathXmlApplicationContext() {


        ClassPathXmlApplicationContext context =
                new ClassPathXmlApplicationContext("a02.xml");

        for (String name : context.getBeanDefinitionNames()) {


            System.out.println(name);
        }

        System.out.println(context.getBean(Bean2.class).getBean1());
    }

    // ⬇️基于磁盘路径下 xml 格式的配置文件来创建
    private static void testFileSystemXmlApplicationContext() {


        FileSystemXmlApplicationContext context =
                new FileSystemXmlApplicationContext(
                        "src\\main\\resources\\a02.xml");
        for (String name : context.getBeanDefinitionNames()) {


            System.out.println(name);
        }

        System.out.println(context.getBean(Bean2.class).getBean1());
    }
Configuration file:
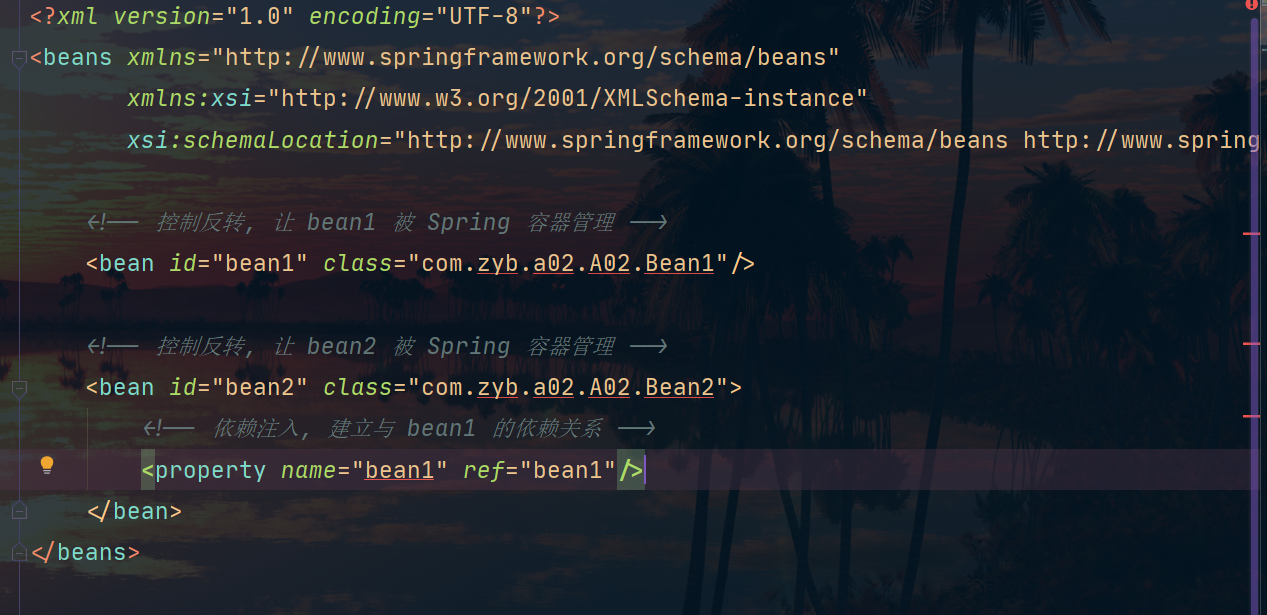
Then let’s talk about their principles. Here we take ClassPathXmlApplicationContext as an example. As we said earlier, it definitely needs the support of BeanFactory (BeanFactory is responsible for the management function of beans). How does ClassPathXmlApplicationContext implement the parsing of the xml file and add it to the BeanFactory?
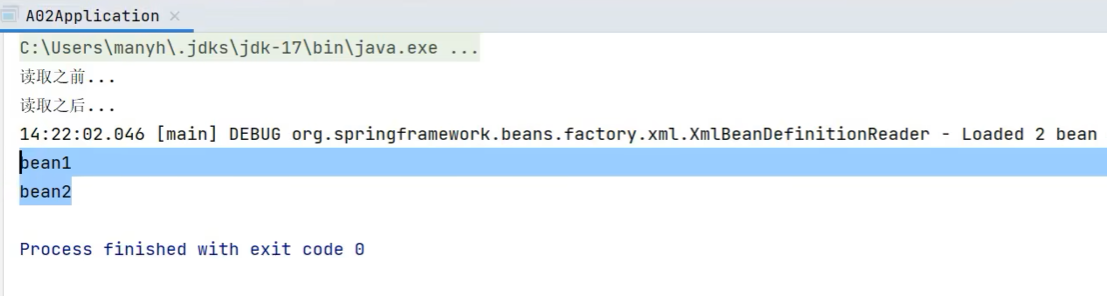
It uses XmlBeanDefinitionReader internally, we can use the following code to experiment:
		DefaultListableBeanFactory beanFactory = new DefaultListableBeanFactory();
        System.out.println("读取之前...");
        for (String name : beanFactory.getBeanDefinitionNames()) {


            System.out.println(name);
        }
        System.out.println("读取之后...");
        XmlBeanDefinitionReader reader = new XmlBeanDefinitionReader(beanFactory);
        reader.loadBeanDefinitions(new FileSystemResource("src\\main\\resources\\a02.xml"));
        for (String name : beanFactory.getBeanDefinitionNames()) {


            System.out.println(name);
        }
Then let's look at the third implementation:
    // ⬇️较为经典的容器, 基于 java 配置类来创建
    private static void testAnnotationConfigApplicationContext() {


        AnnotationConfigApplicationContext context =
                new AnnotationConfigApplicationContext(Config.class);

        for (String name : context.getBeanDefinitionNames()) {


            System.out.println(name);
        }

        System.out.println(context.getBean(Bean2.class).getBean1());
    }

    @Configuration
    static class Config {


        @Bean
        public Bean1 bean1() {


            return new Bean1();
        }

        @Bean
        public Bean2 bean2(Bean1 bean1) {


            Bean2 bean2 = new Bean2();
            bean2.setBean1(bean1);
            return bean2;
        }
    }
After running, we found that compared with the previous xml, there are several more beans in the container (the post-processor we mentioned earlier):
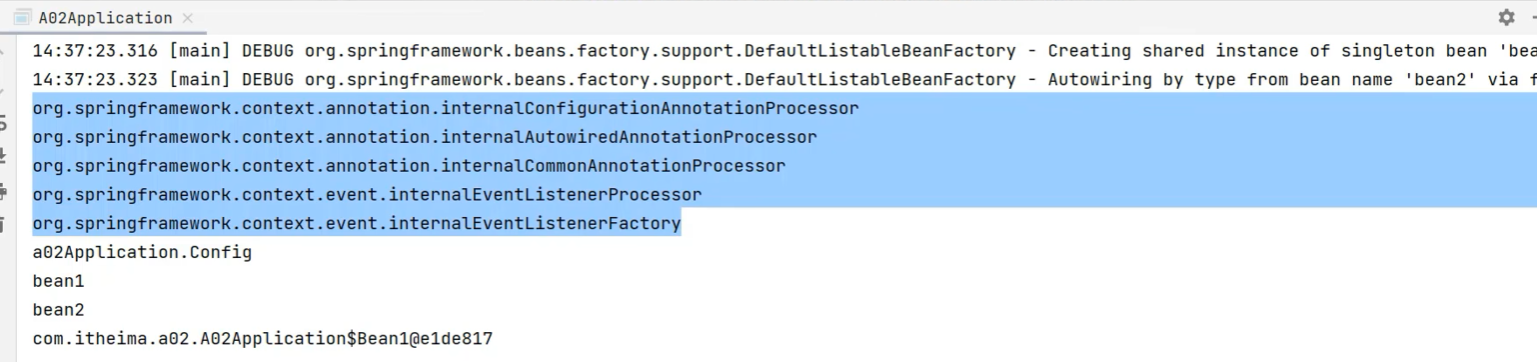
And if we use the previous two ApplicationContext container classes based on xml configuration files, we need to configure it manually:

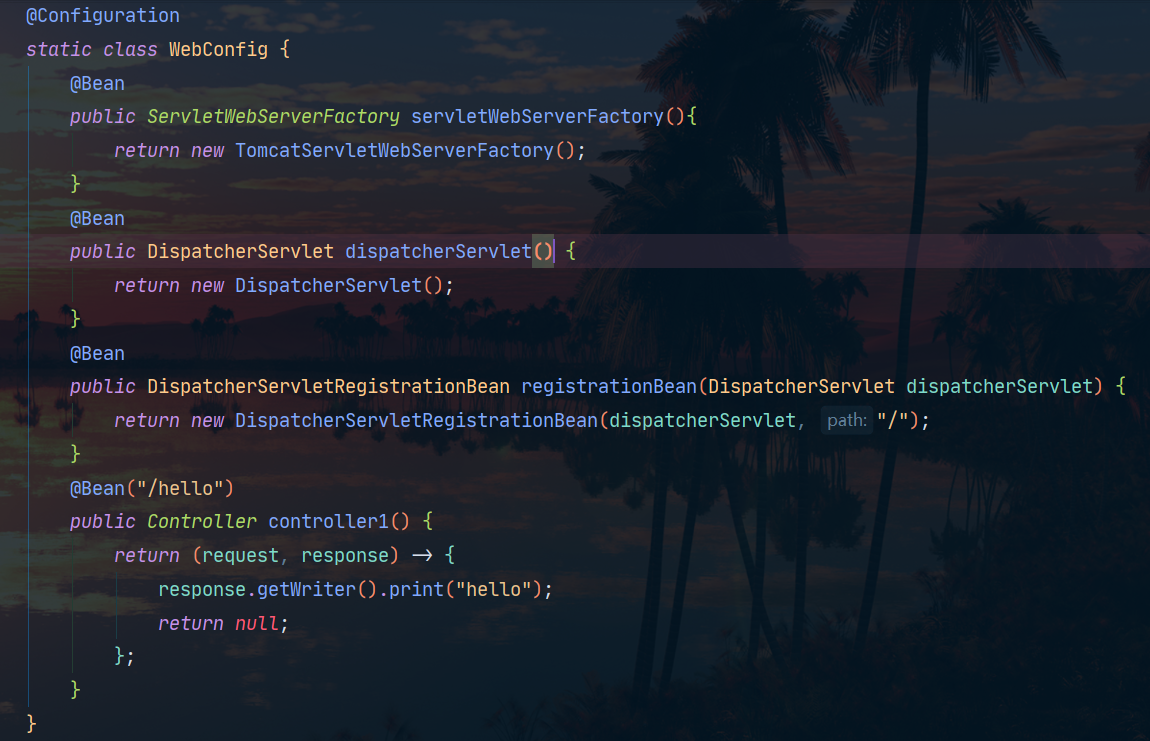
Finally we look at the fourth category:
    // ⬇️较为经典的容器, 基于 java 配置类来创建, 用于 web 环境
    private static void testAnnotationConfigServletWebServerApplicationContext() {


		//这个地方一定要注意是AnnotationConfigServletWebServerApplicationContext,否则会出现容器不能持续运行的问题
        AnnotationConfigServletWebServerApplicationContext context =
                new AnnotationConfigServletWebServerApplicationContext(WebConfig.class);
        for (String name : context.getBeanDefinitionNames()) {


            System.out.println(name);
        }
    }

    @Configuration
    static class WebConfig {


        @Bean
        public ServletWebServerFactory servletWebServerFactory(){


            return new TomcatServletWebServerFactory();
        }
        @Bean
        public DispatcherServlet dispatcherServlet() {


            return new DispatcherServlet();
        }
        @Bean
        public DispatcherServletRegistrationBean registrationBean(DispatcherServlet dispatcherServlet) {


            return new DispatcherServletRegistrationBean(dispatcherServlet, "/");
        }

    }
To start a web project, there must be three beans in the container:
- ServletWebServerFactory
- DispatcherServlet
- DispatcherServletRegistrationBean
Let's take a look at ServletWebServerFactory first :
ServletWebServerFactory is a Servlet Web server factory interface for starting embedded Servlet containers in Spring applications.
In Spring Boot applications, we usually use Servlet containers such as embedded Tomcat, Jetty or Undertow, instead of packaging them into WAR files and deploying them in standalone Servlet containers.
The implementation classes of the ServletWebServerFactory interface are these embedded Servlet container factories, mainly including:
- TomcatServletWebServerFactory: Embedded Tomcat factory
- JettyServletWebServerFactory: Embedded Jetty factory
- UndertowServletWebServerFactory: Embedded Undertow factory
In Spring Boot applications, we usually don't need to configure these factories manually, because Spring Boot will automatically select a factory configuration according to the dependencies you add. For example:
- Adding spring-boot-starter-tomcat will automatically use TomcatServletWebServerFactory
- Adding spring-boot-starter-jetty will automatically use JettyServletWebServerFactory
- Adding spring-boot-starter-undertow will automatically use UndertowServletWebServerFactory
However, if we need to customize the configuration of the embedded Servlet container, we can manually add a ServletWebServerFactory bean. For example:
@Bean
public ServletWebServerFactory servletContainer() {


    TomcatServletWebServerFactory factory = new TomcatServletWebServerFactory();
    factory.setPort(9000);
    factory.setSessionTimeout(10 * 60);
    return factory;
}
Here we have customized the Tomcat server, set the port to 9000 and the session timeout to 10 minutes.
Other uses of ServletWebServerFactory are:
- Add multiple ServletWebServerFactories to start multiple embedded Servlet container instances.
- Choose different ServletWebServerFactory according to different environments, for example, choose Undertow in Windows environment.
- For deeper Servlet container configuration. ServletWebServerFactory only exposes some configuration options, and deep configuration can directly call the API of the Servlet container.
So, in summary, the main functions of ServletWebServerFactory are:
- Start an embedded Servlet container (Tomcat, Jetty, Undertow) in a Spring Boot application
- Servlet container configuration can be customized to override the default configuration
- Start multiple Servlet container instances
- Choose different Servlet containers according to the environment
As for DispatcherServlet, everyone should be familiar with it. It intercepts network requests. We generally call it the pre-controller, which is equivalent to the entrance of the Springweb program.
Now there is an embedded web container and DispatcherServlet, but the two of them have not been connected yet. We need to register DispatcherServlet in the web container.
And DispatcherServletRegistrationBean is a Servlet registration bean, which is used to register DispatcherServlet with the Servlet container.
With these three beans, we can start a web project, but we can't do anything yet, so we add another controller Controller: Note here: If the name
of the bean /starts with the agreement, it means the interception path.
Bean life cycle
A bean managed by Spring, the main life cycle phases are
- Create: Create bean instance objects according to the bean's constructor or factory method
- Dependency injection: According to @Autowired, @Value or some other means, fill values and establish relationships for bean member variables
- Initialization: call back various Aware interfaces, call various initialization methods of objects
- Destruction: When the container is closed, all singleton objects will be destroyed (that is, their destruction methods will be called)
- The prototype object can also be destroyed, but it needs to be actively called by the container
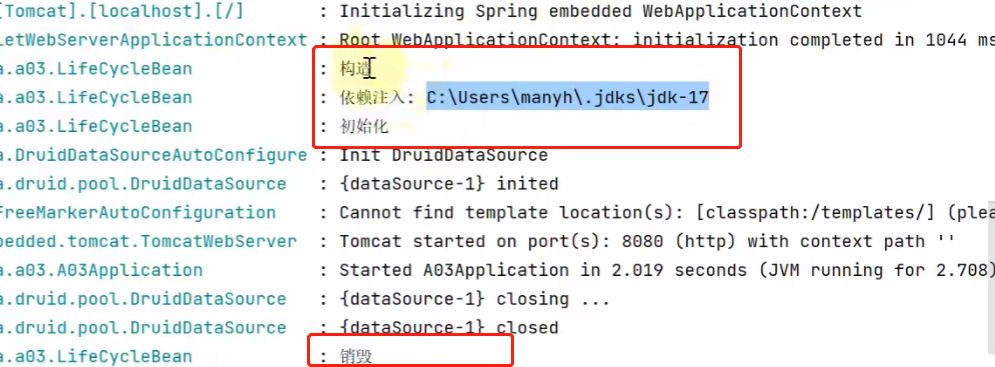
Let's verify it with code:
@Component
public class LifeCycleBean {


    private static final Logger log = LoggerFactory.getLogger(LifeCycleBean.class);

    public LifeCycleBean() {


        log.debug("构造");
    }

    @Autowired
    public void autowire(@Value("${JAVA_HOME}") String home) {


        log.debug("依赖注入: {}", home);
    }

    @PostConstruct
    public void init() {


        log.debug("初始化");
    }

    @PreDestroy
    public void destroy() {


        log.debug("销毁");
    }
}
Test class:
@SpringBootApplication
public class A03 {


    public static void main(String[] args) {


        ConfigurableApplicationContext context = SpringApplication.run(A03.class, args);
        context.close();
    }
}
operation result:
You should still remember the Bean post-processor we mentioned earlier. It is closely related to the life cycle of our bean. It can provide functional expansion for each stage of the bean life cycle. Let's look at a piece of code next:
@Component
public class MyBeanPostProcessor implements InstantiationAwareBeanPostProcessor, DestructionAwareBeanPostProcessor {


    private static final Logger log = LoggerFactory.getLogger(MyBeanPostProcessor.class);

    @Override
    public void postProcessBeforeDestruction(Object bean, String beanName) throws BeansException {


        if (beanName.equals("lifeCycleBean"))
            log.debug("<<<<<< 销毁之前执行, 如 @PreDestroy");
    }

    @Override
    public Object postProcessBeforeInstantiation(Class<?> beanClass, String beanName) throws BeansException {


        if (beanName.equals("lifeCycleBean"))
            log.debug("<<<<<< 实例化之前执行, 这里返回的对象会替换掉原本的 bean");
        return null;
    }

    @Override
    public boolean postProcessAfterInstantiation(Object bean, String beanName) throws BeansException {


        if (beanName.equals("lifeCycleBean")) {


            log.debug("<<<<<< 实例化之后执行, 这里如果返回 false 会跳过依赖注入阶段");
//            return false;
        }
        return true;
    }

    @Override
    public PropertyValues postProcessProperties(PropertyValues pvs, Object bean, String beanName) throws BeansException {


        if (beanName.equals("lifeCycleBean"))
            log.debug("<<<<<< 依赖注入阶段执行, 如 @Autowired、@Value、@Resource");
        return pvs;
    }

    @Override
    public Object postProcessBeforeInitialization(Object bean, String beanName) throws BeansException {


        if (beanName.equals("lifeCycleBean"))
            log.debug("<<<<<< 初始化之前执行, 这里返回的对象会替换掉原本的 bean, 如 @PostConstruct、@ConfigurationProperties");
        return bean;
    }

    @Override
    public Object postProcessAfterInitialization(Object bean, String beanName) throws BeansException {


        if (beanName.equals("lifeCycleBean"))
            log.debug("<<<<<< 初始化之后执行, 这里返回的对象会替换掉原本的 bean, 如代理增强");
        return bean;
    }
}
Let's execute it:
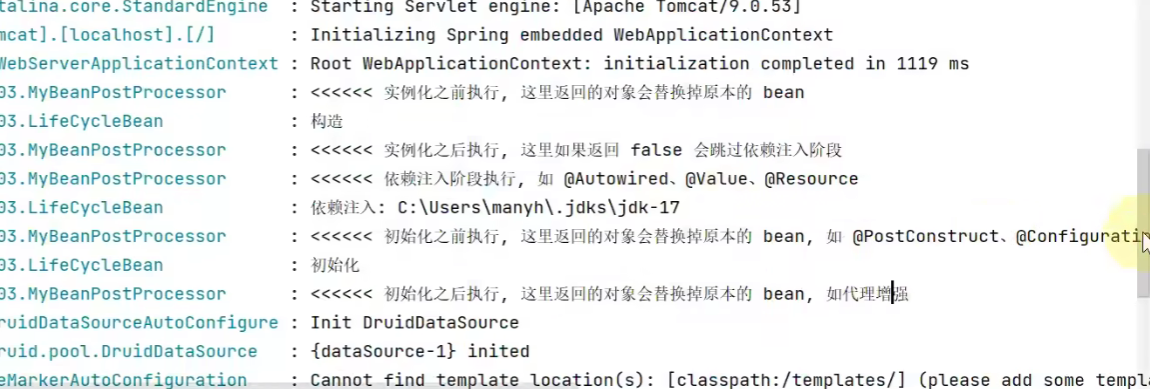

Enhancements before and after creation
- postProcessBeforeInstantiation
- If the object returned here is not null, the original bean will be replaced, and only the postProcessAfterInitialization process will be followed
- postProcessAfterInstantiation
- Here, if false is returned, the dependency injection phase will be skipped
Enhancements before dependency injection
- postProcessProperties
- 如 @Autowired、@Value、@Resource
Enhancements before and after initialization
- postProcessBeforeInitialization
- The object returned here will replace the original bean
- 如 @PostConstruct、@ConfigurationProperties
- postProcessAfterInitialization
- The object returned here will replace the original bean
- Such as agent enhancement
enhancements before destruction
- postProcessBeforeDestruction
- as @PreDestroy
Template Method Design Pattern
The template method pattern defines an algorithm skeleton and delays the implementation of some steps to subclasses, so that subclasses can redefine some specific steps of the algorithm without changing the algorithm structure, so as to realize the extension and packaging of the algorithm.
In the template method, the method of combining dynamic and static methods is used to realize the scalability of the method:
- Action: Uncertain parts, abstracted into subclasses or interfaces, and called back
- Static: fixed algorithm skeleton
In layman's terms, it means that the large process has been fixed, and extensions are provided before and after some key points through interface callbacks (bean post-processors)
Let's look at an example:
Now we simulate a BeanFactory container:
    // 模板方法  Template Method Pattern
    static class MyBeanFactory {


        public Object getBean() {


            Object bean = new Object();
            System.out.println("构造 " + bean);
            System.out.println("依赖注入 " + bean); // @Autowired, @Resource
            System.out.println("初始化 " + bean);
            return bean;
        }
}
When we first designed the code, we didn't consider the later scalability. We will add new functions later, so we can only keep accumulating code in it. In the end, this method will become huge and cumbersome.
Here we can use the template method design pattern to modify the above code:
For example, if we want to add some logic after dependency injection, then we can abstract the logic after dependency injection into an interface, and then call them one by one after dependency injection
public class TestMethodTemplate {


    public static void main(String[] args) {


        MyBeanFactory beanFactory = new MyBeanFactory();
        beanFactory.addBeanPostProcessor(bean -> System.out.println("解析 @Autowired"));
        beanFactory.addBeanPostProcessor(bean -> System.out.println("解析 @Resource"));
        beanFactory.getBean();
    }

    // 模板方法  Template Method Pattern
    static class MyBeanFactory {


        public Object getBean() {


            Object bean = new Object();
            System.out.println("构造 " + bean);
            System.out.println("依赖注入 " + bean); // @Autowired, @Resource
            for (BeanPostProcessor processor : processors) {


                processor.inject(bean);
            }
            System.out.println("初始化 " + bean);
            return bean;
        }

        private List<BeanPostProcessor> processors = new ArrayList<>();

        public void addBeanPostProcessor(BeanPostProcessor processor) {


            processors.add(processor);
        }
    }

    static interface BeanPostProcessor {


        public void inject(Object bean); // 对依赖注入阶段的扩展
    }
}
Bean Post Processor
- The parsing of annotations such as @Autowired belongs to the extended functions of the bean life cycle phase (dependency injection, initialization), and these extended functions are completed by the bean post-processor
- What each post-processor enhances
- AutowiredAnnotationBeanPostProcessor parses @Autowired and @Value
- CommonAnnotationBeanPostProcessor 解析 @Resource、@PostConstruct、@PreDestroy
- ConfigurationPropertiesBindingPostProcessor 解析 @ConfigurationProperties
- In addition, ContextAnnotationAutowireCandidateResolver is responsible for obtaining the value of @Value, parsing @Qualifier, generics, @Lazy, etc. (this annotation is more complicated, and will be explained in detail later) ( this is not a Bean post-processor )
Then let's talk about the operation principle of the Bean post-processor AutowiredAnnotationBeanPostProcessor in detail .
To understand this method, we use it alone, and we wrote the following test code:
// AutowiredAnnotationBeanPostProcessor 运行分析
public class DigInAutowired {


    public static void main(String[] args) throws Throwable {


        DefaultListableBeanFactory beanFactory = new DefaultListableBeanFactory();
        beanFactory.registerSingleton("bean2", new Bean2()); // 创建过程,依赖注入,初始化
        beanFactory.registerSingleton("bean3", new Bean3());
        beanFactory.setAutowireCandidateResolver(new ContextAnnotationAutowireCandidateResolver()); // @Value


        AutowiredAnnotationBeanPostProcessor processor = new AutowiredAnnotationBeanPostProcessor();
        processor.setBeanFactory(beanFactory); //依赖注入部分跟Bean有关,需要得到BeanFactory的支持
        Bean1 bean1 = new Bean1();

        System.out.println(bean1);
        processor.postProcessProperties(null, bean1, "bean1"); // 执行依赖注入 @Autowired @Value
        System.out.println(bean1);

    }
}
Here we need three dependencies in bean1:
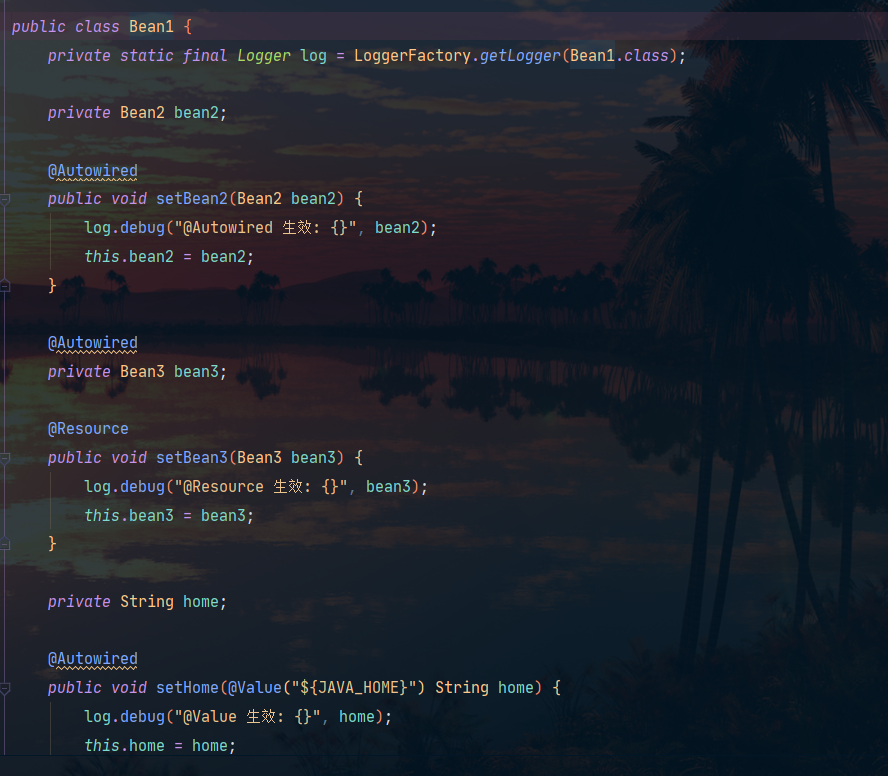
Image Errata: There is no @Autowired annotation on Bean3 at this time
In Spring, the @Autowired annotation is marked on the method to indicate that the method needs to automatically inject dependent beans. When calling this method, Spring will automatically find a bean whose name matches the parameter type from the context and inject it into the method .
operation result:

The ${} here has not been parsed, we can add a sentence:
beanFactory.addEmbeddedValueResolver(new StandardEnvironment()::resolvePlaceholders); // ${} 的解析器
After calling the postProcessProperties method in AutowiredAnnotationBeanPostProcessor, our dependency is successfully injected, indicating that this method has worked. Next, let's take a look at how it is executed:
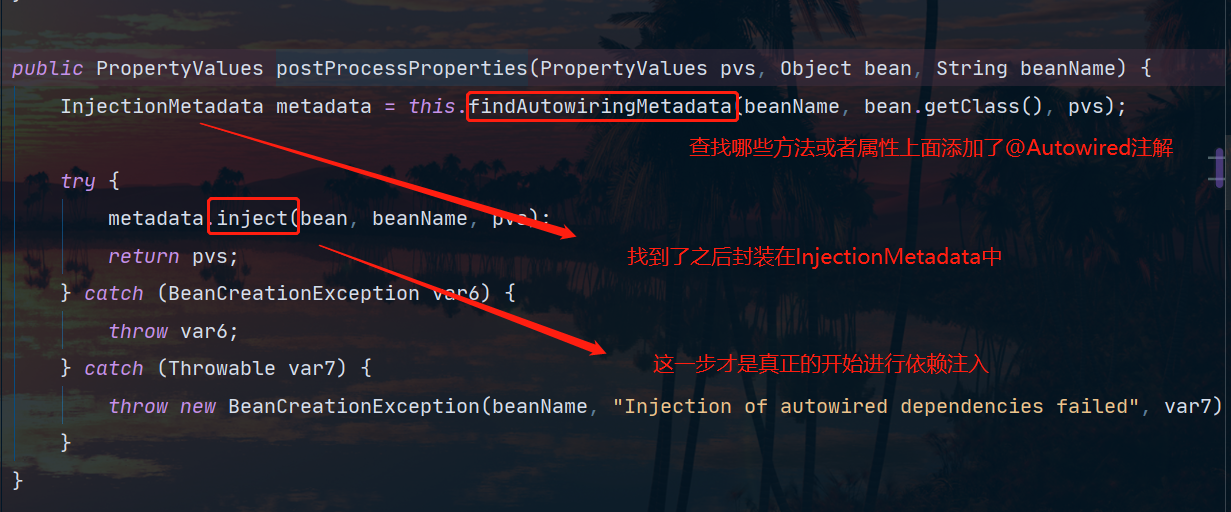
We can take a look at the break point, this InjectionMetadata:
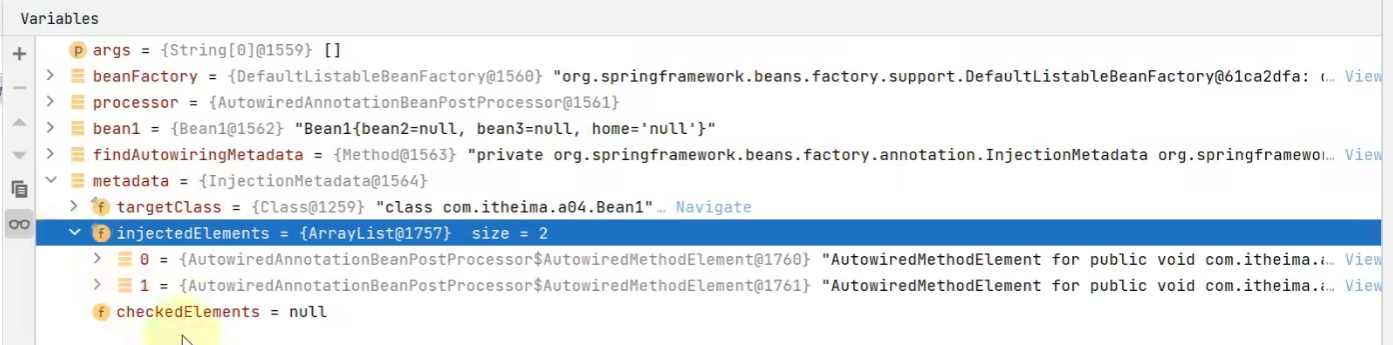

Corresponds exactly to our two methods:
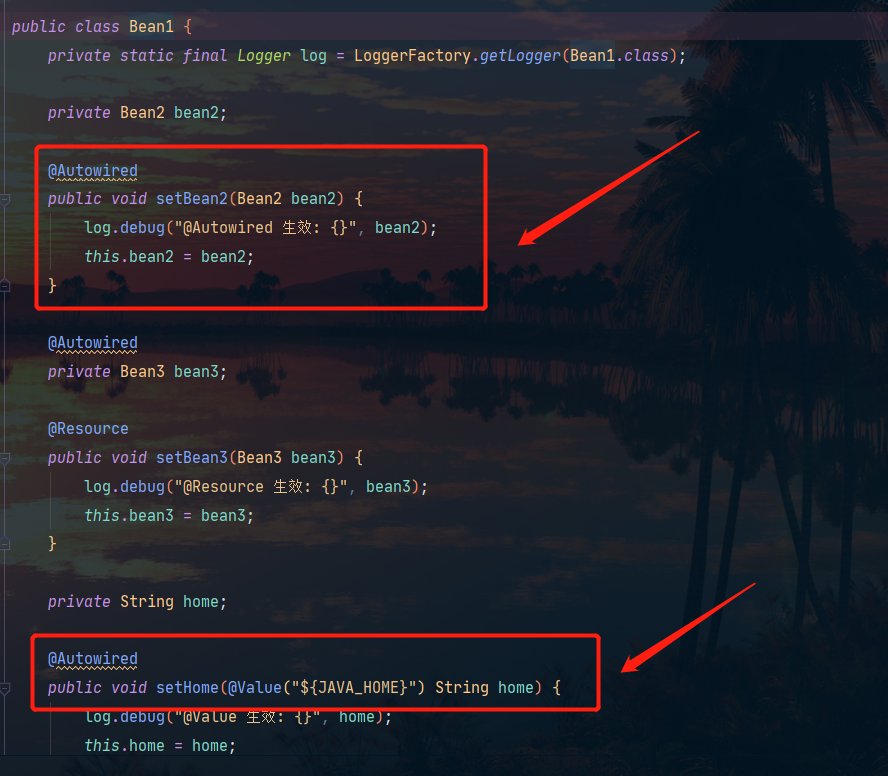
Image Errata: There is no @Autowired annotation on Bean3 at this time
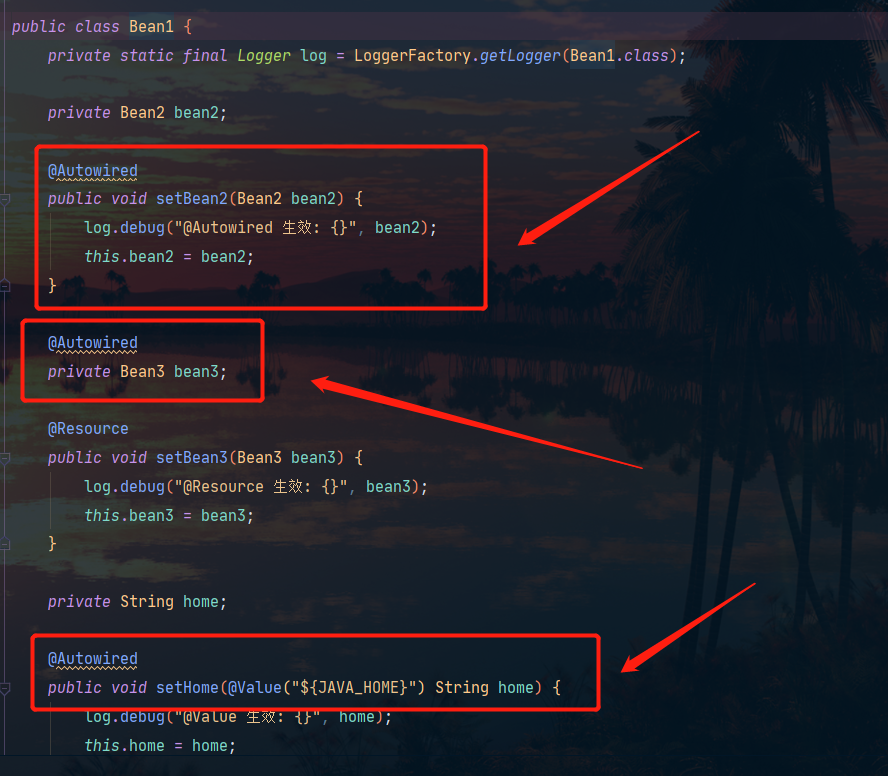
In the inject method, the logic is to wrap the method parameters or attributes with DependencyDescriptor, and then we can use the beanFactory.doResolveDependency method to search. The process is as follows:
		//@Autowired作用于Bean3
        Field bean3 = Bean1.class.getDeclaredField("bean3");
        DependencyDescriptor dd1 = new DependencyDescriptor(bean3, false);
        Object o = beanFactory.doResolveDependency(dd1, null, null, null);
        System.out.println(o);

		//@Autowired作用于setBean2方法
        Method setBean2 = Bean1.class.getDeclaredMethod("setBean2", Bean2.class);
        DependencyDescriptor dd2 =
                new DependencyDescriptor(new MethodParameter(setBean2, 0), true);
        Object o1 = beanFactory.doResolveDependency(dd2, null, null, null);
        System.out.println(o1);

		//@Autowired作用于setHome方法
        Method setHome = Bean1.class.getDeclaredMethod("setHome", String.class);
        DependencyDescriptor dd3 = new DependencyDescriptor(new MethodParameter(setHome, 0), true);
        Object o2 = beanFactory.doResolveDependency(dd3, null, null, null);
        System.out.println(o2);
Corresponding to the three parts in the figure below:
Finally, let's summarize the operating principle of the Bean post-processor AutowiredAnnotationBeanPostProcessor:
- AutowiredAnnotationBeanPostProcessor.findAutowiringMetadata is used to obtain the member variable and method parameter information of a bean with @Value @Autowired, expressed as InjectionMetadata
- InjectionMetadata can complete dependency injection
- According to member variables inside InjectionMetadata, method parameters are encapsulated as DependencyDescriptor type
- With DependencyDescriptor, you can use beanFactory.doResolveDependency method for type-based lookup
BeanFactory Post Processor
The experimental code is as follows, which is similar to the previous idea (control variables):

The initialization container here will have two operations:
- Will execute the post-processor of BeanFactory
- Create each singleton bean
It can be concluded:
- ConfigurationClassPostProcessor can resolve
- @ComponentScan
- @Bean
- @Import
- @ImportResource
- MapperScannerConfigurer can resolve
- Mapper interface
- The analysis of @ComponentScan, @Bean, @Mapper and other annotations belongs to the extended function of the core container (ie BeanFactory)
- These extended functions are completed by different BeanFactory post-processors, in fact, it is mainly to supplement some bean definitions
Next, we use simulation to figure out how ConfigurationClassPostProcessor parses the @ComponentScan annotation.
//在初始化容器的时候会回调这个BeanFactory后处理器
public class ComponentScanPostProcessor implements BeanDefinitionRegistryPostProcessor {


    @Override // context.refresh
    public void postProcessBeanFactory(ConfigurableListableBeanFactory configurableListableBeanFactory) throws BeansException {


    }

    @Override
    public void postProcessBeanDefinitionRegistry(BeanDefinitionRegistry beanFactory) throws BeansException {


        try {


            //在指定的类、方法、字段或者构造器上查找指定类型的注解。如果找到,则返回该注解,否则返回 null。
            ComponentScan componentScan = AnnotationUtils.findAnnotation(Config.class, ComponentScan.class);
            if (componentScan != null) {


                for (String p : componentScan.basePackages()) {


                    //System.out.println(p);
                    //将包名转化为路径名方便后面资源的查找
                    // com.zyb.a05.component -> classpath*:com/zyb/a05/component/**/*.class
                    String path = "classpath*:" + p.replace(".", "/") + "/**/*.class";
                    //System.out.println(path);
                    CachingMetadataReaderFactory factory = new CachingMetadataReaderFactory();
                    Resource[] resources = new PathMatchingResourcePatternResolver().getResources(path);
                    //一个工具类:根据类上的注解生成 bean 的名称
                    AnnotationBeanNameGenerator generator = new AnnotationBeanNameGenerator();
                    for (Resource resource : resources) {


                        // System.out.println(resource);
                        MetadataReader reader = factory.getMetadataReader(resource);
                        // System.out.println("类名:" + reader.getClassMetadata().getClassName());
                        AnnotationMetadata annotationMetadata = reader.getAnnotationMetadata();
                        // System.out.println("是否加了 @Component:" + annotationMetadata.hasAnnotation(Component.class.getName()));
                        // System.out.println("是否加了 @Component 派生:" + annotationMetadata.hasMetaAnnotation(Component.class.getName()));
                        if (annotationMetadata.hasAnnotation(Component.class.getName())
                            || annotationMetadata.hasMetaAnnotation(Component.class.getName())) {


                            //创建一个Bean的定义
                            AbstractBeanDefinition bd = BeanDefinitionBuilder
                                    .genericBeanDefinition(reader.getClassMetadata().getClassName())
                                    .getBeanDefinition();
                            //根据类上的注解生成 bean 的名称
                            String name = generator.generateBeanName(bd, beanFactory);
                            //根据定义注册Bean
                            beanFactory.registerBeanDefinition(name, bd);
                        }
                    }
                }
            }
        } catch (IOException e) {


            e.printStackTrace();
        }
    }
}
The BeanDefinitionRegistryPostProcessor implemented by this class here is also a BeanFactory post-processor:
When the Spring container is initialized, it will automatically detect and call all registered BeanDefinitionRegistryPostProcessor, process the Bean definition, and then instantiate it.
This post-processor allows us to modify the bean definition after the Spring bean definition is loaded and before the bean is instantiated.
The BeanDefinitionRegistryPostProcessor interface defines two methods:
- postProcessBeanDefinitionRegistry(): Called after the bean definition is loaded and before instantiation. The bean definition can be modified.
- postProcessBeanFactory(): Called after the bean definition is loaded and before instantiation. The BeanFactory can be obtained here, but the bean instance cannot be obtained at this time.

The basic logic is:
- Get the scanned package through the ComponentScan annotation
- Get all class files under the package
- Determine which class files have Component annotations or their derived annotations
- Register the classes that meet the requirements
important point:
-
Regarding symbols in paths:
*Represents 0 to multiple characters, for example:*.txtrepresents all txt files**Represents 0 to multiple folders, for example:/app1/**,/app2/**represents any layer folder under the app1 folder, and any layer folder under app2
-
In Spring, we can use MetadataReader to read class information, such as class name, interface, annotation, etc. However, the overhead of obtaining the MetadataReader object is relatively large, and loading class information from the class path every time will affect performance.
-
CachingMetadataReaderFactory exists to solve this problem. It internally maintains a cache of MetadataReader instances, which can reuse created MetadataReader instances without completely reloading class information every time.
in conclusion:
- Spring's tool class CachingMetadataReaderFactory for manipulating metadata
- Obtain the annotation information of direct or indirect annotation through annotation metadata (AnnotationMetadata)
- Obtain the class name through the class metadata (ClassMetadata), and AnnotationBeanNameGenerator generates the bean name
- Parsing metadata is based on ASM technology
ASM is a Java bytecode manipulation framework. It allows us to modify bytecode in binary form, or dynamically generate classes.
ASM can be used for:
- Dynamic class generation: The bytecode of a class is generated at runtime according to certain rules.
- Modify the class: add fields or methods to the class at runtime, modify the method body in the class, etc.
- Analyze classes: Get detailed information about classes at runtime, such as class inheritance relationships, methods and fields in classes, etc.
- Convert classes: convert class files from one format to another at runtime, such as converting from Java class files to dex files, etc.
The working principle of ASM is: it analyzes the bytecode of the class file, and converts it into a higher-level ASM element (called Node) to represent, such as MethodNode, FieldNode, etc. We can generate new classes by adding or modifying these Nodes, or modify existing classes.
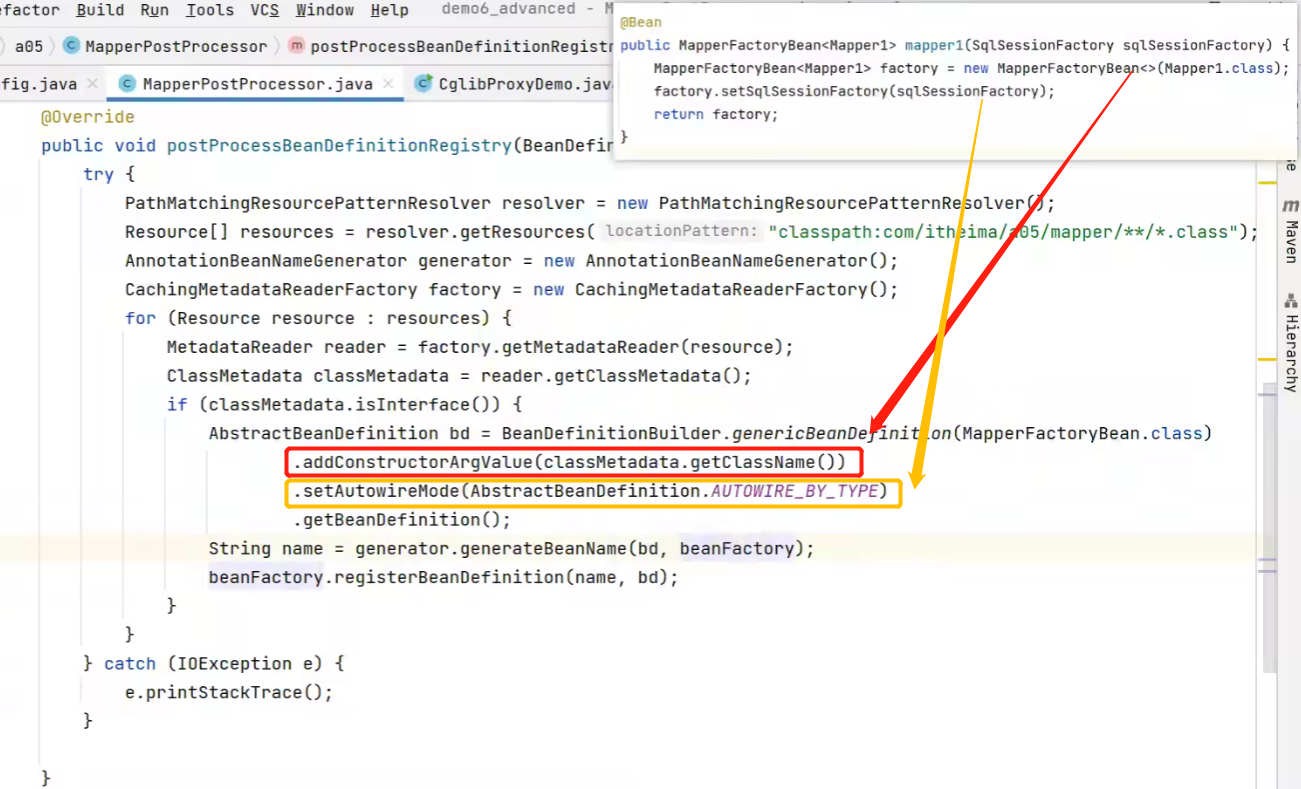
Next, let's pay attention to one more thing:
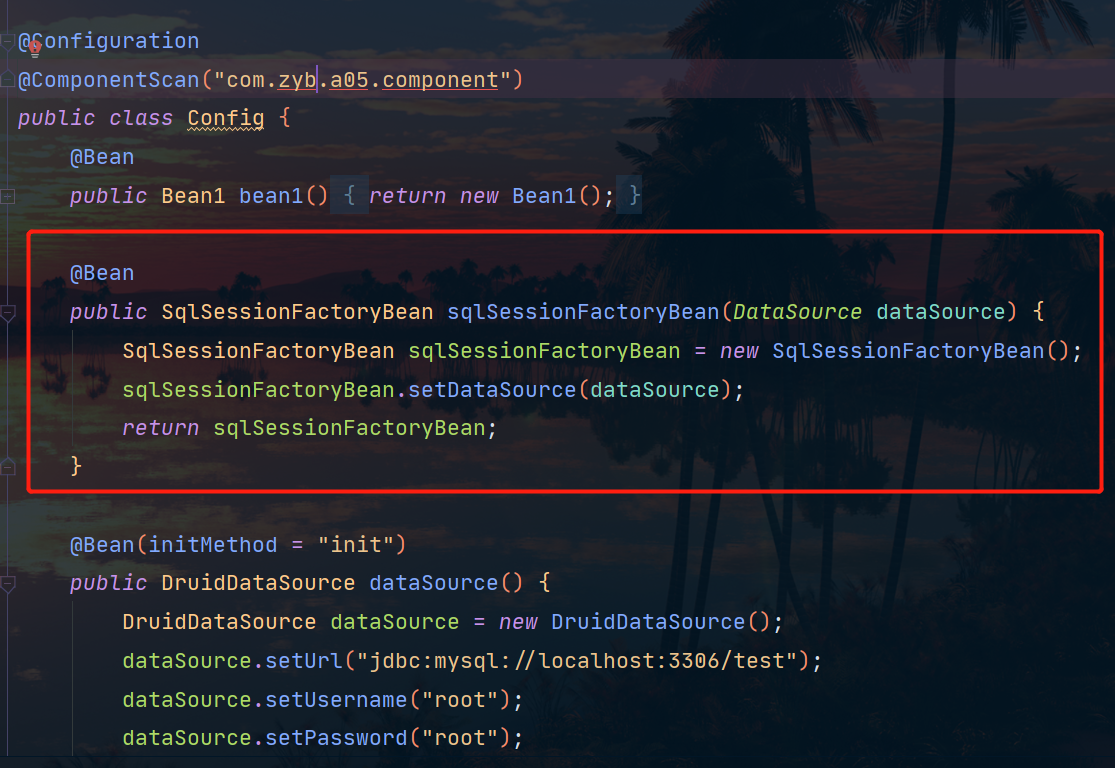
In this configuration class code, we can actually see two ways to define beans:
- Configuration class + @Bean
- Configuration class + factory Bean (the red box part in the figure)
We are very familiar with the first type, so what is the factory bean in the second type?
Let's take this SqlSessionFactoryBean as an example:
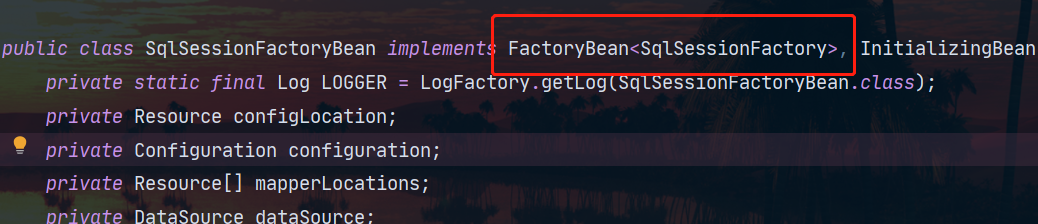
So what is this FactoryBean?
In Spring, the FactoryBean interface is the interface of a factory bean . Beans implementing this interface will be treated as factory beans in the Spring container. When a bean depends on the factory bean, the getObject() method is called to obtain the bean instance. It allows you to perform some custom logic during Bean instantiation.
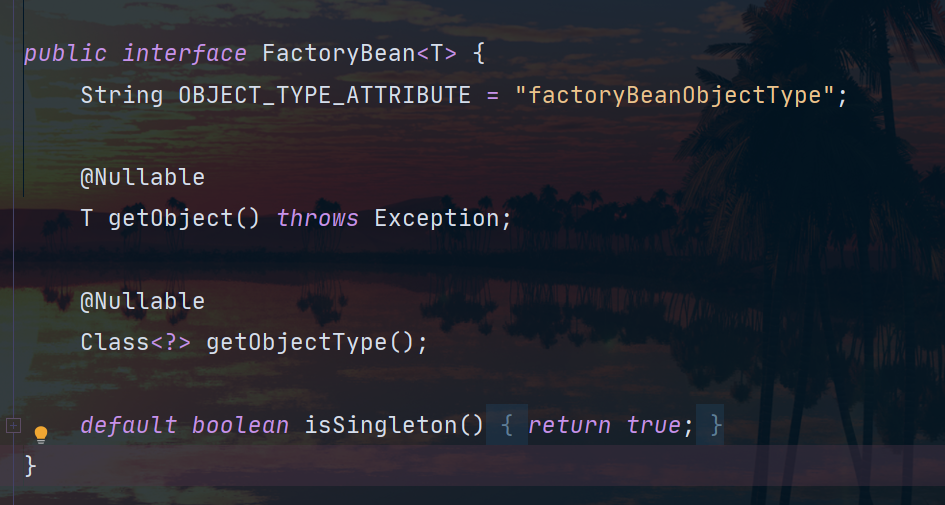
Factory beans generally follow the following pattern:
- Implement the org.springframework.beans.factory.FactoryBean interface
- Return the Bean instance to be generated from the factory in the getObject() method
- Returns the type of the Bean to be generated, specified in the getObjectType() method
- Specify whether the generated Bean is a singleton in the isSingleton() method
Factory beans can be well combined with @Configuration configuration classes to define beans.
For example, we can define a factory post-processor method in the configuration class and use the @Bean annotation to register the factory post-processor:
@Configuration
public class AppConfig {


    @Bean
    public MyFactoryBean myFactoryBean() {


        return new MyFactoryBean();
    }
}
Then the factory post-processor MyFactoryBean can define the bean in the getObject() method:
public class MyFactoryBean implements FactoryBean<Example> {


    @Override
    public Example getObject() throws Exception {


        return new Example();
    }
}
In this way, Spring will:
- Instantiate the configuration class AppConfig
- Call the myFactoryBean() method and register the returned MyFactoryBean instance as a bean
- To get the final bean instance from MyFactoryBean, the Example instance returned by calling the getObject() method will also be registered as a bean
So, in the end two beans will be registered:
- myFactoryBean: MyFactoryBean instance
- example:Example instance
And the example bean is generated by the myFactoryBean factory post-processor.
Clients can inject example just like regular beans:
public class Client {


    @Autowired
    private Example example;
}
In this way, we define beans flexibly through configuration classes and factory beans. The configuration class defines the factory bean, which in turn defines the final bean.
This method combines the flexibility of factory beans with the convenience brought by @Configuration, and is a very practical mode for defining beans in Spring.
Next, we still use code to simulate this parsing process:
public class AtBeanPostProcessor implements BeanDefinitionRegistryPostProcessor {


    @Override
    public void postProcessBeanFactory(ConfigurableListableBeanFactory configurableListableBeanFactory) throws BeansException {


    }

    @Override
    public void postProcessBeanDefinitionRegistry(BeanDefinitionRegistry beanFactory) throws BeansException {


        try {


        	//首先建立一个元数据读取工厂,方便后面的元数据读取
            CachingMetadataReaderFactory factory = new CachingMetadataReaderFactory();
            //对指定路径上的类资源进行元数据读取
            MetadataReader reader = factory.getMetadataReader(new ClassPathResource("com/itheima/a05/Config.class"));
            //得到所有带有@Bean注解的方法
            Set<MethodMetadata> methods = reader.getAnnotationMetadata().getAnnotatedMethods(Bean.class.getName());
            for (MethodMetadata method : methods) {


                System.out.println(method);
                //创建BeanDefinitionBuilder
                BeanDefinitionBuilder builder = BeanDefinitionBuilder.genericBeanDefinition();
                //提供工厂方法的名字,同时指定工厂对象
                builder.setFactoryMethodOnBean(method.getMethodName(), "config");
                //因为 工厂方法有参数我们这里要设置自动装配的模式
                builder.setAutowireMode(AbstractBeanDefinition.AUTOWIRE_CONSTRUCTOR);
                //得到bean定义
                AbstractBeanDefinition bd = builder.getBeanDefinition();
                //通过BeanFactory进行bean的注册
                beanFactory.registerBeanDefinition(method.getMethodName(), bd);
            }
        } catch (IOException e) {


            e.printStackTrace();
        }
    }
}
Notice:
- Because the factory method has parameters, we need to set the automatic assembly mode here
- For the parameters of the factory method and the constructor method, if you want to use automatic assembly, they are all
AbstractBeanDefinition.AUTOWIRE_CONSTRUCTORtypes - We can imagine the configuration class as a factory, and the method marked with @Bean in the configuration class acts as a factory method.
Finally, let's simulate and analyze the Mapper interface:
First of all, we need to understand how the Mapper interface is managed by Spring?
Spring will automatically generate proxy implementation classes based on the Mapper interface, which is how Spring manages the Mapper interface.
The specific steps are:
- Register the Mapper interface in the Spring configuration, usually using the @MapperScan annotation to scan all Mapper interfaces under the package:
@MapperScan("com.example.mapper") @Configuration public class AppConfig { } - Spring will generate the corresponding proxy object according to the Mapper interface, and the proxy object will implement the method of the Mapper interface.
- When the method of the Mapper interface is called, the method of the proxy object is actually executed. The proxy object will obtain SqlSession from SqlSessionFactory, and call SqlSession to perform database operations.
- SqlSession is created by Spring using SqlSessionFactory. SqlSessionFactory is obtained according to DataSource and Mapper XML or annotation configuration.
So, the whole process is:
- Register the Mapper interface (usually using @MapperScan)
- Spring generates a proxy object for the Mapper interface
- The program calls the Mapper interface method, which actually calls the proxy object method
- The proxy object performs database operations through SqlSession
- SqlSession is obtained from SqlSessionFactory, and SqlSessionFactory is configured from DataSource
After reading the above process, we can easily have a question: Where does the proxy object of this Mapper come from ?
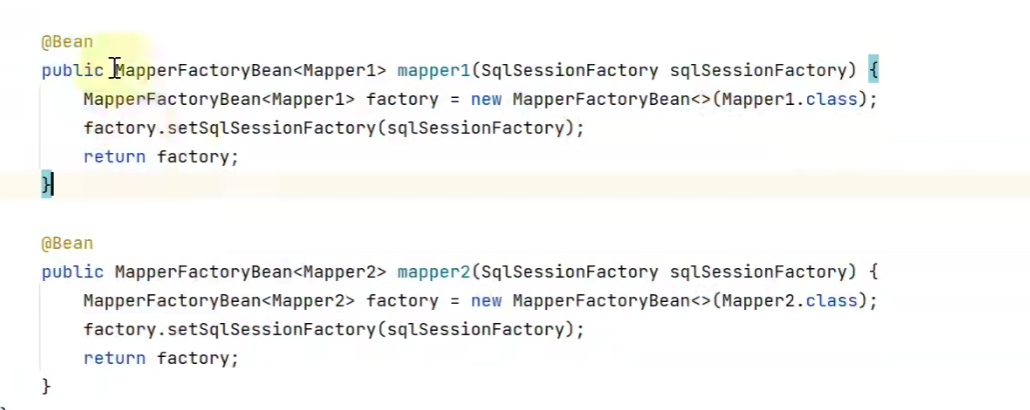
Here we are going to introduce another important component:MapperFactoryBean
MapperFactoryBean is a factory bean used to generate Mapper interface proxy objects. In other words, Spring actually manages the Mapper interface through MapperFactoryBean.
When we register a Mapper interface bean in Spring configuration, Spring will use MapperFactoryBean to generate this bean。
The whole process is:
- Define the Mapper interface bean in the Spring configuration, and specify the class as MapperFactoryBean:
<bean id="userMapper" class="org.mybatis.spring.mapper.MapperFactoryBean"> <property name="mapperInterface" value="com.example.mapper.UserMapper" /> </bean> - Spring will instantiate a MapperFactoryBean and inject the specified mapperInterface property.
- Spring will call the getObject() method from MapperFactoryBean to get the bean instance.
- In the getObject() method, MapperFactoryBean will construct the proxy object of the Mapper interface and return it.
- The returned proxy object will be registered as a bean whose id is userMapper, and this bean is the proxy implementation of the UserMapper interface.
- Then we can inject UserMapper like injecting ordinary beans, and what we actually get is a proxy object.
Therefore, MapperFactoryBean plays a role that a factory bean should have - generating a bean instance according to certain properties. Here, it generates the proxy object bean of the Mapper interface according to the mapperInterface property.
It can be seen that one of the key steps for Spring to manage the Mapper interface is to use MapperFactoryBean to generate proxy objects. The MapperFactoryBean is a factory bean provided by the MyBatis-Spring module for this purpose.
Next, we start to write the simulation code, the effect is as follows:
public class MapperPostProcessor implements BeanDefinitionRegistryPostProcessor {


    @Override
    public void postProcessBeanDefinitionRegistry(BeanDefinitionRegistry beanFactory) throws BeansException {


        try {


            //创建一个路径匹配资源解析器
            PathMatchingResourcePatternResolver resolver = new PathMatchingResourcePatternResolver();
            //获取该路径下的所有class文件
            Resource[] resources = resolver.getResources("classpath:com/zyb/a05/mapper/**/*.class");
            //创建一个注解beanname生成器,方便后面bean的命名
            AnnotationBeanNameGenerator generator = new AnnotationBeanNameGenerator();
            //创建MetadataReader的工厂,为MetadataReader的使用做准备
            CachingMetadataReaderFactory factory = new CachingMetadataReaderFactory();
            for (Resource resource : resources) {


            	//拿到MetadataReader
                MetadataReader reader = factory.getMetadataReader(resource);
                //获得类的元数据
                ClassMetadata classMetadata = reader.getClassMetadata();
                //判断当前类是不是接口
                if (classMetadata.isInterface()) {


                	//开始生成对应MapperFactoryBean的定义
                    AbstractBeanDefinition bd = BeanDefinitionBuilder.genericBeanDefinition(MapperFactoryBean.class)  //指定Bean的类型
                            .addConstructorArgValue(classMetadata.getClassName())
                            .setAutowireMode(AbstractBeanDefinition.AUTOWIRE_BY_TYPE)
                            .getBeanDefinition();
                     //这里的定义仅仅只是为了生成名字,所以我们后面没有向容器里进行注册
                    AbstractBeanDefinition bd2 = BeanDefinitionBuilder.genericBeanDefinition(classMetadata.getClassName()).getBeanDefinition();
                    String name = generator.generateBeanName(bd2, beanFactory);
                    //使用bd的定义、bd2的name进行注册
                    beanFactory.registerBeanDefinition(name, bd);
                }
            }
        } catch (IOException e) {


            e.printStackTrace();
        }

    }

    @Override
    public void postProcessBeanFactory(ConfigurableListableBeanFactory beanFactory) throws BeansException {


    }
}
Regarding the calling period of the post processor (PostProcessor)
The postProcessBeanFactory() method of BeanFactoryPostProcessor will be called at the following times:
- All BeanDefinitions are loaded, but before any beans are instantiated.
- That is to say, it will modify the bean definition when the container is initialized to prepare for the next bean instance initialization.
The timing of its call is in the initialization phase of the Spring container, and the general process is as follows:
- Spring resource loading, reading xml/annotations, etc. and parsing to generate BeanDefinition.
- Call the postProcessBeanDefinitionRegistry() method of the BeanDefinitionRegistryPostProcessor. BeanDefinitions can be added/removed here.
- Call the postProcessBeanFactory() method of the BeanFactoryPostProcessor. BeanDefinition properties, etc. can be modified here.
- bean instantiation phase - Create bean instance according to BeanDefinition.
- Call the postProcessBeforeInitialization() method of the BeanPostProcessor.
- Call initialization callback methods such as @PostConstruct or init-method.
- Call the postProcessAfterInitialization() method of the BeanPostProcessor.
- The entire Spring container is loaded.
Be sure to have a general order in mind. When the Spring container is initialized, it first parses the definition of the bean, registers the bean in the container according to the definition, and enters the life cycle of the bean after registering the bean: creation --> dependency injection --> initialization --> available --> destruction
so,The timing of calling BeanFactoryPostProcessor is specified in step 3 - after all BeanDefinitions are loaded but before any beans are instantiated. We can use this timing to modify BeanDefinition in batches.
To give a simple example:
public class MyBeanFactoryPostProcessor implements BeanFactoryPostProcessor {


    public void postProcessBeanFactory(ConfigurableListableBeanFactory beanFactory) {


        for (String beanName : beanFactory.getBeanDefinitionNames()) {


            BeanDefinition definition = beanFactory.getBeanDefinition(beanName);
            if (definition.getScope().equals(BeanDefinition.SCOPE_PROTOTYPE)) {


                definition.setScope(BeanDefinition.SCOPE_SINGLETON);
            }
        }
    }
}
This post-processor will modify all prototype-scoped beans to be singleton-scoped. Its call timing is just after all BeanDefinitions are loaded and before the bean is instantiated. So it can batch modify beans.
In addition, the calling timing of BeanDefinitionRegistryPostProcessor is before BeanFactoryPostProcessor, which allows adding or removing BeanDefinition. Therefore, if these two interfaces are implemented at the same time, it should be noted that the BeanDefinition defined in postProcessBeanDefinitionRegistry() is available in postProcessBeanFactory().
in conclusion:
- BeanFactoryPostProcessor is called after the BeanDefinition is loaded before the bean is instantiated.
- It can modify the properties of BeanDefinition in batches to prepare for subsequent bean instantiation.
- Its call timing is at a stage in the initialization process of the Spring container, after BeanDefinitionRegistryPostProcessor and before bean instantiation.
- Understanding the timing of its invocation will help us make better use of BeanFactoryPostProcessor to customize the bean definition.
- When implementing BeanFactoryPostProcessor and BeanDefinitionRegistryPostProcessor at the same time, it is necessary to pay attention to the calling order of the two and their impact.
BeanFactoryPostProcessor provides us with a powerful extension point, allowing us to customize and modify BeanDefinition when the container starts.
Aware interface and InitializingBean interface
First of all, we need to know what is the use of the Aware interface?
The Aware interface is an interface in the Spring framework,It allows Bean to perceive its own environment, such as Spring container, application context, etc.. The Spring framework provides multiple Aware interfaces that allow Beans to perceive different environments.
Specifically, when a Bean implements an Aware interface, the Spring container will automatically call the interface method corresponding to the Bean, and pass the corresponding environment information to the method as a parameter. In this way, the Bean can obtain information about its environment and process it accordingly .
That is to say: by implementing these Aware interfaces, we can obtain some objects in the Spring container when the bean is initialized, and then perform further operations on the bean. in a wordThe Aware interface provides a [built-in] injection method
The following are several commonly used Aware interfaces:
-
BeanNameAware: This interface allows the Bean to perceive its own name in the Spring container. -
ApplicationContextAware: This interface allows the Bean to perceive the application context it is in. -
BeanFactoryAware: This interface allows the Bean to perceive the Bean factory it is in.
For example, the following code demonstrates a bean that implements the ApplicationContextAware interface:
public class MyBean implements ApplicationContextAware {


    private ApplicationContext applicationContext;

    @Override
    public void setApplicationContext(ApplicationContext applicationContext) throws BeansException {


        this.applicationContext = applicationContext;
    }

    public void doSomething() {


        // 使用ApplicationContext进行相应的处理
    }
}
In this example, MyBean implements the ApplicationContextAware interface and rewrites the setApplicationContext method. In this method, we save the incoming ApplicationContext instance for use in subsequent processing.
It should be noted that the Aware interface is only a perception mechanism, and it does not change the Bean's behavior. Therefore, if a Bean implements the Aware interface, but does not process the corresponding environment information, then the interface has no practical effect.
Then let's take a look at the InitializingBean interface, what is this stuff?
InitializingBean is an interface and it has one method:
void afterPropertiesSet() throws Exception;
Beans implementing this interface will call the afterPropertiesSet() method after the container has set all necessary properties and before initialization。
Like the Aware interface, we can understand it as:
The InitializingBean interface provides a [built-in] initialization method
This gives us an opportunity to do some custom initialization on the bean before it is initialized . For example, in the afterPropertiesSet() method, we can:
- Check if required properties are all set
- Do final processing on certain attributes
- call initialization method etc.
A simple example:
public class MyBean implements InitializingBean {


    private String message;

    public void setMessage(String message) {


        this.message = message;
    }

    @Override
    public void afterPropertiesSet() {


        System.out.println(message);
    }
}
Then define this bean in Spring configuration:
<bean id="myBean" class="com.example.MyBean">
    <property name="message" value="Init done!" />
</bean>
When the Spring container initializes this bean, the following process occurs:
- Set the necessary properties through the setter method, and the message property is set to "Init done!"
- Call the afterPropertiesSet() method to print out the value of the message property
- bean initialization complete
Therefore, the afterPropertiesSet() method provides a callback, allowing us to add custom logic before bean initialization. This is also a purpose similar to the Aware interface, but in a slightly different way:
- Aware interface callbacks happen after dependency injection
- Whereas the InitializingBean callback happens after dependency injection, but before initialization.
- The callback timing of the Aware interface and the InitializingBean interface is after the Bean is instantiated, so they can both obtain the Bean instance and perform corresponding operations. However, the callback timing of the Aware interface is before the dependency injection, so it cannot obtain other Bean instances. The callback timing of the InitializingBean interface is after dependency injection, so it can obtain other Bean instances and perform corresponding initialization work.
About the Aware interface and the InitializingBean interface, we also say :
- Built-in injection and initialization are not affected by extension functions and will always be executed
- However, the extended function may be invalid due to certain circumstances.
- Therefore, classes inside the Spring framework often use built-in injection and initialization
These few sentences may not be easy to understand, let's give an example:
Some functions can be realized with @Autowired, why use the Aware interface?
general speaking:
- The analysis of @Autowired needs to use the bean post-processor, which belongs to the extension function
- The Aware interface is a built-in function, without any extension, Spring can recognize that
in some cases, the extended function will fail, but the built-in function will not fail
Let's look at a piece of code:
@Configuration
public class MyConfig1 {


    private static final Logger log = LoggerFactory.getLogger(MyConfig1.class);

    @Autowired
    public void setApplicationContext(ApplicationContext applicationContext) {


        log.debug("注入 ApplicationContext");
    }

    @PostConstruct
    public void init() {


        log.debug("初始化");
    }

    @Bean //  beanFactory 后处理器
    public BeanFactoryPostProcessor processor1() {


        return beanFactory -> {


            log.debug("执行 processor1");
        };
    }

}
Test class:
/*
    Aware 接口及 InitializingBean 接口
 */
public class A06 {


    private static final Logger log = LoggerFactory.getLogger(A06.class);

    public static void main(String[] args) {


        GenericApplicationContext context = new GenericApplicationContext();

        context.registerBean("myConfig1", MyConfig1.class);

        context.registerBean(AutowiredAnnotationBeanPostProcessor.class);
        context.registerBean(CommonAnnotationBeanPostProcessor.class);
        context.registerBean(ConfigurationClassPostProcessor.class);


        /*
            Java 配置类在添加了 bean 工厂后处理器后,
                你会发现用传统接口方式的注入和初始化仍然成功, 而 @Autowired 和 @PostConstruct 的注入和初始化失败
         */

        context.refresh(); // 1. beanFactory 后处理器,  2. 添加 bean 后处理器, 3. 初始化单例
        context.close();
    }
}
After the refresh() method is executed, the following operations will be executed roughly in sequence in the container (there are many actions not listed):
- beanFactory Post Processor
- Add bean post-processor
- Initialize the singleton
Result:

It can be seen that @PostConstruct and @Autowired annotations are invalid. Why?
If you want to fully understand here, you must figure out the callback timing of the post-processor, Aware interface and InitializingBean interface! ! !
The case where the Java configuration class does not contain BeanFactoryPostProcessor
The case where the Java configuration class contains BeanFactoryPostProcessor
Therefore, to create the BeanFactoryPostProcessor, you must create the Java configuration class in advance (how to execute the method to get the Bean if you don’t create it), and the BeanPostProcessor is not ready at this time, causing annotations such as @Autowired to fail
NOTE
Workaround:
- Replace extended dependency injection and initialization with built-in dependency injection and initialization
- Use static factory methods instead of instance factory methods to avoid factory objects being created in advance
If you need to use @Autowired and @PostConstruct annotations in BeanFactoryPostProcessor, you can consider using the ApplicationContextAware interface and InitializingBean interface to implement dependency injection and initialization. Specifically, you can implement the ApplicationContextAware interface to obtain an ApplicationContext instance, and then use this instance for dependency injection; at the same time, you can implement the InitializingBean interface to implement the Bean initialization logic.
For example:
@Configuration
public class MyConfig1 implements ApplicationContextAware, InitializingBean {


    private static final Logger log = LoggerFactory.getLogger(MyConfig1.class);

    private ApplicationContext applicationContext;

    @Override
    public void setApplicationContext(ApplicationContext applicationContext) {


        this.applicationContext = applicationContext;
        log.debug("注入 ApplicationContext");
    }

    @Override
    public void afterPropertiesSet() {


        log.debug("初始化");
    }

    @Bean
    public BeanFactoryPostProcessor processor1() {


        return beanFactory -> {


            log.debug("执行 processor1");
        };
    }
}
In this example, the ApplicationContextAware interface and the InitializingBean interface are implemented for dependency injection and initialization respectively. In this way, when the BeanFactoryPostProcessor is executed, dependency injection can be performed through the ApplicationContext instance; at the same time, after the Bean is instantiated, it can be initialized through the implementation method of the InitializingBean interface.
initialization and destruction
Spring provides a variety of initialization methods. In addition to @PostConstruct and @Bean(initMethod), it can also implement the InitializingBean interface for initialization. If the same bean declares three initialization methods using the above methods, their execution order is
- Initialization method annotated by @PostConstruct
- Initialization method of the InitializingBean interface
- The initialization method specified by @Bean(initMethod)
Similar to initialization, Spring also provides a variety of destruction methods, the execution order is
- @PreDestroy 标注的销毁方法
- DisposableBean 接口的销毁方法
- @Bean(destroyMethod) 指定的销毁方法
示例代码:
@SpringBootApplication
public class A07_1 {


    public static void main(String[] args) {


        ConfigurableApplicationContext context = SpringApplication.run(A07_1.class, args);
        context.close();

    }

    @Bean(initMethod = "init3")
    public Bean1 bean1() {


        return new Bean1();
    }

    @Bean(destroyMethod = "destroy3")
    public Bean2 bean2() {


        return new Bean2();
    }
}
public class Bean1 implements InitializingBean {


    private static final Logger log = LoggerFactory.getLogger(Bean1.class);

    @PostConstruct
    public void init1() {


        log.debug("初始化1");
    }

    @Override
    public void afterPropertiesSet() throws Exception {


        log.debug("初始化2");
    }

    public void init3() {


        log.debug("初始化3");
    }
}
public class Bean2 implements DisposableBean {


    private static final Logger log = LoggerFactory.getLogger(Bean2.class);

    @PreDestroy
    public void destroy1() {


        log.debug("销毁1");
    }

    @Override
    public void destroy() throws Exception {


        log.debug("销毁2");
    }

    public void destroy3() {


        log.debug("销毁3");
    }
}
Scope
在当前版本的 Spring 和 Spring Boot 程序中,支持五种 Scope
- singleton,容器启动时创建(未设置延迟),容器关闭时销毁(单例与容器同生共死)
- prototype,每次使用时创建,不会自动销毁,需要调用 DefaultListableBeanFactory.destroyBean(bean) 销毁(也就是说多例的销毁不归容器管理)
- request,每次请求用到此 bean 时创建,请求结束时销毁
- session,每个会话用到此 bean 时创建,会话结束时销毁
- application,web 容器用到此 bean 时创建,容器停止时销毁
有些文章提到有 globalSession 这一 Scope,也是陈旧的说法,目前 Spring 中已废弃
但要注意,如果在 singleton 注入其它 scope 都会有问题,解决方法有
- @Lazy
- @Scope(proxyMode = ScopedProxyMode.TARGET_CLASS)
- ObjectFactory
- ApplicationContext.getBean
解决方法虽然不同,但理念上殊途同归: 都是推迟其它 scope bean 的获取
我们举一个例子:
以单例注入多例为例
有一个单例对象 E
@Component
public class E {


    private static final Logger log = LoggerFactory.getLogger(E.class);

    private F f;

    public E() {


        log.info("E()");
    }

    @Autowired
    public void setF(F f) {


        this.f = f;
        log.info("setF(F f) {}", f.getClass());
    }

    public F getF() {


        return f;
    }
}
要注入的对象 F 期望是多例
@Component
@Scope("prototype")
public class F {


    private static final Logger log = LoggerFactory.getLogger(F.class);

    public F() {


        log.info("F()");
    }
}
测试
E e = context.getBean(E.class);
F f1 = e.getF();
F f2 = e.getF();
System.out.println(f1);
System.out.println(f2);
输出
com.zyb.demo.cycle.F@6622fc65
com.zyb.demo.cycle.F@6622fc65
发现它们是同一个对象,而不是期望的多例对象
对于单例对象来讲,依赖注入仅发生了一次,后续再没有用到多例的 F,因此 E 用的始终是第一次依赖注入的 F
解决
- 仍然使用 @Lazy 生成代理
- Although the proxy object is still the same, when any method of the proxy object is used every time , a new f object is created by the proxy
@Component
public class E {


    @Autowired
    @Lazy
    public void setF(F f) {


        this.f = f;
        log.info("setF(F f) {}", f.getClass());
    }

    // ...
}
Notice
- @Lazy can also be added to member variables, but the purpose of adding it to the set method is to observe the output, and adding it to member variables will not work
- The purpose of adding @Autowired to the set method is similar
output
E: setF(F f) class com.zyb.demo.cycle.F$$EnhancerBySpringCGLIB$$8b54f2bc
F: F()
com.zyb.demo.cycle.F@3a6f2de3
F: F()
com.zyb.demo.cycle.F@56303b57
From the output log, we can see that when the setF method is called, the type of the f object is the proxy type