Article Directory
Start detailed
The startup of SpringBoot is divided into two parts:
- Construct SpringApplication
- Execute the run method

Construct SpringApplication
Let's take a look at it as a whole:
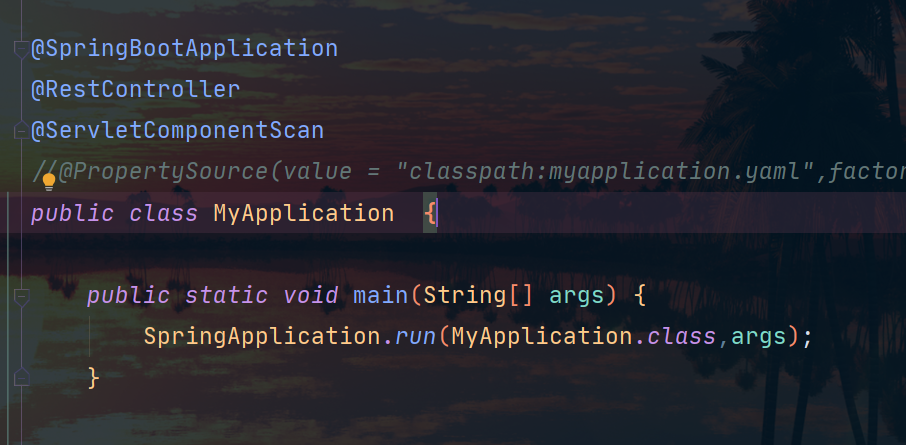
Join our current startup class as follows:
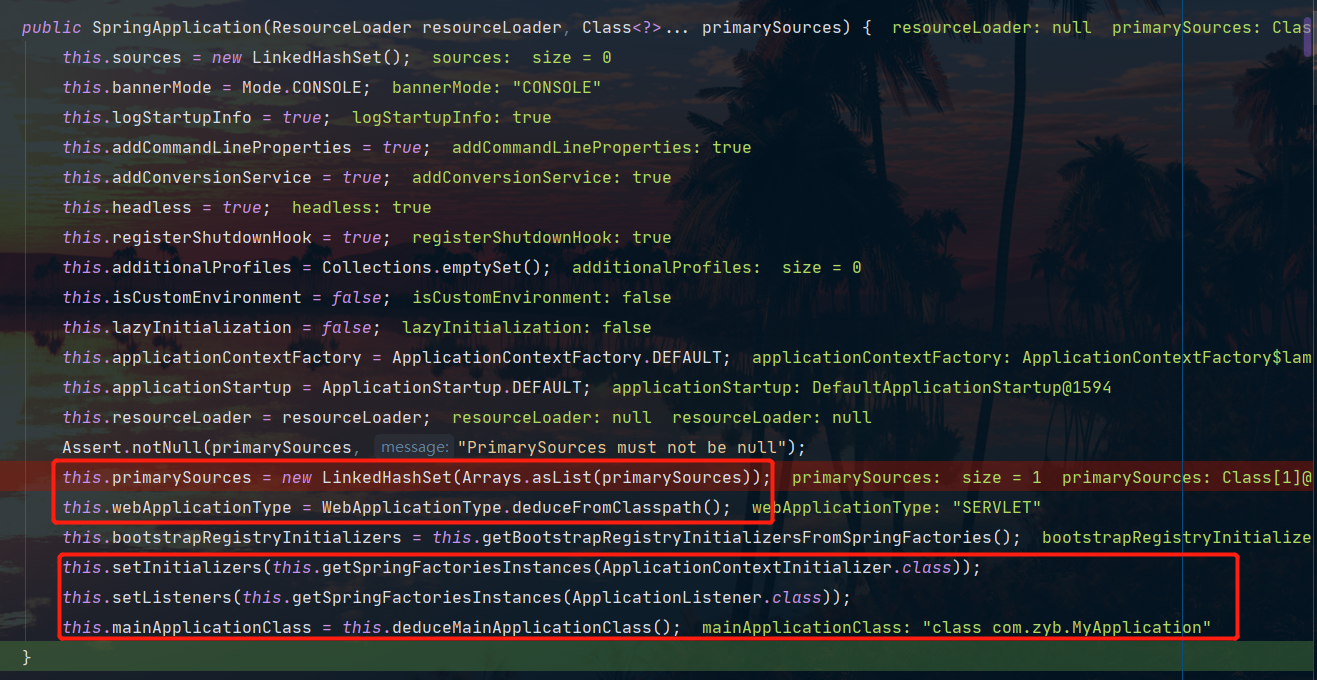
It can be found that roughly the following things have been done:
- Set the main source of the BeanDefinition
- Infer application type
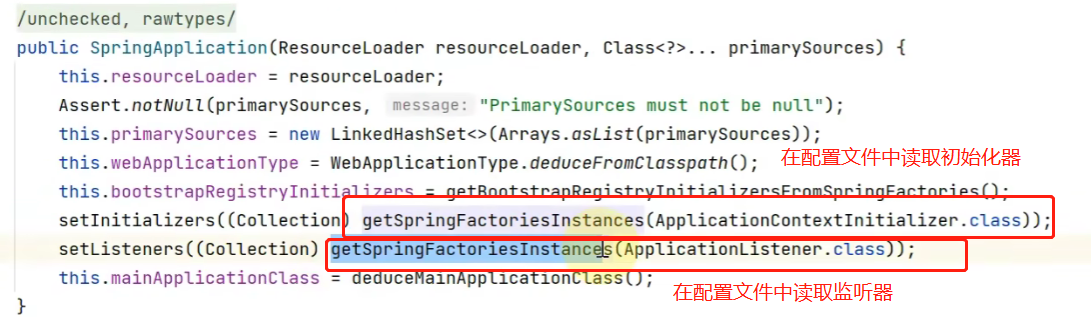
- Set the ApplicationContext initializer
- set listener
- inferring the main startup class
Next, let's look at each step in detail:
Step 1: Record the BeanDefinition source
Everyone knows that the internal BeanFactory of our Spring container is empty at the beginning, and it needs to find BeanDefinition from various sources. These sources may come from configuration classes or XML files, etc. In the construction method of SpringApplication, we need to obtain a main source, which is set by the first parameter of our run method. We generally set it as the startup class, and of course we can also set other sources.
Let's demonstrate it with code:
@Configuration
public class A39_1 {


    public static void main(String[] args) throws Exception {


        System.out.println("1. 演示获取 Bean Definition 源");
        SpringApplication spring = new SpringApplication(A39_1.class);

        System.out.println("2. 演示推断应用类型");
        System.out.println("3. 演示 ApplicationContext 初始化器");
        System.out.println("4. 演示监听器与事件");
        System.out.println("5. 演示主类推断");

		// 创建 ApplicationContext
        ConfigurableApplicationContext context = spring.run(args);


        for (String name : context.getBeanDefinitionNames()) {


            //打印容器中bean的名字和来源
            System.out.println("name: " + name + " 来源:" + context.getBeanFactory().getBeanDefinition(name).getResourceDescription());
        }
        context.close();

    }

    static class Bean1 {


    }

    static class Bean2 {


    }

    static class Bean3 {


    }

    @Bean
    public Bean2 bean2() {


        return new Bean2();
    }

    @Bean
    public TomcatServletWebServerFactory servletWebServerFactory() {


        return new TomcatServletWebServerFactory();
    }
}
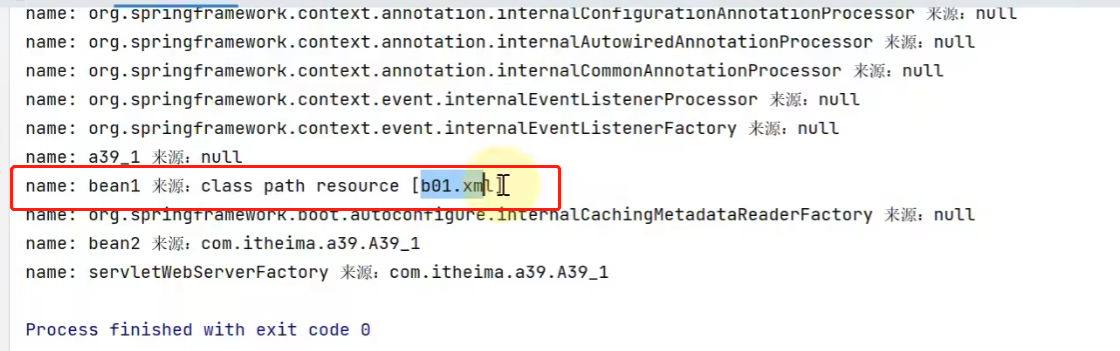
The result is as follows:
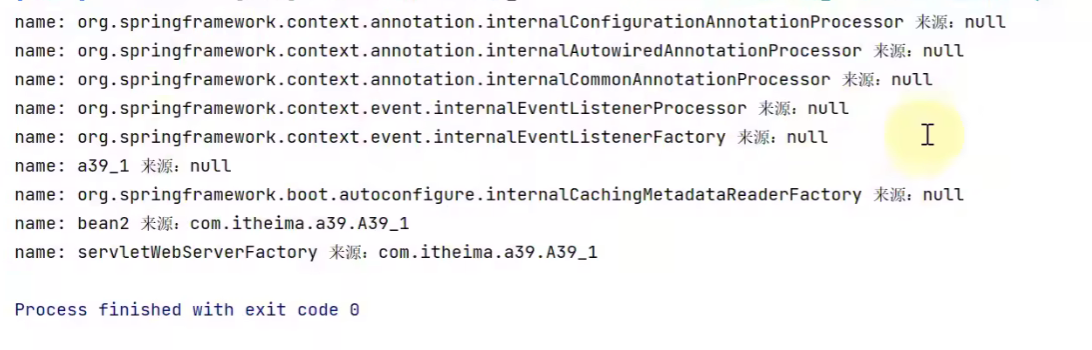
These sources are null, indicating that they do not come from a certain configuration class, but belong to some beans built in Spring.
Next we add a source :

we define a bean in the xml configuration file:
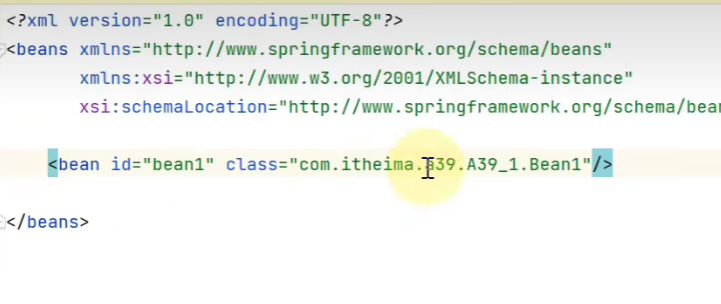
Next we run again:
Step 2: Infer the application type
The SpringBoot program supports three types:
- non-web program
- Servlet-based web program
- Reactive-based web program
It will look at the key classes in the JAR package under the current class path to see what kind of program it should be, and create different ApplicationContexts later according to different types of programs.
Here we go directly to the construction method of the source code to view its logic:
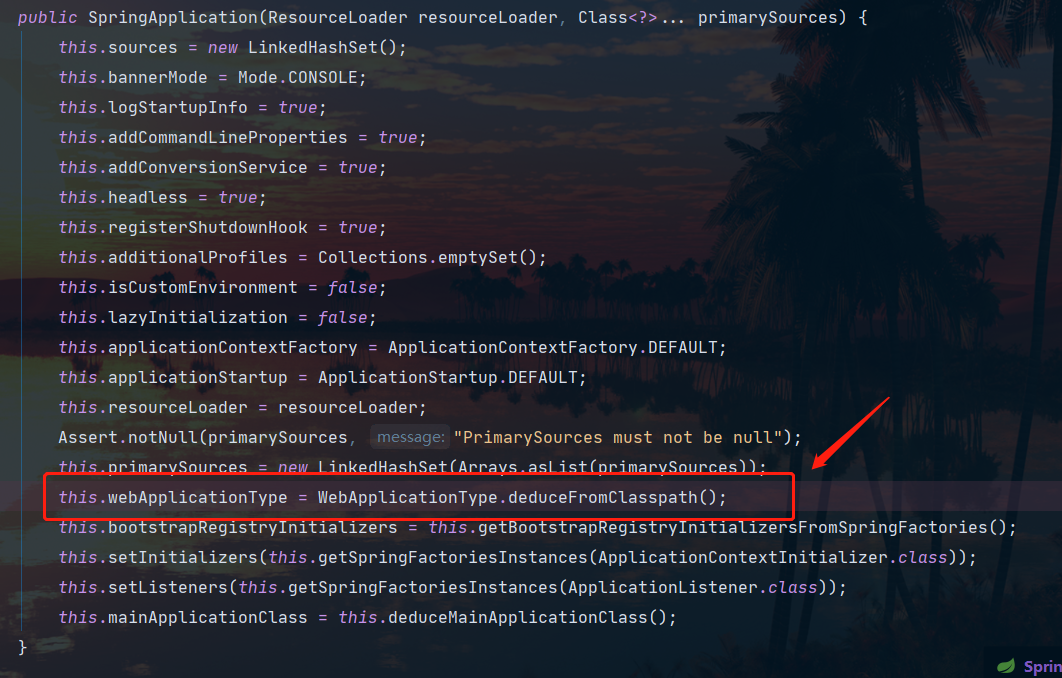
    static WebApplicationType deduceFromClasspath() {


        if (ClassUtils.isPresent("org.springframework.web.reactive.DispatcherHandler", (ClassLoader)null) && !ClassUtils.isPresent("org.springframework.web.servlet.DispatcherServlet", (ClassLoader)null) && !ClassUtils.isPresent("org.glassfish.jersey.servlet.ServletContainer", (ClassLoader)null)) {


            return REACTIVE;
        } else {


            String[] var0 = SERVLET_INDICATOR_CLASSES;
            int var1 = var0.length;

            for(int var2 = 0; var2 < var1; ++var2) {


                String className = var0[var2];
                if (!ClassUtils.isPresent(className, (ClassLoader)null)) {


                    return NONE;
                }
            }

            return SERVLET;
        }
    }
- The ClassUtils.isPresent method is used to determine whether a class exists in the class path
- Judgment logic:
-
First judge whether it is a Reactive type

-
When judging whether it is a non-web type:
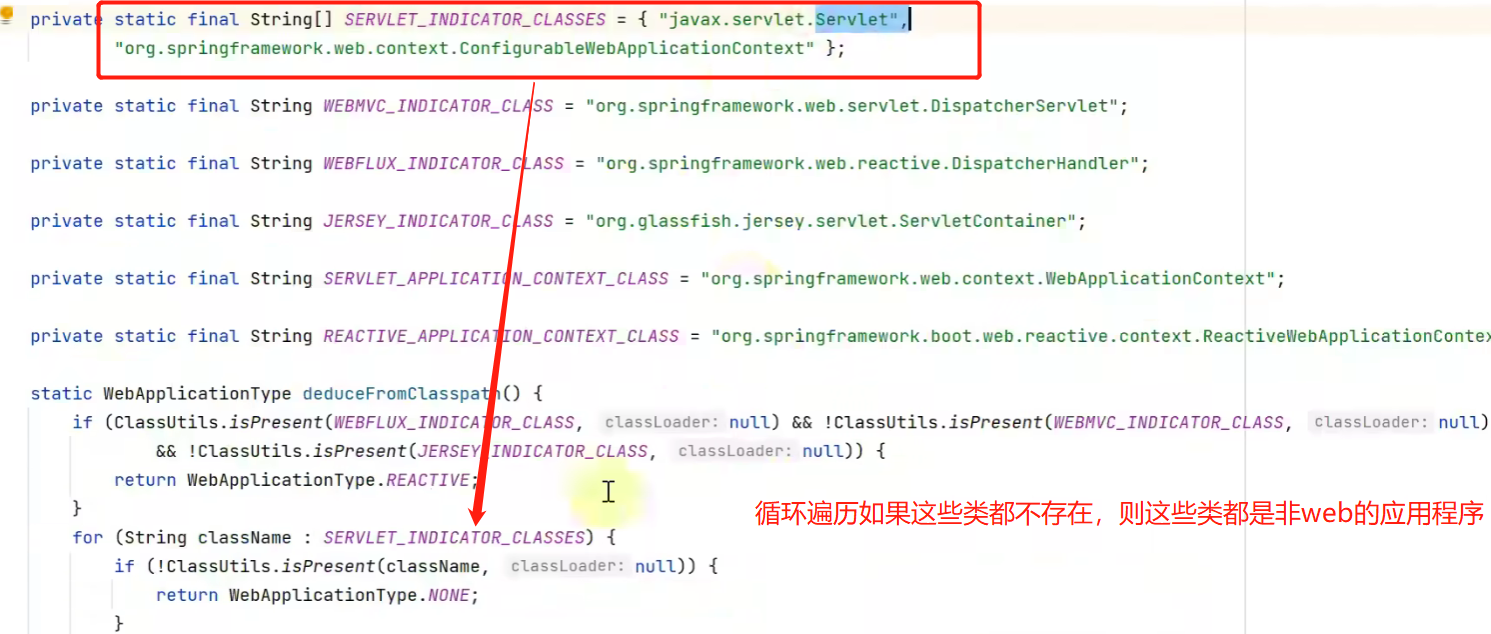
-
If neither type is Servlet type
-
Step 3: Record the ApplicationContext initializer
When we finish the first two steps, we can create the Spring container ( here only has the conditions for creation, and the real creation is in the run method ), and at this time we may need to extend it, and this work can be handed over to our ApplicationContext initializer.
Here we also need to understand some steps when the ApplicationContext container is created:
- Step 1: Create ApplicationContext
- Step 2: Call the initializer to extend the ApplicationContext
- Step 3: Call the ApplicationContext.refresh method to complete the initialization of the container
We also use code simulation here. It should be noted that in the construction method of SpringApplication, it reads the initializer in the configuration file. Here we simply implement one by ourselves:
		System.out.println("3. 演示 ApplicationContext 初始化器");
        spring.addInitializers(applicationContext -> {


            if (applicationContext instanceof GenericApplicationContext gac) {


                gac.registerBean("bean3", Bean3.class);
            }
        });
- The initializer is of type ApplicationContextInitializer
- This initializer will provide a parameter that is just created but not yet refreshed container
- Here we register a bean3 in the initializer, simulating the extension of the initializer to the beanDefinition in the container
Result:
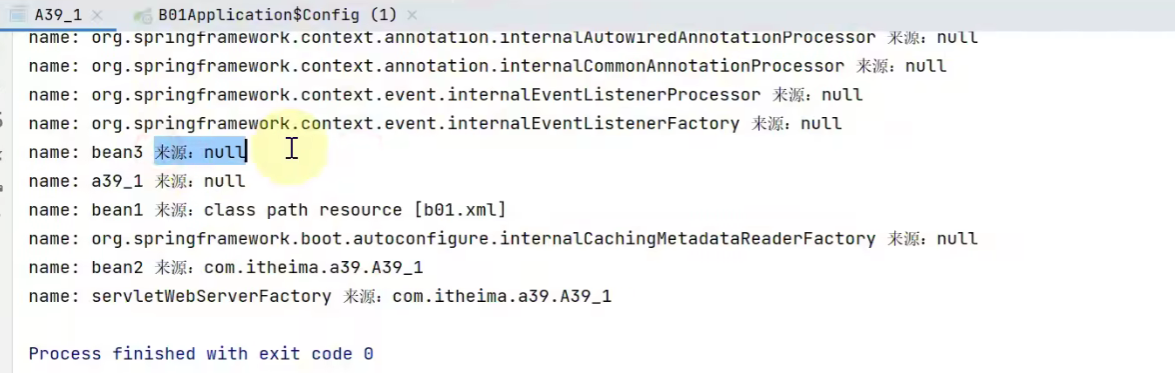
You can see that the source of the definition provided by the initializer is also null
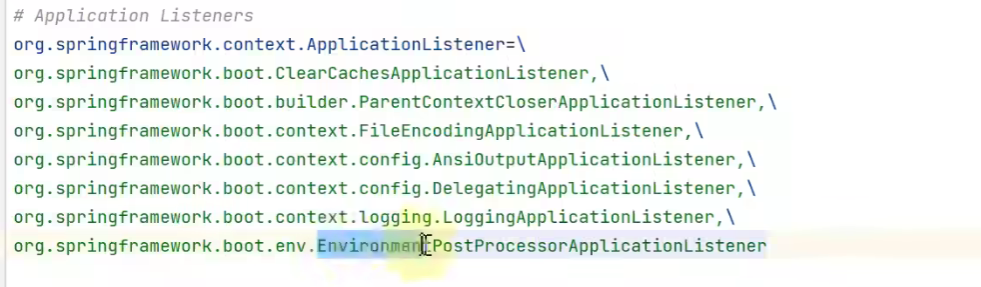
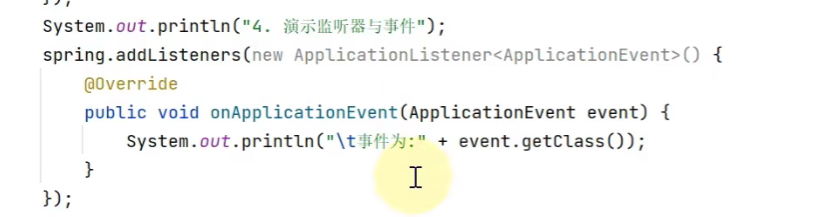
Step 4: Record Listener
Listen to some important events published in SpringBoot startup through listeners.
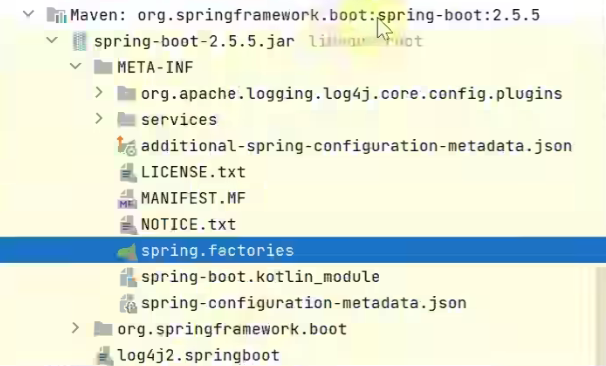
In the construction method of SpringApplication, some listener implementations are also read through configuration files.
Let's simulate it with code:
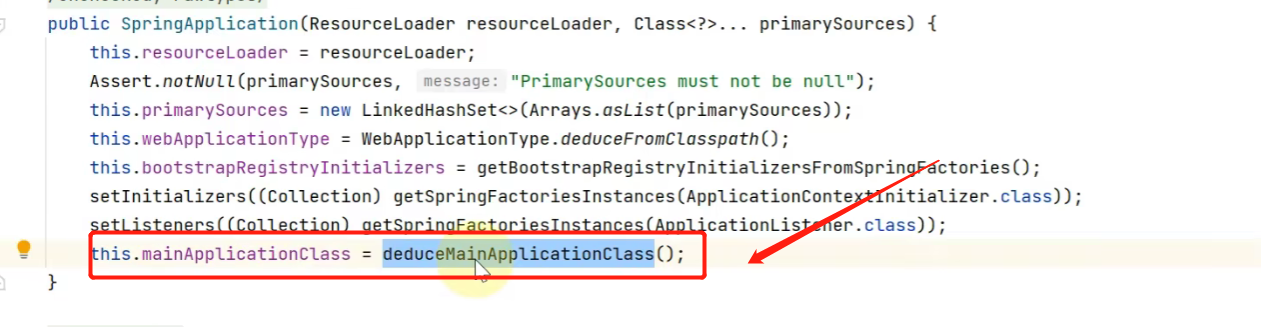
Step 5: Infer the main startup class
It is to infer who the class that runs the main method in SpringBoot is
The corresponding method in SpringApplication:
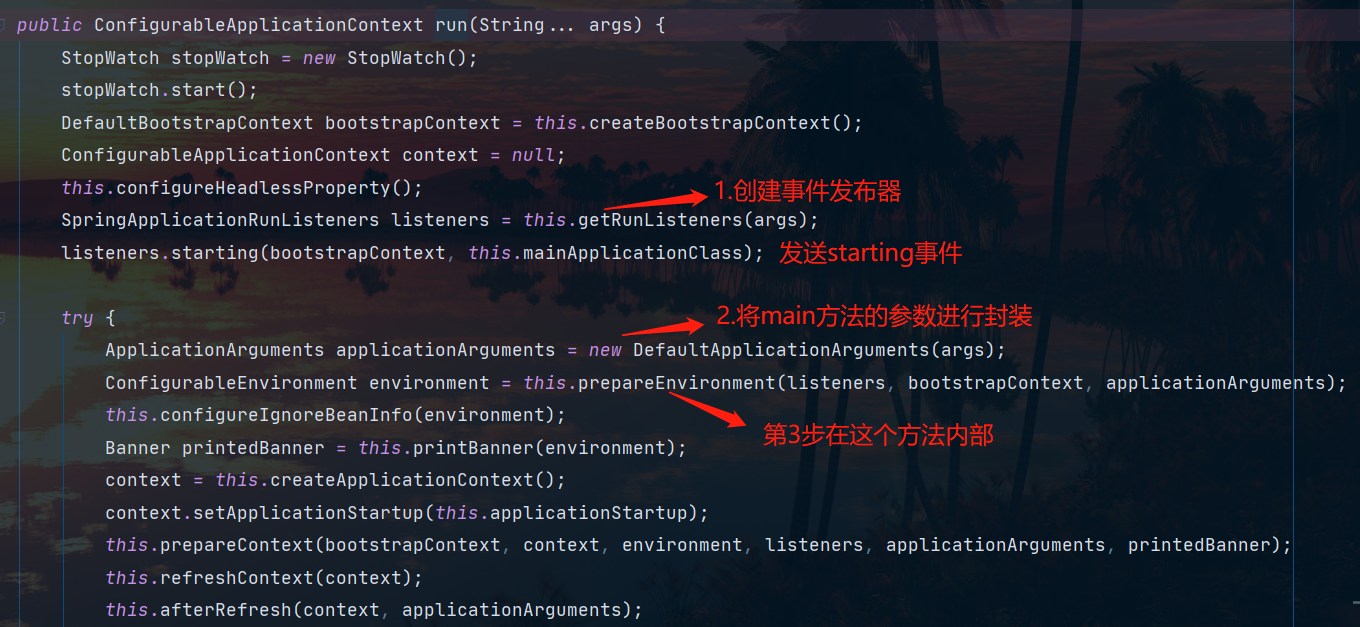
Next, let's look at the second part of SpringBoot startup: that is, the execution of the run method
Execute the run method
-
Get SpringApplicationRunListeners, the name is not good, don't be misled, it is actually an event publisher
-
Function: During the startup process of the SpringBoot program, some important nodes will be executed and corresponding events will be released (the blue labels behind are the events released in each process)
-
The interface of the event publisher is SpringApplicationRunListener, and SpringApplicationRunListeners is a combiner of multiple event publishers
-
The SpringApplicationRunListener interface has only one implementation class EventPublishingRunListener. Although there is only one implementation, SpringBoot does not write it into the java code, but writes the corresponding relationship between the interface and the implementation in a configuration file:


-
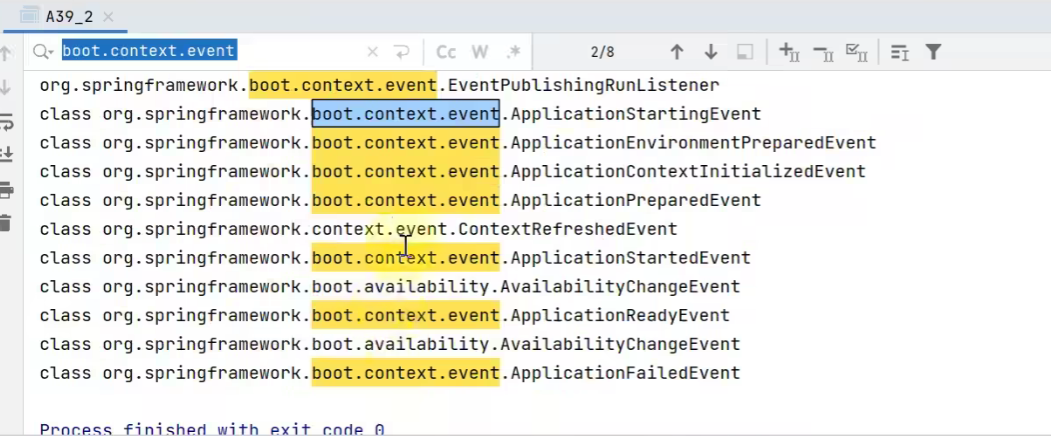
Publish application starting event 1️⃣
-
-
Package startup args
-
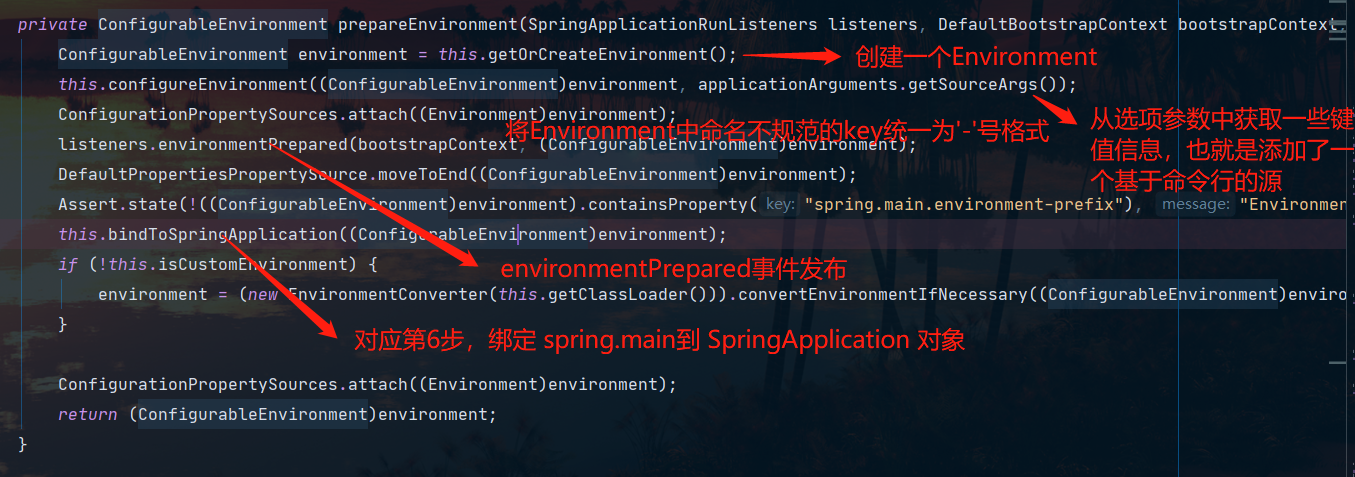
Prepare Environment Add command line parameters
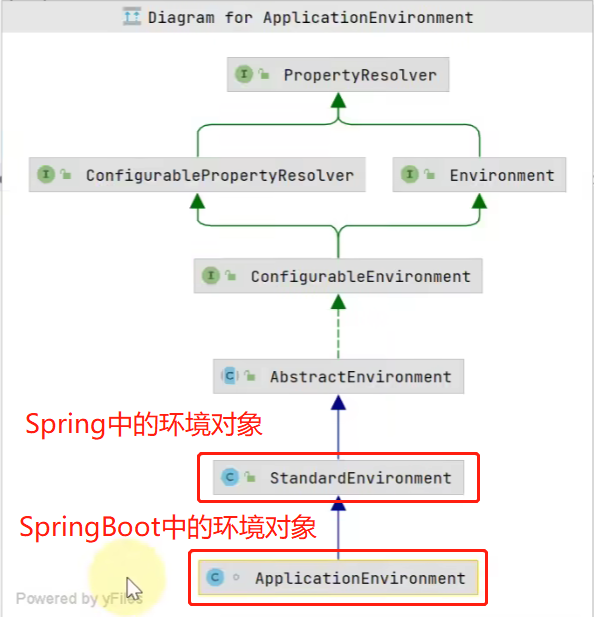
- The environment object is actually an abstraction of our configuration information. Configuration information is divided into multiple sources, such as: system environment variables, properties files, and yaml files. This environment object can integrate multiple sources together. If you want to find these key-value information in the future, you can go to the environment to find it.
- By default, the environment objects we create have only two sources: system properties and system variables
- In this step, only one command-line configuration source is added to SpringBoot. As for properties and yaml configuration sources, they are added in subsequent steps.
-
ConfigurationPropertySources handling
- This step will add a highest priority source ConfigurationPropertySourcesPropertySource to the environment object
- Its function is to unify the format of the key in the configuration
- Release application environment is ready for event 2️⃣
-
Call the post-processor of Environment to enhance, thus adding more sources
-
The Environment post-processor here is obtained through the spring.factories configuration file

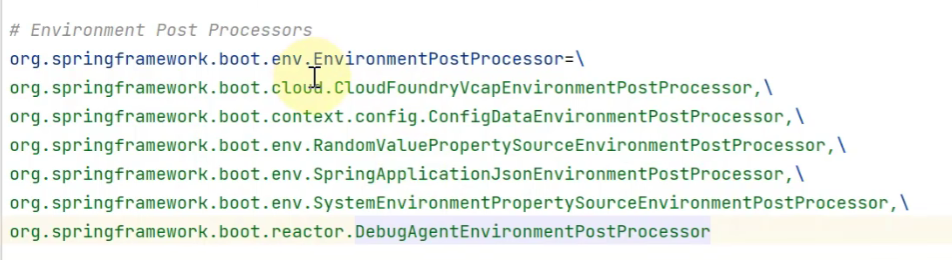
-
Add application.properties configuration file source through ConfigDataEnvironmentPostProcessor post processor
-
Add a random configuration source through the RandomValuePropertySourceEnvironmentPostProcessor post-processor
-
So who will read these Environment post-processors and call their methods? In fact, it is done through the EnvironmentPostProcessorApplicationListener listener. What it listens to is the event we published in step 4.
-
-
Bind spring.main (the attribute starting with spring.main in the configuration file) to the SpringApplication object
- for example:
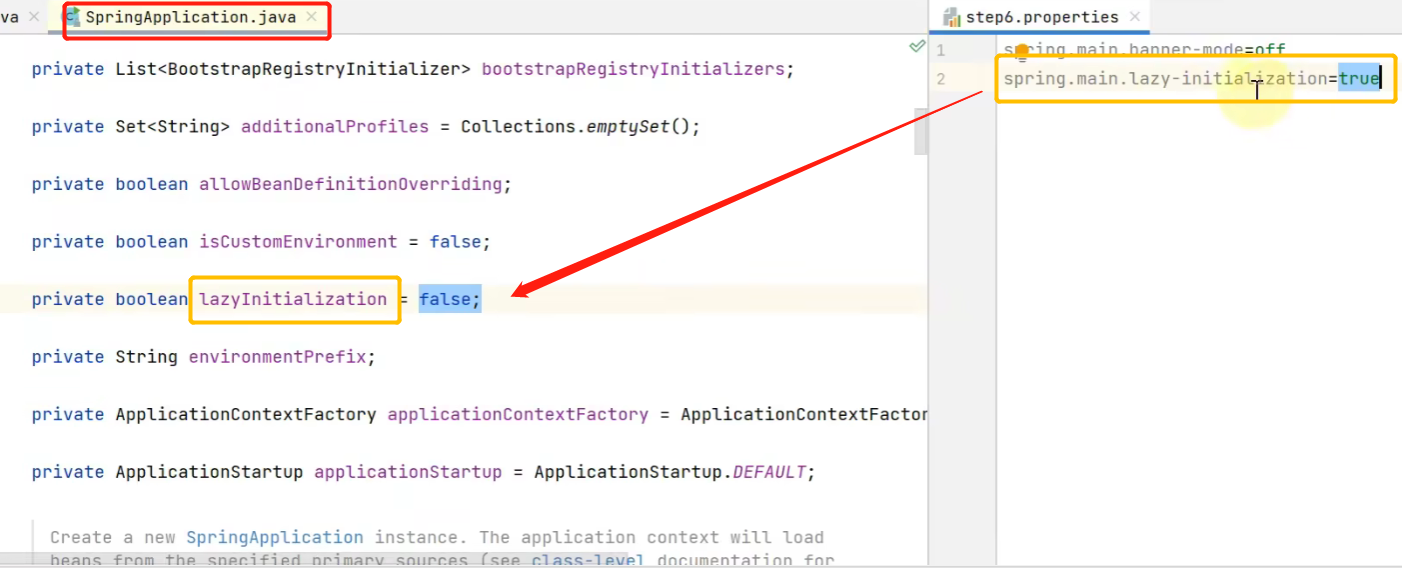
- for example:
-
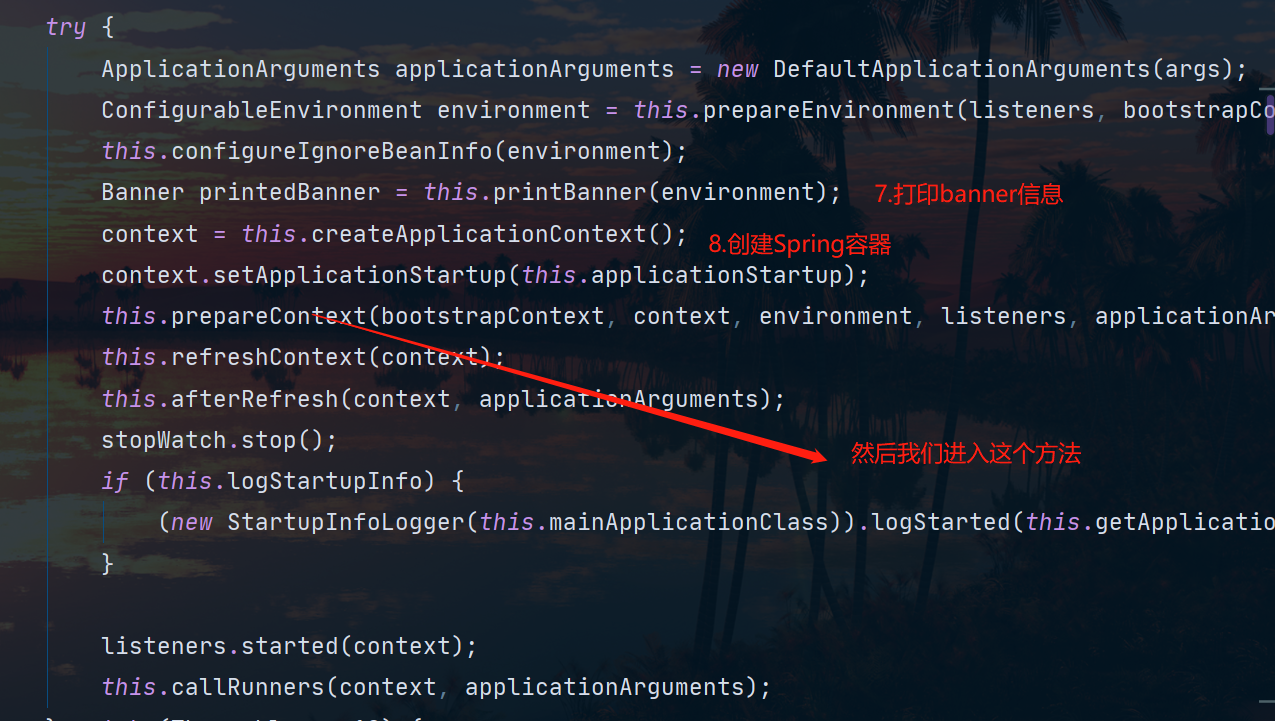
print banner
-
create container
-
Prepare the container
- Publish application context initialized event 3️⃣
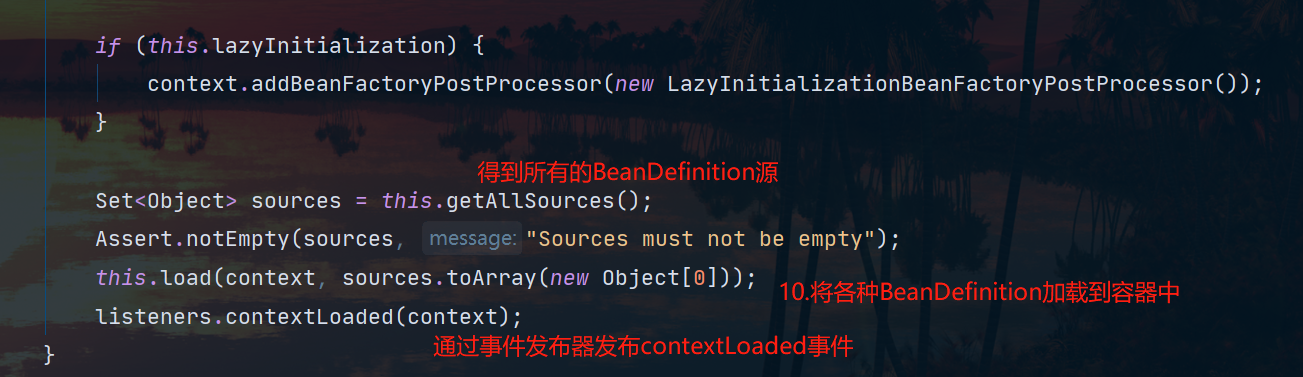
-
load bean definition
- Publish application prepared event 4️⃣
-
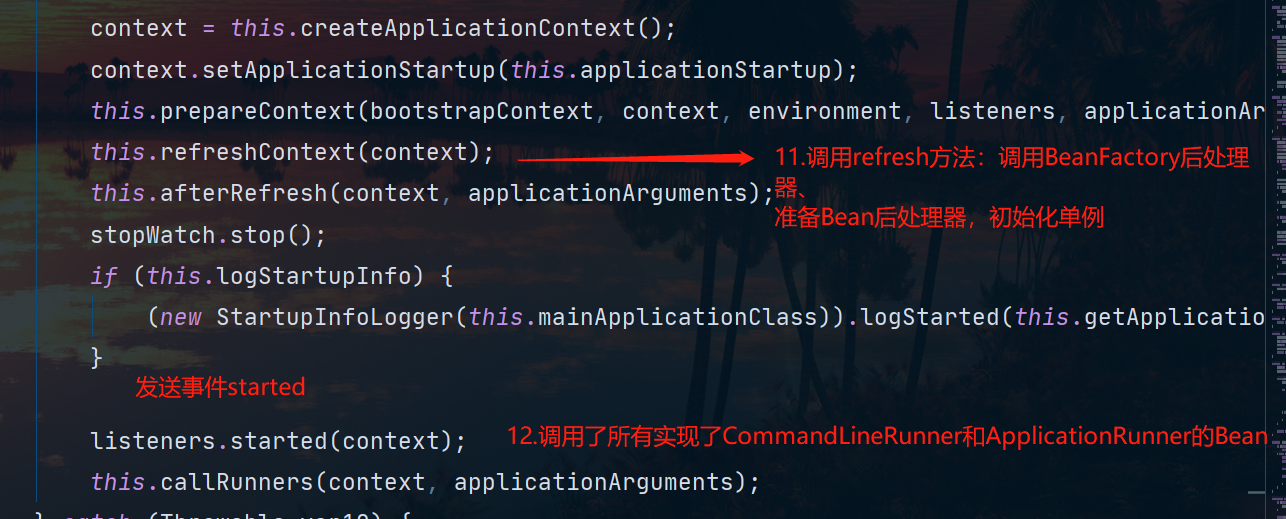
refresh container
- Publish application started event 5️⃣
-
Execute the runner
-
Publish application ready event 6️⃣
-
There is an exception in this, and the application failed event is released 7️⃣
-
start demo
This part corresponds to the first step of executing the run method: get the event publisher and demonstrate 7 events
public class A39_2 {


    public static void main(String[] args) throws Exception{


        // 添加 app 监听器
        SpringApplication app = new SpringApplication();
        app.addListeners(e -> System.out.println(e.getClass()));

        // 获取事件发送器实现类名
        List<String> names = SpringFactoriesLoader.loadFactoryNames(SpringApplicationRunListener.class, A39_2.class.getClassLoader());
        for (String name : names) {


            System.out.println(name);
            Class<?> clazz = Class.forName(name);
            Constructor<?> constructor = clazz.getConstructor(SpringApplication.class, String[].class);
            SpringApplicationRunListener publisher = (SpringApplicationRunListener) constructor.newInstance(app, args);

            // 发布事件
            DefaultBootstrapContext bootstrapContext = new DefaultBootstrapContext();
            publisher.starting(bootstrapContext); // spring boot 开始启动
            publisher.environmentPrepared(bootstrapContext, new StandardEnvironment()); // 环境信息准备完毕
            GenericApplicationContext context = new GenericApplicationContext();
            publisher.contextPrepared(context); // 在 spring 容器创建,并调用初始化器之后,发送此事件
            publisher.contextLoaded(context); // 所有 bean definition 加载完毕
            context.refresh();
            publisher.started(context); // spring 容器初始化完成(refresh 方法调用完毕)
            publisher.running(context); // spring boot 启动完毕

            publisher.failed(context, new Exception("出错了")); // spring boot 启动出错
        }
- SpringFactoriesLoader: specially used to read the spring.factories file
- publisher.starting method: Send an event to represent that the Spring program has just started
- publisher.running method: Send an event to represent that the entire SpringBoot program has started
- Before creating the SpringBoot container, we need to prepare the environment, which includes reading key-value information from system environment variables, properties files, yaml files, etc. When the environment is prepared, the publisher.environmentPrepared method will be called to send an event to indicate that the environment information has been prepared
- After the environment information is prepared, it will start to create the Spring container, and it will also call the initializer of the SpringApplicationContext we mentioned earlier to enhance it. When the container is created and the initializer is executed, it will use the publisher.contextPrepared method to publish an event
- After that, some BeanDefinitions may need to be added. We said before that BeanDefiniton has many sources, including from XML configuration files, from configuration classes, from component scans, and so on. When all the BeanDefinitions are loaded, it will send an event through publisher.contextLoaded
- After completing this series of steps, you can call the context.refresh() method, which means that the Spring container is ready. In the refresh method, various post-processors will be prepared, all singletons will be initialized, and so on. After the refresh is finished, publisher.started is called to send an event, indicating that the Spring container has been initialized.
- When an exception occurs in our process, he will also send an event through publisher.failed
The result we get after running:
It is marked with a yellow mark and released by SpringApplicationRunListener
This part corresponds to steps 2, 8, 9, 10, 11, and 12 of the run method
// 运行时请添加运行参数 --server.port=8080 debug
public class A39_3 {
@SuppressWarnings("all")
public static void main(String[] args) throws Exception {
SpringApplication app = new SpringApplication();
//我们随便添加一个初始化器,会在初始化器的时候被调用
app.addInitializers(new ApplicationContextInitializer<ConfigurableApplicationContext>() {
@Override
public void initialize(ConfigurableApplicationContext applicationContext) {
System.out.println("执行初始化器增强...");
}
});
System.out.println(">>>>>>>>>>>>>>>>>>>>>>>> 2. 封装启动 args");
//也就是对12步中runnner参数的封装
DefaultApplicationArguments arguments = new DefaultApplicationArguments(args);
System.out.println(">>>>>>>>>>>>>>>>>>>>>>>> 8. 创建容器");
//因为已经在构造方法推断出容器类型了,我们根据类型在三种容器中选一种就行
GenericApplicationContext context = createApplicationContext(WebApplicationType.SERVLET);
System.out.println(">>>>>>>>>>>>>>>>>>>>>>>> 9. 准备容器");
//这里的准备容器就是指我们要执行使用SpringApplication添加的容器初始化器
//循环遍历所有初始化器并执行
for (ApplicationContextInitializer initializer : app.getInitializers()) {
initializer.initialize(context);
}
System.out.println(">>>>>>>>>>>>>>>>>>>>>>>> 10. 加载 bean 定义");
/**
模拟三种情况:
1.读取配置类中的Bean定义
2.读取XML文件中的Bean定义
3.通过扫描读取Bean定义
**/
//将BeanFactory抽离出来,后面多处都会用到
DefaultListableBeanFactory beanFactory = context.getDefaultListableBeanFactory();
//AnnotatedBeanDefinitionReader 就放在SpringApplication的内部,一旦发现来源是配置类,就会调用它来读取配置类中的BeanDefinition,这个参数就是设置读取出来的bean放在哪(BeanFactory)
AnnotatedBeanDefinitionReader reader1 = new AnnotatedBeanDefinitionReader(beanFactory);
//与上面同理,只用来读XML配置文件中BeanDefinition的
XmlBeanDefinitionReader reader2 = new XmlBeanDefinitionReader(beanFactory);
//与上面同理,通过扫描来读取BeanDefinition
ClassPathBeanDefinitionScanner scanner = new ClassPathBeanDefinitionScanner(beanFactory);
//开始解析配置类的BeanDefinition,并加入到BeanFactory
reader1.register(Config.class);
reader2.loadBeanDefinitions(new ClassPathResource("b03.xml"));
scanner.scan("com.zyb.a39.sub");
System.out.println(">>>>>>>>>>>>>>>>>>>>>>>> 11. refresh 容器");
context.refresh();
for (String name : context.getBeanDefinitionNames()) {
System.out.println("name:" + name + " 来源:" + beanFactory.getBeanDefinition(name).getResourceDescription());
}
System.out.println(">>>>>>>>>>>>>>>>>>>>>>>> 12. 执行 runner");
//得到所有实现了CommandLineRunner的bean进行回调
for (CommandLineRunner runner : context.getBeansOfType(CommandLineRunner.class).values()) {
//不用封装直接把main方法的参数传进去
runner.run(args);
}
//得到所有实现了ApplicationRunner的bean进行回调
for (ApplicationRunner runner : context.getBeansOfType(ApplicationRunner.class).values()) {
//将main方法的参数进行封装了之后再传
runner.run(arguments);
}
}
//创建容器
private static GenericApplicationContext createApplicationContext(WebApplicationType type) {
GenericApplicationContext context = null;
switch (type) {
case SERVLET -> context = new AnnotationConfigServletWebServerApplicationContext();
case REACTIVE -> context = new AnnotationConfigReactiveWebServerApplicationContext();
case NONE -> context = new AnnotationConfigApplicationContext();
}
return context;
}
static class Bean4 {
}
static class Bean5 {
}
static class Bean6 {
}
@Configuration
static class Config {
@Bean
public Bean5 bean5() {
return new Bean5();
}
@Bean
public ServletWebServerFactory servletWebServerFactory() {
return new TomcatServletWebServerFactory();
}
@Bean
public CommandLineRunner commandLineRunner() {
return new CommandLineRunner() {
@Override
public void run(String... args) throws Exception {
System.out.println("commandLineRunner()..." + Arrays.toString(args));
}
};
}
@Bean
public ApplicationRunner applicationRunner() {
return new ApplicationRunner() {
@Override
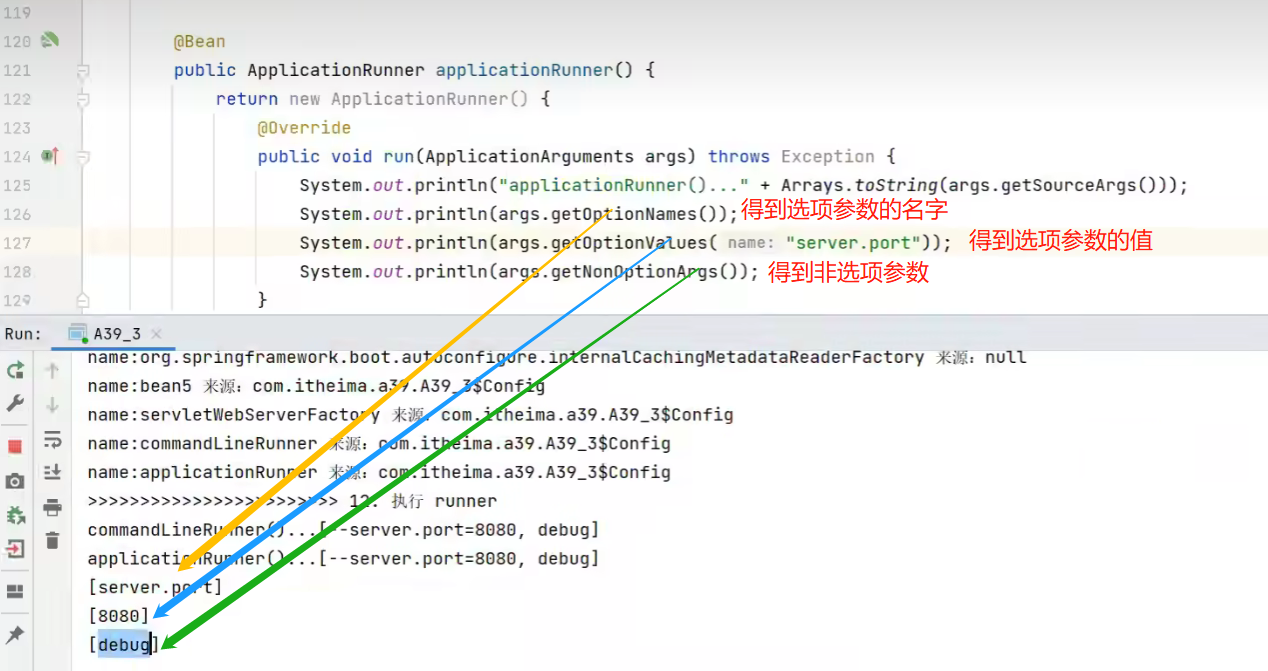
public void run(ApplicationArguments args) throws Exception {
System.out.println("applicationRunner()..." + Arrays.toString(args.getSourceArgs()));
System.out.println(args.getOptionNames());
System.out.println(args.getOptionValues("server.port"));
System.out.println(args.getNonOptionArgs());
}
};
}
}
}
- We involve many sources in the step of loading bean definitions, such as configuration classes, XML files, and the names of packages involved in scanning, all of which are parsed. SpringApplication has a setSources method, which can pass in a collection, which contains various sources, and then try different parsers to parse these sources one by one
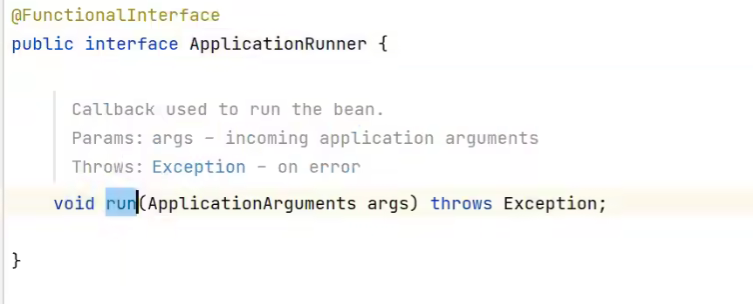
- A runner is a bean that implements a specific interface. This bean has a run method, which is called at the timing of step 12. As for what to call it for, this is determined by our business. For example, at this time our Spring container has been started, we can use this runner to perform some data preloading or testing. There are two types of interfaces implemented by this runner:
-
CommandLineRunner: where args is generally the parameter array we passed from the main method, no packaging is required

-
ApplicationRunner: The args here are encapsulated parameter objects. And this encapsulation step we will be inStep 2: Encapsulate startup argsconduct.
- The parameter object encapsulated here has an additional function: option parameters can be classified separately, for example
--server.port=8080
- The parameter object encapsulated here has an additional function: option parameters can be classified separately, for example
-
This part corresponds to the third step of the run method
public class Step3 {


    public static void main(String[] args) throws IOException {


        //默认情况下我们创建的环境对象只有两个来源:系统属性和系统变量
        ApplicationEnvironment env = new ApplicationEnvironment();
        //添加一个新的配置源:properties配置文件
        //从尾部加入优先级最低
        env.getPropertySources().addLast(new ResourcePropertySource(new ClassPathResource("step3.properties")));
        //添加一个新的配置源:命令行
        //从头部加入优先级最高
        env.getPropertySources().addFirst(new SimpleCommandLinePropertySource(args));
        //打印所有来源
        for (PropertySource<?> ps : env.getPropertySources()) {


            System.out.println(ps);
        }
//        System.out.println(env.getProperty("JAVA_HOME"));

        System.out.println(env.getProperty("server.port"));
    }
}
This part corresponds to step 4 of the run method
public class Step4 {
public static void main(String[] args) throws IOException, NoSuchFieldException {
ApplicationEnvironment env = new ApplicationEnvironment();
env.getPropertySources().addLast(
new ResourcePropertySource("step4", new ClassPathResource("step4.properties"))
);
ConfigurationPropertySources.attach(env);
for (PropertySource<?> ps : env.getPropertySources()) {
System.out.println(ps);
}
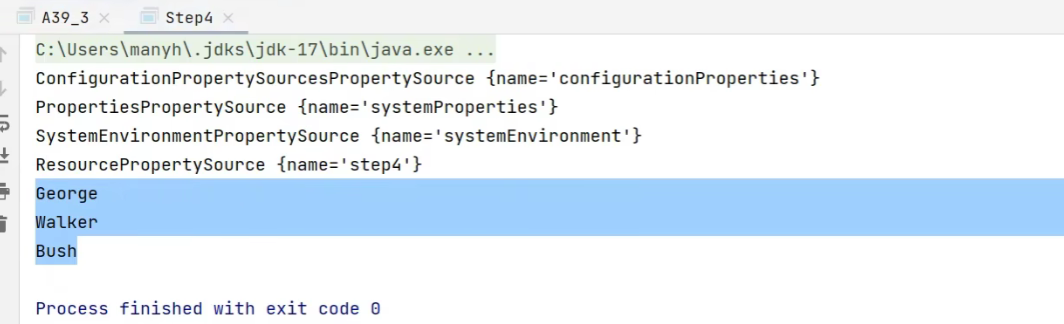
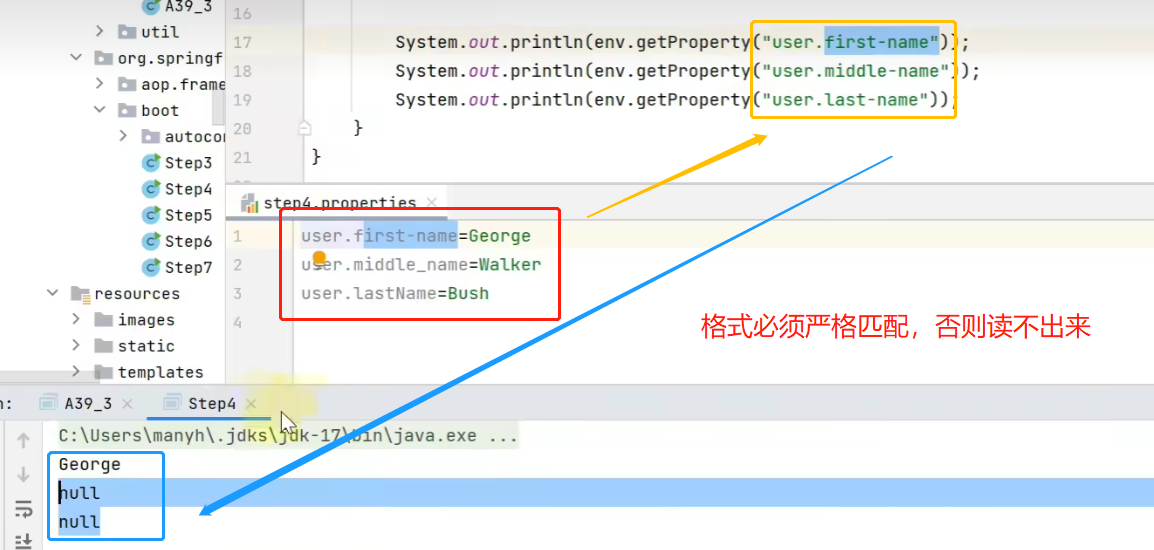
System.out.println(env.getProperty("user.first-name"));
System.out.println(env.getProperty("user.middle-name"));
System.out.println(env.getProperty("user.last-name"));
}
}
result:
If we don't add the ConfigurationPropertySourcesPropertySource source, then the key must match strictly or it cannot be read:
This part corresponds to step 5 of the run method
/*
    可以添加参数 --spring.application.json={\"server\":{\"port\":9090}} 测试 SpringApplicationJsonEnvironmentPostProcessor
 */
public class Step5 {


    private static void test1() {


        SpringApplication app = new SpringApplication();
        ApplicationEnvironment env = new ApplicationEnvironment();

        System.out.println(">>>>>>>>>>>>>>>>>>>>>>>>> 增强前");
        for (PropertySource<?> ps : env.getPropertySources()) {


            System.out.println(ps);
        }
        //创建用来读取application.properties文件的环境后处理器
        ConfigDataEnvironmentPostProcessor postProcessor1 = new ConfigDataEnvironmentPostProcessor(new DeferredLogs(), new DefaultBootstrapContext());
        //向环境中添加一些配置源
        postProcessor1.postProcessEnvironment(env, app);
        System.out.println(">>>>>>>>>>>>>>>>>>>>>>>>> 增强后");
        for (PropertySource<?> ps : env.getPropertySources()) {


            System.out.println(ps);
        }
        //像环境中添加一些随即配置源
        RandomValuePropertySourceEnvironmentPostProcessor postProcessor2 = new RandomValuePropertySourceEnvironmentPostProcessor(new DeferredLog());
        postProcessor2.postProcessEnvironment(env, app);
        System.out.println(">>>>>>>>>>>>>>>>>>>>>>>>> 增强后");
        for (PropertySource<?> ps : env.getPropertySources()) {


            System.out.println(ps);
        }
        System.out.println(env.getProperty("server.port"));
        System.out.println(env.getProperty("random.int"));
        System.out.println(env.getProperty("random.int"));
        System.out.println(env.getProperty("random.int"));
        System.out.println(env.getProperty("random.uuid"));
        System.out.println(env.getProperty("random.uuid"));
        System.out.println(env.getProperty("random.uuid"));
    }
}
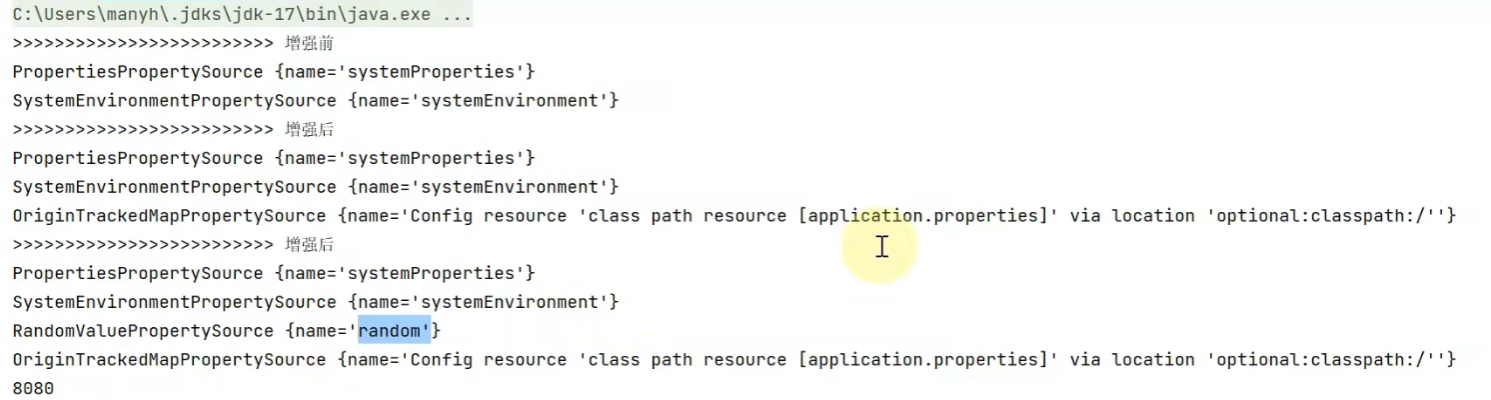

The function of this random source is to write some keys starting with random when going to getProperty through Environment, and you can get some random values:
- random.int: generate a random integer
- random.uuid: generate a uuid
    public static void main(String[] args) {


        SpringApplication app = new SpringApplication();
        app.addListeners(new EnvironmentPostProcessorApplicationListener());

        /*
		用来读取spring.factories配置文件
		List<String> names = SpringFactoriesLoader.loadFactoryNames(EnvironmentPostProcessor.class, Step5.class.getClassLoader());
        for (String name : names) {
            System.out.println(name);
        }*/

        EventPublishingRunListener publisher = new EventPublishingRunListener(app, args);
        ApplicationEnvironment env = new ApplicationEnvironment();
        System.out.println(">>>>>>>>>>>>>>>>>>>>>>>>> 增强前");
        for (PropertySource<?> ps : env.getPropertySources()) {


            System.out.println(ps);
        }
        publisher.environmentPrepared(new DefaultBootstrapContext(), env);
        System.out.println(">>>>>>>>>>>>>>>>>>>>>>>>> 增强后");
        for (PropertySource<?> ps : env.getPropertySources()) {


            System.out.println(ps);
        }

    }
result:

Some post-processors here do not take effect. It is related to your configuration environment. For example, if you use a yaml file for configuration, a new post-processor will take effect.
This part corresponds to step 6 of the run method
public class Step6 {
// 绑定 spring.main 前缀的 key value 至 SpringApplication, 请通过 debug 查看
public static void main(String[] args) throws IOException {
SpringApplication application = new SpringApplication();
ApplicationEnvironment env = new ApplicationEnvironment();
env.getPropertySources().addLast(new ResourcePropertySource("step4", new ClassPathResource("step4.properties")));
env.getPropertySources().addLast(new ResourcePropertySource("step6", new ClassPathResource("step6.properties")));
System.out.println(application);
Binder.get(env).bind("spring.main", Bindable.ofInstance(application));
System.out.println(application);
}
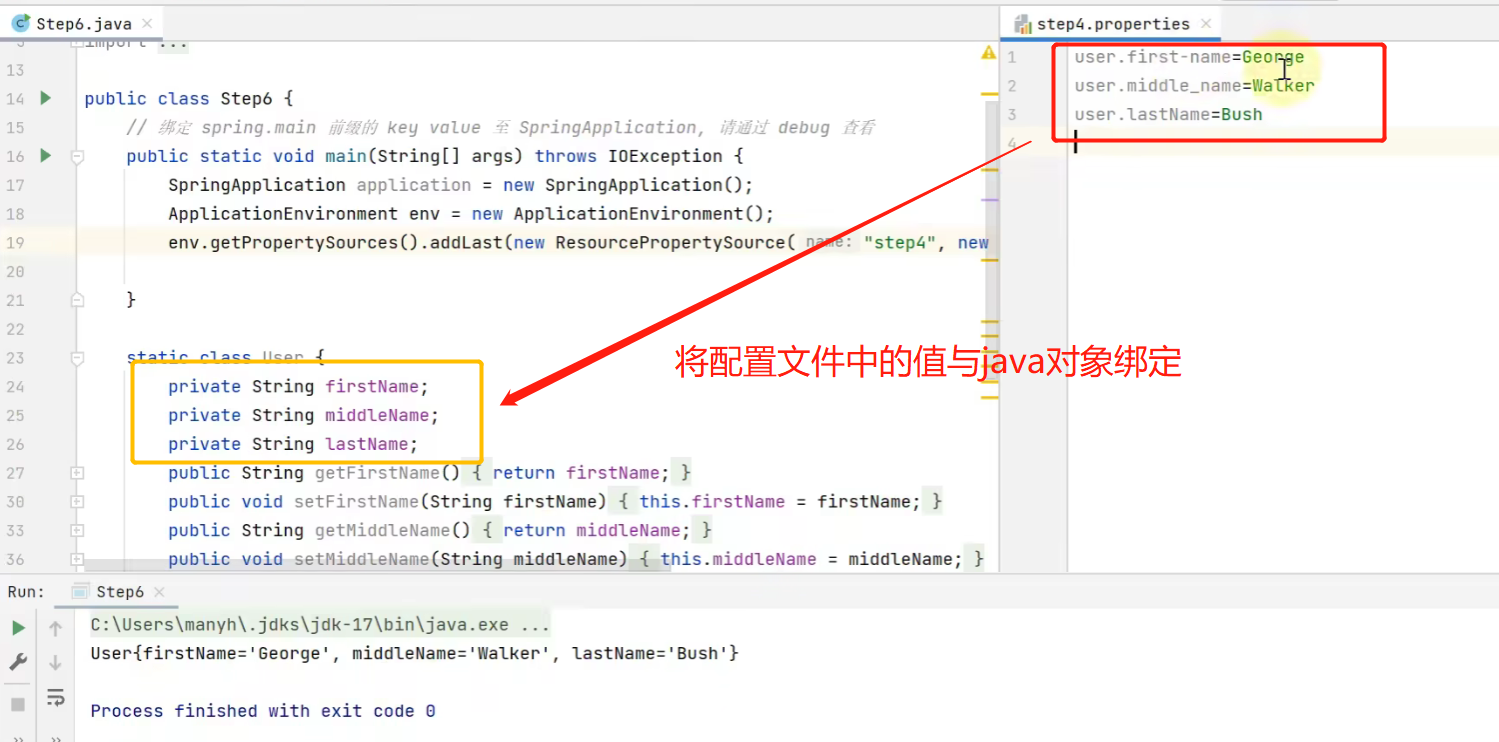
static class User {
private String firstName;
private String middleName;
private String lastName;
}
Let's first understand how to bind the key value in the Environment to the java object, which is the principle of the @ConfigurationProperties annotation we mentioned before: the

bottom layer is the following API:
        User user = Binder.get(env).bind("user", User.class).get();

        System.out.println(user);

		//基于已有的对象进行绑定
        User user = new User();
        Binder.get(env).bind("user", Bindable.ofInstance(user));
        System.out.println(user);
This part corresponds to step 7 of the run method
public class Step7 {


    public static void main(String[] args) {


        ApplicationEnvironment env = new ApplicationEnvironment();
        SpringApplicationBannerPrinter printer = new SpringApplicationBannerPrinter(
                new DefaultResourceLoader(),
                new SpringBootBanner()
        );
        // 自定义文字 banner
//        env.getPropertySources().addLast(new MapPropertySource("custom", Map.of("spring.banner.location","banner1.txt")));
        // 自定义图片 banner
//        env.getPropertySources().addLast(new MapPropertySource("custom", Map.of("spring.banner.image.location","banner2.png")));
        // 版本号的获取
        System.out.println(SpringBootVersion.getVersion());
        printer.print(env, Step7.class, System.out);
    }
}
We summarize a few points for attention:
- Operations done in the SpringApplication constructor
- Multiple sources can be used to load bean definitions
- Application type inference
- Add container initializer
- add listener
- Demonstrate main class inference
- How to read the configuration in spring.factories
- Get important event publishers from configuration: SpringApplicationRunListeners
- Container creation, initializer enhancement, loading bean definition, etc.
- The role of CommandLineRunner and ApplicationRunner
- environment object
- Command line PropertySource
- ConfigurationPropertySources canonical environment key name
- EnvironmentPostProcessor post-processing enhancements
- Called by EventPublishingRunListener by listening to event 2️⃣
- Bind the key value prefixed with spring.main to SpringApplication
- Banner
Summary of the startup process
Back to the run method:

Back to the run method again:

@SpringBootApplication
For the startup of SpringBoot, the @SpringBootApplication annotation is very important. Let's take a look at this annotation in detail:
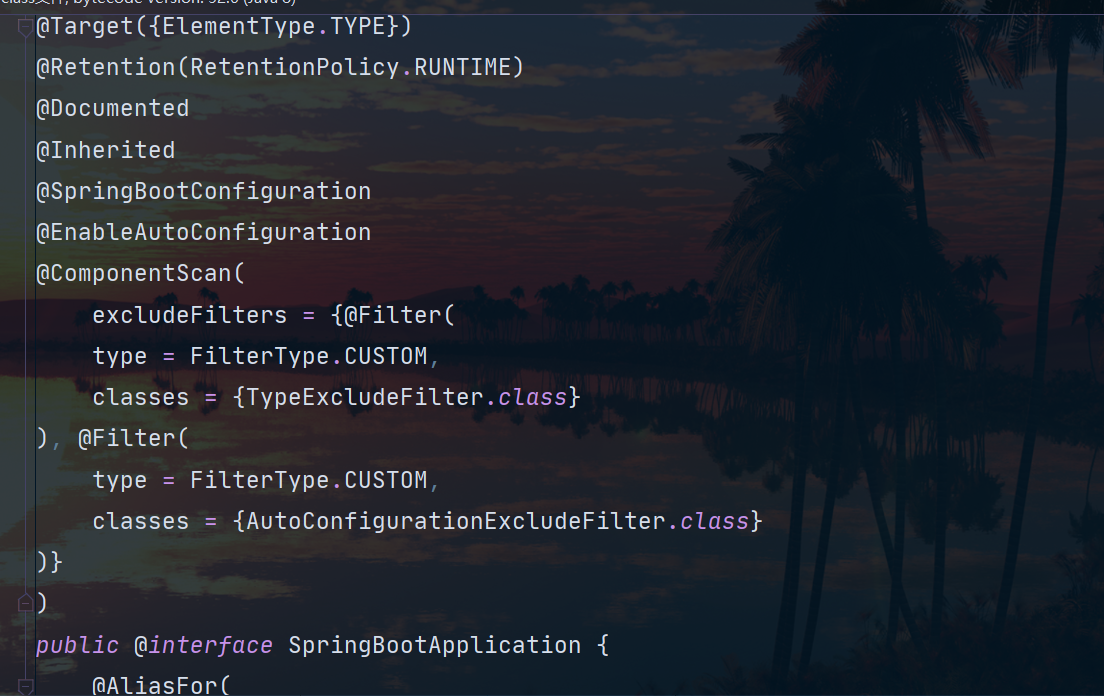
There are three important notes here:
- @SpringBootConfiguration
- @EnableAutoConfiguration
- @ComponentScan
There are two annotations that are easier to understand:
@SpringBootConfiguration
@SpringBootConfiguration inherits from @Configuration, and the functions of the two are also consistent. Mark the current class as a configuration class,
And will include one or more instances of methods marked with @Bean annotation declared in the current class into the spring container, and the instance name is the method name.
@ComponentScan
Automatically scan and load qualified components (such as @Component and @Repository, etc.) or bean definitions, and finally load these bean definitions into the IoC container.
We can fine-grainedly customize the scope of @ComponentScan automatic scanning through attributes such as basePackages. If not specified, the default Spring framework implementation will scan from the package that declares the class where @ComponentScan is located.
Finally, let's take a look at the key annotation @EnableAutoConfiguration:
This annotation is the key to SpringBoot's automatic assembly
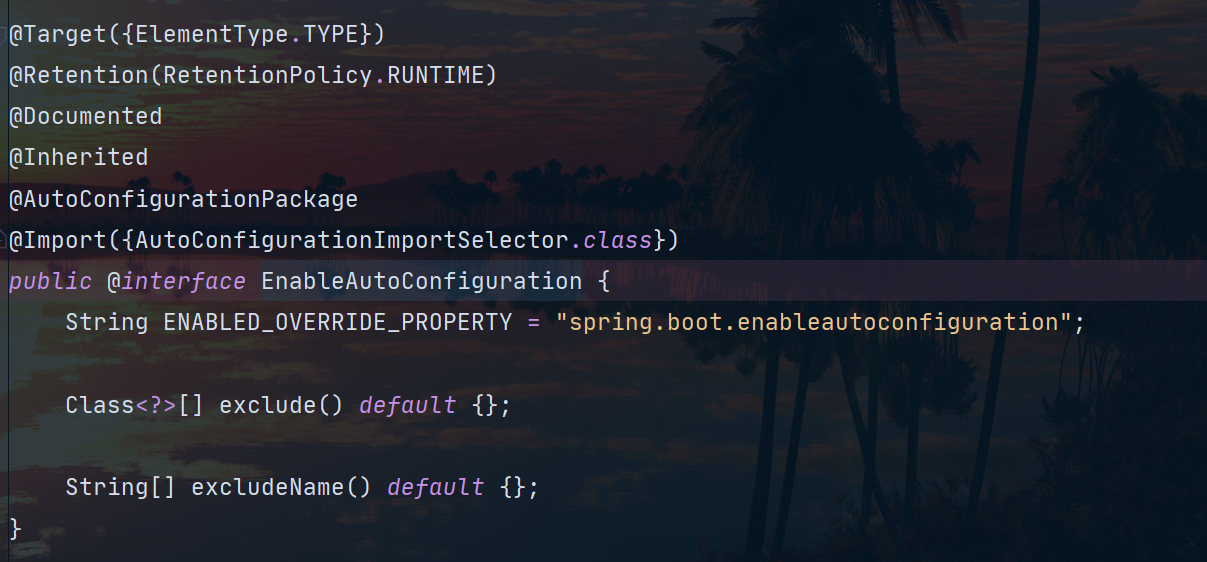
This annotation contains two sub-annotations:
- @AutoConfigurationPackage
- @Import({AutoConfigurationImportSelector.class})
@Import(AutoConfigurationImportSelector.class)
With AutoConfigurationImportSelector, @EnableAutoConfiguration can help SpringBoot applications load all eligible @Configuration configurations into the current IoC container created and used by SpringBoot .
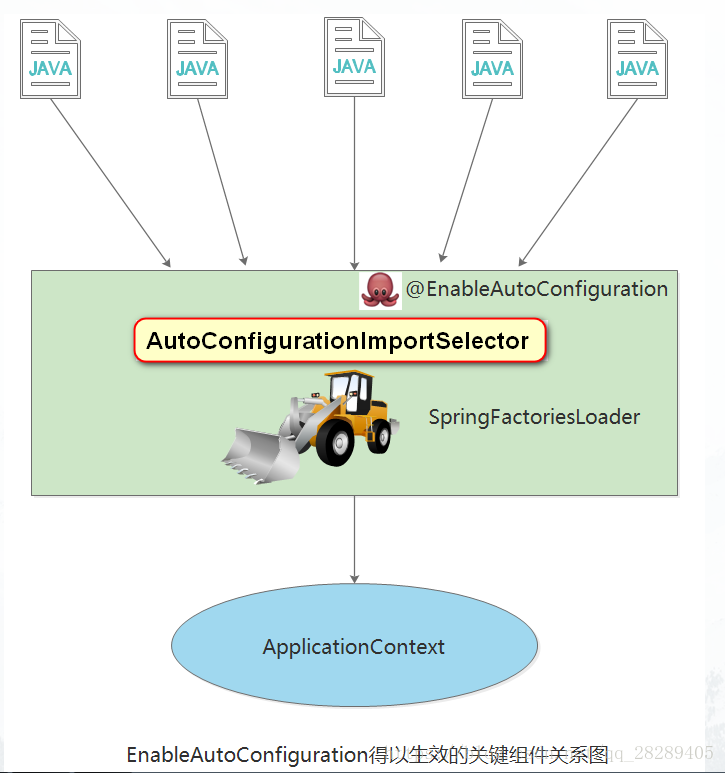
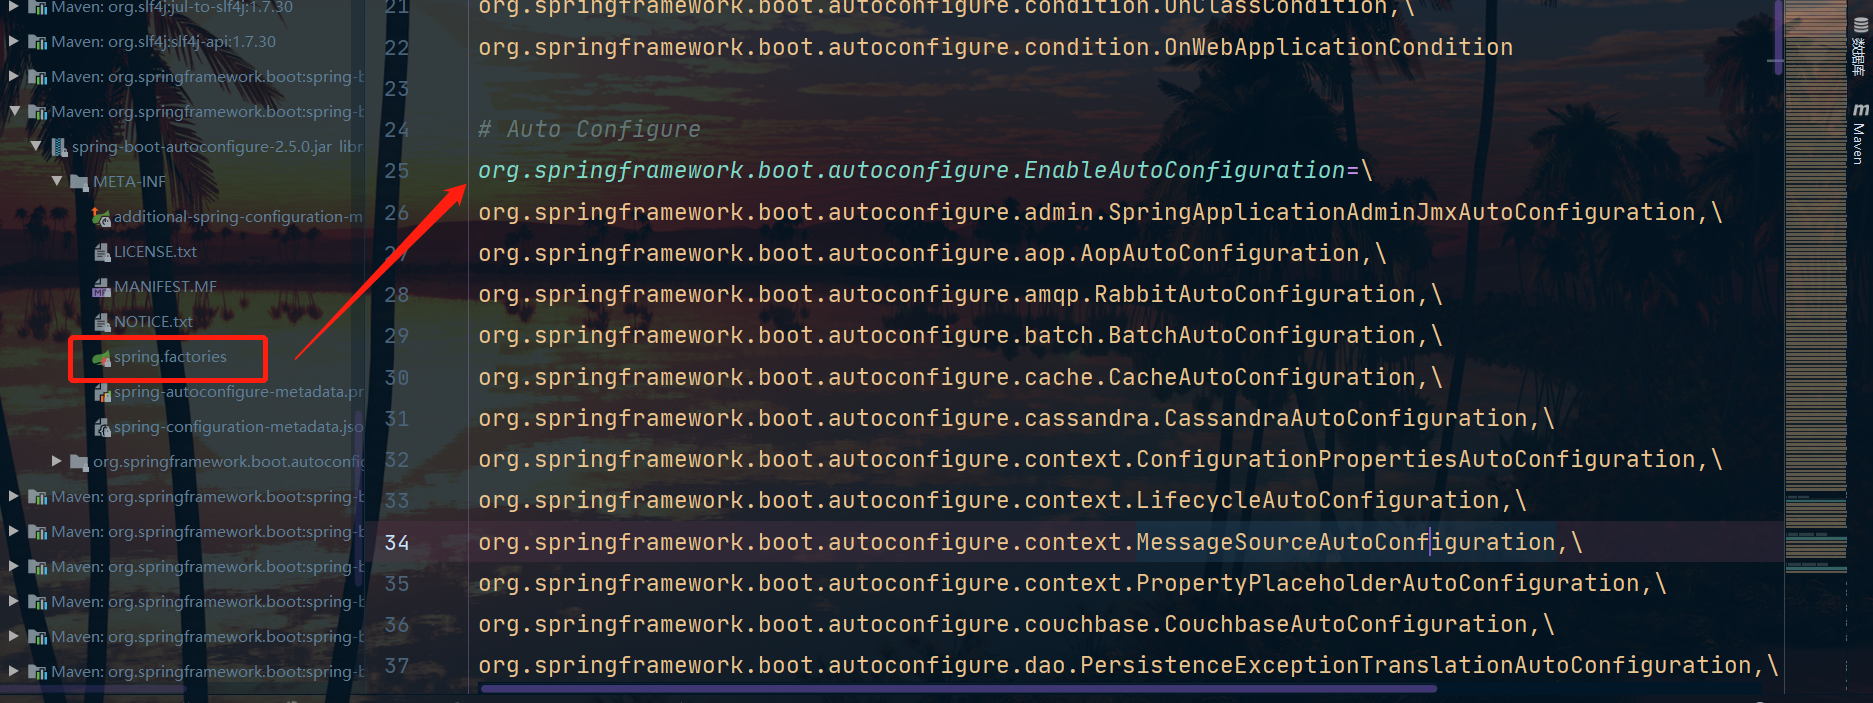
We can see that there is a SpringFactoriesLoader in the figure, which is the key to automatic configuration:
SpringFactoriesLoader is a private extension scheme of the Spring framework. Its main function is to load configuration from the specified configuration file META-INF/spring.factories.
If it is used with @EnableAutoConfiguration, it provides more functional support for configuration search, that is, according to the complete class name of @EnableAutoConfiguration org.springframework.boot.autoconfigure.EnableAutoConfiguration as the search Key, obtain a corresponding set of @Configuration classes
@AutoConfigurationPackage
The function is to manage the package (and its sub-packages) where the class adding the annotation is located as an automatic configuration package.
So what's the use of automatically configuring the package?
It can be used by other third-party auto-configured bean scanning classes. For example, why the dao interface marked by @Mapper in Springboot can be registered as a bean is to scan and register according to the above package path
So we can probably have a concept:
@AutoConfigurationPackage is similar to @ComponentScan annotation, the difference is:
- @ComponentScan is used for the Spring framework itself to scan components
- @AutoConfigurationPackage is used for third-party scanning components
Let's summarize the role of @EnableAutoConfiguration:
Search all META-INF/spring.factories configuration files from the classpath, and instantiate the configuration items corresponding to org.springframework.boot.autoconfigure.EnableutoConfiguration into corresponding IoC container configuration classes in the form of JavaConfig marked with @Configuration through reflection (Java Refletion), and then aggregate them into one and load them into the IoC container
All kinds of xxxAutoConfiguration in spring.factories exist under SpringBoot's autoconfigure package, but they may not all take effect, because the automatic configuration classes provided by Spring Boot basically have @ConditionalOnClass conditional annotations, and the corresponding Bean will only be created when we judge that there is a specified class in our project. The premise of having a specified class generally requires us to introduce the dependencies of the corresponding framework.
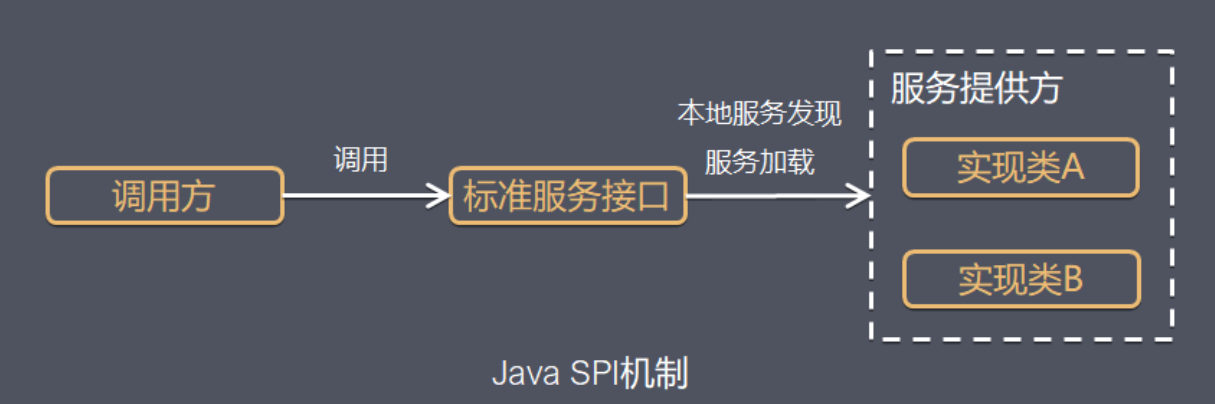
SPI technology
In fact, the SpringFactoriesLoader we just mentioned in the @EnableAutoConfiguration annotation loads the configuration from the specified configuration file META-INF/spring.factories. This is a kind of SPI technology.
The full name of SPI: Service Provider Interface is a set of interfaces provided by Java to be implemented or extended by third parties. It can be used to enable framework extensions and replace components.
In object-oriented design, we generally recommend interface-based programming between modules, and no hard-coding of implementation classes between modules. Once the code involves a specific implementation class, it violates the principle of pluggability. If you need to replace an implementation, you need to modify the code.
In order to realize that there is no need to dynamically specify in the program when the module is assembled, this requires a service discovery mechanism. Java spi provides such a mechanism: a mechanism to find a service implementation for an interface. This is a bit similar to the idea of IOC, which moves the control of assembly out of the program.
The role of the SPI is to find service implementations for the extended API .
Essence: Java SPI is actually a dynamic loading mechanism implemented by the combination of "interface-based programming + strategy mode + convention configuration file"
Typical implementation steps of SPI:
- Create a service interface and provide a service method signature.
- Create an interface implementation class, and create a META-INF/services/{interface fully qualified name} file.
- Fill in the fully qualified name of the implementation class in the resource file.
- The module loads the implementation class through SPI at runtime, and initializes the instance for use.
Let's look at an example:
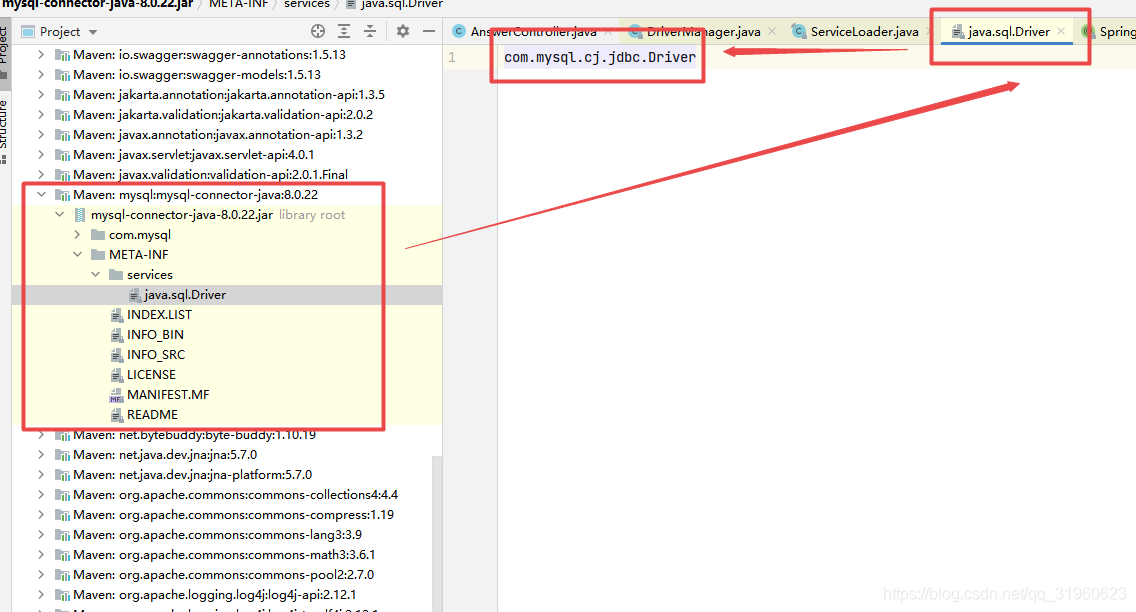
Open the DriverManager class, the code for initializing the driver is as follows:

Enter the ServiceLoader method and find that a variable is defined inside it: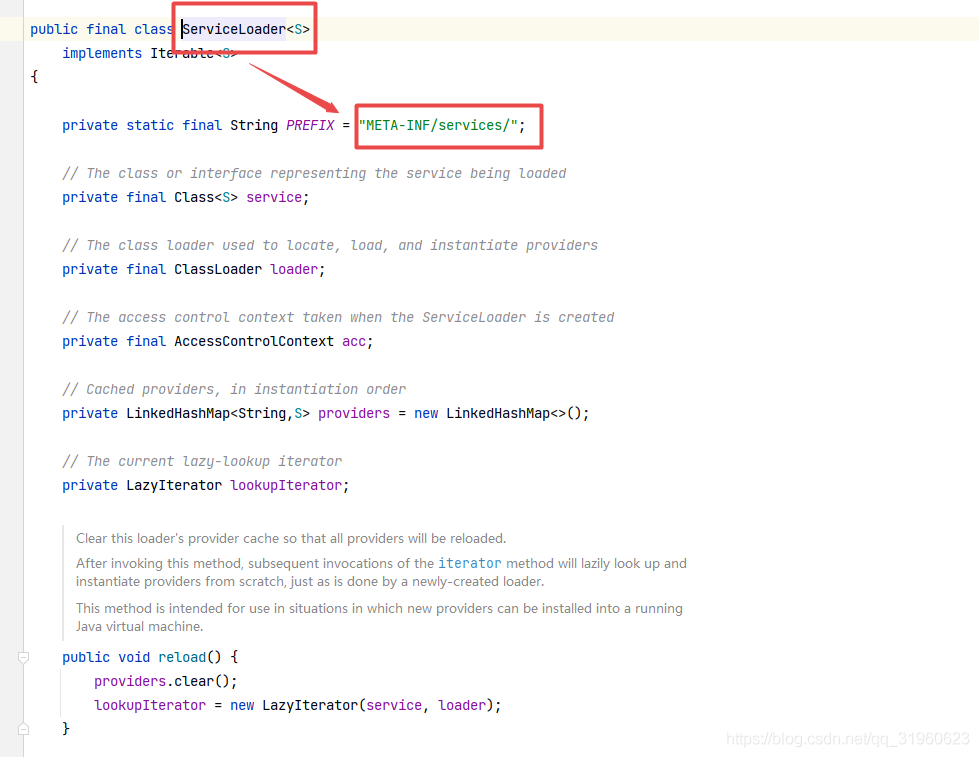
This variable is useful when loading the driver below. The service in the figure below is java.sql.Driver: 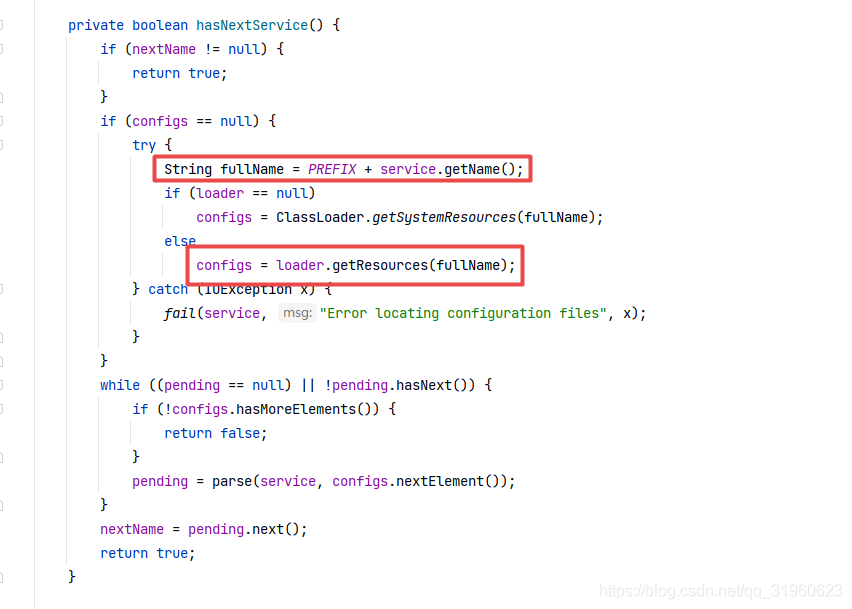
So, there is a file under META-INF/services/ under the database driver jar package.