1. Nacos configuration management
1. Unified configuration management
When more and more instances of microservices are deployed, reaching dozens or hundreds, modifying the configuration of microservices one by one will make people crazy and error-prone. We need a unified configuration management solution that can centrally manage the configuration of all instances.
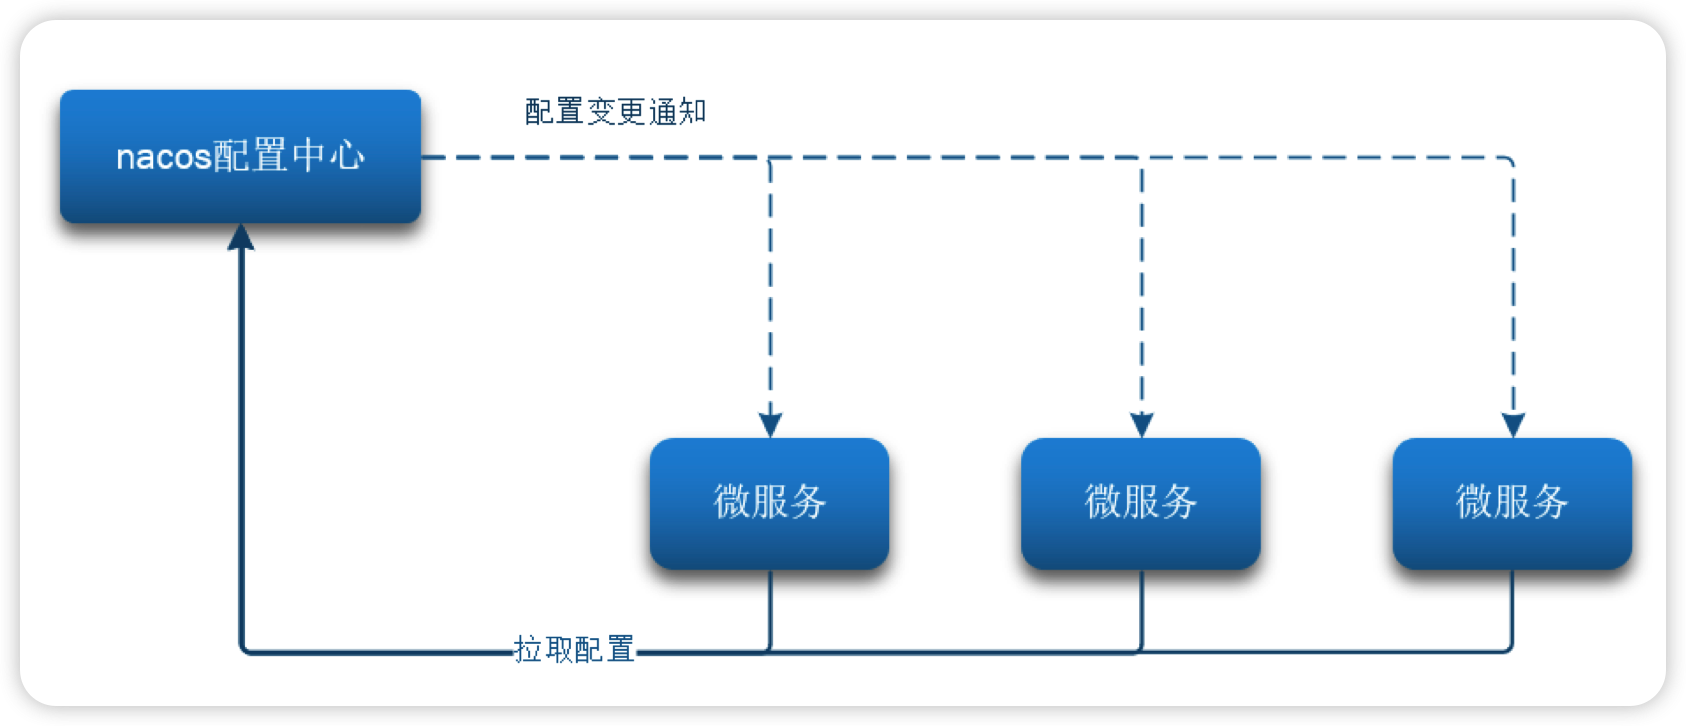
On the one hand, Nacos can centrally manage the configuration, and on the other hand, when the configuration changes, it can notify the microservice in time to realize hot update of the configuration.
1.1. Add configuration files in nacos
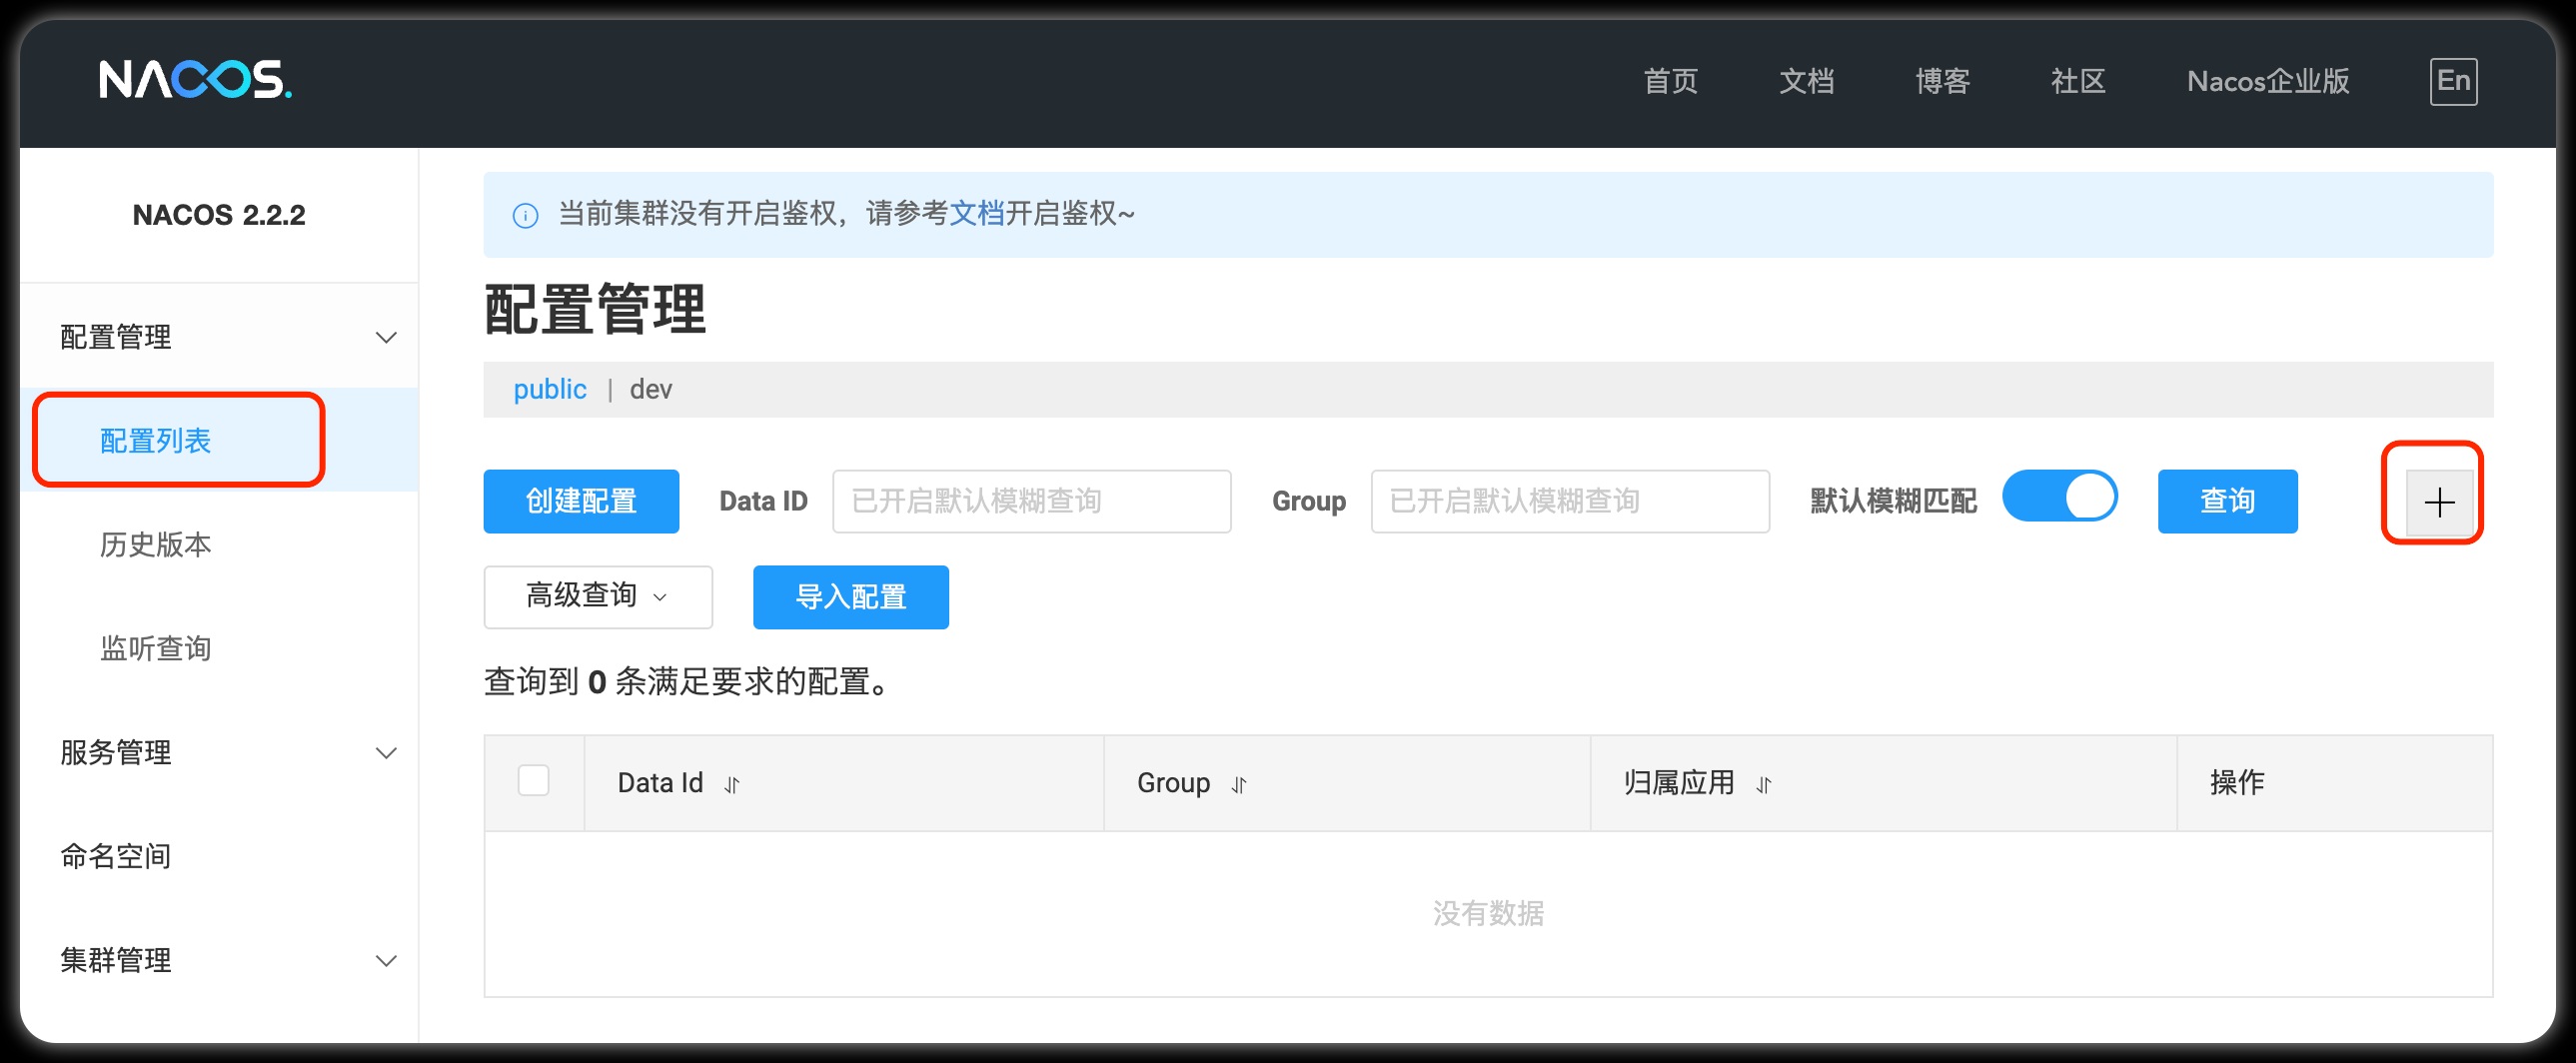
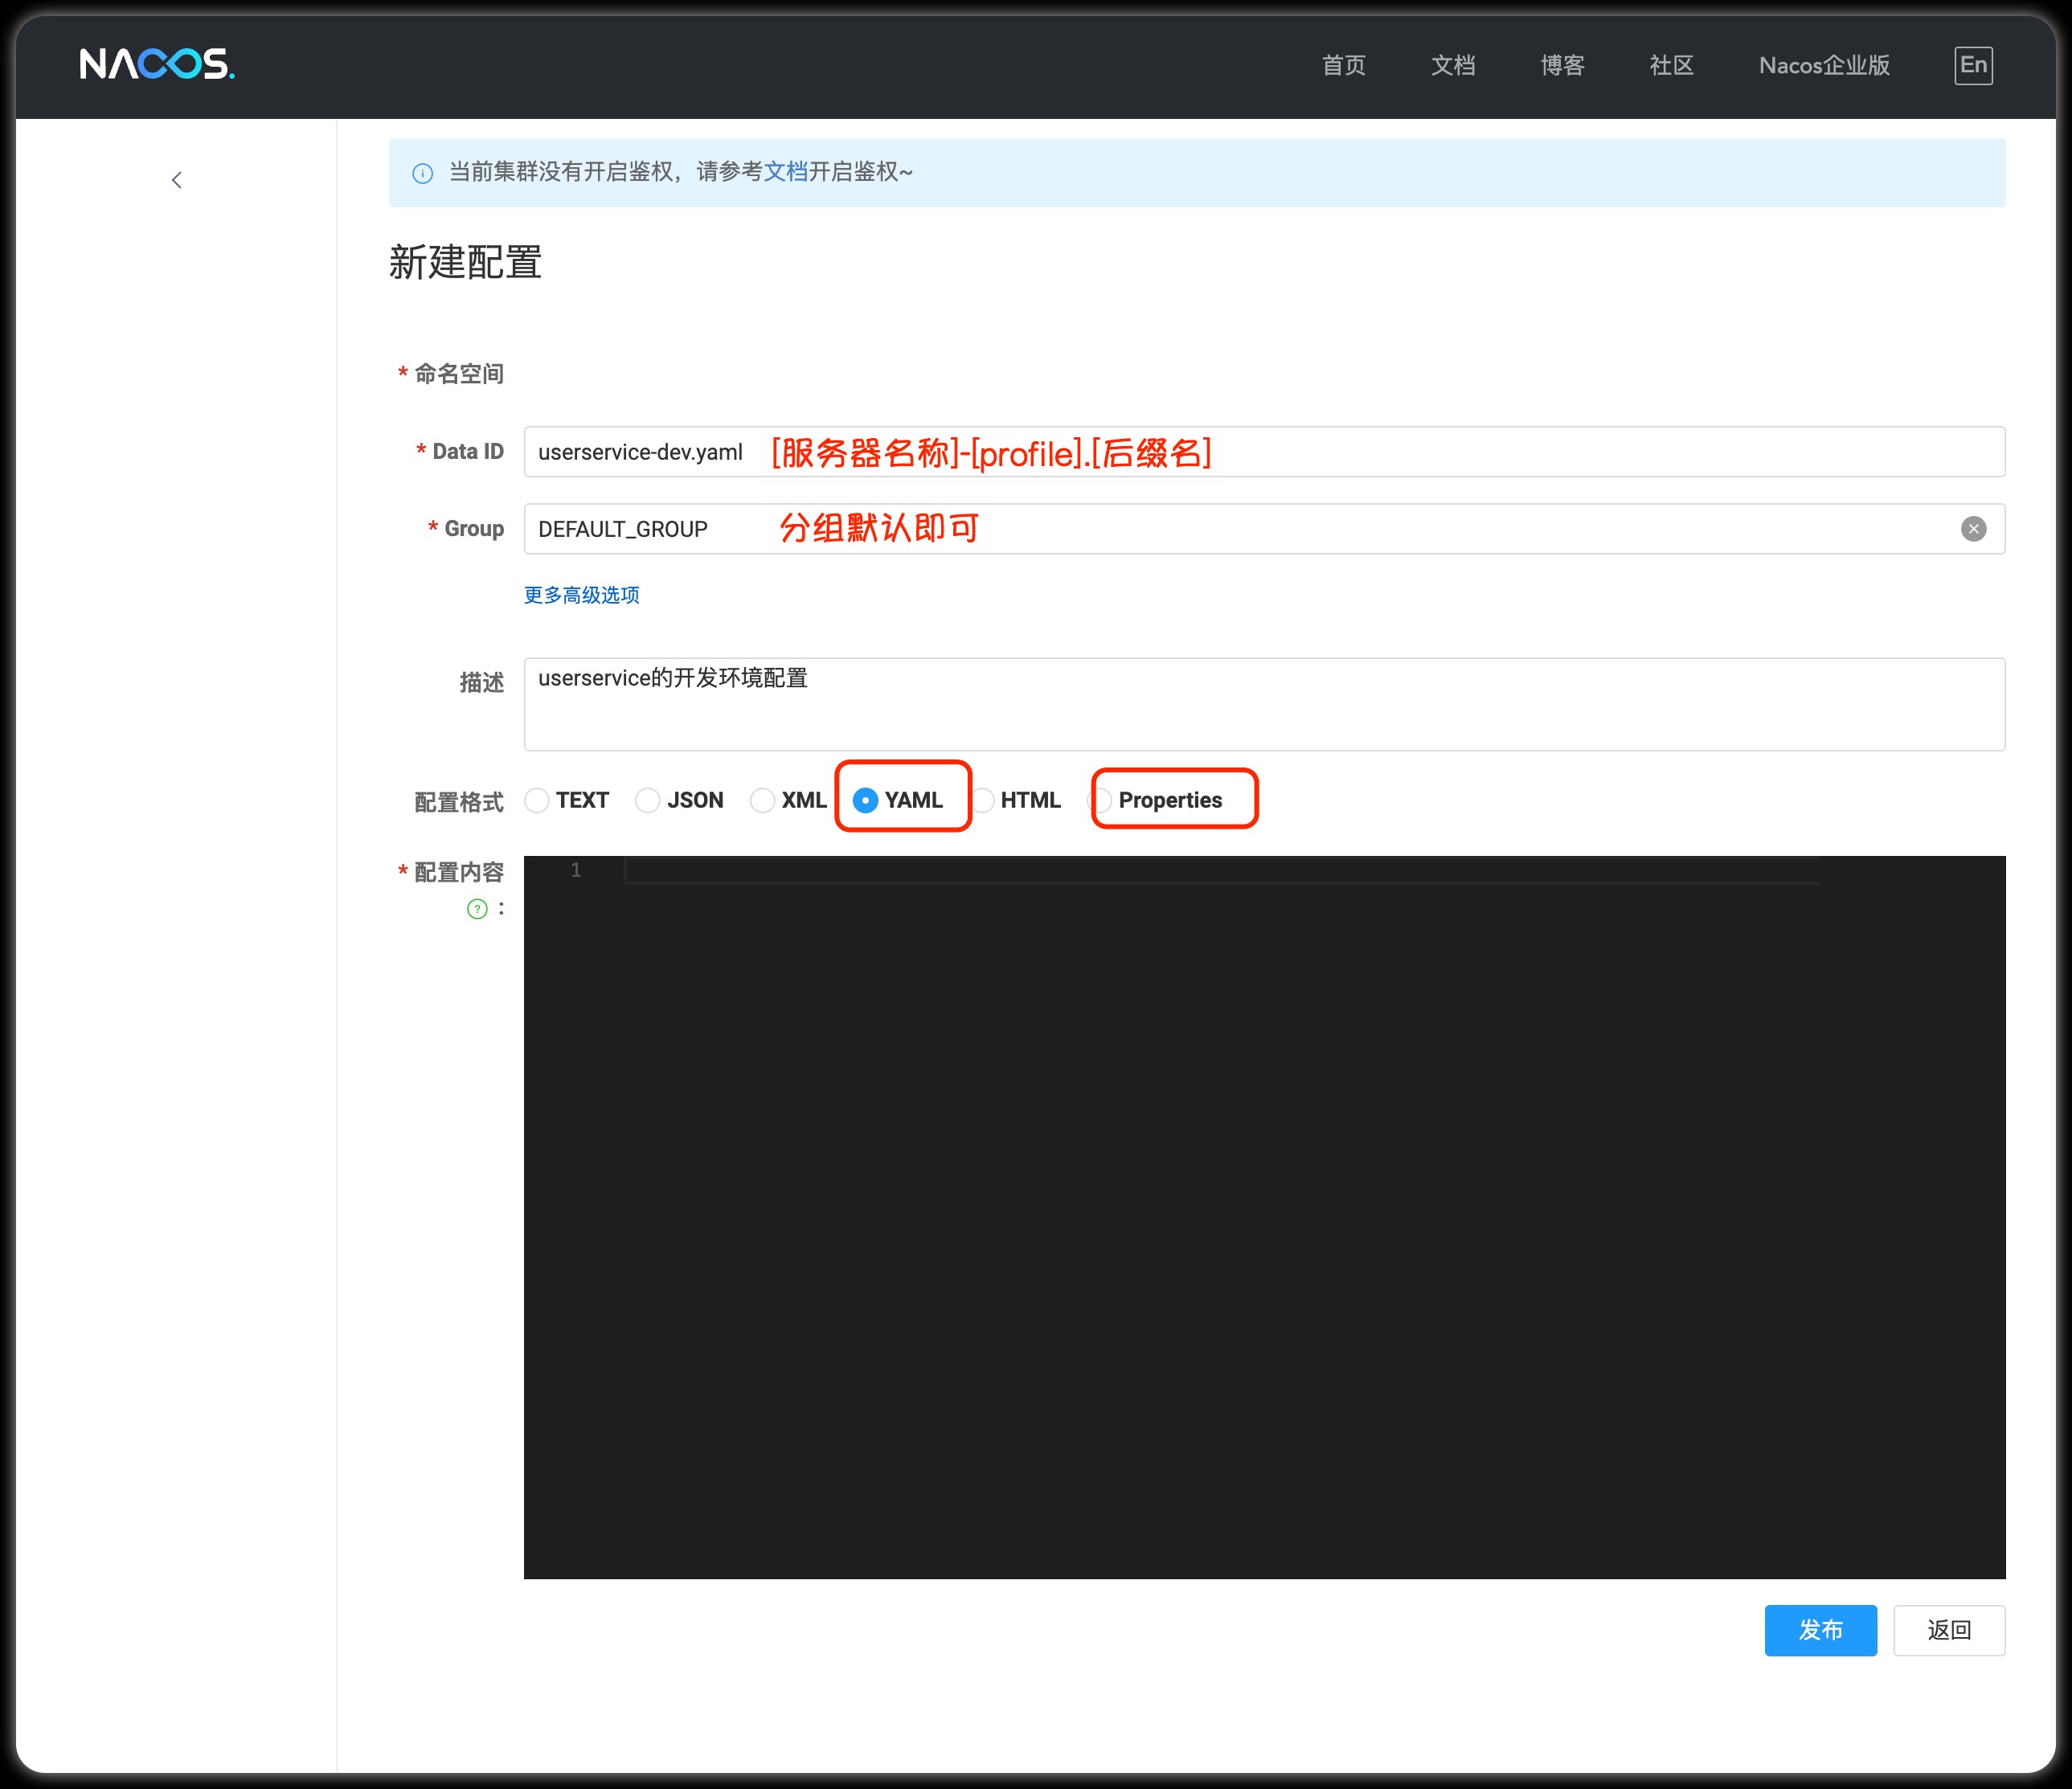
Fill in the configuration information in the form
Note: The core configuration of the project needs to be managed by nacos only when the hot update configuration is required. It is better to save some configurations that will not be changed locally in the microservice.
1.2 Pull configuration from microservices
1) Introduce nacos-config dependency
First, in the user-service service, introduce the client dependency of nacos-config:
<!--nacos配置管理依赖-->
<dependency>
    <groupId>com.alibaba.cloud</groupId>
    <artifactId>spring-cloud-starter-alibaba-nacos-config</artifactId>
</dependency>
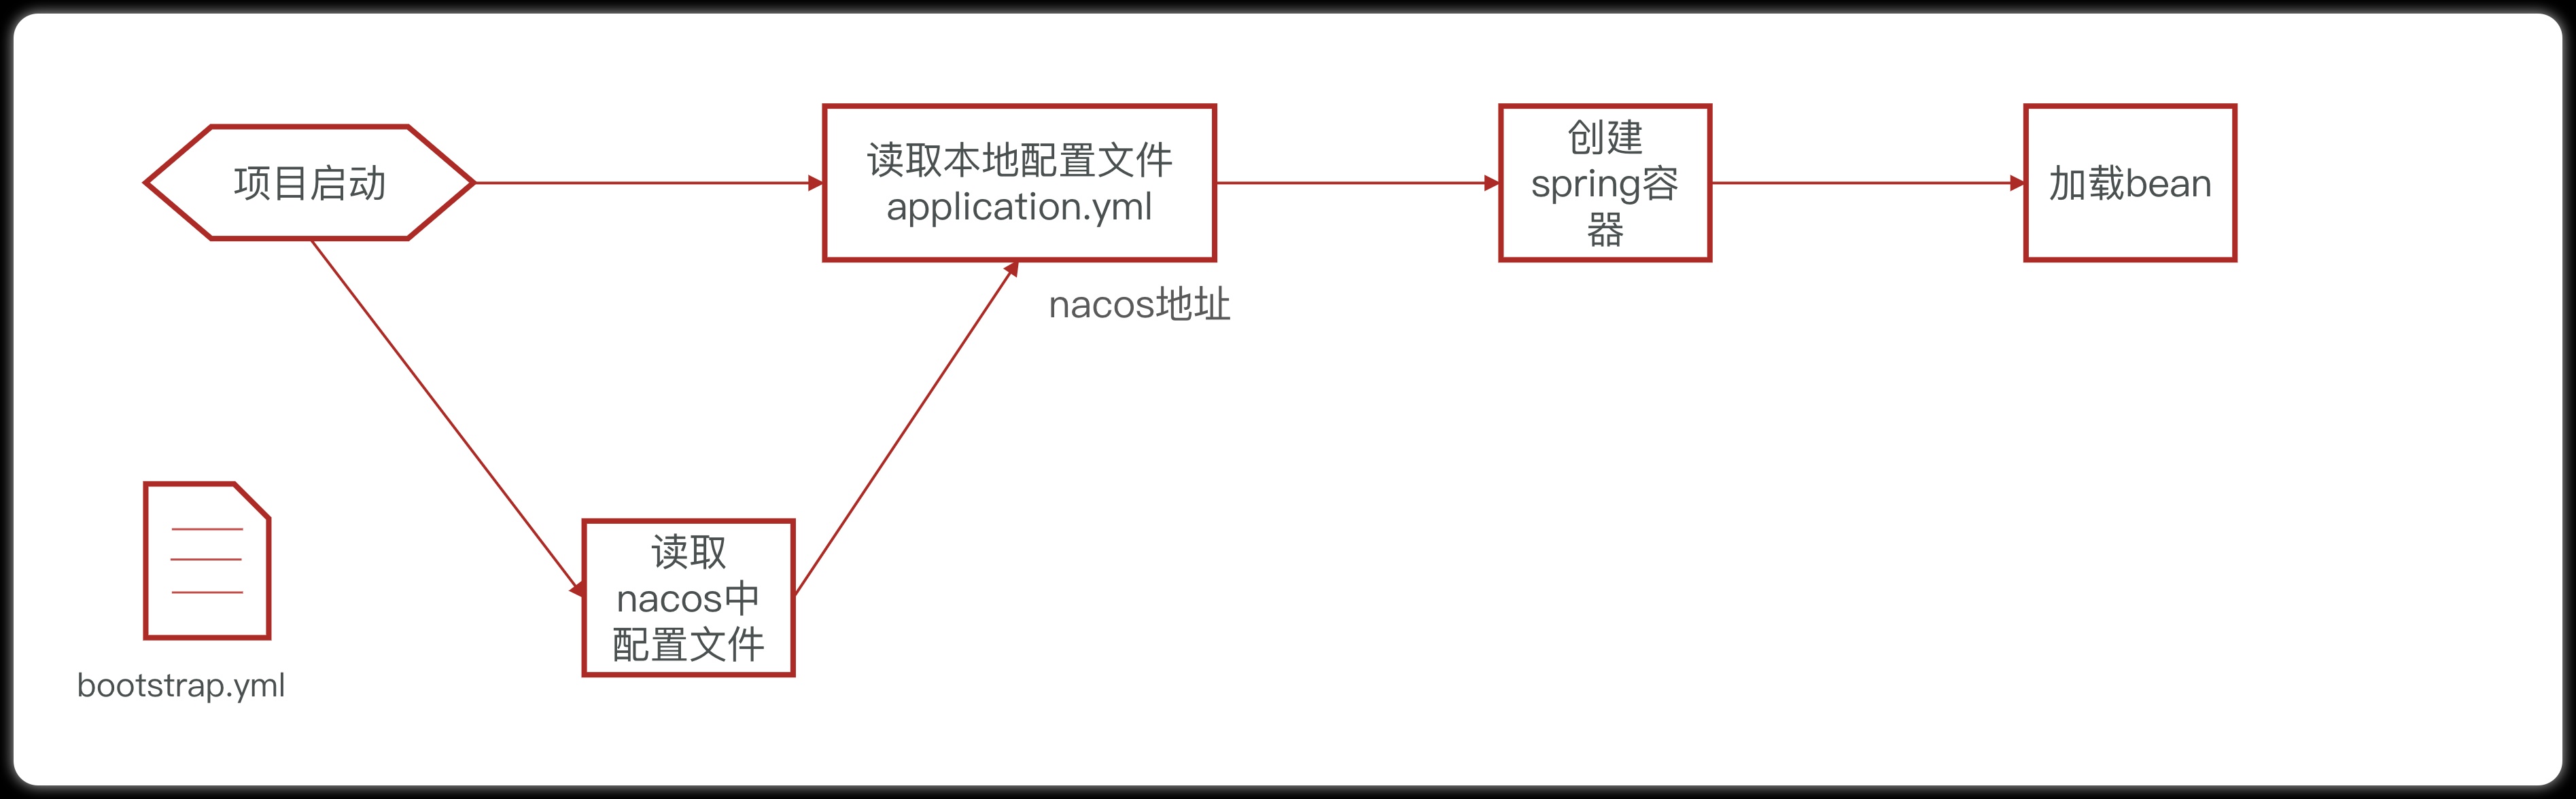
2) Add bootstrap.yaml
Then, add a bootstrap.yaml file in user-service with the following content:
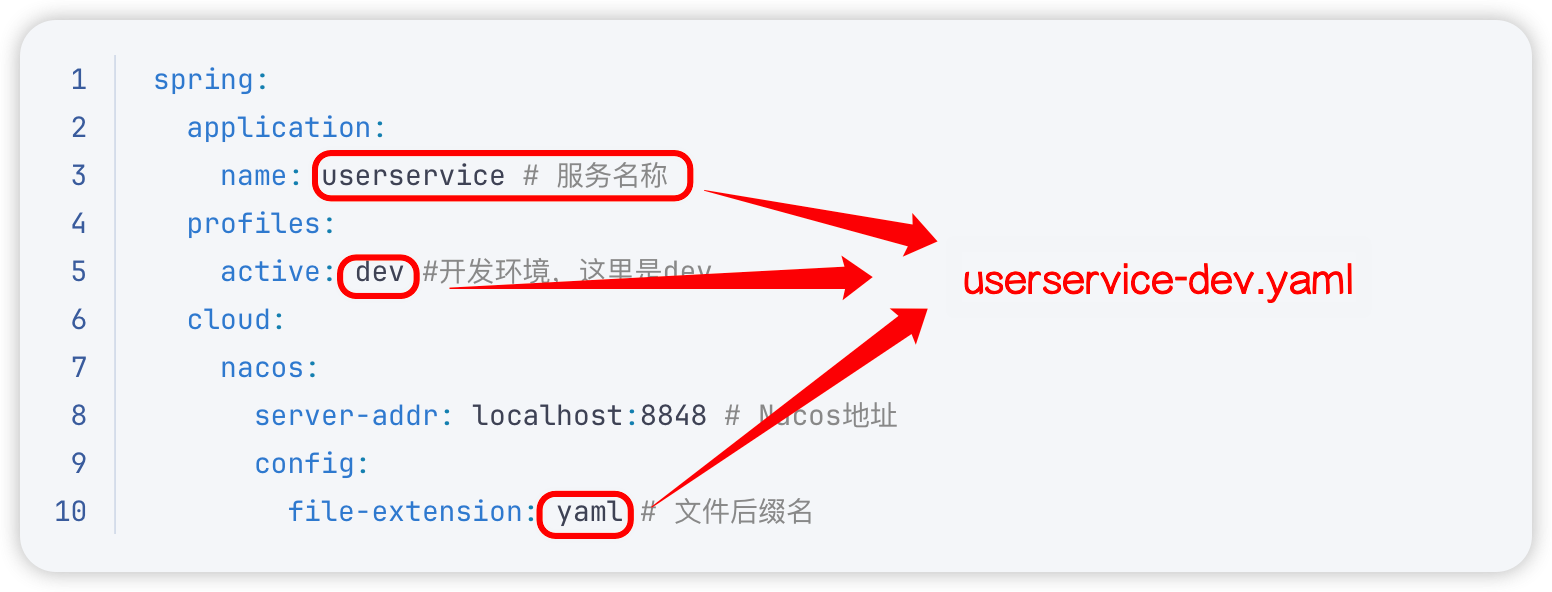
spring:
  application:
    name: userservice # 服务名称
  profiles:
    active: dev #开发环境,这里是dev
  cloud:
    nacos:
      server-addr: localhost:8848 # Nacos地址
      config:
        file-extension: yaml # 文件后缀名
Here, the nacos address will be obtained according to spring.cloud.nacos.server-addr, and then according to
${spring.application.name}-${spring.profiles.active}.${spring.cloud.nacos.config.file-extension}As a file id, to read the configuration.
In this example, it is to read userservice-dev.yaml:
3) Read nacos configuration
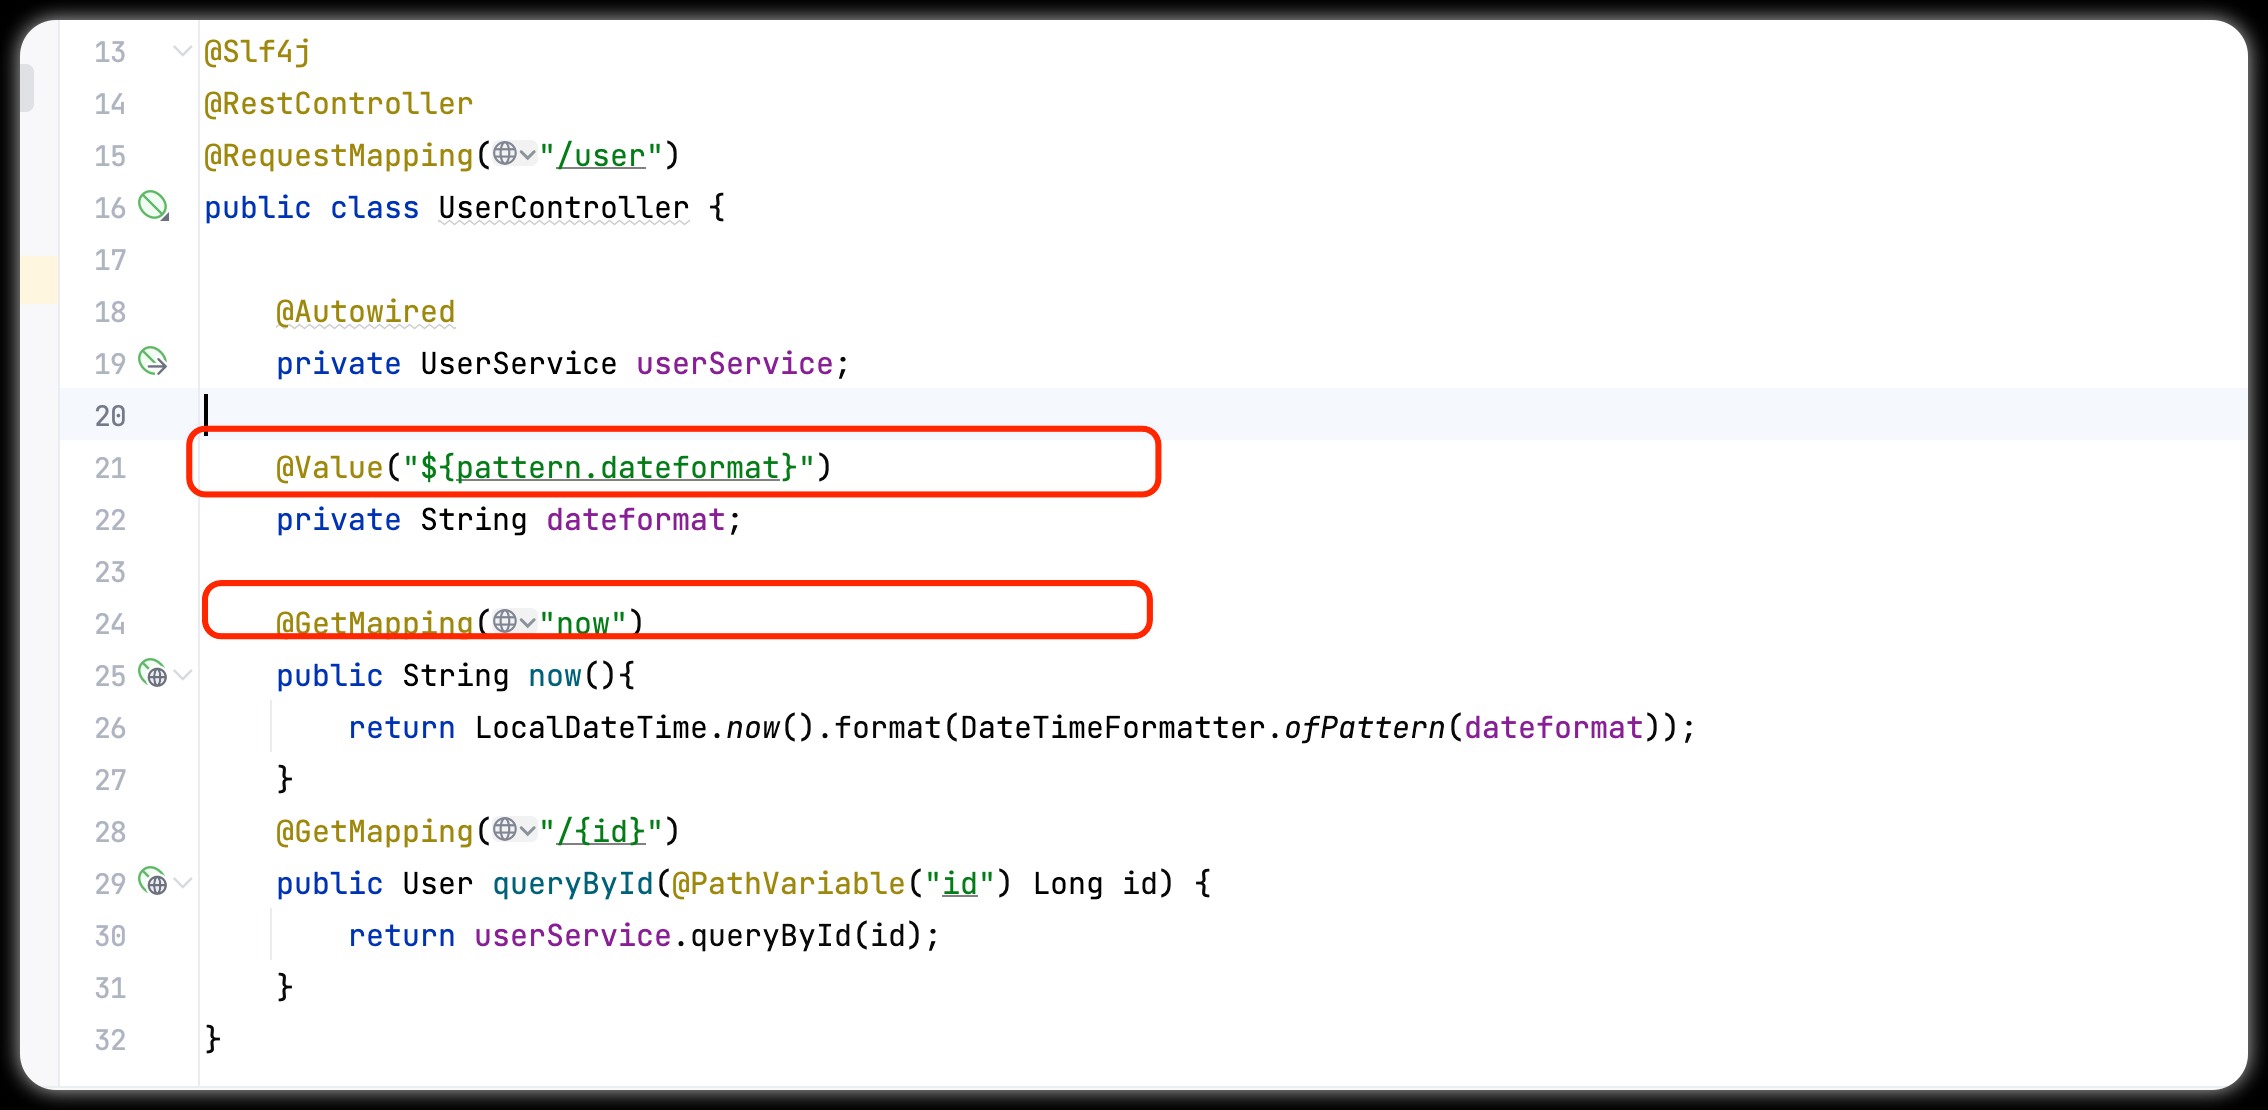
Add business logic to UserController in user-service, read pattern.dateformat configuration:
package tech.wangkay.user.web;

import tech.wangkay.user.pojo.User;
import tech.wangkay.user.service.UserService;
import lombok.extern.slf4j.Slf4j;
import org.springframework.beans.factory.annotation.Autowired;
import org.springframework.beans.factory.annotation.Value;
import org.springframework.web.bind.annotation.*;

import java.time.LocalDateTime;
import java.time.format.DateTimeFormatter;

@Slf4j
@RestController
@RequestMapping("/user")
public class UserController {


    @Autowired
    private UserService userService;

    @Value("${pattern.dateformat}")
    private String dateformat;

    @GetMapping("now")
    public String now(){


        return LocalDateTime.now().format(DateTimeFormatter.ofPattern(dateformat));
    }
    @GetMapping("/{id}")
    public User queryById(@PathVariable("id") Long id) {


        return userService.queryById(id);
    }
}
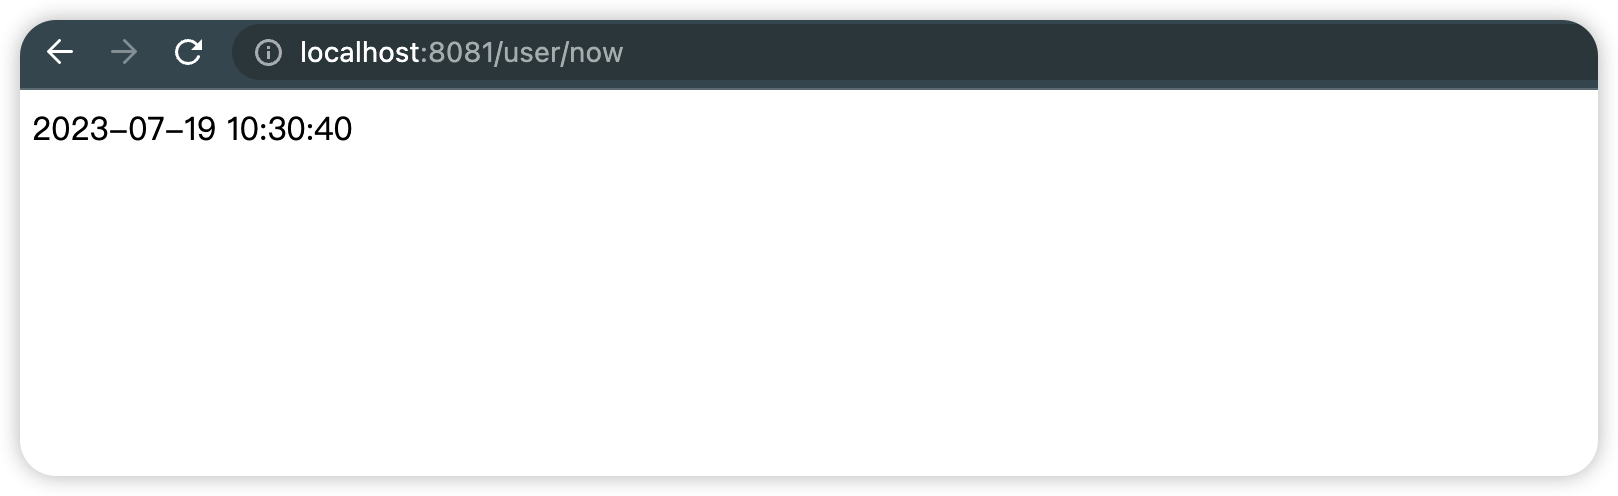
When visiting the page, you can see the effect:
2. Configuration hot update
Our ultimate goal is to modify the configuration in nacos, so that the microservice can make the configuration take effect without restarting, that is, configuration hot update .
To achieve configuration hot update, two methods can be used:
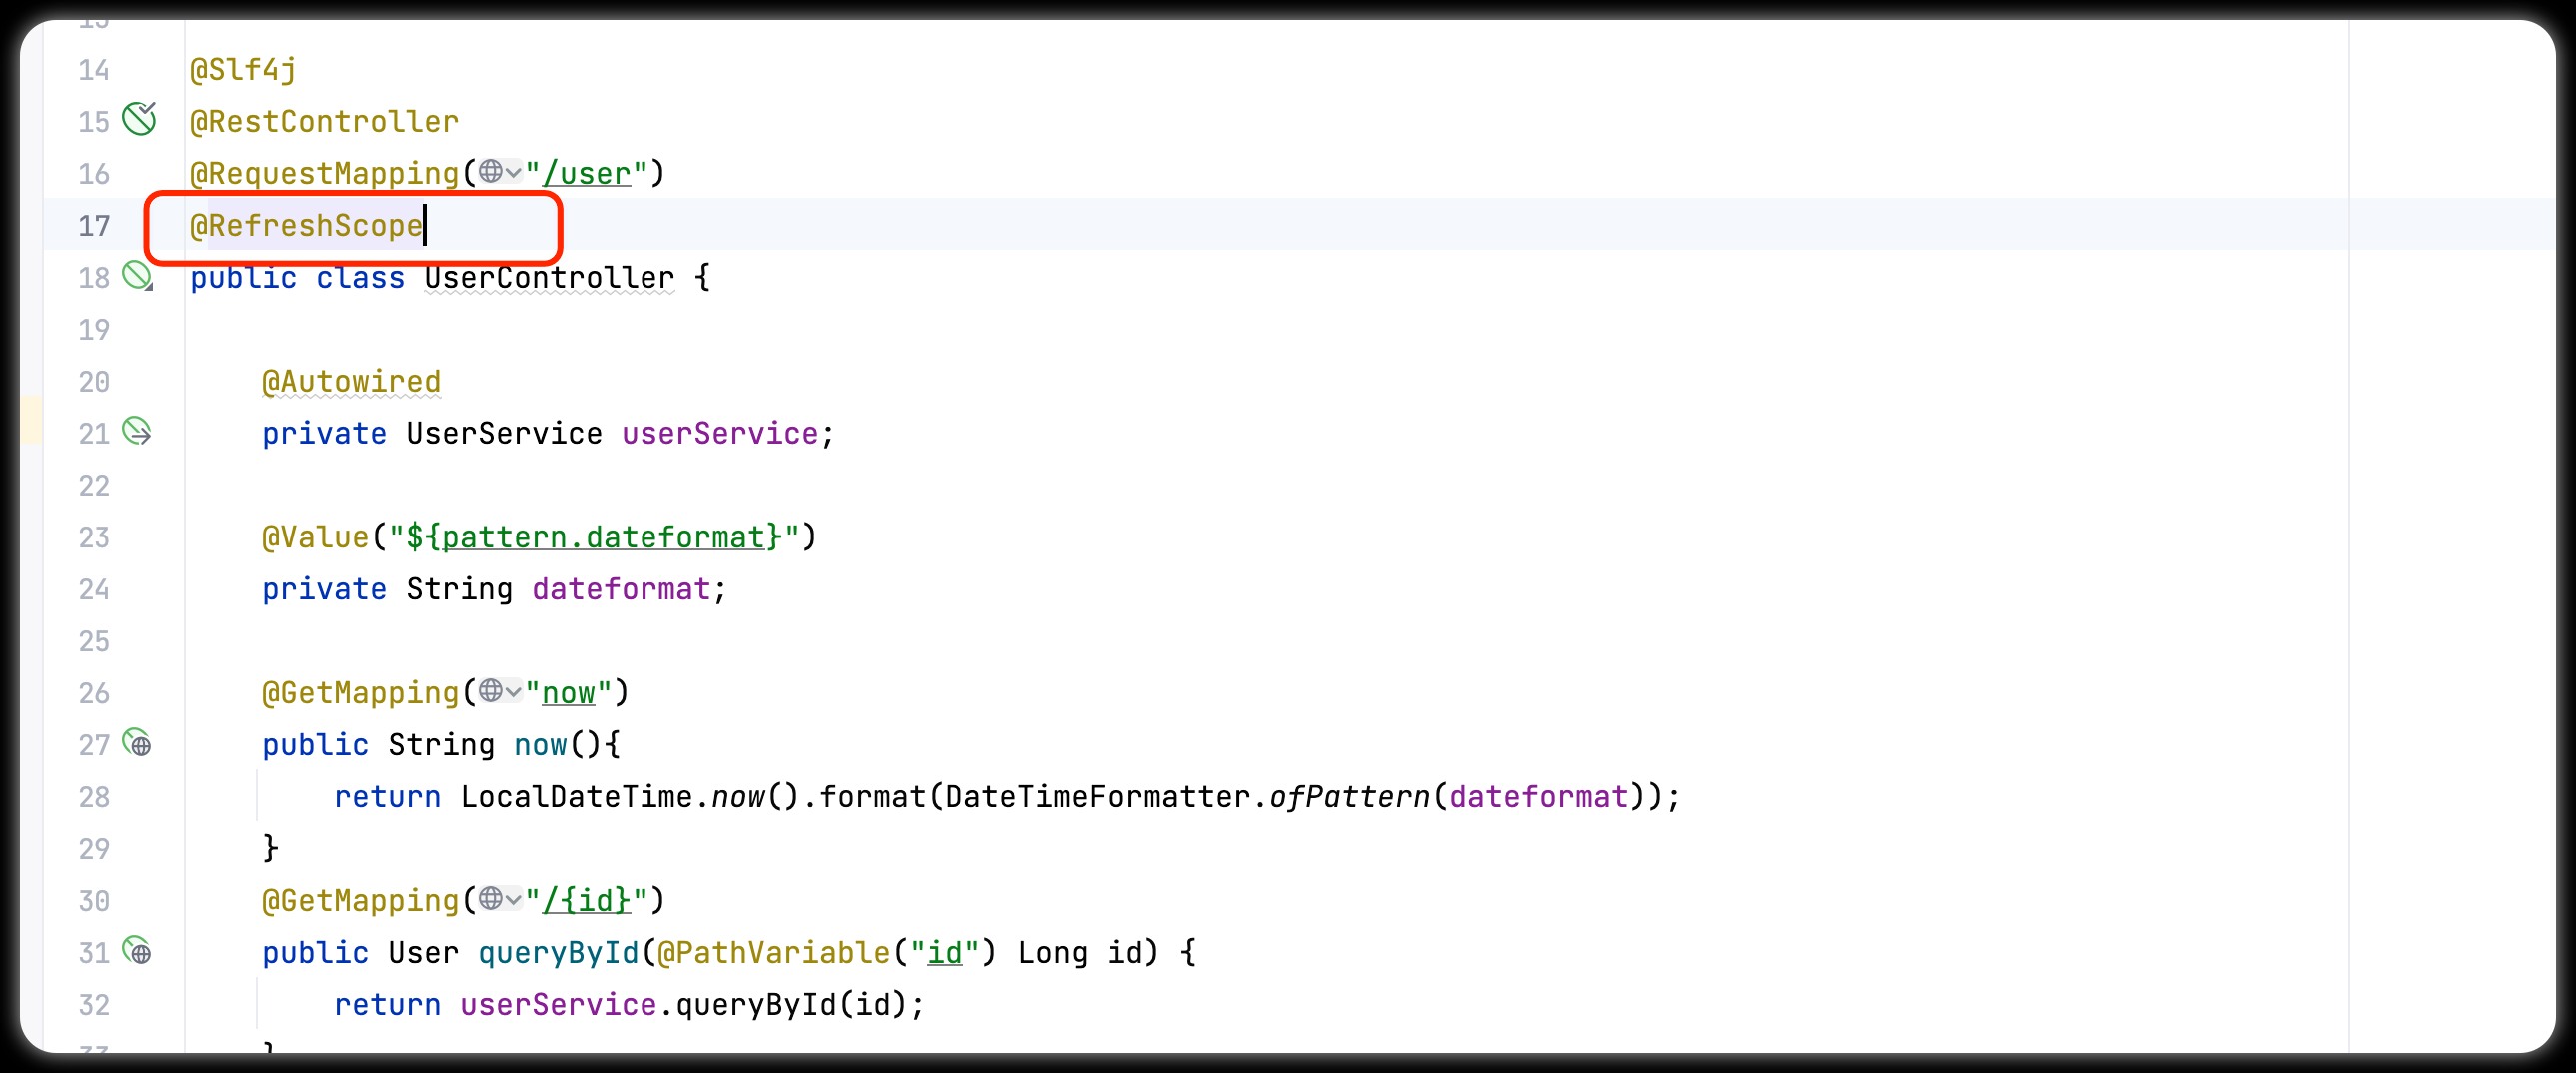
1.2.1. Method 1
Add the annotation @RefreshScope to the class where the variable injected by @Value is located:
1.2.2. Method 2
Use the @ConfigurationProperties annotation instead of the @Value annotation.
In the user-service service, add a class to read the patternern.dateformat property:
package cn.itcast.user.config;

import lombok.Data;
import org.springframework.boot.context.properties.ConfigurationProperties;
import org.springframework.stereotype.Component;

@Component
@Data
@ConfigurationProperties(prefix = "pattern")
public class PatternProperties {


    private String dateformat;
}
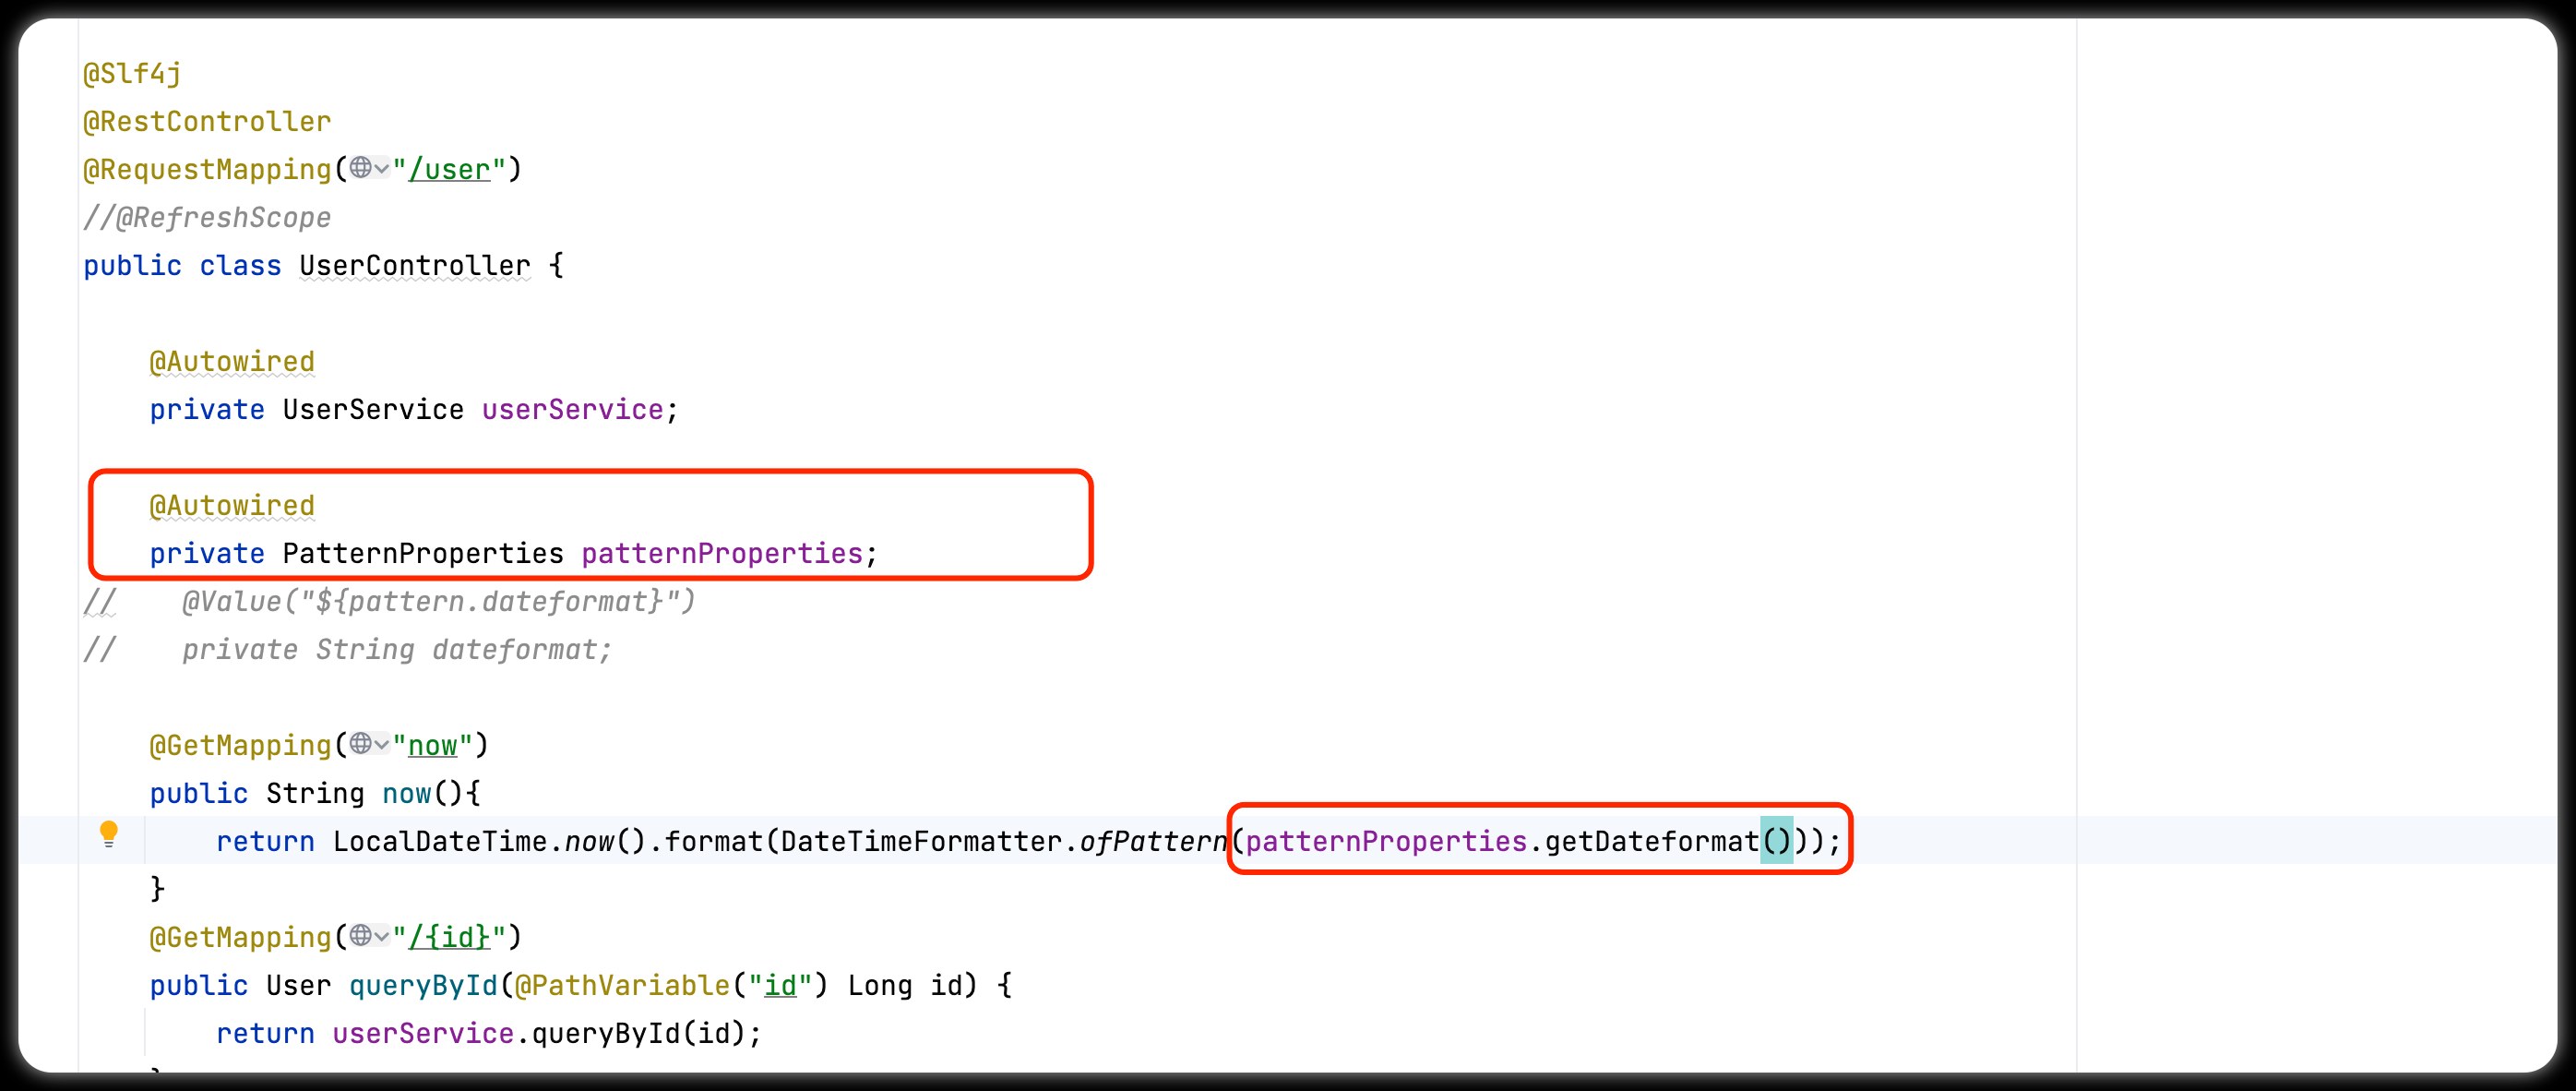
Use this class instead of @Value in UserController:
package tech.wangkay.user.web;

import org.springframework.cloud.context.config.annotation.RefreshScope;
import tech.wangkay.user.config.PatternProperties;
import tech.wangkay.user.pojo.User;
import tech.wangkay.user.service.UserService;
import lombok.extern.slf4j.Slf4j;
import org.springframework.beans.factory.annotation.Autowired;
import org.springframework.beans.factory.annotation.Value;
import org.springframework.web.bind.annotation.*;

import java.time.LocalDateTime;
import java.time.format.DateTimeFormatter;

@Slf4j
@RestController
@RequestMapping("/user")
//@RefreshScope
public class UserController {


    @Autowired
    private UserService userService;

    @Autowired
    private PatternProperties patternProperties;
//    @Value("${pattern.dateformat}")
//    private String dateformat;

    @GetMapping("now")
    public String now(){


        return LocalDateTime.now().format(DateTimeFormatter.ofPattern(patternProperties.getDateformat()));
    }
    @GetMapping("/{id}")
    public User queryById(@PathVariable("id") Long id) {


        return userService.queryById(id);
    }
}
3. Configuration sharing
When the microservice starts, it will read multiple configuration files from nacos:
- [spring.application.name]-[spring.profiles.active].yaml,例如:userservice-dev.yaml
- [spring.application.name].yaml,例如:userservice.yaml
No matter how the profile changes, the [spring.application.name].yaml file will be loaded, so multi-environment sharing configuration can be written to this file
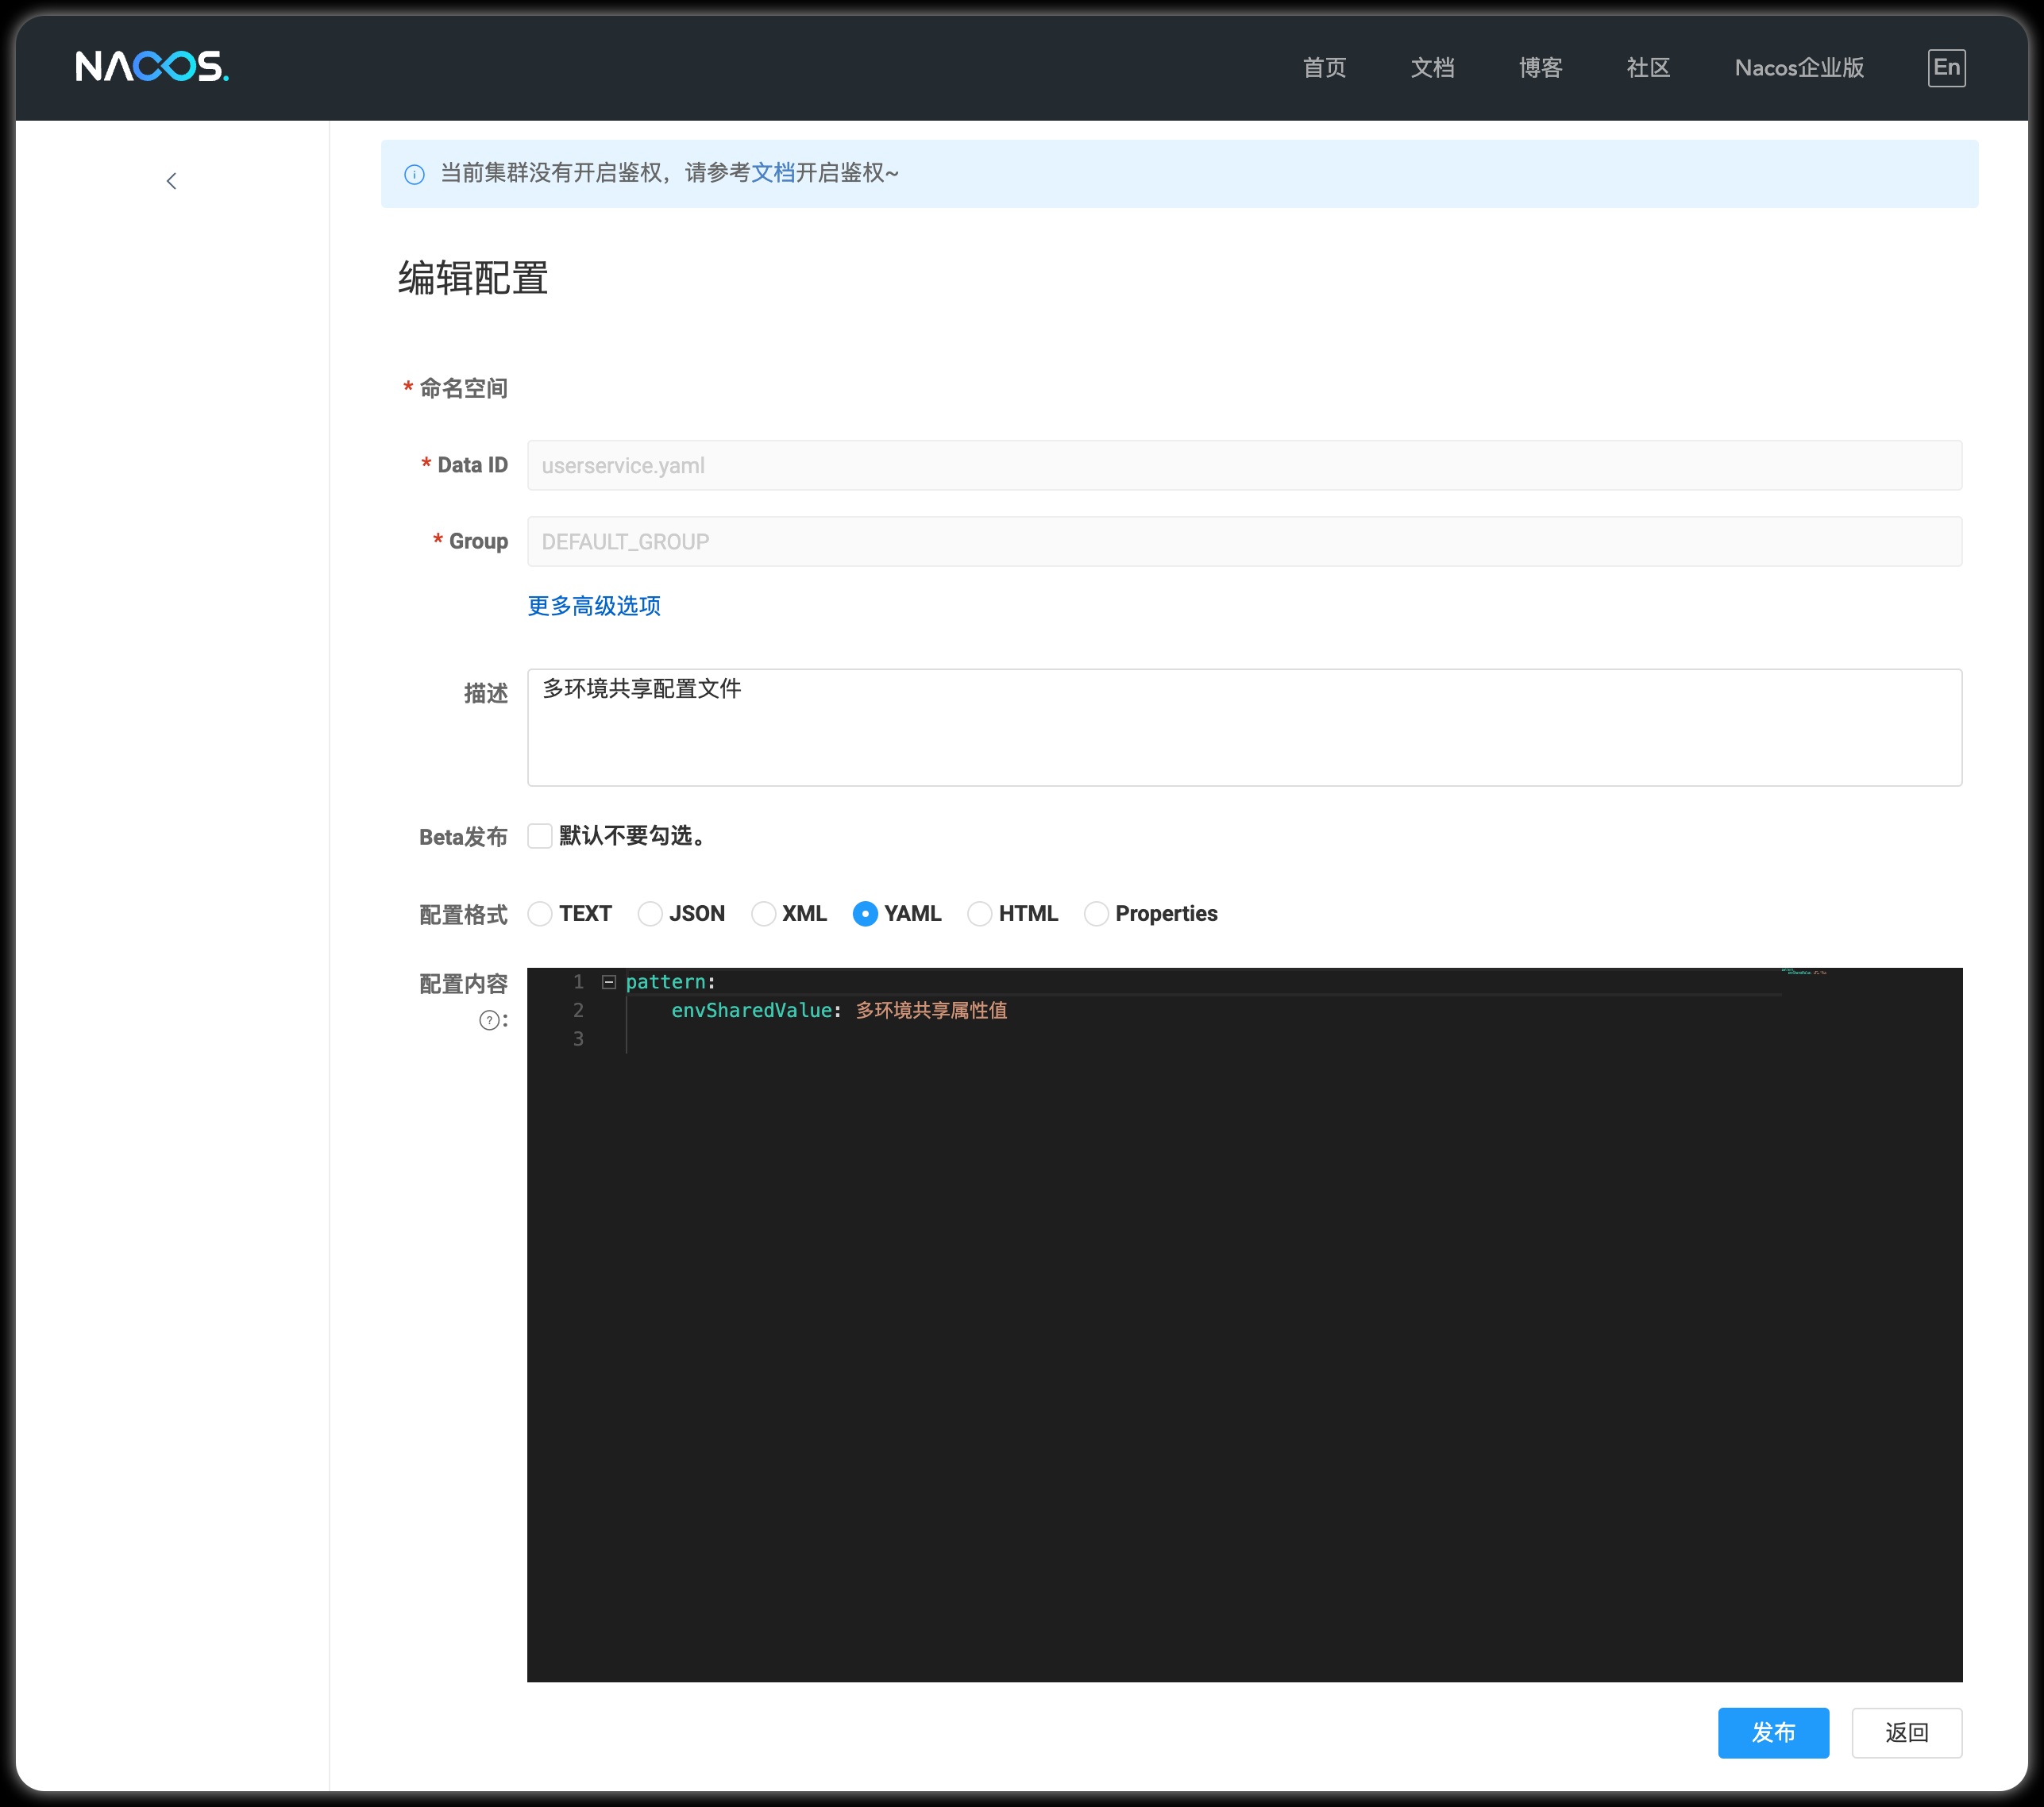
1) Add an environment sharing configuration
We add a userservice.yaml file in nacos:
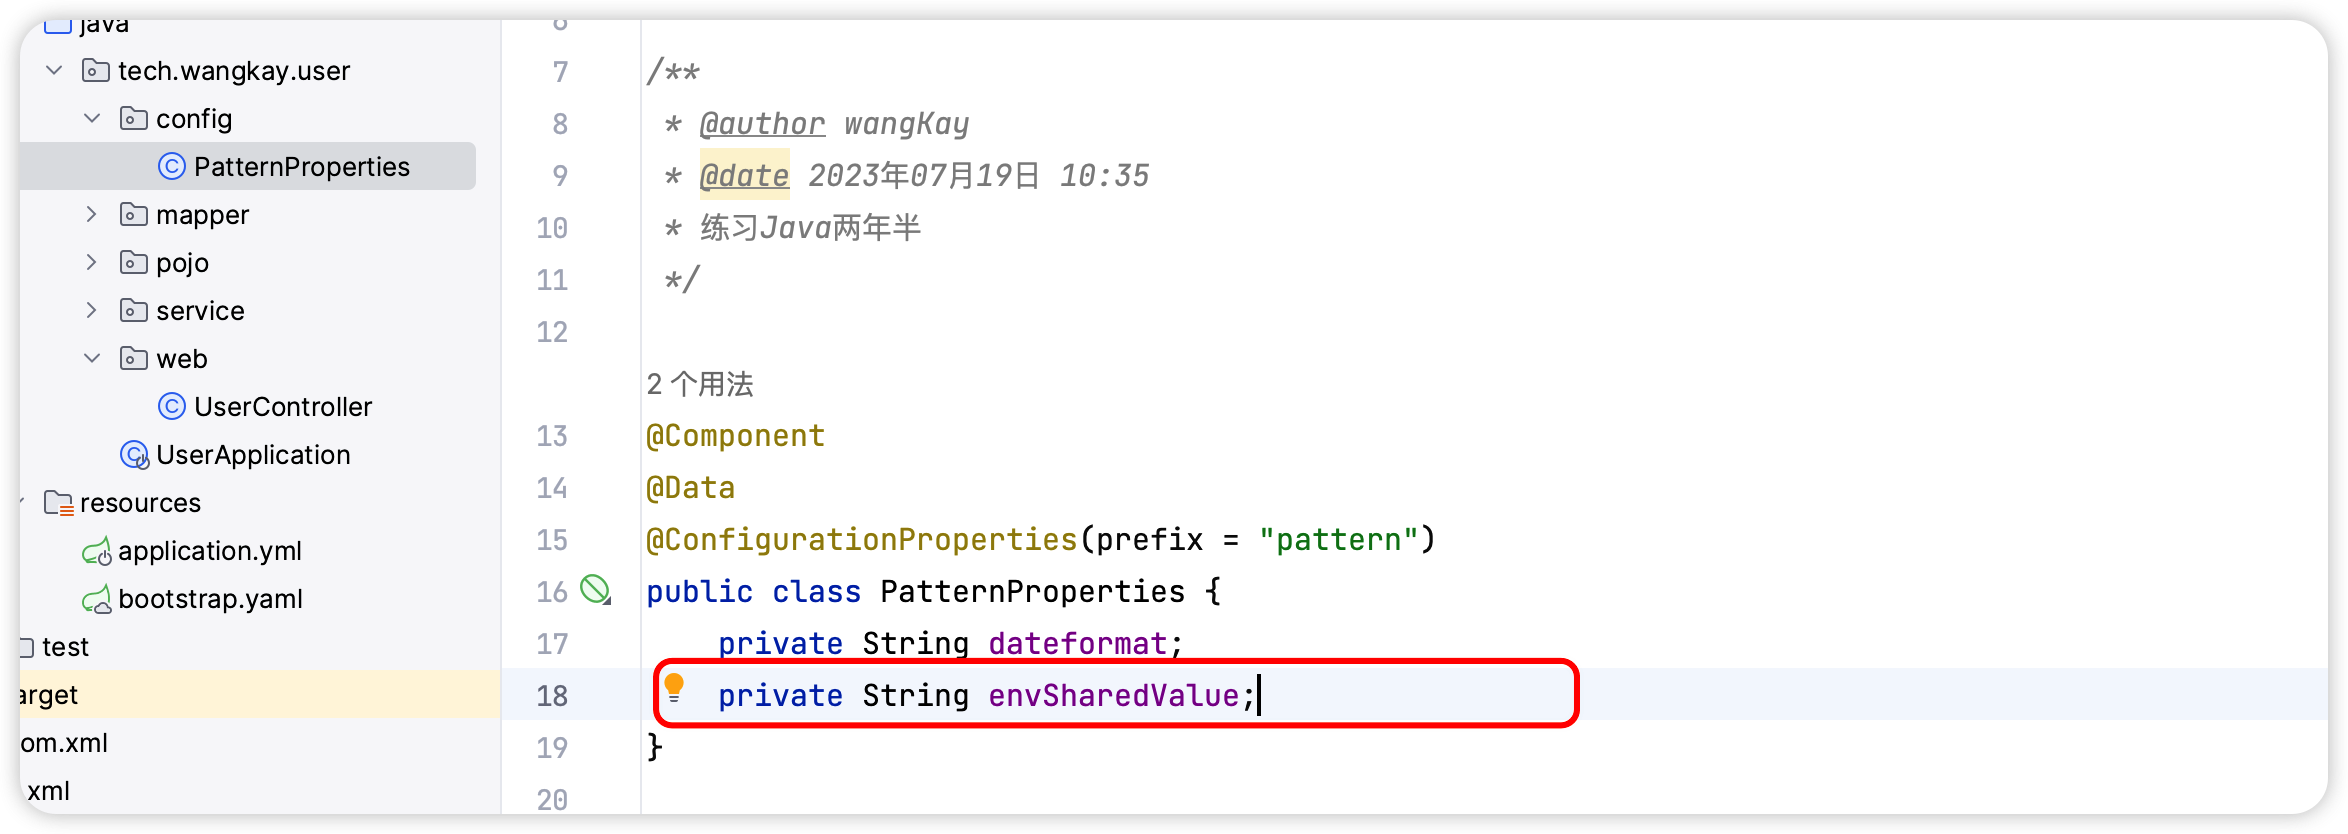
2) Read shared configuration in user-service
In the user-service service, modify the PatternProperties class to read the newly added properties:
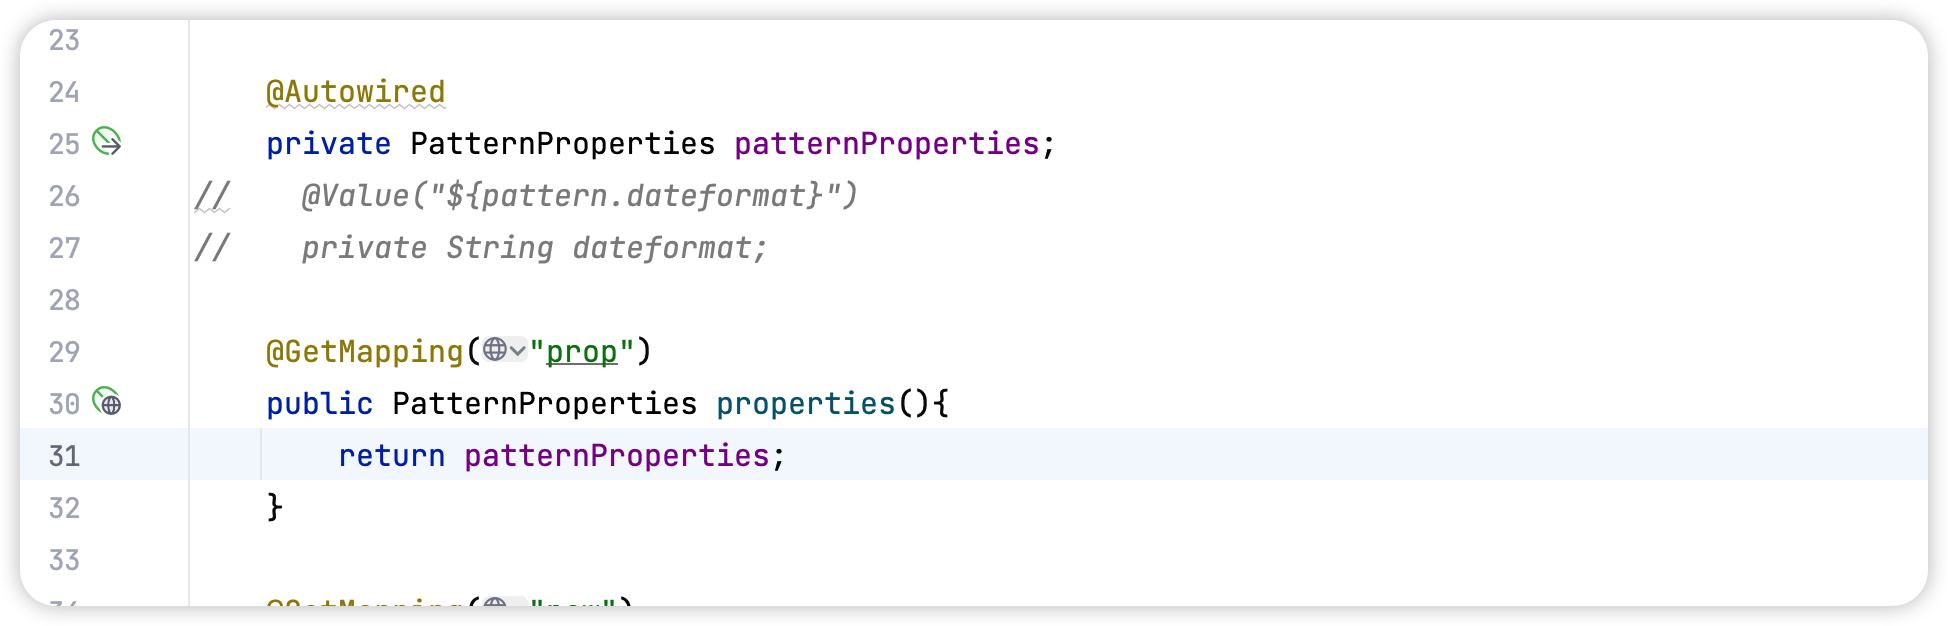
In the user-service service, modify UserController and add a method:
3) Run two UserApplications, using different profiles
Modify the startup item UserApplication2 and change its profile value:

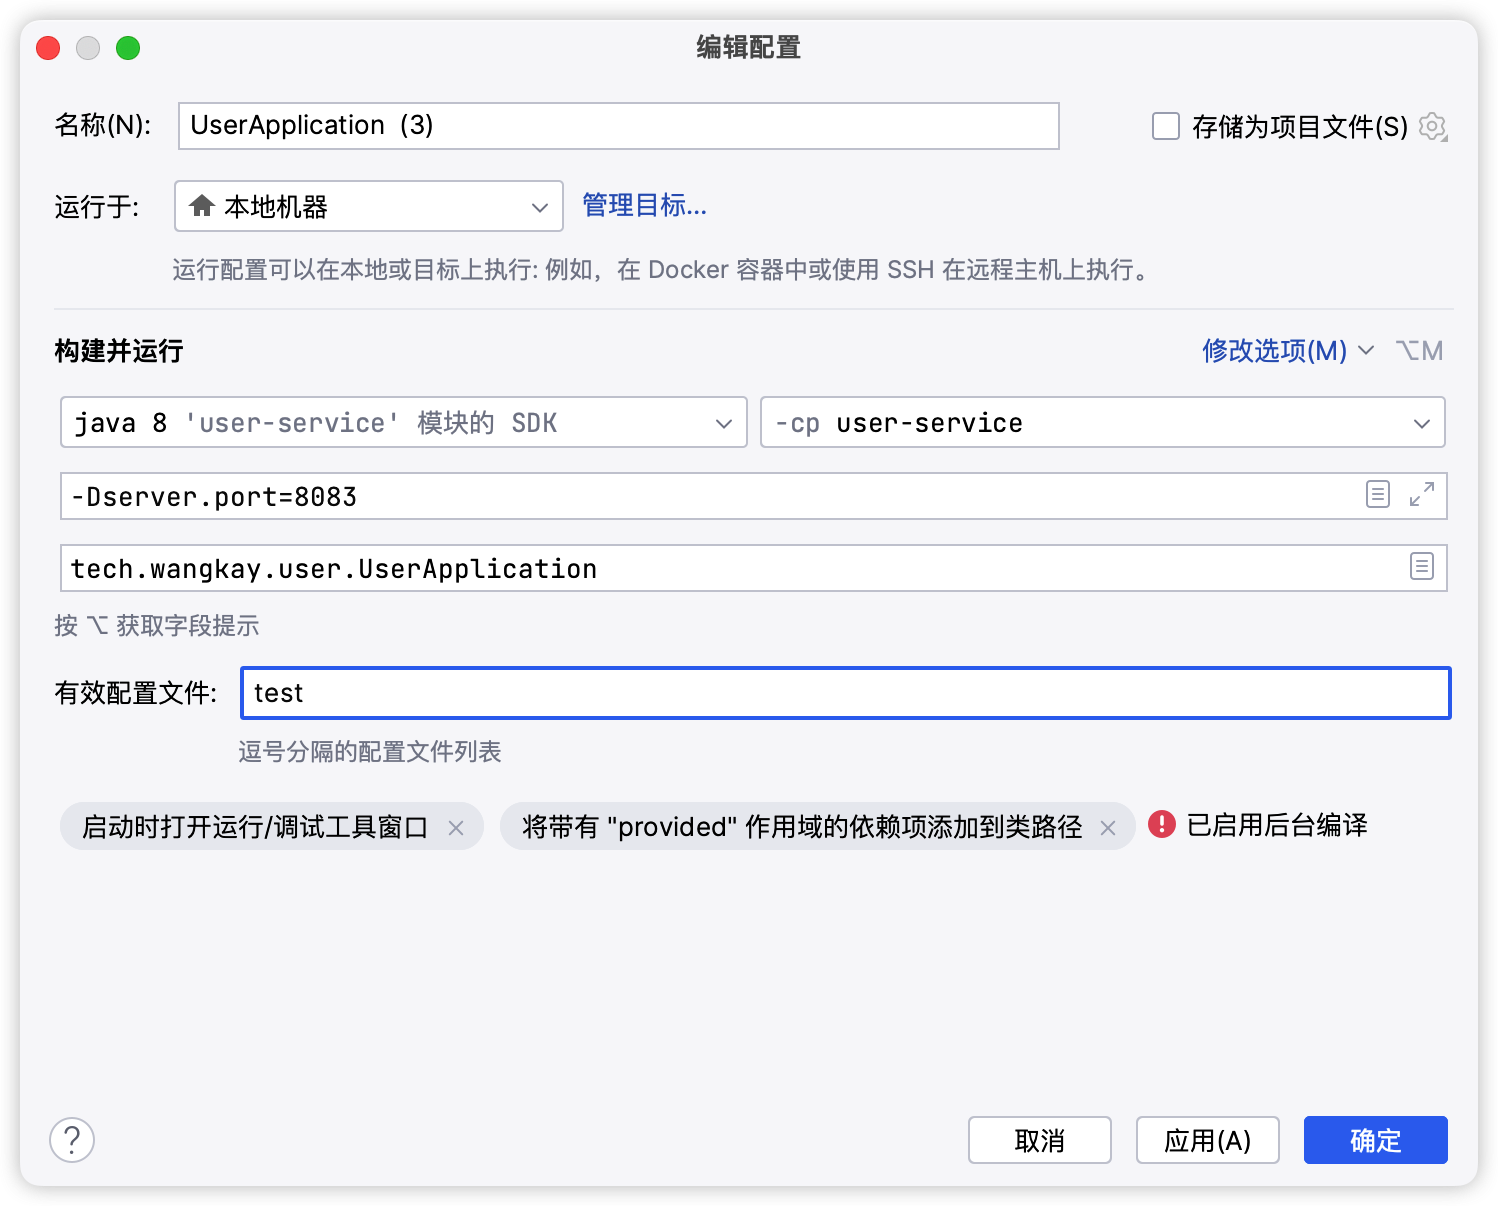
In this way, the profile used by UserApplication (8081) is dev, and the profile used by UserApplication3 (8083) is test.
Start UserApplication and UserApplication2
Visit http://localhost:8081/user/prop , the result:

Visit http://localhost:8083/user/prop , the result:
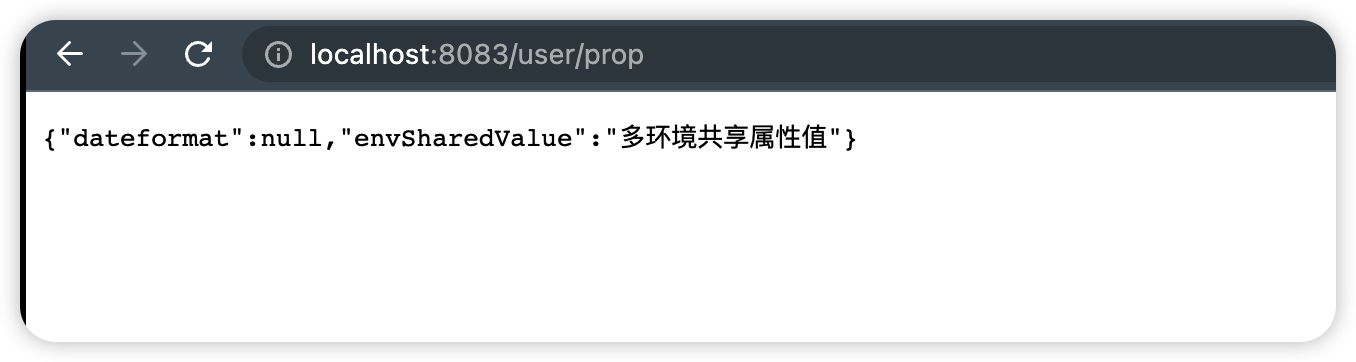
It can be seen that both the dev and test environments have read the value of the attribute envSharedValue.
4) Configure the priority of sharing
When nacos and service local have the same attribute at the same time, the priority is divided into high and low:
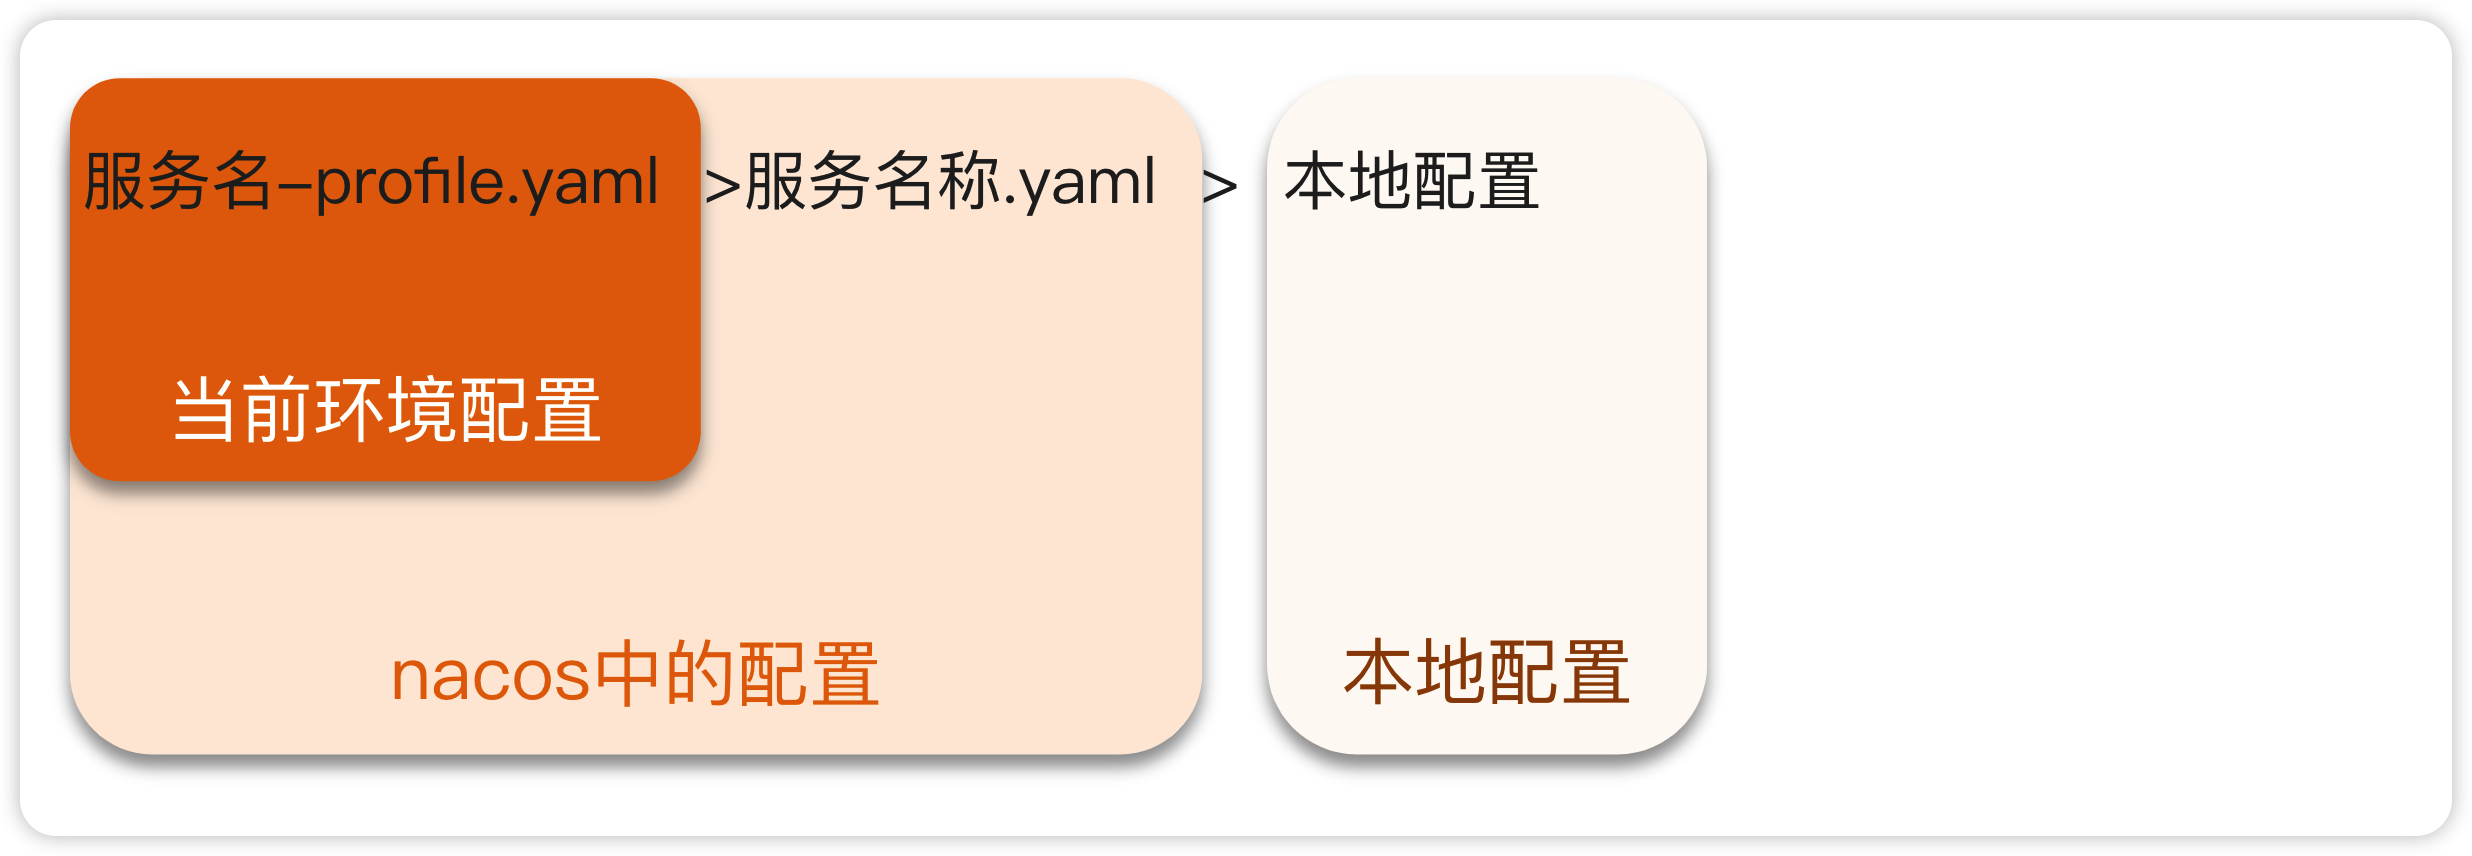
The configuration file that the microservice will read from nacos:
- [service name]-[spring.profile.active].yaml, environment configuration
- [service name].yaml, default configuration, multi-environment sharing
priority:
- [service name]-[environment].yaml >[service name].yaml > local configuration
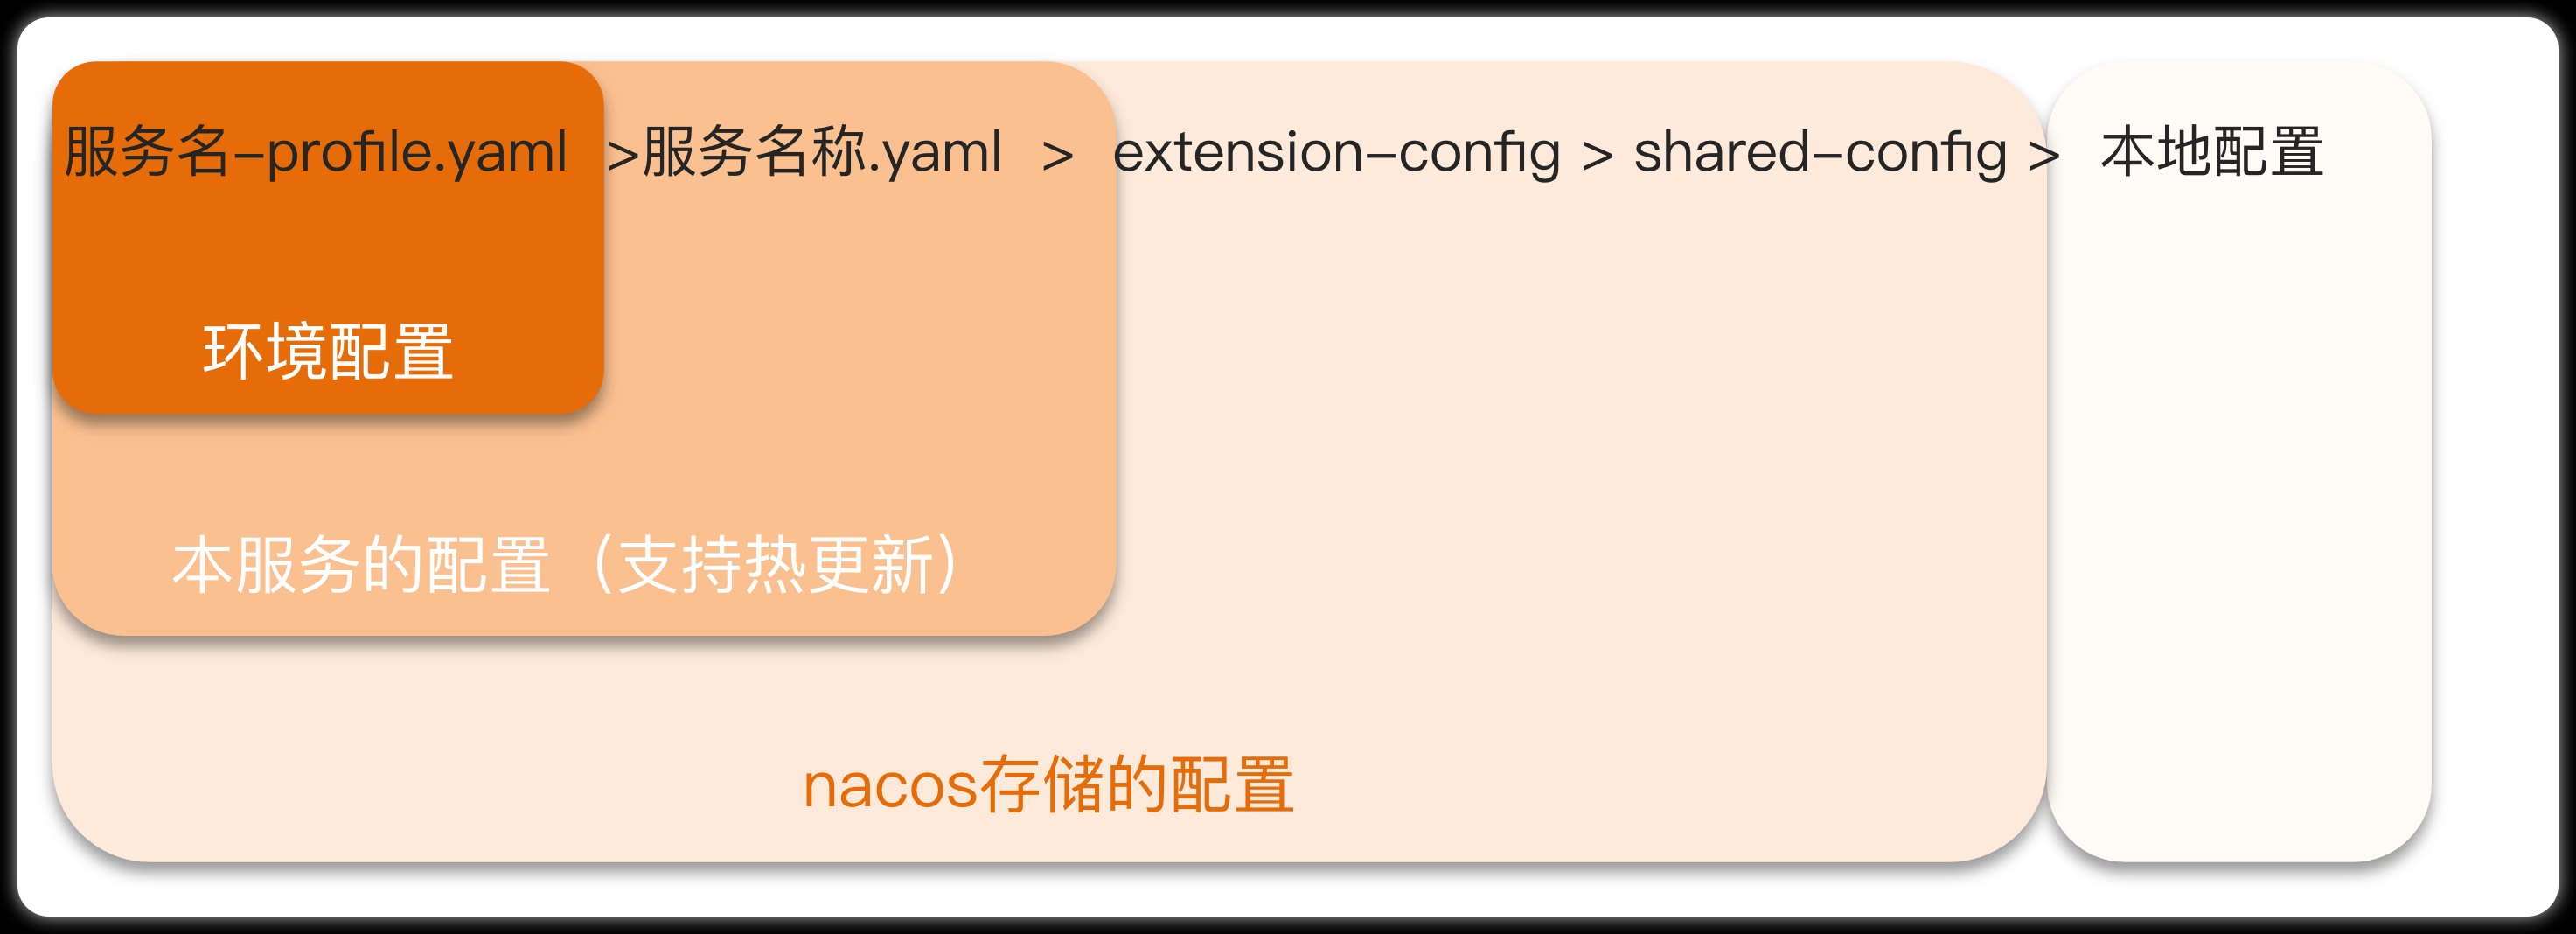
Multi-service shared configuration
Configuration files can be shared between different microservices, specified in the following two ways:
- method one:
spring:
  application:
    name: userservice # 服务名称
  profiles:
    active: dev # 环境,
  cloud:
    nacos:
      server-addr: localhost:8848 # Nacos地址
      config:
        file-extension: yaml # 文件后缀名
        shared-configs: # 多微服务间共享的配置列表
          - dataId: common.yaml # 要共享的配置文件id
- Method 2:
spring:
  application:
    name: userservice # 服务名称
  profiles:
    active: dev # 环境,
  cloud:
    nacos:
      server-addr: localhost:8848 # Nacos地址
      config:
        file-extension: yaml # 文件后缀名
        extends-configs: # 多微服务间共享的配置列表
          - dataId: extend.yaml # 要共享的配置文件id
4. Nacos cluster construction
In the Nacos production environment, it must be deployed in a cluster state. For the deployment method, refer to the documentation in Xiaoyao Inn: Nacos cluster construction
Two, Feign remote call
There are following problems:
Feign is a declarative http client, official address: https://github.com/OpenFeign/feign
Its role is to help us send http requests elegantly, solving
poor code readability, inconsistent programming experience
and complex parameters URLs are difficult to maintain
1. Feign replaces RestTemplate
The steps to use Fegin are as follows:
1) Introduce dependencies
We introduce the feign dependency in the pom file of the order-service service:
<dependency>
    <groupId>org.springframework.cloud</groupId>
    <artifactId>spring-cloud-starter-openfeign</artifactId>
</dependency>
2) Add annotations
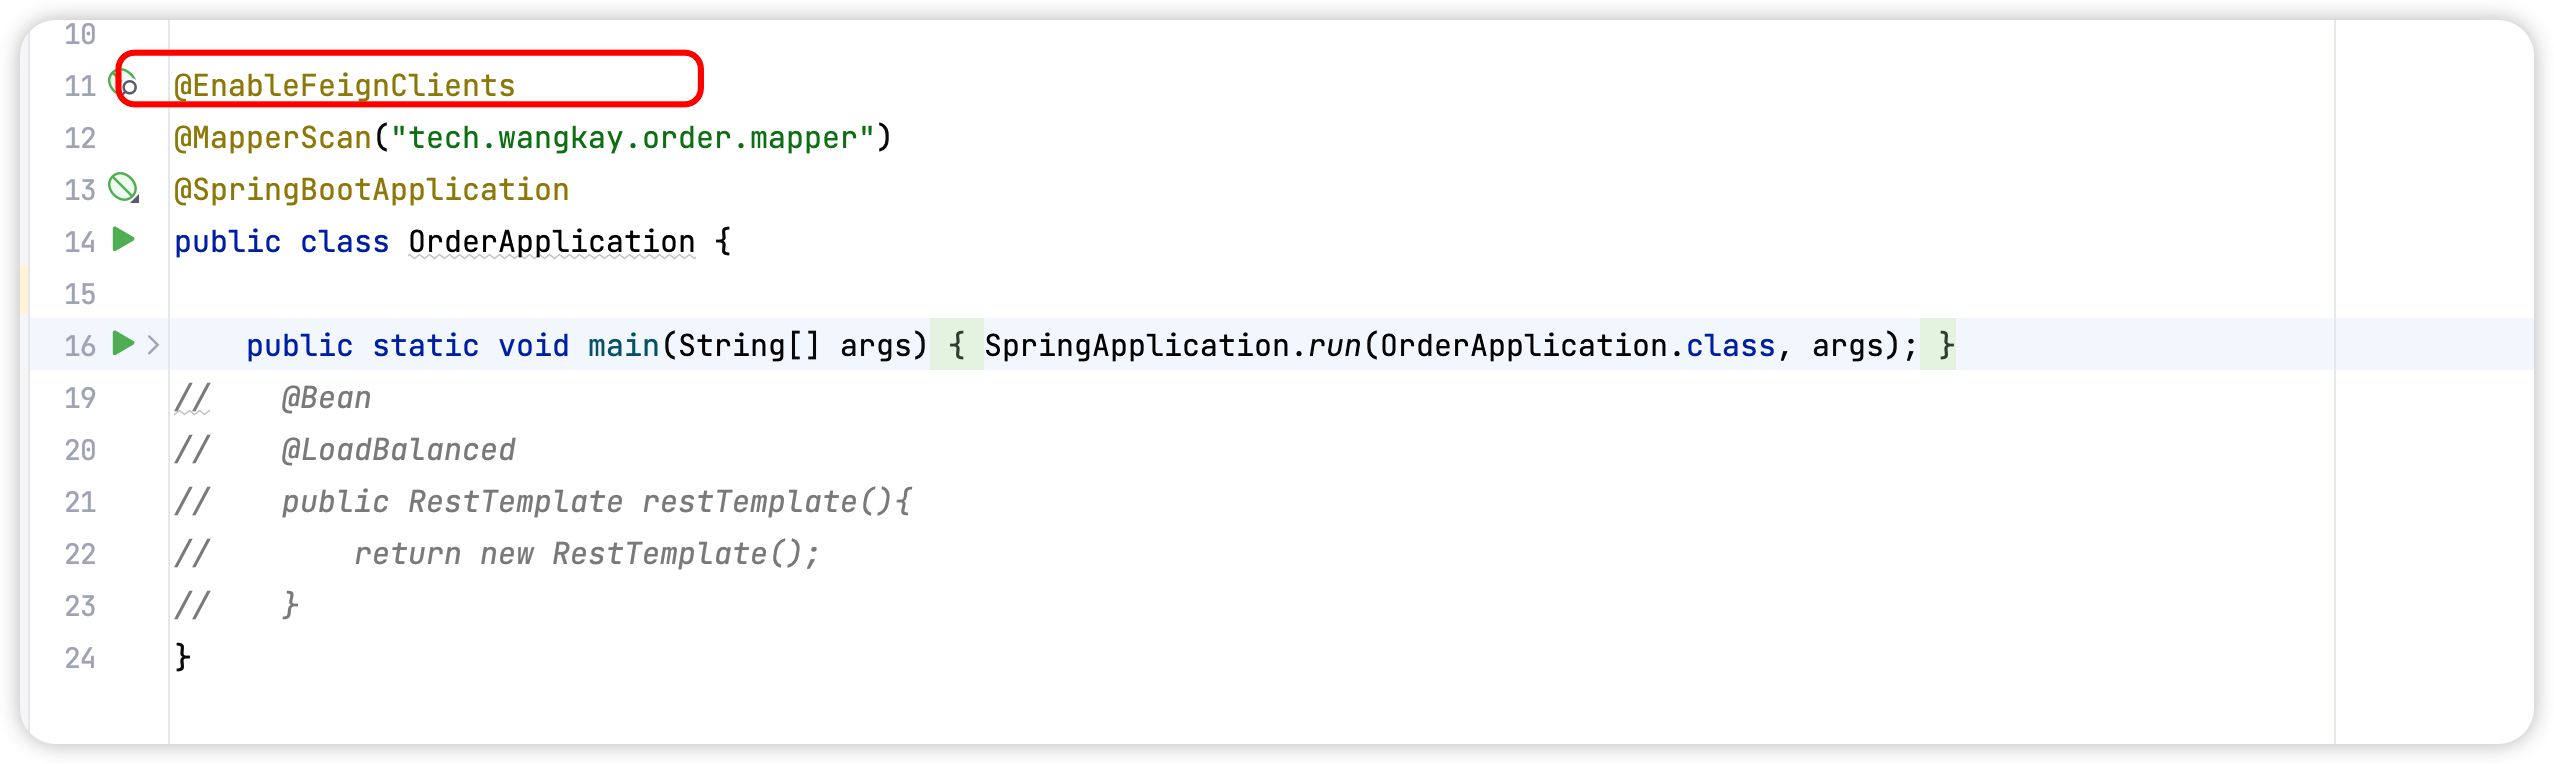
Add annotations to the startup class of order-service to enable the function of Feign:
3) Write Feign's client
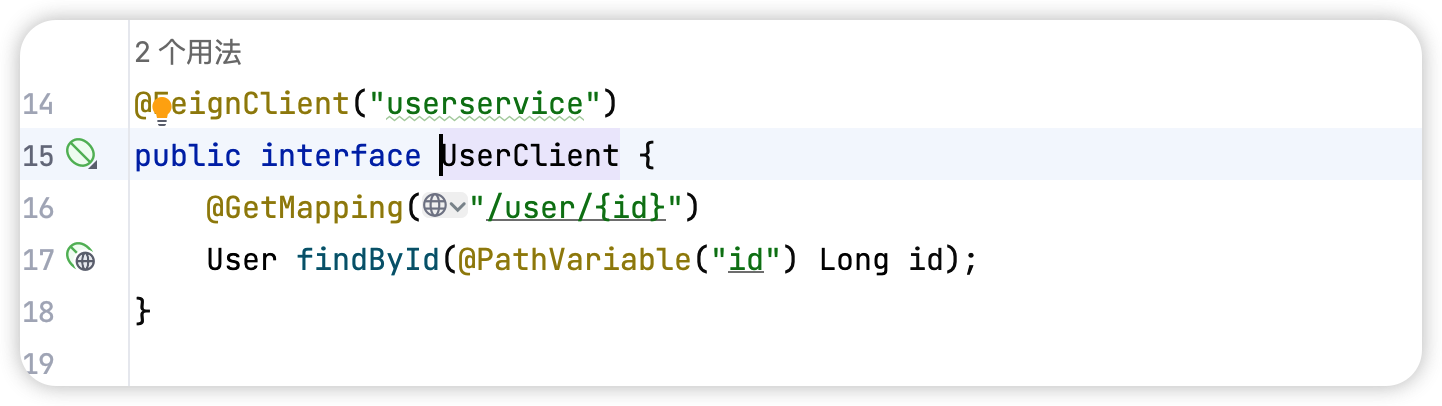
Create a new interface in order-service with the following content:
package cn.itcast.order.client;

import cn.itcast.order.pojo.User;
import org.springframework.cloud.openfeign.FeignClient;
import org.springframework.web.bind.annotation.GetMapping;
import org.springframework.web.bind.annotation.PathVariable;

@FeignClient("userservice")
public interface UserClient {


    @GetMapping("/user/{id}")
    User findById(@PathVariable("id") Long id);
}
This client is mainly based on SpringMVC annotations to declare remote call information, such as:
- Service name: userservice
- Request method: GET
- Request path: /user/{id}
- Request parameter: Long id
- Return value type: User
In this way, Feign can help us send http requests without using RestTemplate to send them ourselves.
4) test
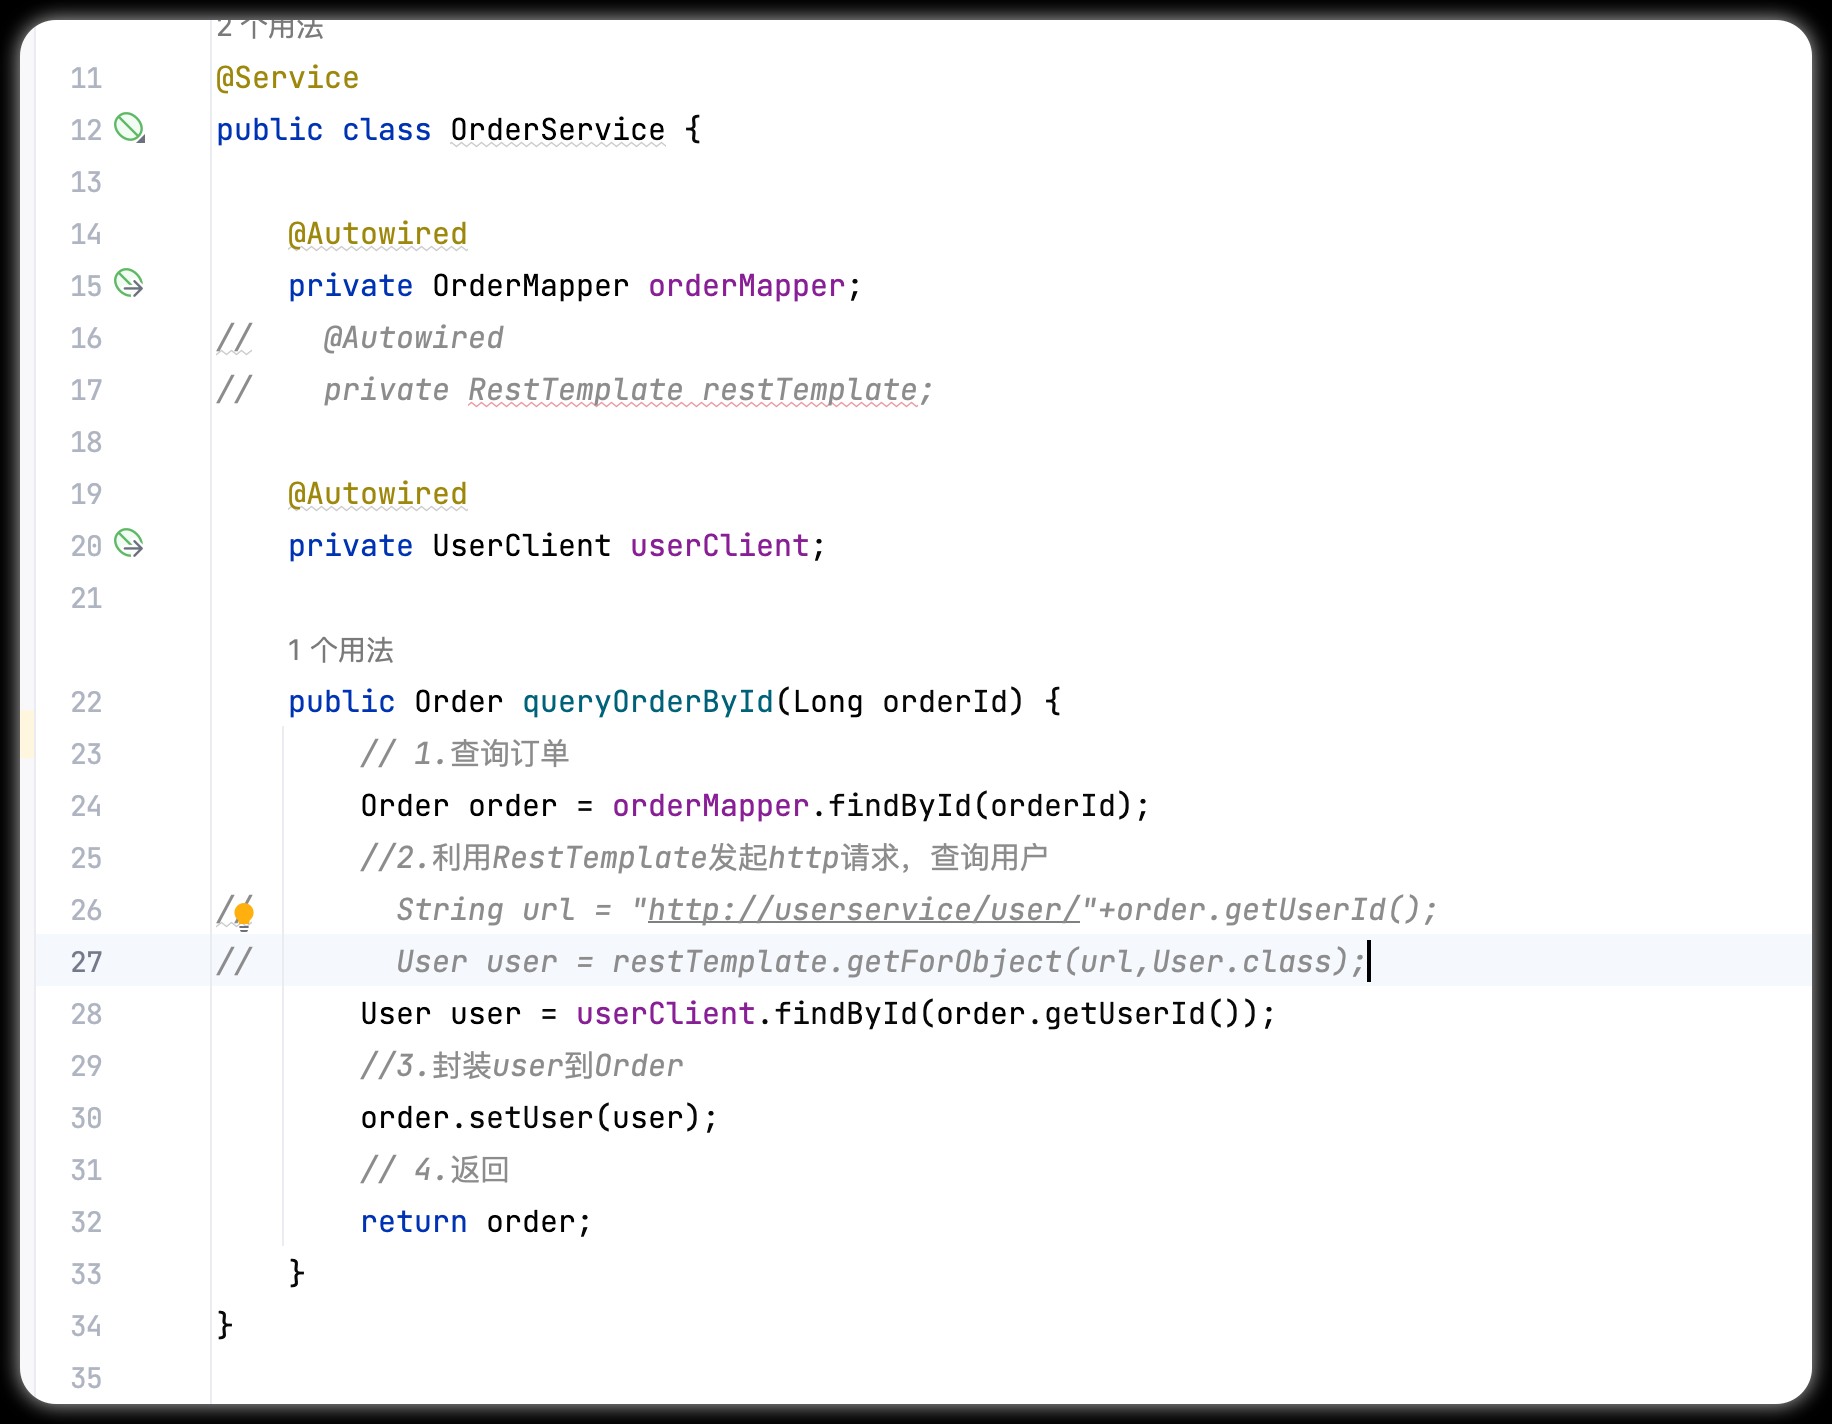
Modify the queryOrderById method in the OrderService class in order-service, and use Feign client instead of RestTemplate:
5) Summary
Steps to use Feign:
① Introduce dependency
② Add @EnableFeignClients annotation
③ Write the FeignClient interface
④ Use the method defined in FeignClient instead of RestTemplate
2. Custom configuration
Feign can support many custom configurations, as shown in the following table:
| type | effect | illustrate |
|---|---|---|
| feign.Logger.Level | Modify log level | Contains four different levels: NONE, BASIC, HEADERS, FULL |
| feign.codec.Decoder | Parser for the response result | Parsing the results of http remote calls, such as parsing json strings into java objects |
| feign.codec.Encoder | request parameter encoding | Encode request parameters for sending via http requests |
| feign. Contract | Supported Annotation Formats | The default is the annotation of SpringMVC |
| feign. Retryer | Failure retry mechanism | The retry mechanism for request failure, the default is no, but Ribbon's retry will be used |
Under normal circumstances, the default value is enough for us to use. If you want to customize it, you only need to create a custom @Bean to override the default Bean.
2.1 Configuration file method
Modifying feign's log level based on the configuration file can target a single service:
feign:
  client:
    config:
      userservice: # 针对某个微服务的配置
        loggerLevel: FULL #  日志级别
It is also possible to target all services:
feign:
  client:
    config:
      default: # 这里用default就是全局配置,如果是写服务名称,则是针对某个微服务的配置
        loggerLevel: FULL #  日志级别
The log level is divided into four types:
- NONE: Do not record any log information, which is the default value.
- BASIC: Only log the request method, URL, response status code and execution time
- HEADERS: On the basis of BASIC, the header information of the request and response is additionally recorded
- FULL: Record details of all requests and responses, including header information, request body, and metadata.
2.2 Java code method
You can also modify the log level based on Java code, first declare a class, and then declare a Logger.Level object:
public class DefaultFeignConfiguration  {


    @Bean
    public Logger.Level feignLogLevel(){


        return Logger.Level.BASIC; // 日志级别为BASIC
    }
}
If you want to take effect globally , put it in the @EnableFeignClients annotation of the startup class:
@EnableFeignClients(defaultConfiguration = DefaultFeignConfiguration .class)
If it is locally effective , put it in the corresponding @FeignClient annotation:
@FeignClient(value = "userservice", configuration = DefaultFeignConfiguration .class)
Feign's log configuration:
- The first way is to configure the file, feign.client.config.xxx.loggerLevel
- If xxx is default, it means global
- If xxx is a service name, such as userservice, it represents a service
- The second way is to configure the Logger.Level Bean in java code
- If declared in the @EnableFeignClients annotation, it represents the global
- If declared in the @FeignClient annotation, it represents a service
2.3 Feign usage optimization
The bottom layer of Feign initiates http requests and relies on other frameworks. Its underlying client implementation includes:
•URLConnection: default implementation, does not support connection pool
• Apache HttpClient: support connection pool
• OKHttp: support connection pool
Therefore, the main means to improve the performance of Feign is to use the connection pool instead of the default URLConnection.
Here we use Apache's HttpClient to demonstrate.
1) Introduce dependencies
Introduce Apache's HttpClient dependency in the pom file of order-service:
<!--httpClient的依赖 -->
<dependency>
    <groupId>io.github.openfeign</groupId>
    <artifactId>feign-httpclient</artifactId>
</dependency>
2) Configure the connection pool
Add configuration in application.yml of order-service:
feign:
  client:
    config:
      default: # default全局的配置
        loggerLevel: BASIC # 日志级别,BASIC就是基本的请求和响应信息
  httpclient:
    enabled: true # 开启feign对HttpClient的支持
    max-connections: 200 # 最大的连接数
    max-connections-per-route: 50 # 每个路径的最大连接数
Feign's optimization:
1. Try to use basic as the log level
2. Use HttpClient or OKHttp instead of URLConnection
① Introduce feign-httpClient dependency
② The configuration file enables the httpClient function and sets the connection pool parameters
2.4 Best Practices
The so-called best practice refers to the experience summarized in the use process, the best way to use it.
Self-study observation shows that Feign's client is very similar to the controller code of the service provider:
feign client:
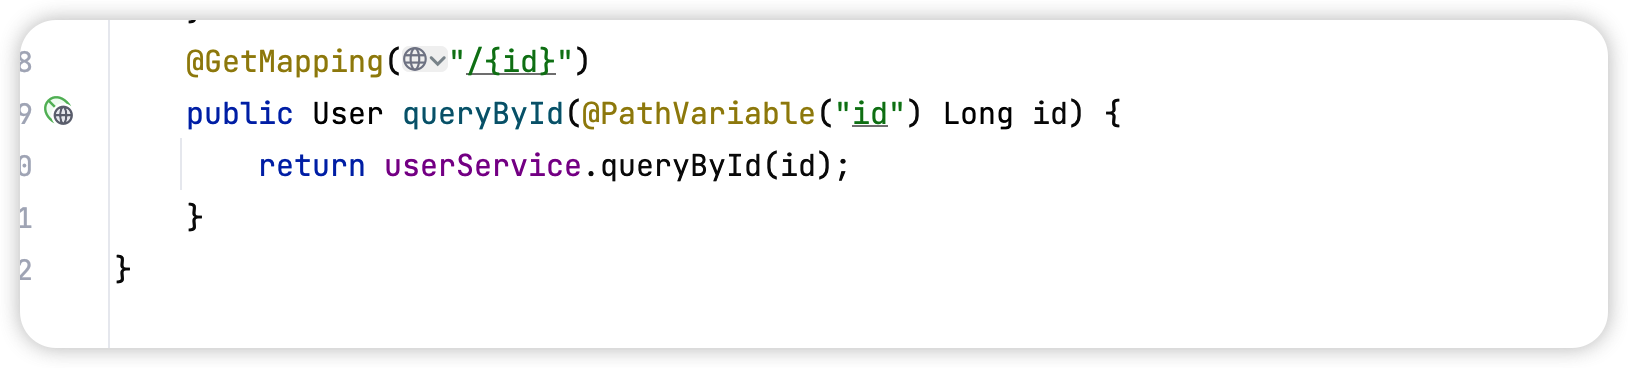
UserController:
Is there a way to simplify this repetitive coding?
Inheritance
The same code can be shared through inheritance:
1) Define an API interface, use the definition method, and make a statement based on SpringMVC annotations.
2) Both the Feign client and the Controller integrate the interface
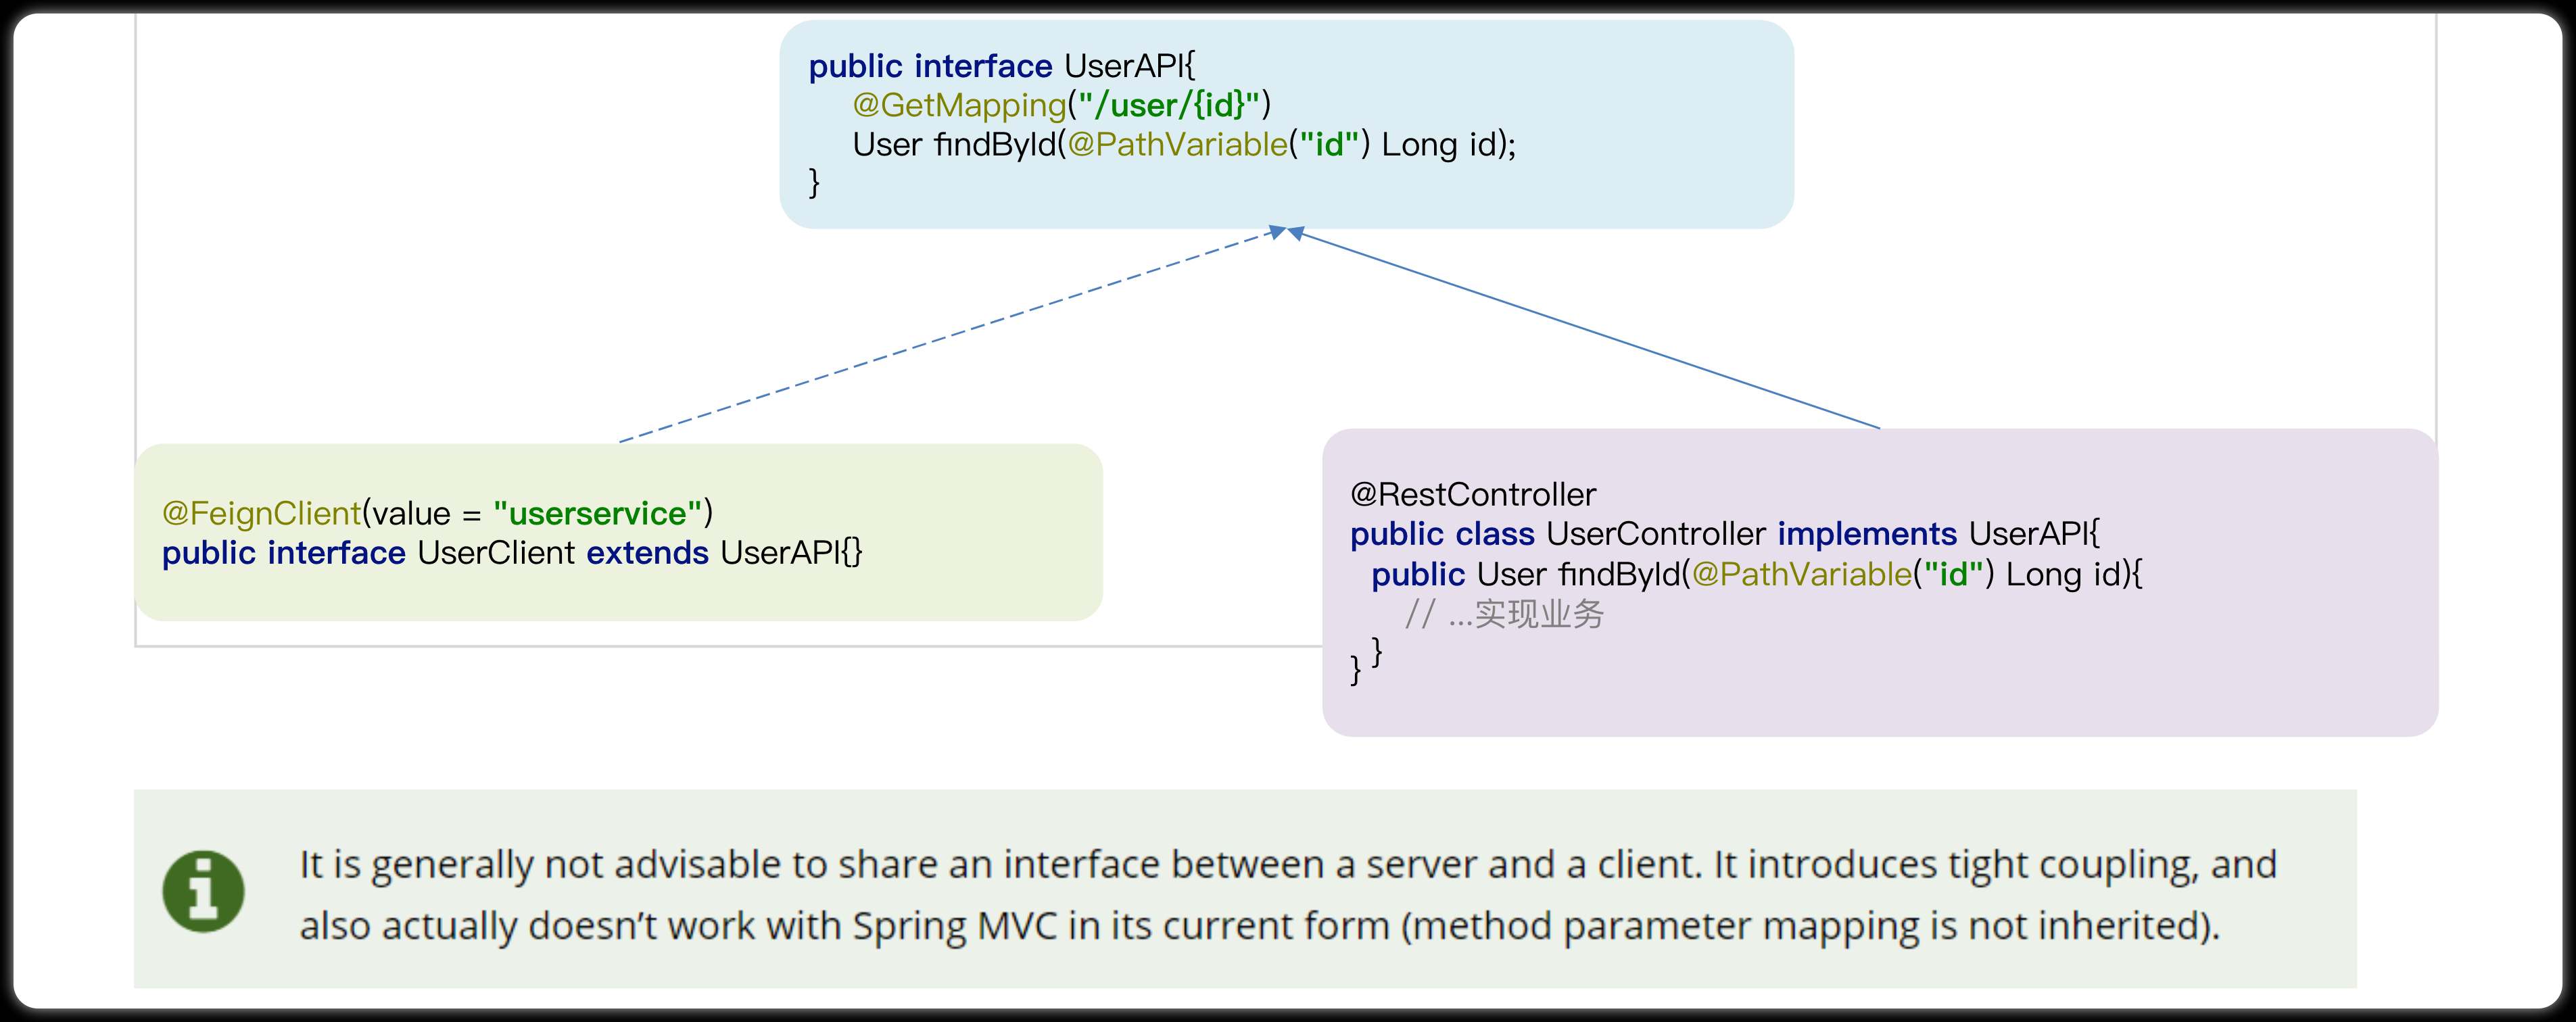
advantage:
- Simple
- code sharing
shortcoming:
-
Service provider and service consumer are tightly coupled
-
The annotation mapping in the parameter list will not be inherited, so the method, parameter list, and annotation must be declared again in the Controller
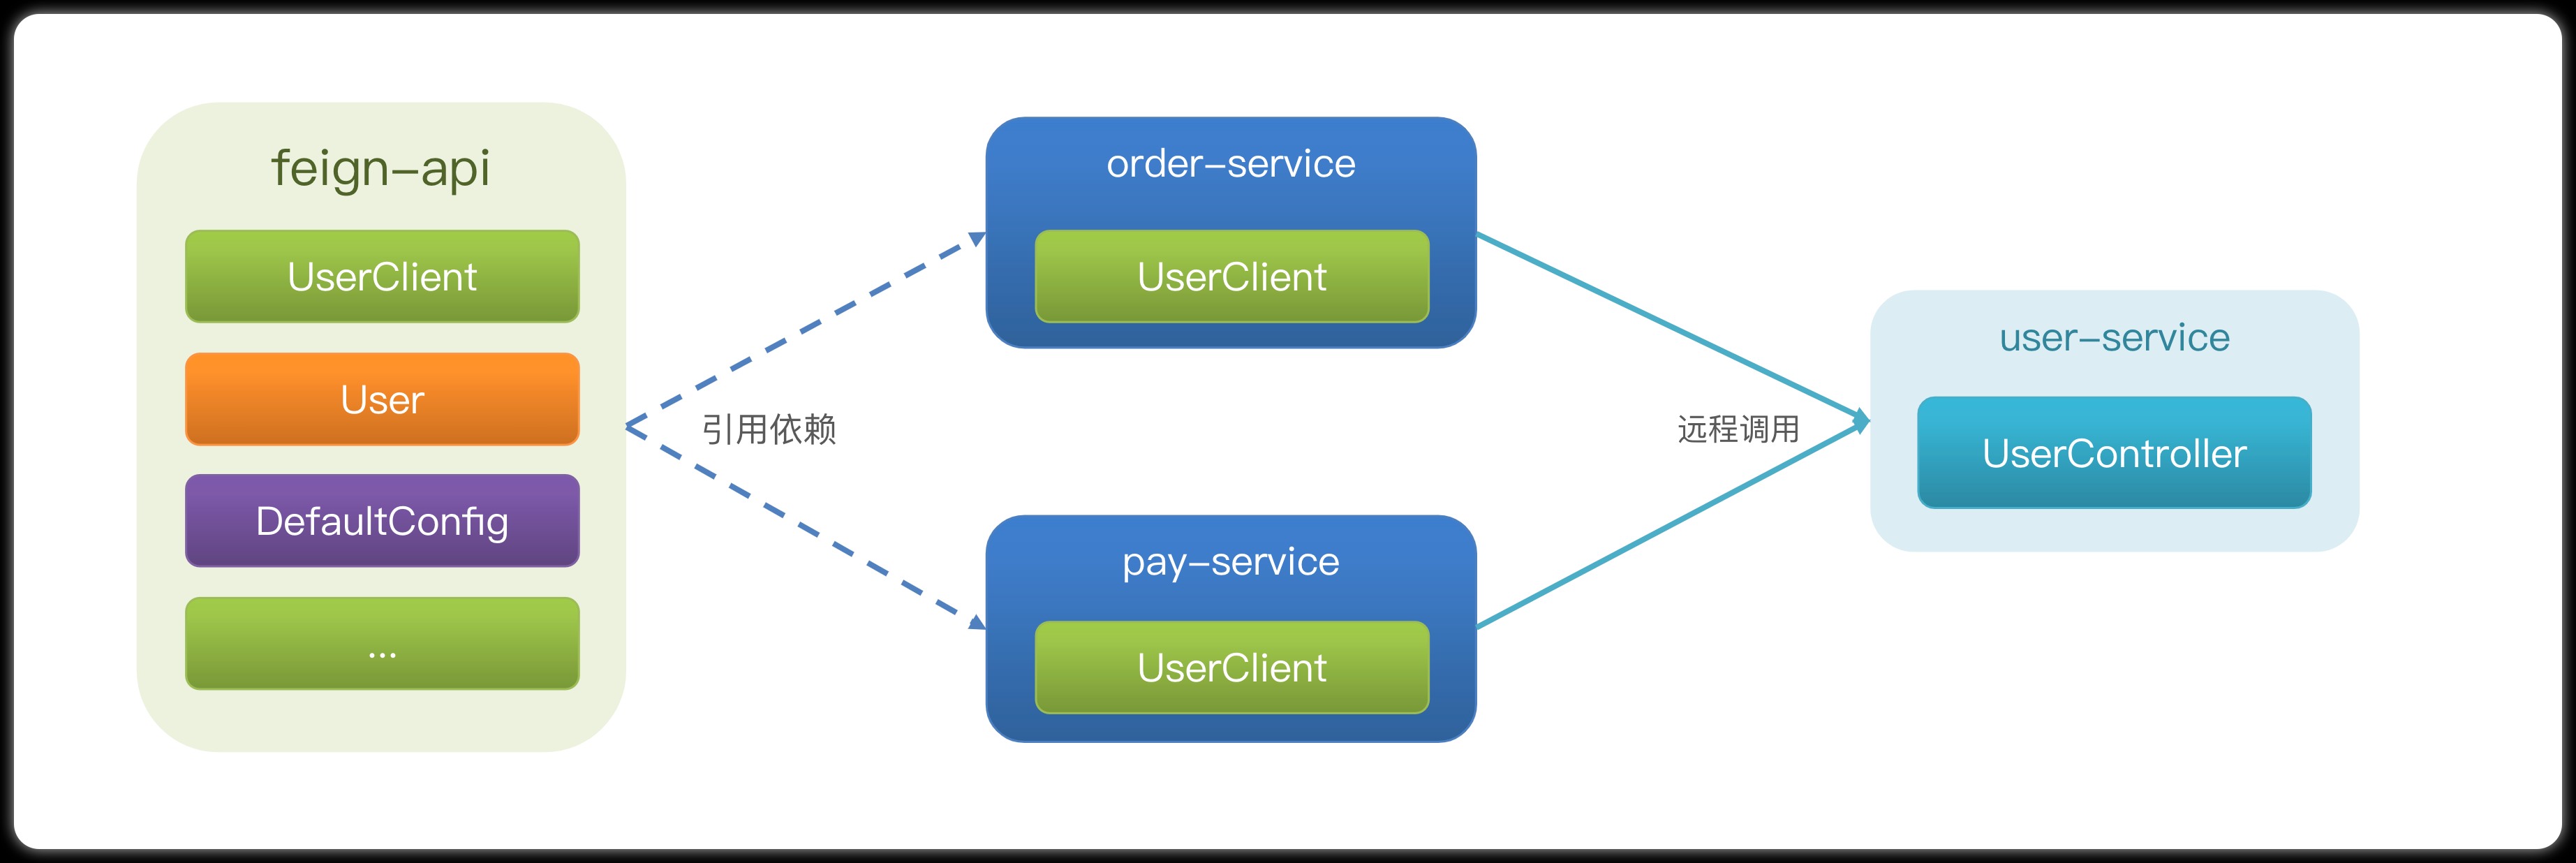
Extraction method
Extract Feign's Client as an independent module, and put the interface-related POJO and default Feign configuration into this module for all consumers to use.
For example, the default configurations of UserClient, User, and Feign are all extracted into a feign-api package, and all microservices can be used directly by referencing this dependency package.
3. Gateway Service Gateway
Spring Cloud Gateway is a new project of Spring Cloud, which is a gateway developed based on responsive programming and event flow technologies such as Spring 5.0, Spring Boot 2.0 and Project Reactor. It aims to provide a simple and effective unified API routing management method for microservice architecture.
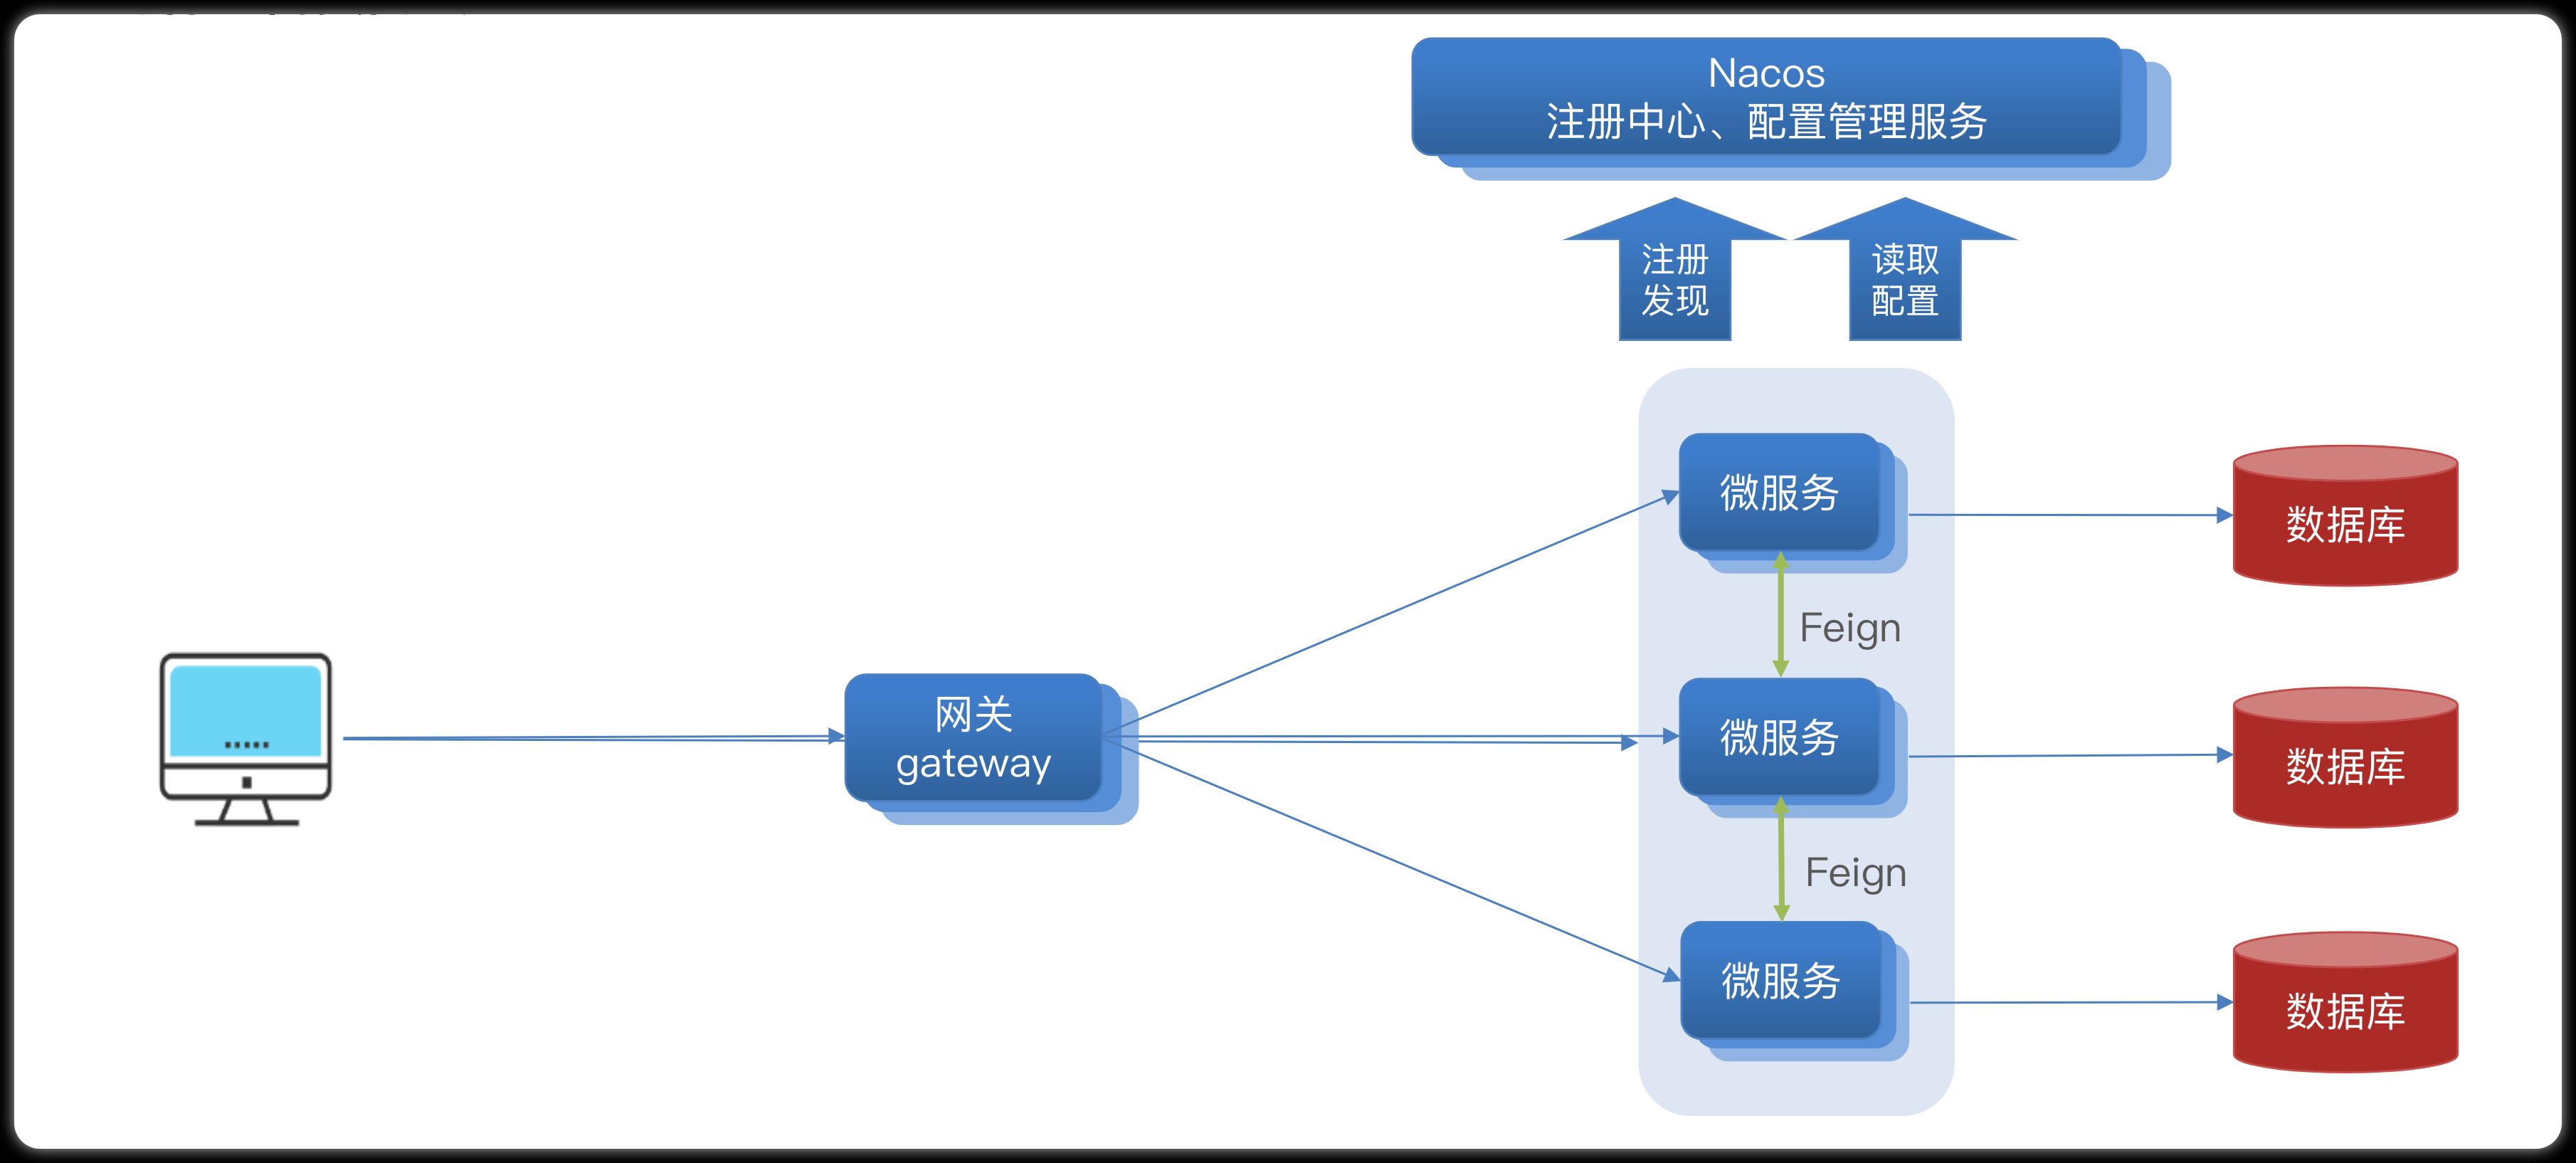
1. Why do we need a gateway
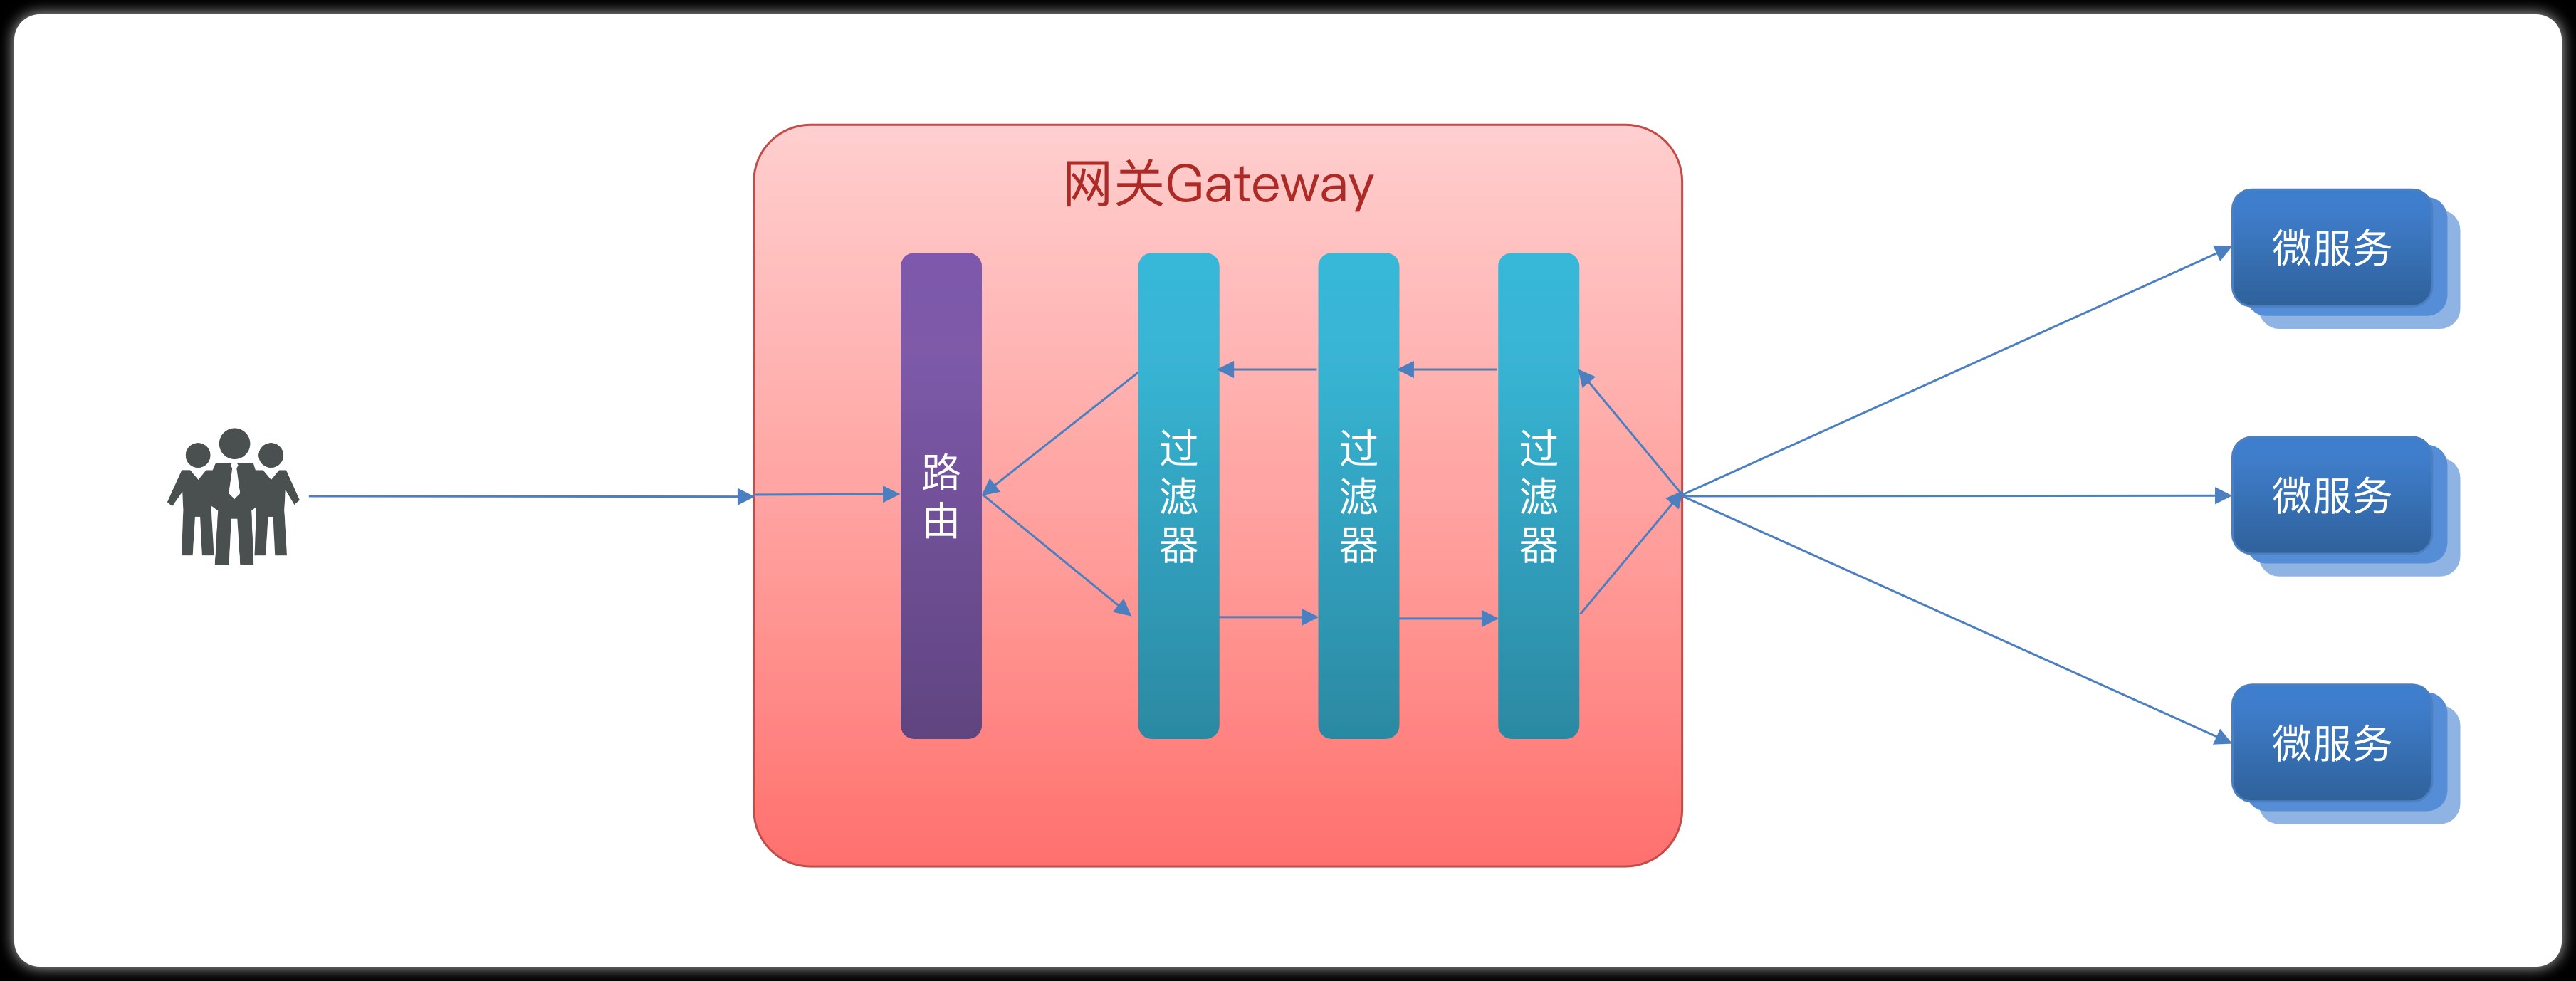
Gateway is the gatekeeper of our services, the unified entrance of all microservices.
The core functional characteristics of the gateway :
- request routing
- access control
- Limiting
Architecture diagram:
Access control : As the entry point of microservices, the gateway needs to verify whether the user is eligible for the request, and intercept it if not.
Routing and load balancing : All requests must first pass through the gateway, but the gateway does not process business, but forwards the request to a microservice according to certain rules. This process is called routing. Of course, when there are multiple target services for routing, load balancing is also required.
Current limiting : When the request traffic is too high, the gateway will release the request according to the speed that the downstream microservice can accept, so as to avoid excessive service pressure.
There are two types of gateway implementations in Spring Cloud:
- gateway
- zul
Zuul is a Servlet-based implementation and belongs to blocking programming. Spring Cloud Gateway is based on WebFlux provided in Spring 5, which is an implementation of responsive programming and has better performance.
2. Gateway quick start
Next, we will demonstrate the basic routing function of the gateway. The basic steps are as follows:
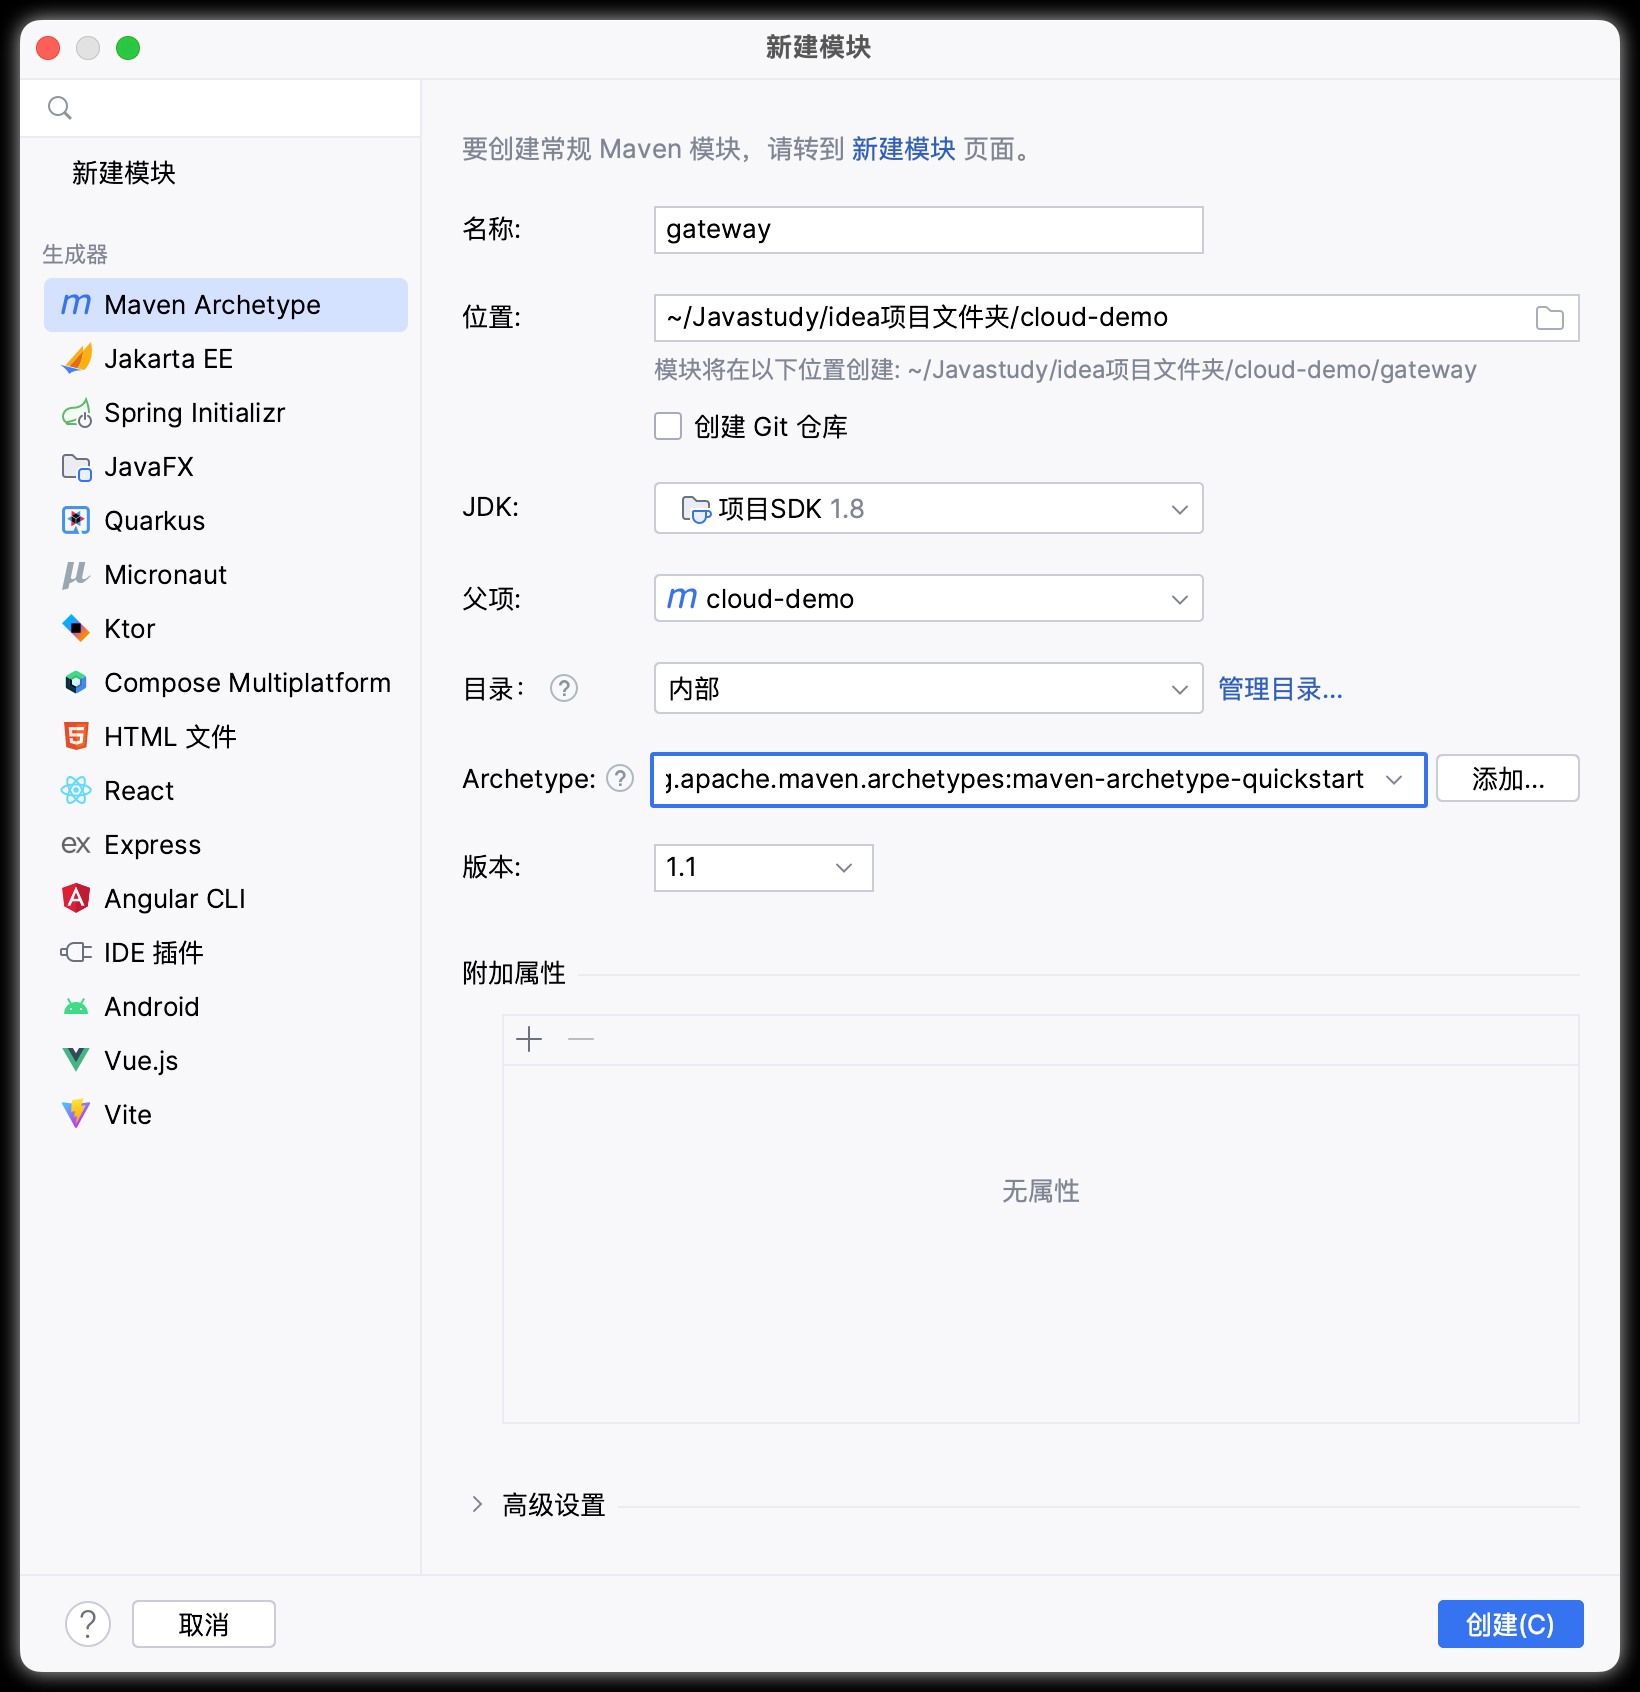
- Create a SpringBoot project gateway and introduce gateway dependencies
- Write startup class
- Write basic configuration and routing rules
- Start the gateway service for testing
1) Create a gateway service and introduce dependencies
Create a service:
Import dependencies:
<!--网关-->
<dependency>
    <groupId>org.springframework.cloud</groupId>
    <artifactId>spring-cloud-starter-gateway</artifactId>
</dependency>
<!--nacos服务发现依赖-->
<dependency>
    <groupId>com.alibaba.cloud</groupId>
    <artifactId>spring-cloud-starter-alibaba-nacos-discovery</artifactId>
</dependency>
2) Write the startup class
package cn.itcast.gateway;

import org.springframework.boot.SpringApplication;
import org.springframework.boot.autoconfigure.SpringBootApplication;

@SpringBootApplication
public class GatewayApplication {


	public static void main(String[] args) {


		SpringApplication.run(GatewayApplication.class, args);
	}
}
3) Write basic configuration and routing rules
Create an application.yml file with the following content:
server:
  port: 10010 # 网关端口
spring:
  application:
    name: gateway # 服务名称
  cloud:
    nacos:
      server-addr: localhost:8848 # nacos地址
    gateway:
      routes: # 网关路由配置
        - id: user-service # 路由id,自定义,只要唯一即可
          # uri: http://127.0.0.1:8081 # 路由的目标地址 http就是固定地址
          uri: lb://userservice # 路由的目标地址 lb就是负载均衡,后面跟服务名称
          predicates: # 路由断言,也就是判断请求是否符合路由规则的条件
            - Path=/user/** # 这个是按照路径匹配,只要以/user/开头就符合要求
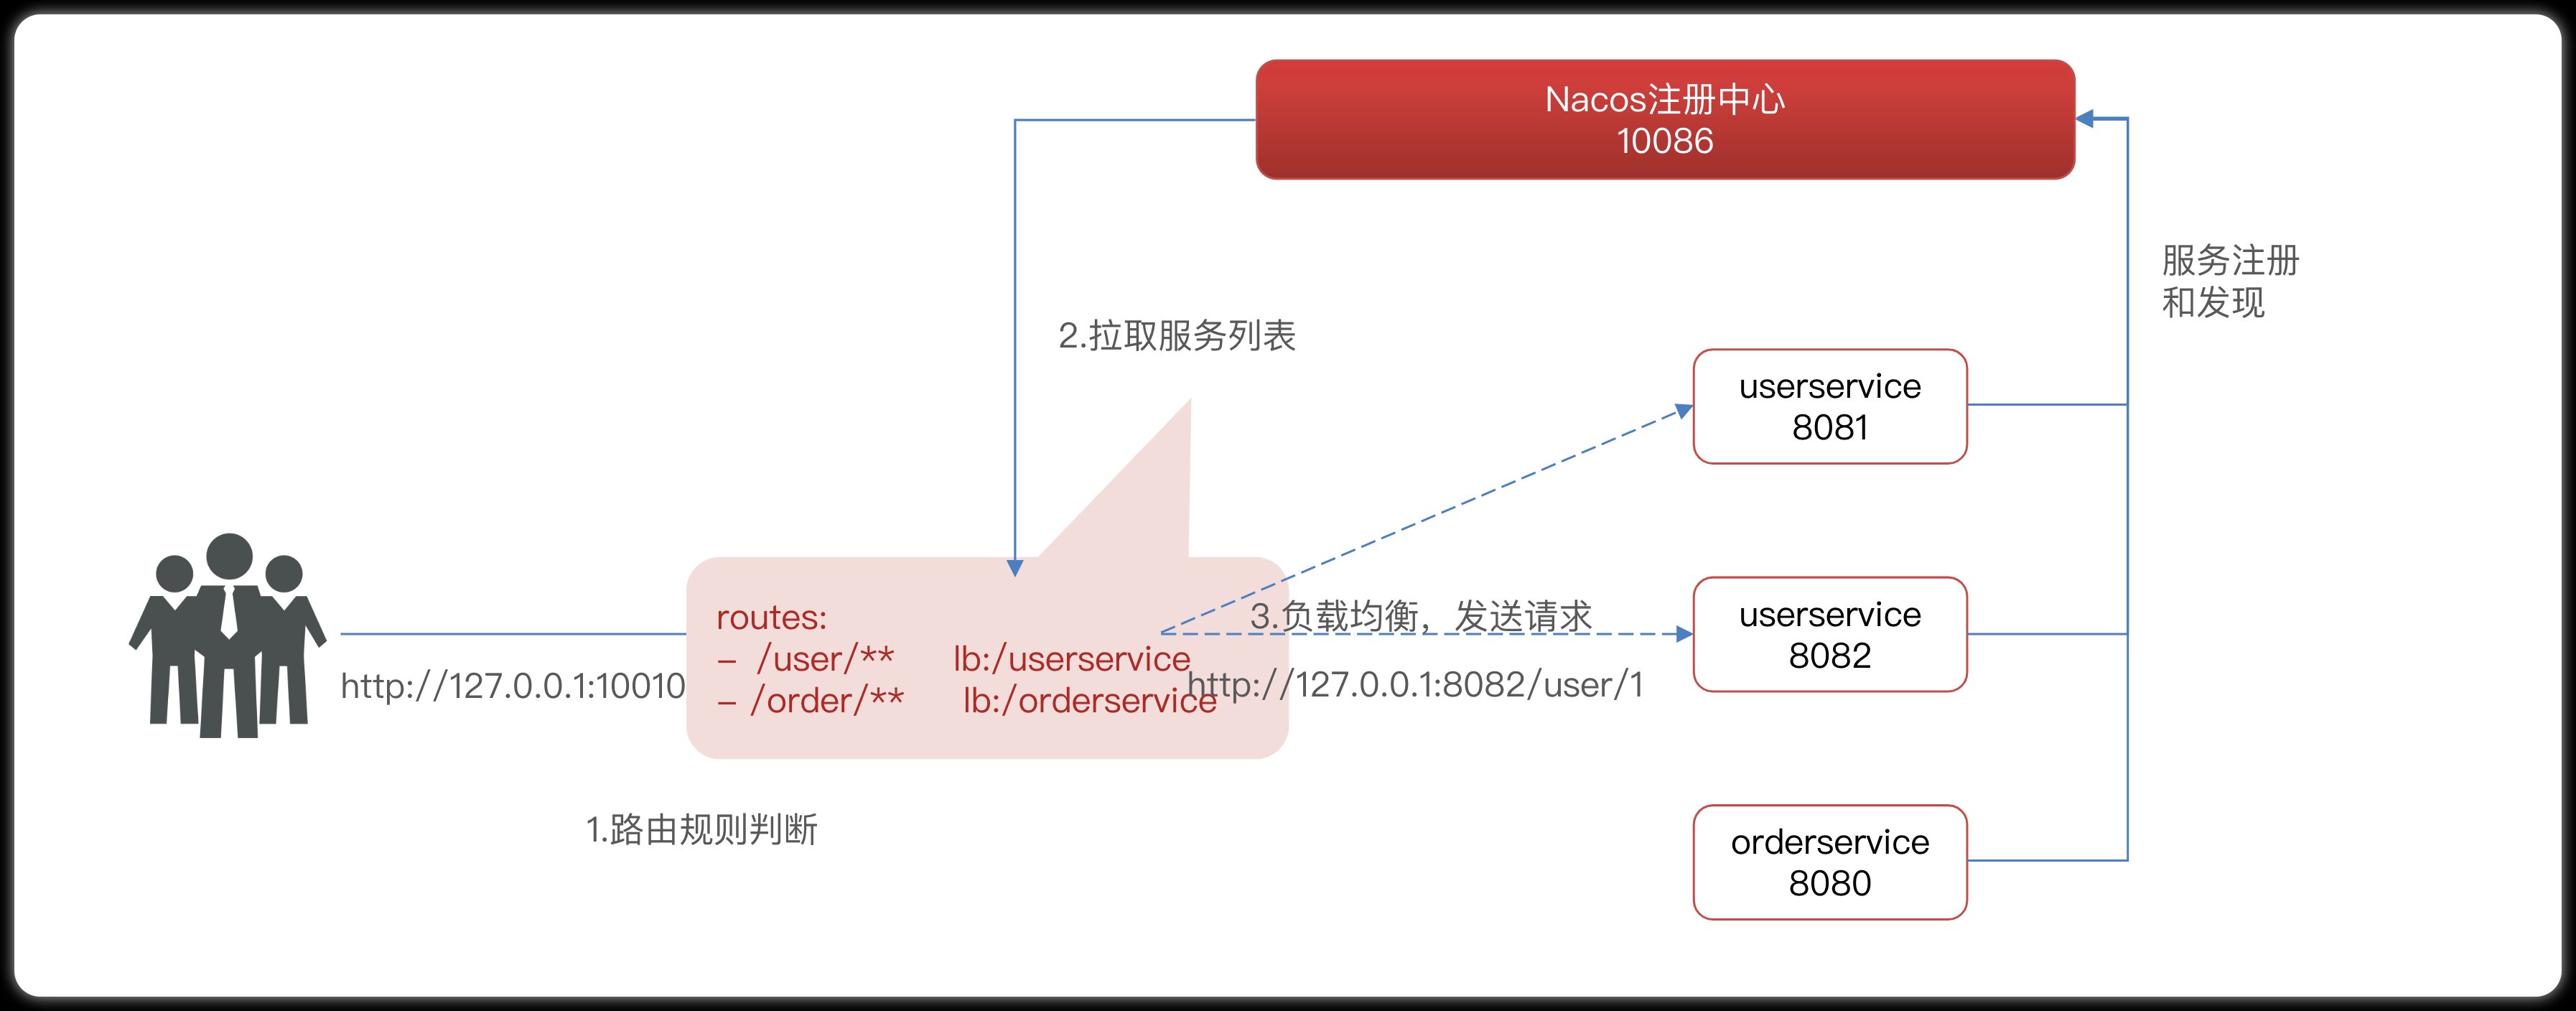
We will Pathproxy all requests that match the rules to urithe address specified by the parameter.
In this example, we proxy /user/**the initial request to, lb://userservicelb is load balancing, pull the service list according to the service name, and realize load balancing.
4) Restart the test
Restart the gateway, when accessing http://localhost:10010/user/1, it complies with /user/**the rules, the request is forwarded to uri: http://userservice/user/1, and the result is obtained:
5) Flow chart of gateway routing
The entire access process is as follows:
Summarize:
Gateway construction steps:
-
Create a project, introduce nacos service discovery and gateway dependencies
-
Configure application.yml, including basic service information, nacos address, routing
Routing configuration includes:
-
Route id: the unique identifier of the route
-
Routing destination (uri): the destination address of the routing, http stands for fixed address, lb stands for load balancing based on service name
-
Routing assertions (predicates): rules for judging routing,
-
Route filters (filters): process the request or response
3. Assertion Factory
Route assertion factory Route Predicate Factory
gateway route can be configured to include:
- Route id: the unique identifier of the route
- uri: routing destination, supports both lb and http
- predicates: routing assertion, to determine whether the request meets the requirements, if it meets the requirements, it will be forwarded to the routing destination
- filters: routing filters, processing requests or responses
The assertion rules we write in the configuration file are just strings, which will be read and processed by the Predicate Factory and turned into conditions for routing judgments
For example, Path=/user/** is matched according to the path. This rule is determined by
org.springframework.cloud.gateway.handler.predicate.PathRoutePredicateFactoryclass to
For processing, there are more than a dozen assertion factories like this in Spring Cloud Gateway:
| name | illustrate | example |
|---|---|---|
| After | is a request after a certain point in time | - After=2037-01-20T17:42:47.789-07:00[America/Denver] |
| Before | is a request before some point in time | - Before=2031-04-13T15:14:47.433+08:00[Asia/Shanghai] |
| Between | is a request before a certain two points in time | - Between=2037-01-20T17:42:47.789-07:00[America/Denver], 2037-01-21T17:42:47.789-07:00[America/Denver] |
| Cookie | Requests must contain certain cookies | - Cookie=chocolate, ch.p |
| Header | Requests must contain certain headers | - Header=X-Request-Id, \d+ |
| Host | The request must be to access a certain host (domain name) | - Host=.somehost.org,.anotherhost.org |
| Method | The request method must be specified | - Method=GET,POST |
| Path | The request path must conform to the specified rules | - Path=/red/{segment},/blue/** |
| Query | The request parameters must contain the specified parameters | - Query=name, Jack or - Query=name |
| RemoteAddr | The requester's ip must be in the specified range | - RemoteAddr=192.168.1.1/24 |
| Weight | weight processing |
We only need to master the routing engineering of Path.
What is the role of PredicateFactory?
- Read user-defined assertion conditions and make judgments on requests
What does Path=/user/** mean?
- If the path starts with /user, it is considered to be in compliance
4. Filter factory
GatewayFilter is a filter provided in the gateway, which can process the requests entering the gateway and the responses returned by microservices:

4.1 Types of routing filters
Spring provides 31 different route filter factories. For example:
| name | illustrate |
|---|---|
| AddRequestHeader | Add a request header to the current request |
| RemoveRequestHeader | Remove a request header from the request |
| AddResponseHeader | Add a response header to the response result |
| RemoveResponseHeader | There is a response header removed from the response result |
| RequestRateLimiter | limit the amount of requests |
4.2 Request header filter
Let's take AddRequestHeader as an example to explain.
Requirement : Add a request header to all requests entering userservice: Truth=itcast is freaking awesome!
Just modify the application.yml file of the gateway service and add route filtering:
spring:
  cloud:
    gateway:
      routes:
      - id: user-service
        uri: lb://userservice
        predicates:
        - Path=/user/**
        filters: # 过滤器
        - AddRequestHeader=Truth, Itcast is freaking awesome! # 添加请求头
The current filter is written under the userservice route, so it is only valid for requests to access userservice.
4.3 Default filter
Let's take AddRequestHeader as an example to explain.
Requirement : Add a request header to all requests entering userservice: Truth=itcast is freaking awesome!
Just modify the application.yml file of the gateway service and add route filtering:
spring:
  cloud:
    gateway:
      routes:
      - id: user-service
        uri: lb://userservice
        predicates:
        - Path=/user/**
        filters: # 过滤器
        - AddRequestHeader=Truth, Itcast is freaking awesome! # 添加请求头
The current filter is written under the userservice route, so it is only valid for requests to access userservice.
Summarize
What is the role of the filter?
① Process the routing request or response, such as adding a request header
② The filter configured under the route only takes effect for the request of the current route
What is the role of defaultFilters?
① A filter that is effective for all routes
5. Global filter
5.1 Function
The role of the global filter is also to process all requests and microservice responses entering the gateway, which is the same as the role of GatewayFilter. The difference is that GatewayFilter is defined through configuration, and the processing logic is fixed; while the logic of GlobalFilter needs to be implemented by writing code yourself.
The way of definition is to implement the GlobalFilter interface.
public interface GlobalFilter {


    /**
     *  处理当前请求,有必要的话通过{@link GatewayFilterChain}将请求交给下一个过滤器处理
     *
     * @param exchange 请求上下文,里面可以获取Request、Response等信息
     * @param chain 用来把请求委托给下一个过滤器
     * @return {@code Mono<Void>} 返回标示当前过滤器业务结束
     */
    Mono<Void> filter(ServerWebExchange exchange, GatewayFilterChain chain);
}
Write custom logic in filter to achieve the following functions:
- Login Status Judgment
- permission check
- Request throttling, etc.
5.2 Custom global filter
Requirements: Define a global filter, intercept requests, and determine whether the parameters of the request meet the following conditions:
-
Whether there is authorization in the parameter,
-
Whether the authorization parameter value is admin
If it is satisfied at the same time, let it go, otherwise block it
accomplish:
Define a filter in gateway:
package tech.wangkay.gateway.filters;

import org.springframework.cloud.gateway.filter.GatewayFilterChain;
import org.springframework.cloud.gateway.filter.GlobalFilter;
import org.springframework.core.annotation.Order;
import org.springframework.http.HttpStatus;
import org.springframework.stereotype.Component;
import org.springframework.web.server.ServerWebExchange;
import reactor.core.publisher.Mono;

@Order(-1)
@Component
public class AuthorizeFilter implements GlobalFilter {


    @Override
    public Mono<Void> filter(ServerWebExchange exchange, GatewayFilterChain chain) {


        // 1.获取请求参数
        MultiValueMap<String, String> params = exchange.getRequest().getQueryParams();
        // 2.获取authorization参数
        String auth = params.getFirst("authorization");
        // 3.校验
        if ("admin".equals(auth)) {


            // 放行
            return chain.filter(exchange);
        }
        // 4.拦截
        // 4.1.禁止访问,设置状态码
        exchange.getResponse().setStatusCode(HttpStatus.FORBIDDEN);
        // 4.2.结束处理
        return exchange.getResponse().setComplete();
    }
}
5.3 Filter Execution Order
When a request enters the gateway, it will encounter three types of filters: current route filter, DefaultFilter, GlobalFilter
After requesting routing, the current routing filter, DefaultFilter, and GlobalFilter will be merged into a filter chain (collection), and each filter will be executed in turn after sorting:
What are the rules for sorting?
- Each filter must specify an int type order value, the smaller the order value, the higher the priority, and the higher the execution order .
- GlobalFilter specifies the order value by implementing the Ordered interface or adding the @Order annotation, which is specified by ourselves
- The order of routing filters and defaultFilter is specified by Spring, and the default is to increase from 1 according to the order of declaration.
- When the order values of the filters are the same, they will be executed in the order of defaultFilter > routing filter > GlobalFilter.
For details, you can view the source code:
org.springframework.cloud.gateway.route.RouteDefinitionRouteLocator#getFilters()The method is to load the defaultFilters first, then load the filters of a certain route, and then merge them.
org.springframework.cloud.gateway.handler.FilteringWebHandler#handle()The method will load the global filter, sort according to the order after merging with the previous filter, and organize the filter chain
6. Cross-domain issues
6.1 What is a cross-domain problem
Cross-domain: Inconsistent domain names are cross-domain, mainly including:
-
Different domain names: www.taobao.com and www.taobao.org and www.jd.com and miaosha.jd.com
-
Same domain name, different ports: localhost:8080 and localhost8081
Cross-domain problem: The browser prohibits the originator of the request from making a cross-domain ajax request with the server, and the request is intercepted by the browser
Solution: CORS, this should have been learned before, so I won't repeat it here. Friends who don’t know can check https://www.ruanyifeng.com/blog/2016/04/cors.html
6.2 Solve cross-domain problems
In the application.yml file of the gateway service, add the following configuration:
spring:
  cloud:
    gateway:
      # 。。。
      globalcors: # 全局的跨域处理
        add-to-simple-url-handler-mapping: true # 解决options请求被拦截问题
        corsConfigurations:
          '[/**]':
            allowedOrigins: # 允许哪些网站的跨域请求
              - "http://localhost:8090"
            allowedMethods: # 允许的跨域ajax的请求方式
              - "GET"
              - "POST"
              - "DELETE"
              - "PUT"
              - "OPTIONS"
            allowedHeaders: "*" # 允许在请求中携带的头信息
            allowCredentials: true # 是否允许携带cookie
            maxAge: 360000 # 这次跨域检测的有效期