Getting Started with Gateway and Nacos
1. Architecture analysis
If there are many more microservices in a project, there will be disadvantages in directly requesting the microservices from the front end. The front end configures an absolute path for each request address, which is very unfavorable for system maintenance. For example, the code below requests system management. The service address uses localhost

When the system goes online, this needs to be changed to the domain name of the public network. If there are many such addresses, it will be very troublesome.
Based on this problem, a gateway can be used to solve it, as shown below:
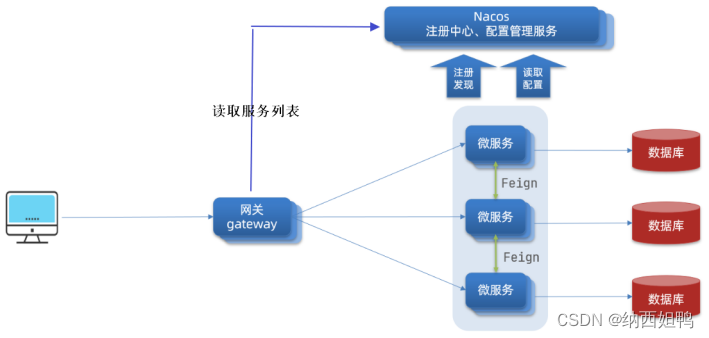
Then based on the gateway, the front end directly requests the address of the microservice and only needs to specify the relative path of each interface.

Moreover, the backend can also change the address for accessing the microservice to the address for accessing the gateway, and then the gateway performs routing.

The gateway can route requests to specific microservices, reducing the cost of connecting microservices to the outside world. In addition, the gateway can also implement functions such as permission control and current limiting.
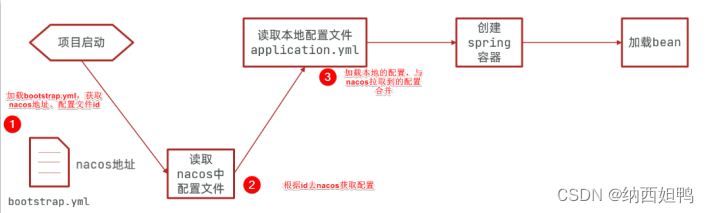
Then it can be seen from the figure that the gateway is deployedprocessas follows:
1. Start the microservice and register yourself to Nacos. Nacos records the address of each microservice instance.
2. The gateway reads the service list from Nacos, including service name, service address, etc.
3. The request reaches the gateway, and the gateway routes the request to the specific microservice.
2. Build Nacos
Service Discovery Center
To use the gateway, first build Nacos. Nacos has two functions:
1. Service discovery center.
The microservice registers itself with Nacos, and the gateway obtains the microservice list from Nacos.
2. Configuration center.
There are many microservices and their configuration information is also very complex. In order to provide system maintainability, the configuration information of microservices is unified in Nacos configuration.
There are two concepts that need to be understood before building the Nacos service discovery center:namespace and group
namespace: used to distinguish environments, such as development environment, test environment, and production environment.
group: used to distinguish projects, such as: xuecheng-plus project, xuecheng2.0 project
First configure namespace in nacos:
After logging in to Nacos, click "Namespace" on the left menu to enter the namespace management interface.

Click "New Namespace" and fill in the relevant information of the namespace. As shown below:

Register microservice messages into Nacos
- First add dependency management
<dependency>
    <groupId>com.alibaba.cloud</groupId>
    <artifactId>spring-cloud-alibaba-dependencies</artifactId>
    <version>Hoxton.SR9</version>
    <type>pom</type>
    <scope>import</scope>
</dependency>
<!--Nacos服务注册依赖-->
<dependency>
   <groupId>com.alibaba.cloud</groupId>
   <artifactId>spring-cloud-starter-alibaba-nacos-discovery</artifactId>
   <version>2.3.7.RELEASE</version>
</dependency>
2. Configure the address of nacos
Configure the following information in the configuration file:
spring:
  application:
    name: content-api  #微服务名称
  cloud:
    nacos:
      server-addr: 192.168.101.65:8848  #Nacos地址
      discovery:
        namespace: dev  #命名空间
        group: xuecheng-plus-project #组
Restart the service.
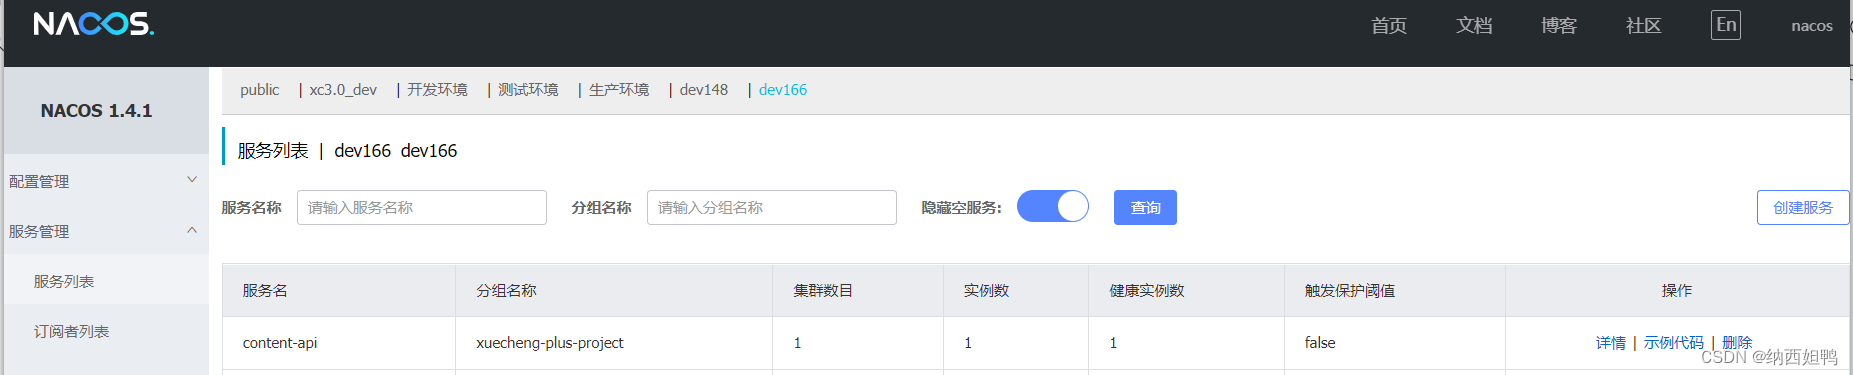
Enter the Nacos service to view the service list and find that there are registered microservice messages
Configuration center
Configuration three elements
After the Nacos service discovery center is built, Nacos is built as the configuration center. Its purpose is to manage all configurations of the project through Nacos.
First classify the configuration files in the project:
1. Configuration unique to each project
This means that the configuration only needs to be configured in some projects, or the configuration has different values in each project.
For example: spring.application.name needs to be configured for each project but the value is different, some projects need to connect to the database but some projects do not, some projects need to configure the message queue but some projects do not.
2. Configuration common to the project
It refers to the configuration with the same configuration content in several projects. For example: redis configuration, many projects use the same redis service, so the configuration is also the same.
In addition, you need to know how nacos locates a specific configuration file, namely:namespace、group、dataid.
1. Find the specific environment and specific projects through namespace and group.
2. Find the specific configuration file through dataid. Dataid consists of three parts.
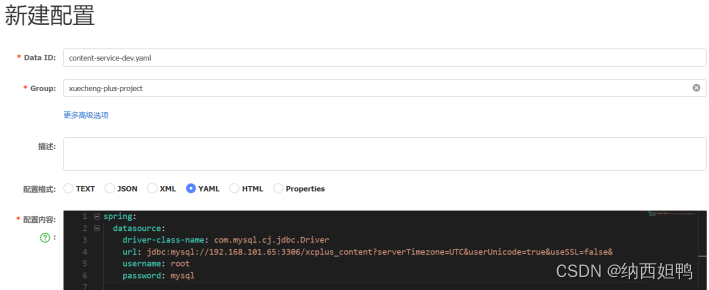
For example: content-service-dev.yaml configuration file consists of three parts: (content-service)-(dev). (yaml)
content-service: The first part, it is the application name configured in application.yaml, that is, the value of spring.application.name.
dev: The second part, it is the environment name, specified through spring.profiles.active,
Yaml: The third part is the suffix of the configuration file. Currently, nacos supports properties, yaml and other format types. This project chooses the yaml format type.
Passed in when we start the projectspring.profiles.activeThe parameters determine which environment configuration file is referenced. For example, passing in spring.profiles.active=dev means using the configuration file of the dev environment, which is content-service-dev.yaml.
For example
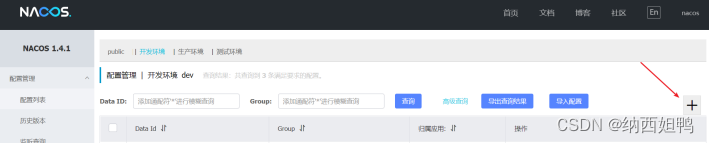
1. Click the plus sign to add configuration
2. Edit configuration
3. Add dependencies
 <!--微服务配置依赖-->
 <dependency>
    <groupId>com.alibaba.cloud</groupId>
    <artifactId>spring-cloud-starter-alibaba-nacos-config</artifactId>
    <version>2.2.6.RELEASE</version>
</dependency>
Modify configuration in configuration file
(See front for details)
YAML
spring:
  application:
    name: content-service
  cloud:
    nacos:
      server-addr: 192.168.101.65:8848
      discovery:
        namespace: dev
        group: xuecheng-plus-project
      config:
        namespace: dev
        group: xuecheng-plus-project
        file-extension: yaml
        refresh-enabled: true

#profiles默认为dev
  profiles:
    active: dev
After the configuration is completed, run the unit test file of the project to see if it can be tested normally. The tracking unit test method can read the database data normally, indicating that the configuration information is read from nacos normally.
Common configuration
If there are configurations that need to be written repeatedly or public configurations, how to configure the public configuration of the project in nacos?
nacos provides shared-configs to introduce public configurations.
For example, if swagger is configured in content-api, all interface projects need to configure swagger. Here, the swagger configuration can be defined as a public configuration, which can be imported into any project.
Create the public configuration of xuecheng-plus separately under the xuecheng-plus-common group, enter the nacos development environment, and add the swagger-dev.yaml public configuration
[External link image transfer failed. The source site may have an anti-leeching mechanism. It is recommended to save the image and upload it directly (img-OSLuJRO1-1689594280792)(file:///C:/Users/a2262/Pictures/Typedown/c50152f7-1c78 -4a9a-aca4-139482cc8dc8.png)]
Then mark the shared configuration information in the configuration file
YAML
spring:
  application:
    name: content-api
  cloud:
    nacos:
      server-addr: 192.168.101.65:8848
      discovery:
        namespace: dev
        group: xuecheng-plus-project
      config:
        namespace: dev
        group: xuecheng-plus-project
        file-extension: yaml
        refresh-enabled: true #开启自动更新配置
        extension-configs: #扩展配置,下面是扩展配置的信息(Nacos中的配置)
          - data-id: content-service-${

    spring.profiles.active}.yaml
            group: xuecheng-plus-project
            refresh: true
        shared-configs: #共享配置,下面是共享配置的信息
          - data-id: logging-${

    spring.profiles.active}.yaml
            group: xuecheng-plus-common
            refresh: true
  profiles:
    active: dev #环境,也是后缀
New configuration
[External link image transfer failed. The source site may have an anti-leeching mechanism. It is recommended to save the image and upload it directly (img-PxnA3s17-1689594280793)(file:///C:/Users/a2262/Pictures/Typedown/67e1ad57-181d -4bfd-b5a6-0e2800fb4022.png)]
After the configuration is completed, restart the project and see if there are corresponding configuration results. If there are, it means the configuration is successful.
Configure priority
The order in which SpringBoot reads configuration files is as follows:
The forms of introducing configuration files are:
1. Introduce by project application name
2. Introduce through extended configuration file
3. Introduce via shared configuration file
4. Local configuration file
The priority of each configuration file: project application name configuration file > extended configuration file > shared configuration file > local configuration file.
If we want to give local priority, we can configure it in the nacos configuration file as follows:
#配置本地优先
spring:
 cloud:
  config:
    override-none: true
3. Build Gateway
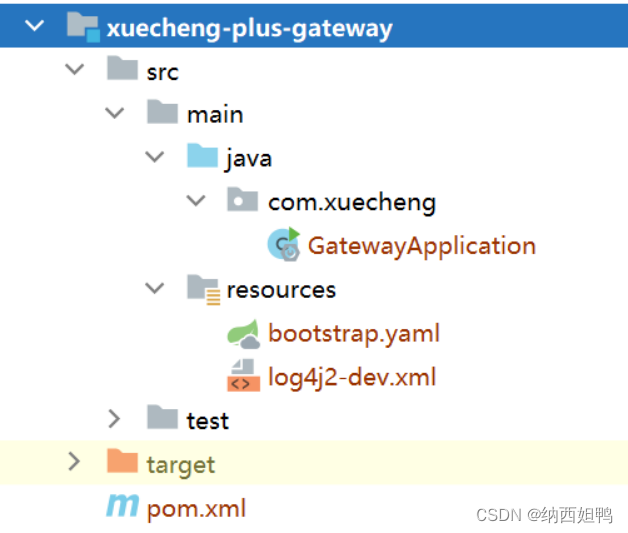
We need to create a gateway project.
1. Create a new gateway project.
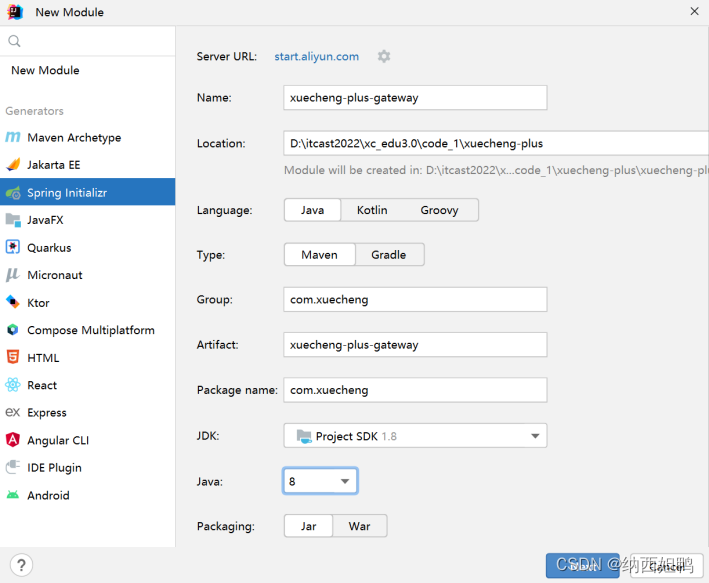
2.Project structure
3. Add dependencies
<artifactId>xuecheng-plus-gateway</artifactId>

<dependencies>

    <!--网关-->
    <dependency>
        <groupId>org.springframework.cloud</groupId>
        <artifactId>spring-cloud-starter-gateway</artifactId>
        <version>2.2.6.RELEASE</version>
    </dependency>

    <!--服务发现中心-->
    <dependency>
        <groupId>com.alibaba.cloud</groupId>
        <artifactId>spring-cloud-starter-alibaba-nacos-discovery</artifactId>
        <version>2.2.6.RELEASE</version>
    </dependency>
    <dependency>
        <groupId>com.alibaba.cloud</groupId>
        <artifactId>spring-cloud-starter-alibaba-nacos-config</artifactId>
        <version>2.2.6.RELEASE</version>
    </dependency>
    <dependency>
        <groupId>com.alibaba</groupId>
        <artifactId>fastjson</artifactId>
        <version>1.2.83</version>
    </dependency>
    <dependency>
        <groupId>org.projectlombok</groupId>
        <artifactId>lombok</artifactId>
        <version>1.18.16</version>
    </dependency>
    <!-- 排除 Spring Boot 依赖的日志包冲突 -->
    <dependency>
        <groupId>org.springframework.boot</groupId>
        <artifactId>spring-boot-starter</artifactId>
        <version>2.3.7.RELEASE</version>
        <exclusions>
            <exclusion>
                <groupId>org.springframework.boot</groupId>
                <artifactId>spring-boot-starter-logging</artifactId>
            </exclusion>
        </exclusions>
    </dependency>

    <!-- Spring Boot 集成 log4j2 -->
    <dependency>
        <groupId>org.springframework.boot</groupId>
        <artifactId>spring-boot-starter-log4j2</artifactId>
        <version>2.3.7.RELEASE</version>
    </dependency>


</dependencies>
4. Configure the bootstrap.yaml configuration file of the gateway
YAML
#微服务配置
spring:
  application:
    name: gateway
  cloud:
    nacos:
      server-addr: 192.168.101.65:8848
      discovery:
        namespace: dev
        group: xuecheng-plus-project
      config:
        namespace: dev
        group: xuecheng-plus-project
        file-extension: yaml
        refresh-enabled: true
        shared-configs:
          - data-id: logging-${

    spring.profiles.active}.yaml
            group: xuecheng-plus-common
            refresh: true


  profiles:
    active: dev
5. Configure gateway routing policy on nacos:
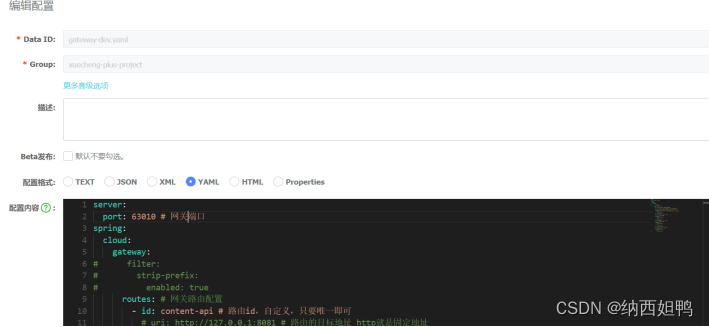
The configuration is as follows
YAML
server:
  port: 63010 # 网关端口
spring:
  cloud:
    gateway:
#      filter:
#        strip-prefix:
#          enabled: true
      routes: # 网关路由配置,这下面是我的几个微服务信息
        - id: content-api # 路由id,自定义,只要唯一即可
          # uri: http://127.0.0.1:8081 # 路由的目标地址 http就是固定地址
          uri: lb://content-api # 路由的目标地址 lb就是负载均衡,后面跟服务名称
          predicates: # 路由断言,也就是判断请求是否符合路由规则的条件
            - Path=/content/** # 这个是按照路径匹配,只要以/content/开头就符合要求
#          filters:
#            - StripPrefix=1
        - id: system-api
          # uri: http://127.0.0.1:8081
          uri: lb://system-api
          predicates:
            - Path=/system/**
#          filters:
#            - StripPrefix=1
        - id: media-api
          # uri: http://127.0.0.1:8081
          uri: lb://media-api
          predicates:
            - Path=/media/**
#          filters:
#            - StripPrefix=1
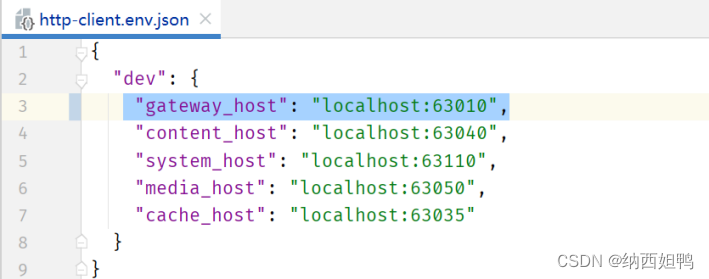
6. Change the address requesting the microservice to the gateway address
for example
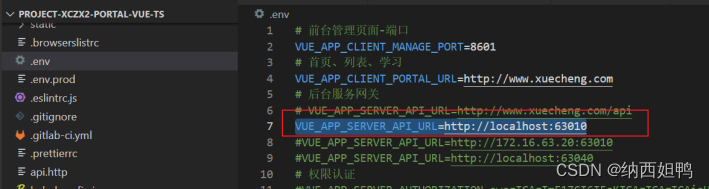
or
Start the project test. If the request is normal, the deployment is successful.