Apple login can be regarded as a kind of third-party login, that is, log in with Apple ID, provided that you already have an Apple developer account, go directly to the topic.
Add App IDs
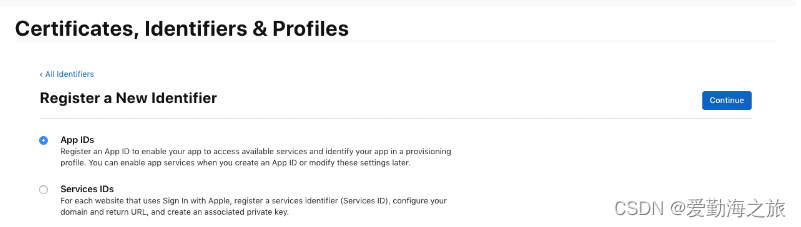
and fill in the Bundle ID
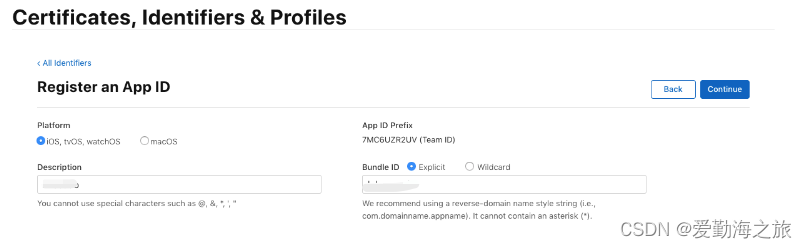
. Check "Sign In with Apple"

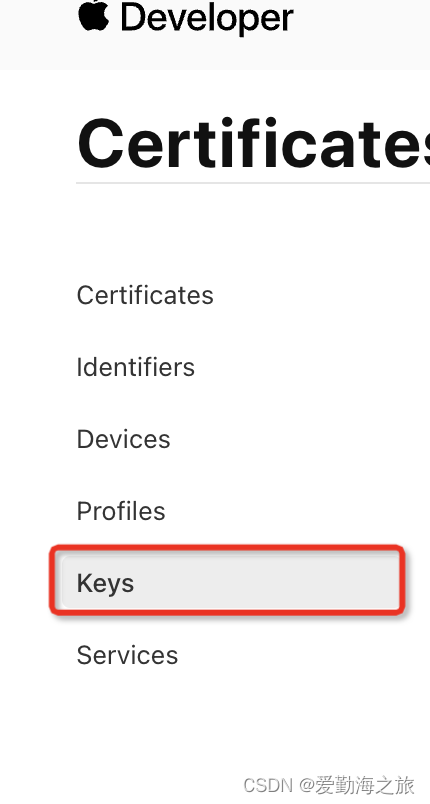
to create a Key.
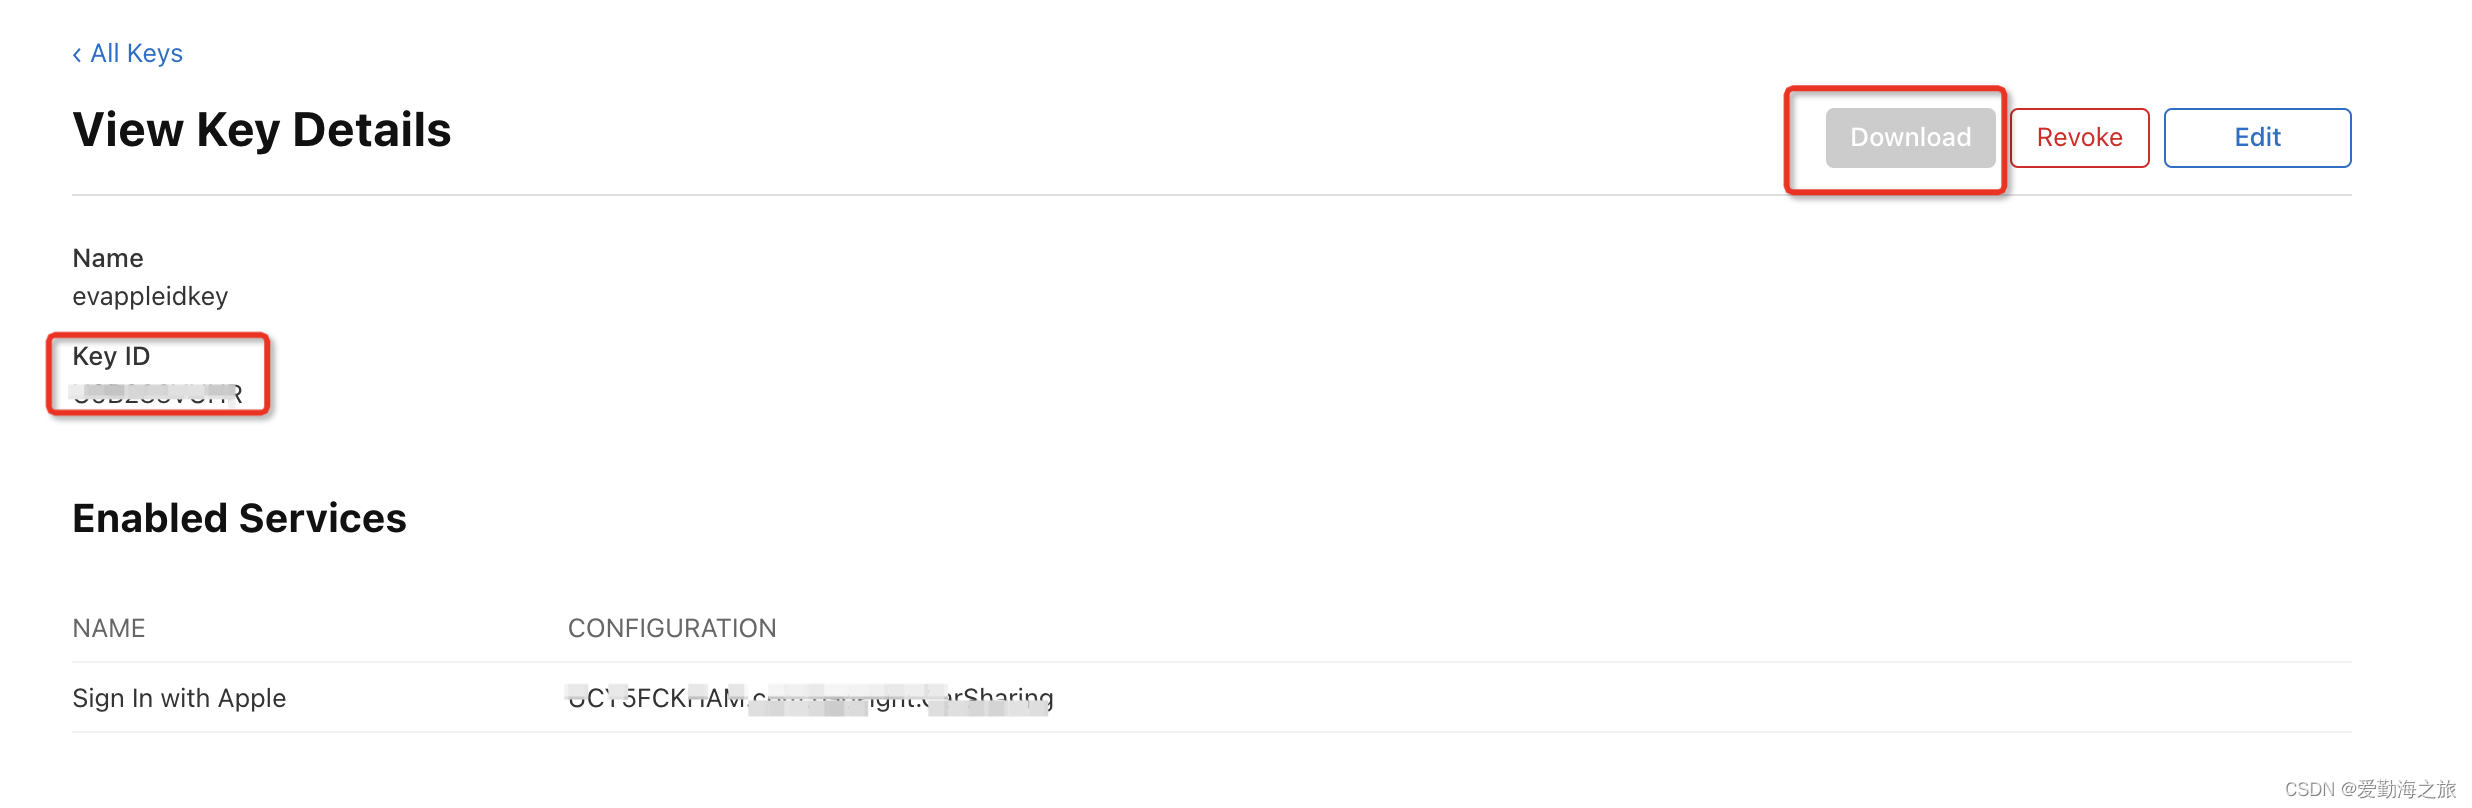
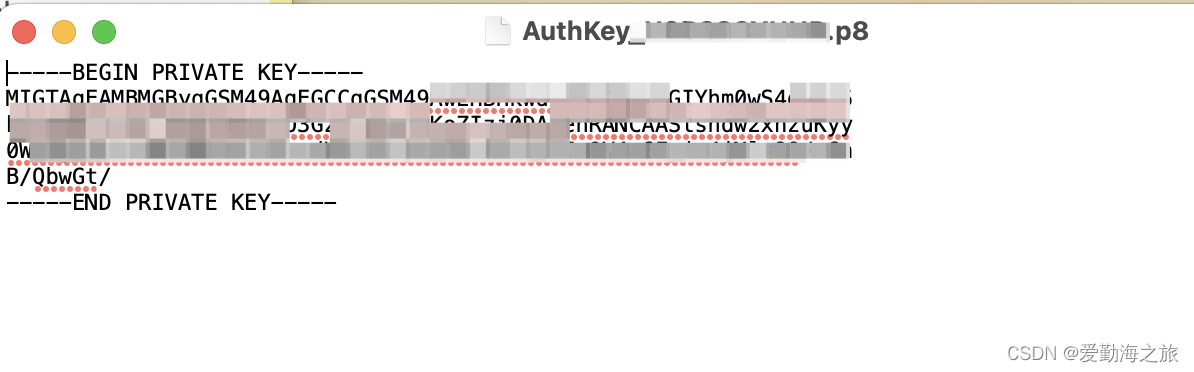
Apple will use the public/private key pair as the OAuth client secret. The client secret is actually a signed JWT. The next step is to register a new one with Apple. private key. After the creation is complete, a key file
will be generated . Key IDThe downloaded key file is actually a .p8file. Double-click to open the required key in this file. This file is very important and can only be downloaded once. Please save it properly! ! !
Generate a client secret (Client Secret)
Apple requires you to derive the client key yourself from the private key, not a static client key. They use the JWT standard, using an elliptic curve algorithm with a P-256 curve and a SHA256 hash. In other words, they use the ES256JWT algorithm. Some JWT libraries don't support elliptic curve methods, so make sure your library supports elliptic curves before you start trying. The RubyJWT library supports this algorithm, so we'll use it to generate the secret.
First, make sure Ruby is installed, then run the following command from the command line to install the JWT gem:
gem install jwt
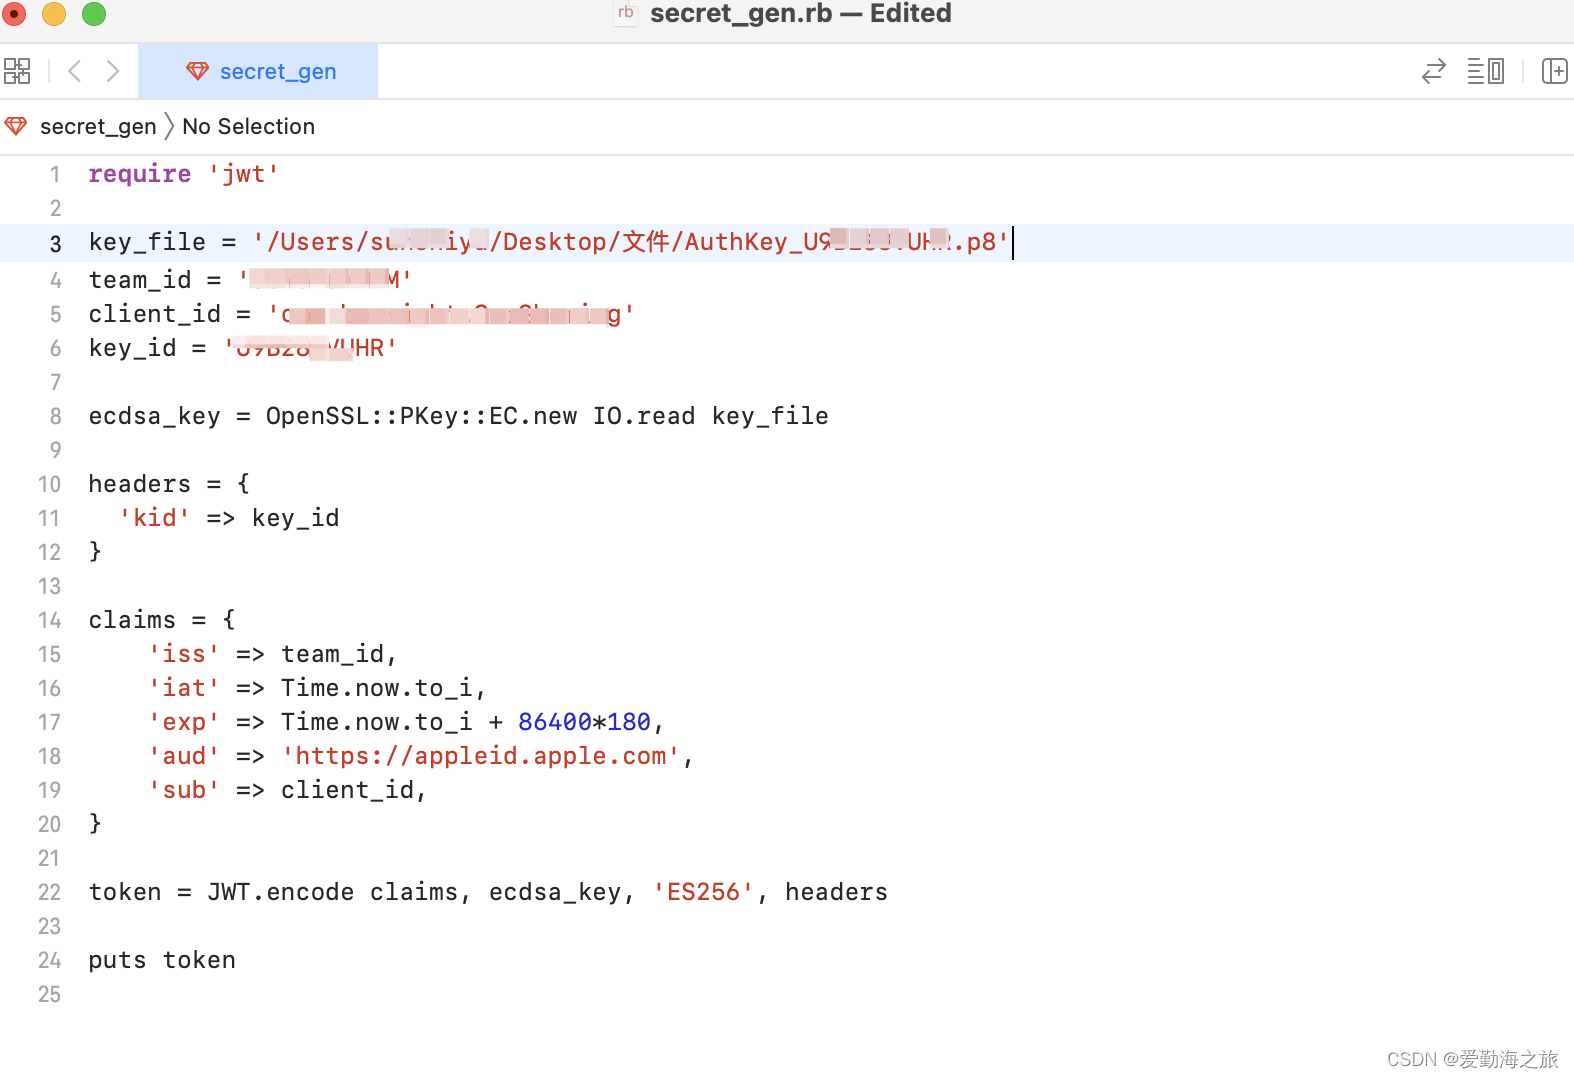
Bundle IDAccording to the , , Team ID, Key IDprepared above , the (client key) AuthKey_xxx.p8can be generated . We simply create a file, name it , and then change the suffix to , ie . The content of the template is as follows:client_secrettxtsecret_gen.rbsecret_gen.rb
require 'jwt'

key_file = ''
team_id = ''
client_id = ''
key_id = ''

ecdsa_key = OpenSSL::PKey::EC.new IO.read key_file

headers = {


  'kid' => key_id
}

claims = {


	'iss' => team_id,
	'iat' => Time.now.to_i,
	'exp' => Time.now.to_i + 86400*180,
	'aud' => 'https://appleid.apple.com',
	'sub' => client_id,
}

token = JWT.encode claims, ecdsa_key, 'ES256', headers

puts token
The code generates JWT with few claims using ES256 algorithm. The JWT will expire in 6 months, which is the maximum age allowed by Apple. If you're generating a new client secret JWT every time a user authenticates, then you should use a shorter expiration date, but this allows us to generate the key once and use it easily in the sample application.
Here we will use the four data we have prepared, now you can run it from the command line and it will output a JWT:
ruby xxx/xx/xx/secret_gen.rb
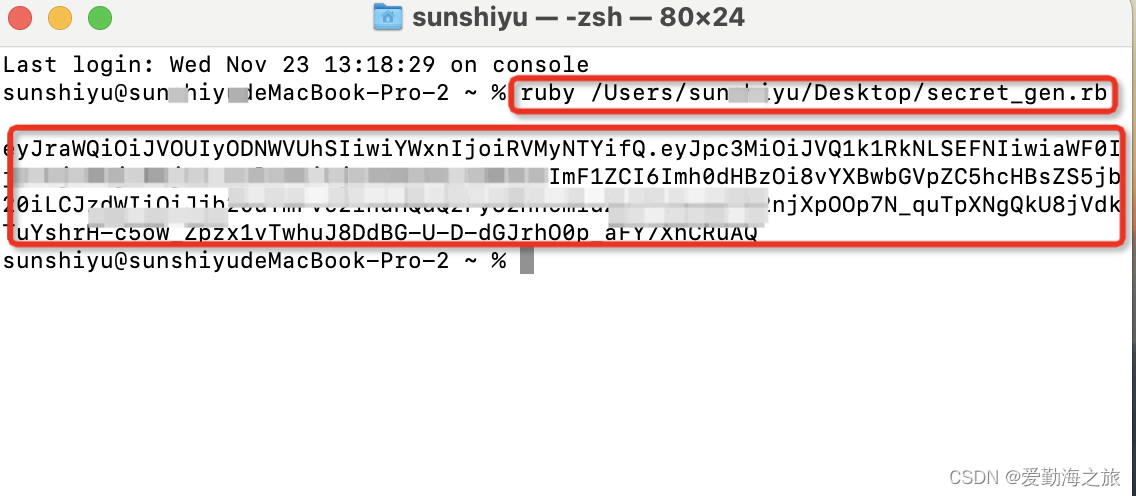
This eyJra.....RuAQis the client key we need, and then we verify that the key is valid.
Configure Apple Sign In in your project
First import the header file #import <AuthenticationServices/AuthenticationServices.h>, and then call up the Apple authorization page
    if (@available(iOS 13.0, *)) {


        ASAuthorizationAppleIDProvider *appleIdProvider = [[ASAuthorizationAppleIDProvider alloc] init];
        ASAuthorizationAppleIDRequest *authAppleIDRequest = [appleIdProvider createRequest];
        /*
         //慎用 ASAuthorizationPasswordRequest
         //当启用ASAuthorizationPasswordRequest且停止使用Apple ID(真机-设置-账户-密码与安全性-使用您Apple ID的App-App列表-停止使用 Apple ID, 如果KeyChain里面没有登录信息且重新使用苹果授权登录(Sign in with Apple)会报未知错误
         ASAuthorizationPasswordRequest* authPasswordRequest = [[[ASAuthorizationPasswordProvider alloc] init] createRequest];

         NSMutableArray <ASAuthorizationRequest*> * array = [NSMutableArray arrayWithCapacity:2];
         if(authAppleIDRequest) [array addObject:authAppleIDRequest];
         if(authPasswordRequest) [array addObject:authPasswordRequest];

         NSArray <ASAuthorizationRequest*> * requests = [array copy];
         ASAuthorizationController* authorizationController = [[ASAuthorizationController alloc] initWithAuthorizationRequests:requests];
         */
        authAppleIDRequest.requestedScopes = @[ASAuthorizationScopeFullName, ASAuthorizationScopeEmail];

        //由ASAuthorizationAppleIDProvider创建的授权请求 管理授权请求的控制器
        ASAuthorizationController* authorizationController = [[ASAuthorizationController alloc] initWithAuthorizationRequests:@[authAppleIDRequest]];
        //设置授权控制器通知授权请求的成功与失败的代理
        authorizationController.delegate = self;
        //设置提供 展示上下文的代理,在这个上下文中 系统可以展示授权界面给用户
        authorizationController.presentationContextProvider = self;
        //在控制器初始化期间启动授权流
        [authorizationController performRequests];

    }
proxy callbackASAuthorizationControllerDelegate, ASAuthorizationControllerPresentationContextProviding
//授权成功
- (void)authorizationController:(ASAuthorizationController *)controller didCompleteWithAuthorization:(ASAuthorization *)authorization API_AVAILABLE(ios(13.0))
{


    NSString *userID = nil;
    NSString *userName = nil;
    NSString *userEmail = nil;

    EVAppleLoginCredentialModel *model = [[EVAppleLoginCredentialModel alloc] init];

    if ([authorization.credential isKindOfClass:[ASAuthorizationAppleIDCredential class]]) {


        ASAuthorizationAppleIDCredential *credential = authorization.credential;

        //苹果用户唯一标识符,该值在同一个开发者账号下的所有App下是一样的,开发者可以用该唯一标识符与自己后台系统的账号体系绑定起来。
        userID = credential.user;

        //苹果用户信息 如果授权过,无法再次获取该信息
        userEmail = credential.email;
        NSPersonNameComponents *fullName = credential.fullName;
        userName = [NSString stringWithFormat:@"%@%@", fullName.familyName, fullName.givenName];

        //用于判断当前登录的苹果账号是否是一个真实用户,取值有:unsupported、unknown、likelyReal
        ASUserDetectionStatus realUserStatus = credential.realUserStatus;

        //服务器验证需要使用的参数
        NSString *authorizationCode = [[NSString alloc] initWithData:credential.authorizationCode encoding:NSUTF8StringEncoding];
        NSString *identityToken = [[NSString alloc] initWithData:credential.identityToken encoding:NSUTF8StringEncoding];

        NSLog(@"authorization [ASAuthorizationAppleIDCredential] successfully");
        NSLog(@"authorization userID: %@", userID);
        NSLog(@"authorization userName: %@", userName);
        NSLog(@"authorization userEmail: %@", userEmail);
        NSLog(@"authorization realUserStatus: %@", @(realUserStatus));
        NSLog(@"authorization authorizationCode: %@", authorizationCode);
        NSLog(@"authorization identityToken: %@", identityToken);

    } else if ([authorization.credential isKindOfClass:[ASPasswordCredential class]]) {


        //用户登录使用现有的密码凭证
        ASPasswordCredential *passwordCredential = authorization.credential;

        //密码凭证对象的用户标识 用户的唯一标识和密码
        userID = passwordCredential.user;
        NSString *password = passwordCredential.password;

        NSLog(@"authorization [ASPasswordCredential] successfully");
        NSLog(@"authorization userID: %@", userID);
        NSLog(@"authorization password: %@", password);

        model.user = passwordCredential.user;

        userName = @"";
        userEmail = @"";

    } else {


        assert(0);
    }

    //数据校验通过后,将这些数据发送给服务器进行验证,等待服务器的回应
    //如果用户选择隐藏邮箱的,email获取不到,其他数据正常,服务端匹配标准userID
    if (![ZJUtils isEmpty:userID]) {


        //在授权成功的回调中拿到服务器所需要的参数传给后台
        //至此我们所需要做的已经完成了,看后台的验证就行了
        if (self.appleLoginBlock) {


            self.appleLoginBlock(0, @"苹果授权成功", model);
        }

    } else {


        //授权数据异常
        if (self.appleLoginBlock) {


            self.appleLoginBlock(-1, @"苹果授权失败", nil);
        }
    }
}

//授权失败
- (void)authorizationController:(ASAuthorizationController *)controller didCompleteWithError:(NSError *)error API_AVAILABLE(ios(13.0))
{


    NSString *errorMsg = nil;
    UIWindow *window = [UIApplication sharedApplication].keyWindow;
    switch (error.code) {


        case ASAuthorizationErrorCanceled:
            errorMsg = @"用户取消了授权请求";
            break;
        case ASAuthorizationErrorFailed:
            errorMsg = @"授权请求失败";
            break;
        case ASAuthorizationErrorInvalidResponse:
            errorMsg = @"授权请求响应无效";
            break;
        case ASAuthorizationErrorNotHandled:
            errorMsg = @"未能处理授权请求";
            break;
        case ASAuthorizationErrorUnknown:
            errorMsg = @"授权请求失败未知原因";
            break;
    }
    NSLog(@"苹果授权状态:%@", errorMsg);
}

#pragma mark ASAuthorizationControllerPresentationContextProviding
- (ASPresentationAnchor) presentationAnchorForAuthorizationController:(ASAuthorizationController *)controller API_AVAILABLE(ios(13.0))
{


    return self.view.window;
}
In - (void)authorizationController:(ASAuthorizationController *)controller didCompleteWithAuthorization:(ASAuthorization *)authorizationthe callback we get authorizationCodethe parameter as validation.
Open postman and let's test:
https://appleid.apple.com/auth/token?client_id=xxx&client_secret=xxx&code=xxx&grant_type=authorization_code&redirect_uri=https://appleid.apple.com

At this point, it is basically completed. In fact, most of the work of Apple login is done in the background, including client_secretgeneration, etc. Our client only needs to get the data authorized by Apple to the backend, and the backend will do the verification.