这两个方法都没有调用。
///回调成功
-(void)authorizationController:(ASAuthorizationController *)controller didCompleteWithAuthorization:(ASAuthorization *)authorization API_AVAILABLE(ios(13.0)){
}


///回调失败

-(void)authorizationController:(ASAuthorizationController *)controller didCompleteWithError:(NSError *)error API_AVAILABLE(ios(13.0)){}
To sum up, I have a problem when doing this.
Question 1: Apple’s login proxy method didCompleteWithAuthorization is not called, and didCompleteWithError is not called?
Solution: After testing, I found that my code for handling Apple login is not called when it is written to a class that inherits NSObject. It can be called successfully when replaced by inheriting UIViewController. Or continue to use inheritance NSObject, but this class can be successfully called if it is written with simple interest. Simple interest code example
//  GSSignWithApple.h 文件

@interface GSSignWithApple : NSObject


+ (GSSignWithApple *)SharedManager;

@end


//  GSSignWithApple.m 文件

+ (GSSignWithApple *)SharedManager{
    static GSSignWithApple *manager = nil;
    static dispatch_once_t onceToken;
    dispatch_once(&onceToken, ^{
        //不能再使用alloc方法
        //因为已经重写了allocWithZone方法,所以这里要调用父类的分配空间的方法
    manager = [[super allocWithZone:NULL] init];
    });
    return manager;
}


// 防止外部调用alloc 或者 new
+ (instancetype)allocWithZone:(struct _NSZone *)zone {
    return [GSSignWithApple SharedManager];
}

//下面是初始化和 几个代理方法 和 点击事件的处理
Question 2: Can it be written without ASAuthorizationAppleIDButton? Is it possible to write with UIUButtom? How is the UI called with the button written in h5?
Answer: Both are fine.
I have tried it all here. Can be called. My page here is written by H5, there is no button to initialize, directly from the usual button click event code to write as follows
//这块代码一般是初始化苹果登陆按钮后,苹果按钮的点击事件。后面的步骤跟正常的苹果登陆代码一样。
-(void)click API_AVAILABLE(ios(13.0)){

    ASAuthorizationAppleIDProvider *appleIDProvider = [[ASAuthorizationAppleIDProvider alloc]init];

    ASAuthorizationAppleIDRequest *request = [appleIDProvider createRequest];

    request.requestedScopes = @[ASAuthorizationScopeFullName,ASAuthorizationScopeEmail];

    ASAuthorizationController *auth = [[ASAuthorizationController alloc]initWithAuthorizationRequests:@[request]];

    auth.delegate = self;

    auth.presentationContextProvider = self;

    [auth performRequests];

}
Question 3: What is iOS responsible for and what is the background complexity? Looking specifically at the following article, iOS is mainly responsible for obtaining user information and token and code. These must be passed to the background, which must be connected to the Apple official website interface. In fact, it's similar to the steps of docking WeChat login. It's just that Apple's encryption verification is more cumbersome.
The following are the specific implementation steps. I copy someone else's.
Author yuyangkk https://www.jianshu.com/p/12aade4d053b
Author 72 lines of code https://www.jianshu.com/p/e1284bd8c72a
1. Background
According to the requirements of Apple's review guidelines, anyone who accesses three-party login must access Apple's authorized login. Because our App is connected to WeChat login, we add Apple login as required.
Apple Audit Guide-4.8 Login via Apple
If the app uses a third-party or social login service (for example, Facebook login, Google login, login via Twitter, login via LinkedIn, login via Amazon or WeChat) to set up or verify this The app’s main user account, the app must also provide "Log in with Apple" as an equivalent option. The user's primary account refers to the account established in the app for identification, login and access to functions and related services.
In the following cases, the option of "Log in with Apple" is not required:
your app only uses the company's own account settings and login system.
Your app is an education, enterprise or business app, and requires users to log in with an existing education or enterprise account.
Your app uses a government or industry-supported citizenship system or electronic ID card to authenticate users.
Your app is a client of a specific third-party service, and users need to log in directly with their email, social media or other third-party accounts to access the content.
2. Preparation for access
2.1 Developer website, open the corresponding Sign in With Apple
Check Sign In With Apple, click Edit

2.1.1 Existing App.png
Check Enable as a primary App ID

2.1.2enable as primary apple id.png
2.2 Create a private key for generating client_secret in the background

2.2.1key.png
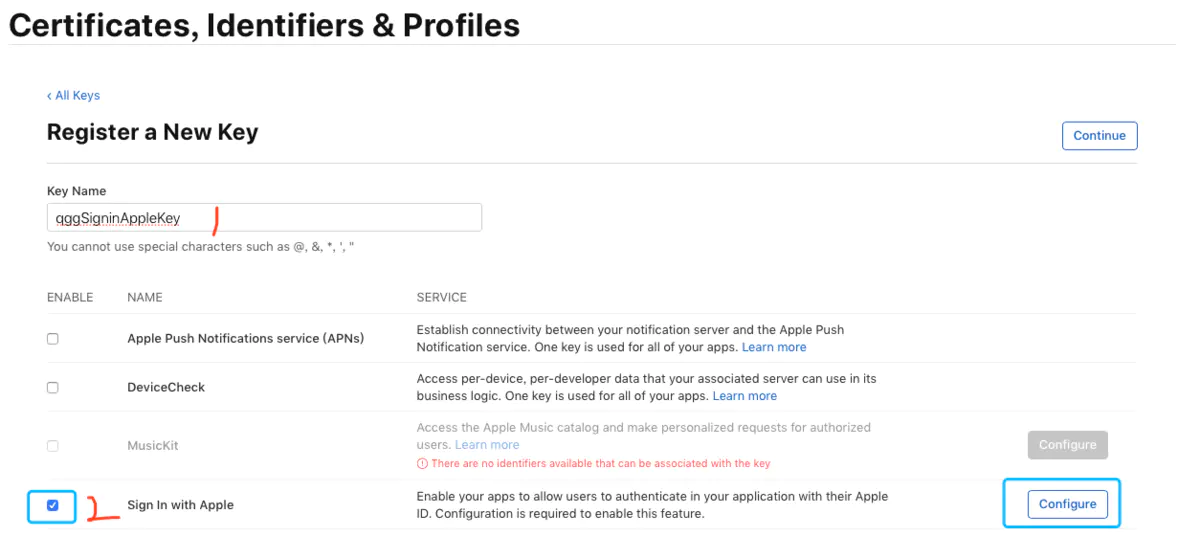
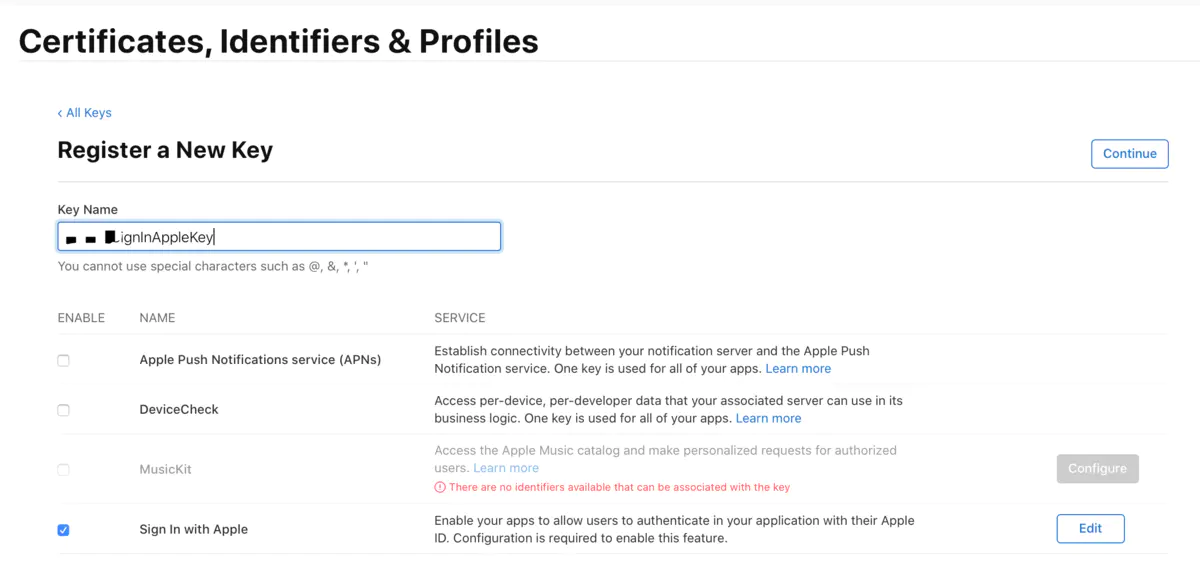
Fill in the KeyName, check Sign In With Apple, click Configure
2.2.2 Fill in key information.png
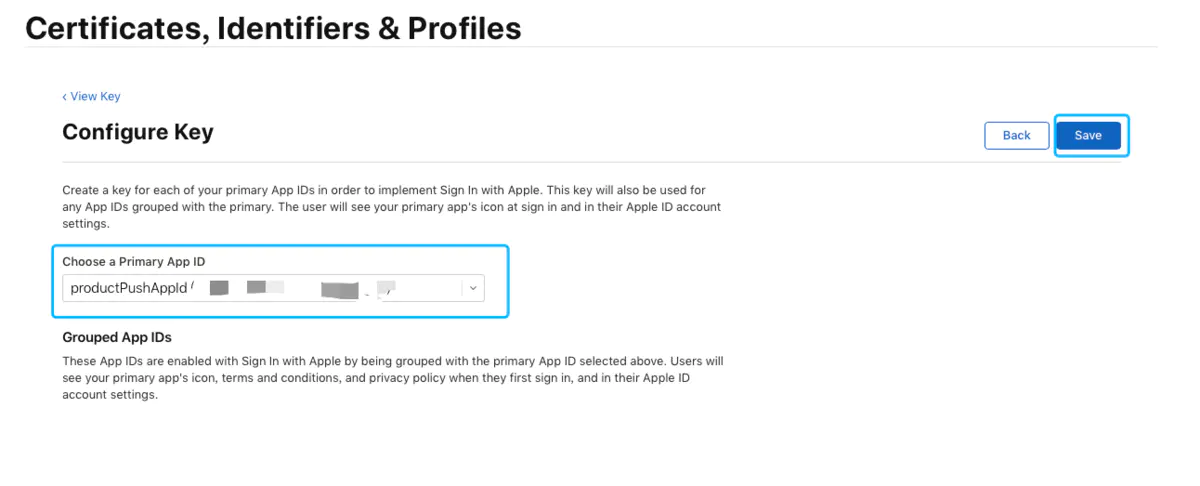
Select the corresponding App ID, click Save
2.2.3 Configure private key.png
Choose continue
2.2.4 choose continue
registered

2.2.5 Registration
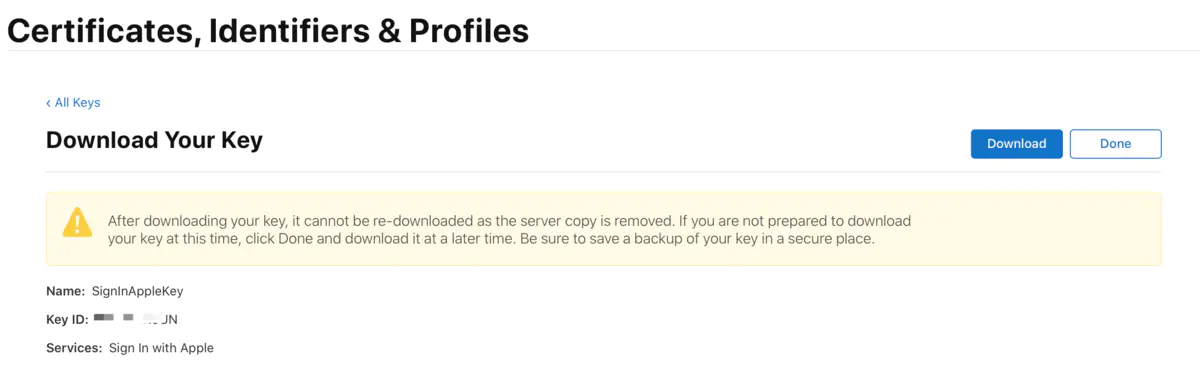
Click Download to download the private key, which can only be downloaded once
2.2.6 Download

2.2.7. Keep keyid
You can also go back to the Keys list, click on the Key we just created, view the Key ID, copy and save it for backup

2.2.8. View keyid.png
2.3. Xcode 开启Sign In With Apple

2.3.Xcode添加Sign in With Apple.png
3. Access sequence diagram

An irregular Apple login sequence diagram.png
In fact, we can verify in two ways:
Solution 1: Our App verifies by itself, parses the userid and identityToken returned by the SDK, and then sends the userId to the backend, and the backend performs database query and returns the binding information. This is relatively simple.
Solution 2: The App gets the authorization_code returned by the SDK and hands it to the backend. The backend checks through the https://appleid.apple.com/auth/token interface, returns id_token, parses the token, and returns the binding information. This relatively complex
4. Work on iOS
Authorization generally requires the following steps:
- Import authorization library#import <AuthenticationServices/AuthenticationServices.h>
- Add a response event to evoke the Apple authorization interface
- Verify password or bio ID
- Pass the verification and pass the callback result to the background
First, add an event button:
- (void)createAppleIDLoginButton{
    if (@available(iOS 13.0, *)) {
        self.appleLoginButton = [[ASAuthorizationAppleIDButton alloc] initWithAuthorizationButtonType:ASAuthorizationAppleIDButtonTypeSignIn authorizationButtonStyle:ASAuthorizationAppleIDButtonStyleWhiteOutline];
        [self.appleLoginButton addTarget:self action:@selector(signinWithApple) forControlEvents:UIControlEventTouchUpInside];
        [loginButtonView addSubview:self.appleLoginButton];
    }
}

// 唤起苹果登录
- (void)signinWithApple API_AVAILABLE(ios(13.0)){
    // 创建登录请求
    ASAuthorizationAppleIDRequest *idRequest = [[[ASAuthorizationAppleIDProvider alloc] init] createRequest];
    // 创建iCloud 密码填充登录,可不创建
    ASAuthorizationPasswordRequest *passwordRequest = [[[ASAuthorizationPasswordProvider alloc] init] createRequest];
    // 请求的用户数据
    idRequest.requestedScopes = @[ASAuthorizationScopeFullName,ASAuthorizationScopeEmail];
    // 如果不需要iCloud密码登录,不添加passwordRequest
    ASAuthorizationController *controller = [[ASAuthorizationController alloc] initWithAuthorizationRequests:@[idRequest,passwordRequest]];
    controller.delegate = self;
    controller.presentationContextProvider = self;
    [controller performRequests];
}

- (void)handleAppleResponse:(ASAuthorizationAppleIDCredential *)credential API_AVAILABLE(ios(13.0)){
    // 将返回的数据,提交给后台
}
Secondly, following the agent ASAuthorizationControllerDelegate, ASAuthorizationControllerPresentationContextProvidingand the agent to achieve the callback:
#pragma mark - ASAuthorizationControllerDelegate
- (void)authorizationController:(ASAuthorizationController *)controller didCompleteWithAuthorization:(ASAuthorization *)authorization API_AVAILABLE(ios(13.0)){
    if ([authorization.credential isKindOfClass:[ASAuthorizationAppleIDCredential class]])       {
        ASAuthorizationAppleIDCredential *credential = authorization.credential;

        NSString *state = credential.state;
        NSString *user = credential.user;
        NSPersonNameComponents *fullName = credential.fullName;
        NSString *email = credential.email;
        NSString *authorizationCode = [[NSString alloc] initWithData:credential.authorizationCode encoding:NSUTF8StringEncoding]; // refresh token
        NSString *identityToken = [[NSString alloc] initWithData:credential.identityToken encoding:NSUTF8StringEncoding]; // access token
        ASUserDetectionStatus realUserStatus = credential.realUserStatus;

        Log(@"state: %@", state);
        Log(@"user: %@", user);
        Log(@"fullName: %@", fullName);
        Log(@"email: %@", email);
        Log(@"authorizationCode: %@", authorizationCode);
        Log(@"identityToken: %@", identityToken);
        Log(@"realUserStatus: %@", @(realUserStatus));

        // 数据处理
        [self handleAppleResponse:credential];
    }
  //else if([authorization.credential isKindOfClass:ASPasswordCredential.class]) {
        //ASPasswordCredential *credential = authorization.credential;
        //Log(@"user:%@", credential.user);
        //Log(@"password:%@", credential.password);
    //}
}

- (void)authorizationController:(ASAuthorizationController *)controller didCompleteWithError:(NSError *)error API_AVAILABLE(ios(13.0)){
    NSString *errorMsg = nil;
    switch (error.code) {
        case ASAuthorizationErrorCanceled:
            errorMsg = @"用户取消了授权请求";
            break;
        case ASAuthorizationErrorFailed:
            errorMsg = @"授权请求失败";
            break;
        case ASAuthorizationErrorInvalidResponse:
            errorMsg = @"授权请求响应无效";
            break;
        case ASAuthorizationErrorNotHandled:
            errorMsg = @"未能处理授权请求";
            break;
        case ASAuthorizationErrorUnknown:
            errorMsg = @"授权请求失败未知原因";
            break;
    }
    Log(@"%@", errorMsg);
}

#pragma mark - ASAuthorizationControllerPresentationContextProviding
- (ASPresentationAnchor)presentationAnchorForAuthorizationController:(ASAuthorizationController *)controller API_AVAILABLE(ios(13.0)){
    return self.window;
}

First evoke the interface.PNG

After authorization, the interface will be evoked again.PNG
5. Background work
Receive and verify the result of iOS authorization, request id_token from Apple service, the general process is:
5.1. Provide an interface to receive user (unique identifier), identityToken, authorizationCode, and perform signature verification;
Use the Json Web Key given by Apple to generate the public key and verify the identityToken passed by the client.
Public key address: https://appleid.apple.com/auth/keys , we need to convert to public key, public key conversion reference address: https://8gwifi.org/jwkconvertfunctions.jsp
{
  "keys": [
    {
      "kty": "RSA",
      "kid": "AIDOPK1",
      "use": "sig",
      "alg": "RS256",
      "n": "lxrwmuYSAsTfn-lUu4goZSXBD9ackM9OJuwUVQHmbZo6GW4Fu_auUdN5zI7Y1dEDfgt7m7QXWbHuMD01HLnD4eRtY-RNwCWdjNfEaY_esUPY3OVMrNDI15Ns13xspWS3q-13kdGv9jHI28P87RvMpjz_JCpQ5IM44oSyRnYtVJO-320SB8E2Bw92pmrenbp67KRUzTEVfGU4-obP5RZ09OxvCr1io4KJvEOjDJuuoClF66AT72WymtoMdwzUmhINjR0XSqK6H0MdWsjw7ysyd_JhmqX5CAaT9Pgi0J8lU_pcl215oANqjy7Ob-VMhug9eGyxAWVfu_1u6QJKePlE-w",
      "e": "AQAB"
    }
  ]
}
To verify the identity token, the server must:
use the server’s public key to verify the JWS E256 signature,
verify the random number for authentication (authorizationcode)
verify that the iss field contains https://appleid.apple.com
confirm that the aud field is the developer’s client_id (bundle id) The
verification time is earlier than the exp value of the token
5.2. Generate client_secret in JWT format required by Apple server to verify legitimacy;
parameters required for client_secret generation:
privatekey: created in Apple developer account, can only be downloaded once (.P8 format), need to keep
alg: algorithm "ES256"
kid: Private key id, the key_id corresponding to the private key created in the Apple developer account
iss: team_id, the Team ID obtained from the Apple developer account
iat: key start time, UTC seconds
exp: key expiration time, its value must not be greater than the server 15777000 (6 months, in seconds) of the current Unix time on the
aud: fixed value " https://appleid.apple.com "
sub:bundle id
After the token is created, it is signed using the elliptic curve digital signature algorithm with P-256 curve (ECDSA) and the SHA-256 hash algorithm. Specify the value ES256 in the algorithm title key. Specify the key identifier in the kid attribute.
5.3. Verify the data returned by the Apple backend through the https://appleid.apple.com/auth/token interface and the data transmitted by the client through the interface
You can verify the refresh token at most once a day to confirm that the Apple ID of the user on the device still maintains a good reputation on Apple's servers. If you try to verify the user’s Apple ID multiple times a day, Apple’s servers may restrict your calls.
You may verify the refresh token up to once a day to confirm that the user’s Apple ID on that device is still in good standing with Apple’s servers. Apple’s servers may throttle your call if you attempt to verify a user’s Apple ID more than once a day.
Parameters:
client_id: client bundle id string, which is public for authorization and refresh tokens, and must be passed.
client_secret: The JWT signature string generated in the previous step, which is public for authorization and refresh tokens and must be passed.
code: The authorizationcode passed by the client, dedicated for authorization, one-time use, and valid for 5 minutes.
grant_type: The type of interaction between the client and the server, a fixed string, the authorization and refresh token are public, and must be passed. Authorize to pass "authorization_code", refresh Token with "refresh_token".
refresh_token: The token used to refresh the Token, used when refreshing the token.
redirect_uri: The redirect URL used for authorization, which is used when the web logs in with AppleID. If you are using the web, fill in the Web Authentication Configuration when configuring sign in with appleid on the developer's website, and it is not necessary to pass it natively.
Data returned by Apple's background:
{
  "access_token": "一个token,此处省略",
  "token_type": "Bearer",
  "expires_in": 3600,
  "refresh_token": "一个token,此处省略",
  "id_token": "结果是JWT,字符串形式,此处省略"
}

//示例:
{

    "access_token": "ac6dd62539f5441cdacd7b548a9fe33a9.0.nrszq.gCD9GEmcznYjt5m3h4UkEg",
    "token_type": "Bearer",
    "expires_in": 3600,
    "refresh_token": "r9f10xxxxxxxxxxxe80e.0.nxxxxq.fk7Q1ZxxxxxxxxxM0w",
    "id_token": "eyJraWQiOiJlWGF1bm1MIiwiYWxnIjoiUlMyNTYifQ.eyJpc3MiOiJodHRwczovL2FwcGxlaWQuYXBwbGUuY29tIiwiYXVkIjoiY29tLnpvZnVuZC5xaWFuZ3VuZ3VuIiwiZXhwIjoxNTgzMTMxNzI1LCJpYXQiOjE1ODMxMzExMjUsInN1YiI6IjAwMTI5MC44MDYzZGRmODMwYjI0YTQ5OTc4OTZhNmUxOGNmMjE5Yi4xMDEzIiwiYXRfaGFzaCI6IjBrU05fMzlkcGxhUEdnMUd0YV9Ka1EiLCJlbWFpbCI6InJlZXM5cGd3NWJAcHJpdmF0ZXJlbGF5LmFwcGxlaWQuY29tIiwiZW1haWxfdmVyaWZpZWQiOiJ0cnVlIiwiaXNfcHJpdmF0ZV9lbWFpbCI6InRydWUiLCJhdXRoX3RpbWUiOjE1ODMxMzEwOTV9.p19sc-tjsNQNCXyb33AX9r4oXj1xA4EmKh9Yp5E5ImxnOe6n_ISqvgMyDGqOuZwLAP9iMfB4-S_--1dpuzPx4HtwOyygpHhZSEZ4GcynCpHg6MFC7Mlkcn34J_awEXPeox_nJMRPRMN-ydQ7GxLvSrEJPJ-1rL473pIBc-DyNdYjkXcuyVU4FN6nEuh2NrOKCzMjkeEDqSmL2nG_TM7qE7JscAOcI6Nv5oml2KkYMeQl24kopQa2rC3m8HSsYSdaPs04pdiFEF20Fl3RqR-cnE0UeTmlC4KaBRF4xGpPpNT-OKvW2P6yUrkHmS27Mt1vM1sJkCiKMUGO3_i0Ef7ghA"
}
Base64 decode the header and payload in id_token to obtain the corresponding information:
header:
{
"kid":"eXaunmL",
"alg":"RS256"
}
payload:
{
"iss":"https://appleid.apple.com",
"aud":"com.qiangungun",
"exp":1582880575,
"iat":1582879975,
"sub":"这个字段和客户端拿到的user以及identityToken第二段base64解码出来的sub相同",
"at_hash":"8_moKGpSUFG-zueTcf5EjQ",
"email":"[email protected]",
"email_verified":"true",
"is_private_email":"true",
"auth_time":1582879944
}
By comparing the user sent from the client with the sub in the payload, you can determine whether it is a unified user
5.4. The verification is passed and the binding status or registration status is returned
If it has been bound, it will return sessionId and userId.
If it has not been bound, it will return information similar to that required for WeChat login, and the client will perform the binding operation.
Author: yuyangkk
link: https: //www.jianshu.com/p/12aade4d053b
Source: Jane books
are copyrighted by the author. For commercial reprints, please contact the author for authorization. For non-commercial reprints, please indicate the source.