
Zero, the main knowledge points of this article
Friendly persuasion: 7400+ words in the full text
If there is nothing you want in the knowledge points, you can just pull it to the end and fight with the masters in the comment area.
The original plan was to write an KylinsGraphicsDebuggerarticle about the principle of implementation, but I feel that if that is the case, the pattern will be small.
Just recently, Qilinzi has received feedback from many R&D leaders, saying that its technical team has top-notch development efficiency and has developed many 2D/3D games. But when encountering 渲染优化, 性能优化, 内存优化, 兼容性处理and other late-stage problems in the project, I am helpless.
Especially as the threshold of the industry is getting higher and higher, the projects are getting bigger and bigger. From the previous 2D to the current 3D, from the previous mild to the current moderate and severe, this problem has become more and more obvious.
This matter has made me think for a long time. What kind of knowledge do these experienced technical teams lack?
After much communication, I found that it wasn't that they didn't know how to deal with it, but that they didn't know where to start.
After discussing the project situation with me, most teams can quickly locate the problem and solve it quickly based on the ideas I provided.
Qilinzi wrote it a while ago KylinsGraphicsDebuggerto provide a convenient debugging tool for such teams.
The content involved in this tool can be said to be 3D项目开发中不可或缺的知识点, so Qilinzi ~抖着胆~arranged the following content:
-
0、
新手和高手的差距在哪里- Skills that can be continuously upgraded
- Locating Problems vs. Solving Problems
- The Importance of Debugging Skills and Methods
-
1、
Mipmaps查看器- The story of 3D modeling lady and programmer Li Ergou
- How to use Mipmaps Viewer
- Art Standards - Model Texture Size Establishment
- Video memory optimization - texture resolution rationality check
- Implementation principle of Mipmaps viewer
-
2、
LightmapUV查看器- What is Lightmap
- How to use the LightmapUV viewer
- Implementation principle of LightmapUV viewer
-
3、
材质实例查看器- Common DrawCalls optimization methods
- DrawCall Merge Failure Troubleshooting
- The use and implementation principle of material instance viewer
-
4、
Overdraw查看器- What is Overdraw
- How to use the Overdraw viewer
- Why reducing Overdraw can improve performance
- Common Overdraw optimization methods
- Implementation principle of Overdraw viewer
1. Heaven, Earth, Xuan, Huang

Qi Linzi remembered that in a certain cultivation novel, the exercises were divided into four levels: Heaven, Earth, Xuan, and Huang.
Among them, the Heaven Rank is the highest and the Yellow Rank is the lowest. From the setting point of view, the middle level of the Xuan-level kung fu can also reach the full level of the yellow-level kung fu, the higher the level of the kung fu, the greater the gap, and so on.
But there are exceptions. There are some yellow-rank exercises that will be upgraded with the level of practice of the user, and the Mahayana exercises can reach the heavenly rank. That is to say, if you are lucky enough to get such a skill, you can just practice it hard, and you don't have to worry about spending too much time on it, and it will be replaced by the mastered heavenly skill in the end.
The protagonist of the comprehension novel relied on a trick-like skill given by his teacher, from nothing to the strongest king, and finally married many rich and beautiful women, and reached the pinnacle of life.
Although the protagonist has practiced a lot of high-level exercises in the later stage, most of them are motivated by this cheating skill.
2. Development and debugging
I don't know if you have heard the following story.
There is a problem with a machine in a certain factory, and no one knows where the problem is. In desperation, an expert was invited from abroad. After observing for a while, the expert drew a line on the machine shell, and asked the relevant personnel to check the place where the line was drawn. The relevant personnel quickly found the problem and solved it easily.
The factory owner paid the expert $10,000, and the expert refused, saying I just drew a line.
The boss said: drawing a line is only worth $1, knowing where to draw a line is worth $9999.
This story tells us that sometimes it is very easy to solve the problem, but it is very difficult to locate the cause of the problem.
Friends with certain project experience should know that in extreme cases, the time we spend on verifying the correctness, stability, compatibility, and performance of the code we write is far greater than the time spent on coding. We call this verification process 调试(Debugging), which is to find out the problem and solve it.
A developer's ascent process from 新手to 高手, roughly speaking, is the process of 写BUGsum 改BUG.
And 调试this skill, the key to distinguishing a master from a novice, is 定位the problem.
Using the same debugging tools and methods, experts can quickly locate the cause of the problem, but novices are often at a loss.
The solution to some problems often only needs to modify a symbol, but it cannot be modified because the problem cannot be found.
For programming, you may learn different platforms, different frameworks, and different languages. But the debugging tools and debugging methods are always the same.
Therefore, taking the time to master
调试技巧与方法must be the part with the highest input-output ratio.
3. Why are you talking so much?
In the first and second sections of the article, Qilinzi talked about two topics that were out of reach. But if you experience it carefully, you will be able to find it. Qilinzi made such a long foreshadowing, just to tell everyone the importance of debugging and the ratio of input to output.
调式技巧与方法In the field of software development, it's like the cultivation method in the comprehension novel, which can be promoted from the yellow rank to the heavenly rank. However, due to the relatively low level of starting, novices can also practice, so they are often ignored.
Therefore, the final positioning of this article is: common problems in 3D project development, and how to use KylinsGraphicsDebuggerand debug these problems.
At the same time, in order to take care of some friends who want to know how the tool is implemented, at the end of each tool, the implementation method of this tool will also be talked about.
Judging from Qilinzi's experience in the industry, these are yes
必须掌握. It will make your daily 3D development related work more efficient.
Four, Mipmaps viewer
4.1. The story of the art lady and the program Li Ergou

Programmer A has been in the industry for more than two years. Through his unremitting efforts, he has been able to proficiently call common APIs in various 3D game development. With a good opportunity, I participated in the development of several 3D games. Relying on his extraordinary skills, he is deeply loved by art ladies. From the installation and uninstallation of software, to the maintenance and reinstallation of the system, he is always looked for.
One day, the model maker 3D美术小姐姐came over and asked Programmer A: Brother Program, look at the screenshot I just sent you, what size texture is suitable for my model?
This is the first time to answer Miss Sister's question in the professional field. Programmer A feels that it is time to show his true strength. You must take this opportunity to perform well, integrate what you have learned all your life into the answer, and try to let the girl know his unparalleled technical attainments, and it is best to generate some admiration.
So programmer A replied: "In the case of ensuring that the display effect is up to standard, the smaller the better, because a larger package will increase the size of the package and bring more memory usage."
After listening to the answer, the young lady gave him a charming smile, then turned and walked towards her workstation.
Suddenly, Li Ergou next to him yelled: "Beauty, please stay!" Seeing that the lady stopped, Li Ergou continued: "With our current camera distance, 128x128 is fine. But the plan seems to want to pull the camera Get closer, and to be on the safe side, use 256x256 first."
The young lady turned around and smiled and said thank you to Li Ergou repeatedly. She still had that charming smile, but it seemed to be different from the smile she had given to Programmer A before.
At this time, programmer A was not happy: Li Ergou said as much as he said, so why?
Li Ergou: "Just based on my Mipmaps查看器analysis a few days ago." …
The story will not continue. In the end, Li Ergou taught the young lady to use the viewer, but the young lady did not have dinner with Li Ergou. Because Mipmaps查看器it is really too simple to use to complete this work (just for this reason).
4.2. How to use Mipmaps Viewer

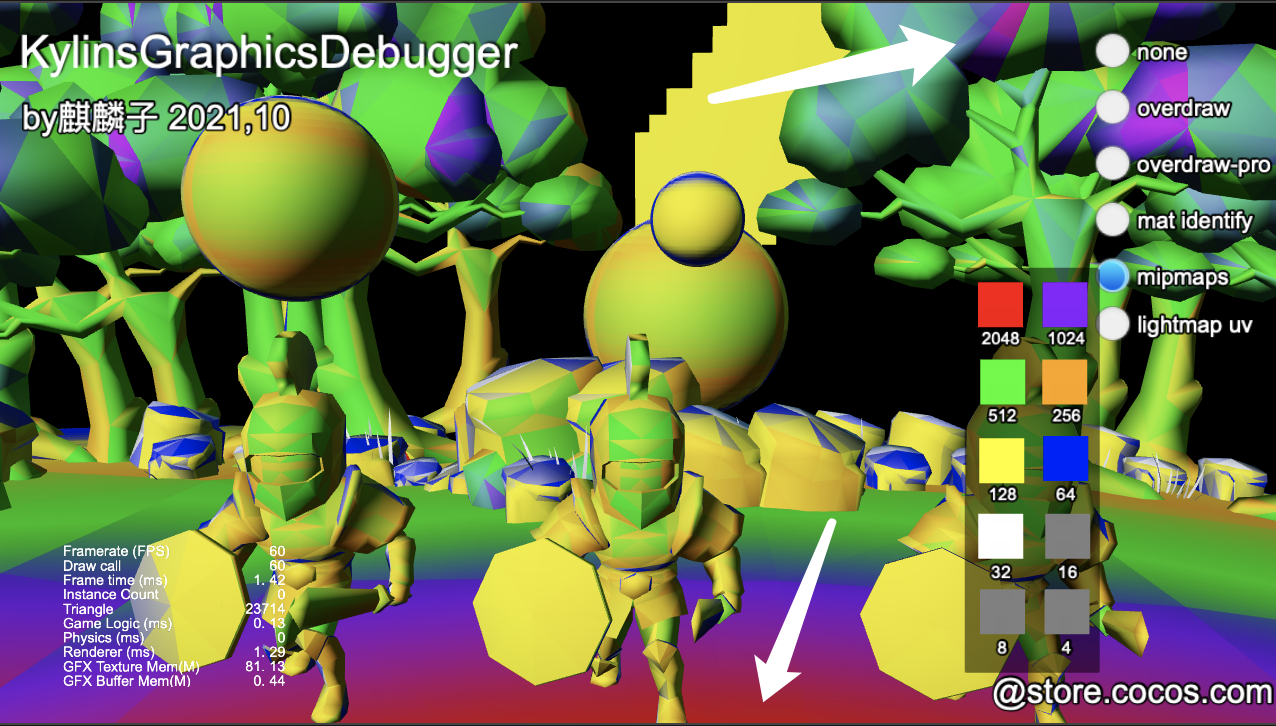
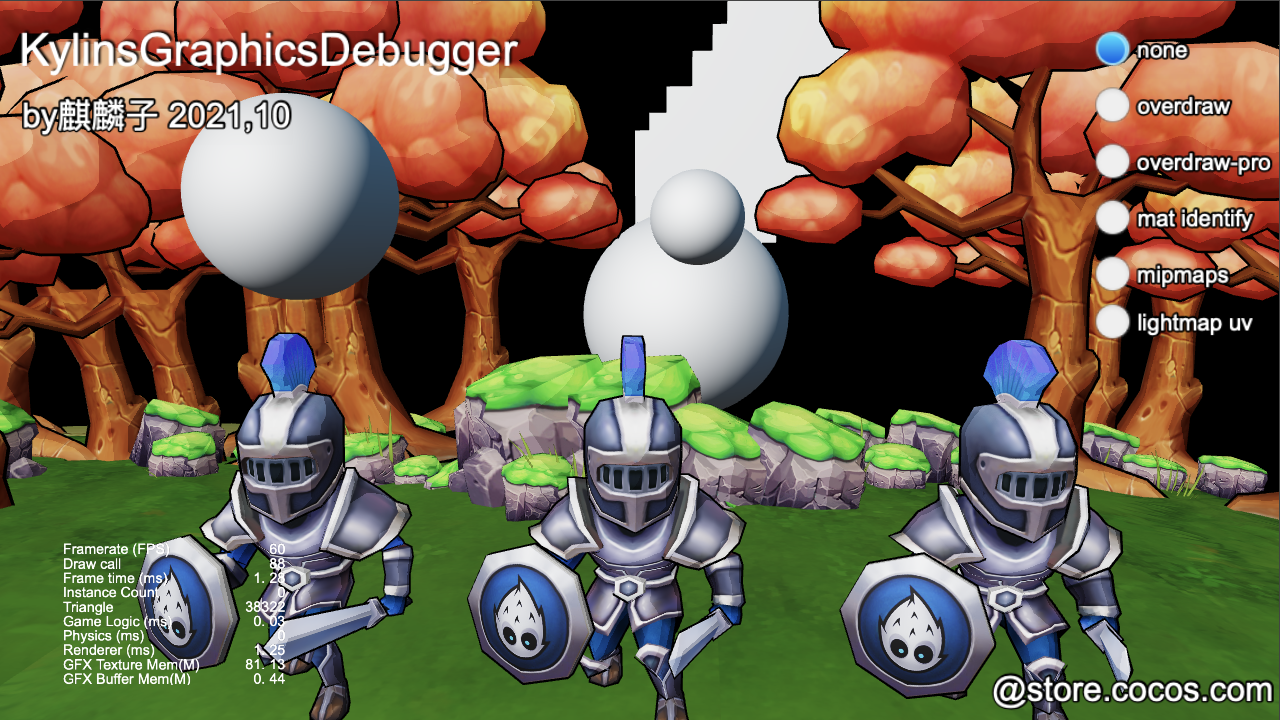
As shown in the picture above, when we turn it on Mipmaps查看模式, the scene will be rendered in different colors.
The color card in the lower right corner is the corresponding relationship between color and size.
Example 1: Nearby
红色means2048x2048the texture it needs.
Example 2: The soldier has the largest area with , so the texture of the soldier should not exceed the size
绿色, otherwise it is a waste.橙色黄色512x512
Example 3: The tree in the distance appears
紫色,绿色,1024x1024the texture represented is enough.
Note: Usually the nearby ground and distant trees do not use
2048x2048such1024x1024a large texture. The reason for this is that the ground and trees are using normal tiles, not 3D modeling.
With the above knowledge, to answer the questions of the art lady in the story, you only need to adjust the camera to the most commonly used viewing angle, and then look at the color of the character in this mode.
你,学,会,了,吗?
If your project is about to go online, and you find that the video memory (there is only memory on the phone) has seriously exceeded the standard, what should you do?
Since textures consume a lot of video memory resources, if we can reduce the video memory usage of textures, it will be better than anything else.
Through the common dynamic loading and unloading texture resource management scheme, it can effectively make unused textures no longer occupy video memory and reduce memory peak value.
But what if the scene needs so many textures at the same time?
We can still use it Mipmaps查看模式for optimization.
First of all, we assign an importance to the resources in the scene, and classify and check whether the texture resolution can be reduced.
Every time a Mipmaplevel is lowered, the video memory usage can be saved 75%.
Still use the above picture as an example.
We consider the importance of detail to be 背景<< . So the order of our inspection is also in this way . We will first find out the parts of these places, and then optimize, because the larger the size of the texture optimization, the higher the profit.地表角色背景地表角色偏紫``偏红
We see that the trees in the distance are large 绿色and small 紫色. Then we can completely control all the textures used in the distance 512x512, and through UV adjustment, UV overlapping and other optimization methods, it can even be reduced to a lower level.
And on the surface 红色, it means that you need 2048x2048to be able to do it.
1024x1024If it is acceptable to reduce to , we can directly reduce to 1024x1024. If it is reduced to 1024x1024unacceptable, we need to consider the optimization of UV multiplexing.
Usually adjust the UV, or use 多重纹理混合+ Texture Tilingto solve it, which can ensure the effect without losing the details of the picture.
Maybe a few shots 128x128can make a very perfect effect.
You see, such a simple thing can be of such great use.
4.3. Implementation Principle of Mipmaps Viewer
Skipping this section does not affect the use of Mipmaps Viewer
To understand this problem, we have to start with the principle of Mipmap.
There are many definitions of Mipmap. A common definition is:
MipmapIt is by pre-generating a series of低通滤波images to avoid the problems caused采样频率低by and数据频率高in the case of .摩尔纹画面失真

As for why it is formed 摩尔纹, in-depth study of the implementation details of texture sampling is required.
Interested friends can search: Mipmap详解this keyword.
The specific practice of the so-called Mipmapseries of low-pass filtered images is to pre-generate images of different sizes through some filtering algorithms.
For example 512x512, a texture whose mipmap levelssize is as follows:
- 0:
512x512 - 1:
256x256 - 2:
128x128 - 3:
64x64 - 4:
32x32 - 5:
16x16 - 6:
8x8 - 7:
4x4 - 8:
2x2 - 9:
1x1
Then the question arises, how does the GPU decide which level of mipmap to use?
When GPU performs texture sampling, it will calculate which level needs to be used according to the buffer pixel span of adjacent texture coordinates.
That is to say, which level to use mipmaphas nothing to do with the scale, translation, rotation and size of the model, but only with the final size it appears on the screen.
Typically, each level
mipmapis based on the previous levelmipmap, by适合的算法generating images of the next level.
However, we can also manually specify the texture content of each level, which can make the content of each level different.
If there is a special texture, its different mipmaps are different colors, what effect will it have when rendering?
Based on the above knowledge content, we can easily imagine that the obtained image is the screenshot at the beginning of this section.
And because different colors correspond to different sizes, we can find the appropriate texture size through the color correspondence.
The key code is as follows:
//定义不同的MIPMAP等级颜色。
public get mipmapsInfo() {
    if (!this._mipmapsInfo) {
        this._mipmapsInfo = [
            { s: 2048, r: 255, g: 0, b: 0 }, //红
            { s: 1024, r: 139, g: 0, b: 255 }, //紫
            { s: 512, r: 0, g: 255, b: 0 }, //绿
            { s: 256, r: 255, g: 165, b: 0 }, //橙
            { s: 128, r: 255, g: 255, b: 0 }, //黄
            { s: 64, r: 0, g: 0, b: 255 }, //蓝
            { s: 32, r: 255, g: 255, b: 255 }, //白
            { s: 16, r: 128, g: 128, b: 128 }, //灰
            { s: 8, r: 128, g: 128, b: 128 }, //灰
            { s: 4, r: 128, g: 128, b: 128 }, //灰
            { s: 2, r: 128, g: 128, b: 128 }, //灰
            { s: 1, r: 128, g: 128, b: 128 }, //灰
        ];
    }
    return this._mipmapsInfo;
}

//通过生成一系列的ImageAsset并赋值给Texture2D:mipmaps
private generateSpicialMipmapsTexture(): Texture2D {

    let mipmaps = Array<ImageAsset>(this.mipmapsInfo.length);
    let pixelBytes = 4;
    let pixelFormat = Texture2D.PixelFormat.RGBA8888;

    for (let i = 0; i < this.mipmapsInfo.length; ++i) {
        let info = this.mipmapsInfo[i];
        let width = info.s;
        let height = info.s;
        let arrayBuffer = new Uint8Array(width * height * pixelBytes);

        for (let i = 0; i < arrayBuffer.byteLength / 4; ++i) {
            arrayBuffer[i * pixelBytes + 0] = info.r;
            arrayBuffer[i * pixelBytes + 1] = info.g;
            arrayBuffer[i * pixelBytes + 2] = info.b;
            arrayBuffer[i * pixelBytes + 3] = 255;
        }

        let imageAsset = new ImageAsset({
            width: width,
            height: height,
            format: pixelFormat,
            _data: arrayBuffer,
            _compressed: false
        });

        mipmaps[i] = imageAsset;
    }

    let texture = new Texture2D();
    texture.mipmaps = mipmaps;

    texture.setMipFilter(Texture2D.Filter.LINEAR);
    texture.setFilters(Texture2D.Filter.LINEAR, Texture2D.Filter.LINEAR);
    return texture;
}
Five, LightmapUV viewer
I originally prepared a touching story for everyone, it was about Li Ergou. However, due to space reasons, it is omitted here, and we directly enter the topic.
5.1 What is a lightmap
In projects, sometimes we need to pursue higher shadow effects while maintaining better rendering performance. LightmapIn this case, it is better to use pre-baked lightmaps ( ) to achieve shadows.
Lightmaps are sampled 通常using 第二套texture coordinates, but modelers sometimes forget, resulting in incorrect lighting bake effects during scene editing.
At this time, the person in charge of baking is not sure whether there is a problem with his own parameter setting, or there is a problem with the UV of the model itself.
So this LightmapUV查看器is used to view the second set of texture coordinates of the model.
5.2 How to use the LightmapUV viewer
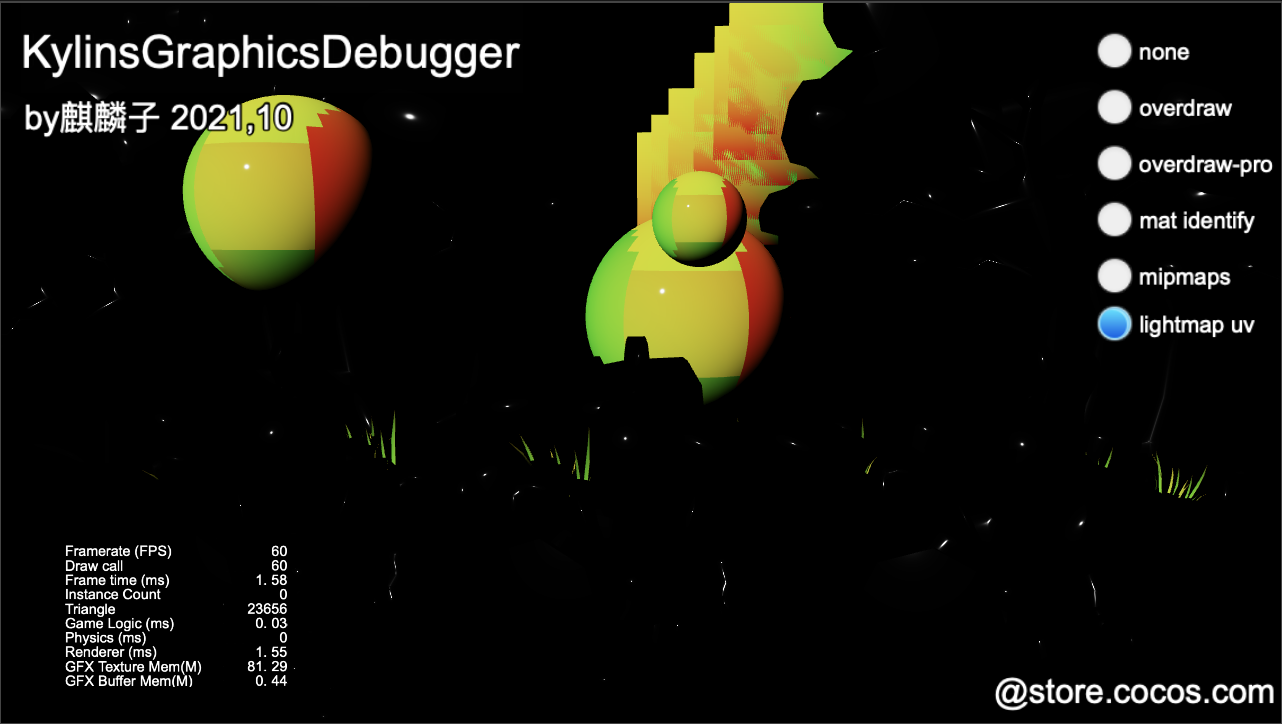
See the picture above?
When we enter LightmapUV显示模式, if a model has a second set of model UVs for Lightmap, the color will be displayed 红黄绿(why this color is displayed, I will talk about it below).
Black if a model doesn't have a second set of UVs.
This function is very simple and practical, and can help bakers quickly troubleshoot the cause of the problem.
5.3 Implementation principle of LightmapUV viewer
The implementation of this is super simple, just output the second set of texture coordinates of the model in color.
The following is the corresponding Shader code:
  vec4 frag () {
    vec4 col = vec4(v_uv1.x,v_uv1.y,0.0,0.0);
    return CCFragOutput(col);
  }
Since we uvonly do channel mapping when outputting r, gthere will be no channels, and a series of colors 蓝色will eventually appear .红黄蓝
6. Material Instance Viewer
6.1 Common methods to reduce DrawCalls
Whether it is a 2D game or a 3D game, it is essential to reduce the operation of DrawCalls when optimizing performance.
The three most common ways to reduce DrawCalls are:
- 1、
剔除(Culling) - 2、
静态合批(Static Batching) - 3、
动态合批(Dynamic Batching) - 3、
GPU几何体实例化(GPU Instancing)
This is not an article specifically about reducing DrawCalls, but it has been mentioned. Qilinzi would like to give a friendly reminder of the advantages and disadvantages of these three methods.
剔除: It will increase the CPU computing burden, but it can not only reduce DrawCalls, but also reduce the GPU burden.
Therefore, it will always be preferred as long as the culling algorithm is right.
The engine rendering pipeline generally has a built-in culling algorithm, but for some games on specific occasions, we can customize a more accurate and simpler algorithm to maximize the culling benefit.
静态合批: Static batching will only increase the CPU load when merging, because Mesh merging will be done on the CPU.
But because it is only done once, the CPU burden of one frame can be exchanged for the reduction of DrawCalls for countless frames, which is very cost-effective.
动态合批: Dynamic batching will increase the CPU burden. Since the CPU side will perform Mesh merging every frame (or when it is marked as needing to be re-merged), it is not suitable for the situation where there are too many vertices to be merged, otherwise it may not be worth the loss.
Don't forcefully reduce DrawCalls
GPU几何体实例化: Geometry instantiation requires that the participating objects are completely consistent ( Meshand Materialmust be the same), and also need to obtain the support of 硬件and . 平台系统Fortunately, the current penetration rate is very high, so there is no need to worry about compatibility issues.
6.2 The use and implementation principle of material instance viewer
The premise of the above-mentioned 合批and 几何体实例化taking effect is that 材质(Material) is the same.
During the development of the project, Qilinzi once encountered a particularly strange problem: the monster instantiation effect was good at the beginning, but it failed after playing.
RenderDoc, Spector.JS, XCodehave been used, and the cause of failure has not been found. There are too many monsters and it is not easy to grab.
That being the case, you have to figure it out yourself.
There are only two possibilities for instantiation failure: 1. The model has changed; 2. The material has changed.
It is impossible to change the model, and it is impossible to change it in this life, because it has not been changed at all, it can only be that the material has changed.
So I wrote a special material debugger:
- 1. Count the materials used in the scene and get their instance ID
- 2. Assign a random color to each instance ID and create a solid color material
- 3. Replace the material corresponding to the instance ID with this solid color material
After doing this, the result that can be achieved is: objects of different material instances will be displayed in different colors.
As shown below:

After writing this debugger, when the instantiation function was found to be invalid, I started the debugger and found that the monsters had turned into different colors, and the monsters that turned into different colors happened to be monsters 被攻击过的.
With this clue, we followed the clues, found the function of the monster being attacked, and locked 受击变色this function.
I found that it was used when operating the monster material .material.setProperty, but it cannot be used here .sharedMaterial.setProperty, because I only want to change the color of the attacked monster.
Note: The first call to getter material of MeshRenderer will trigger material clone.
Note: Calling the getter sharedMaterial of MeshRenderer will not trigger material clone, but will affect all objects using this material.
I 材质实例查看器quickly located the cause of the problem, and finally simply made a material pool of the object being hit, and solved the problem by replacing and restoring the material.
More application occasions...
In addition to troubleshooting the material problems caused by the dynamic modification of the program, you can also check the original unreasonable material instance reference problems in the scene.
For example, when editing a scene, two objects with the same appearance accidentally create two material instance files, which look the same, but will cause the batching and GPU geometry instantiation schemes to fail.
Seven, Overdraw viewer
7.1 What is Overdraw
OverdrawRefers to the number of times pixels are redrawn in a rendered frame.
Our ideal state is that every pixel position on the screen is only drawn once.
When we only display one picture on the screen, Quadno additional occlusion is caused because it is only drawn once. In this case, the pixel at each pixel position is drawn only once, which we consider Overdrawto be 0.
We drew a smaller picture on this picture, and the part where the smaller picture overlaps with the big picture Overdrawis 1.
Rendering of the 3D world is more complex and produces Overdraweven more.
When Overdrawthe value exceeds a certain number, it will cause performance problems. OverdrawFor example, there are more than 10 pixel areas in a large area .
7.2 How to use Overdrawthe viewer
OverdrawViewing is also very simple, and the common classic mode is shown in the figure below:

When we turn on Overdrawthe viewing function, the entire scene will be rendered 红色. Among them, 越亮the place where Overdrawthe number of times is more.
Have you found a problem, through this picture, how to find the Overdraw greater than 5 or 10?
When Qilinzi was researching, he also discovered this problem. You know, everyone's sensitivity 色觉and 色温sensitivity are different. It is unscientific to judge the value simply by color 深浅.明暗
In order to make the result more intuitive, Qilinzi 色卡made a data visualization in a way, as shown in the following figure:
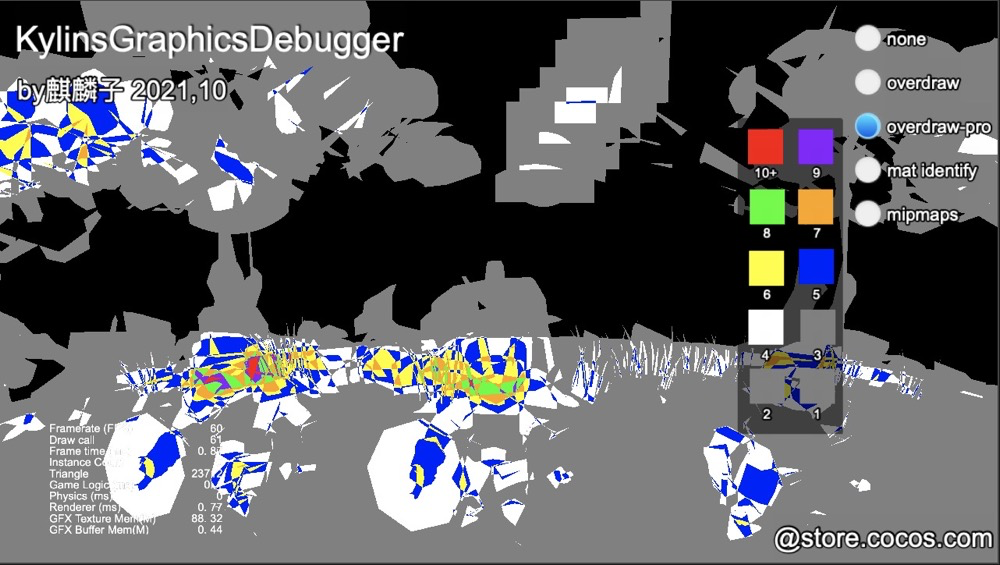
Through the comparison of the color in the picture and the color card, it can be found that in this scene, Overdraw>= 10is only a little bit below the root of the tree (you only need to find the red area). Overdraw>= 5focuses on the character, the grass on the ground, and the canopy in the upper left corner.
With this intuitive viewing method, all that remains is to optimize for specific problems.
7.3 Why reduction Overdrawimproves performance
To present a model on the screen, it mainly goes through: 顶点处理-> 光栅化-> 像素处理-> - 深度测试> -> 模板测试-> 混合(半透明)-> 写入缓冲区and other steps.
And the burden and burden 像素处理caused GPUby this process is relatively large.运算纹理填充率
In the process, the burden caused 混合by 写入缓冲区the relationship is relatively large.GPU像素填充率
For 非透明对象, because 不需要混合, at the same time, there are many in-depth test optimizations for 硬件both .渲染管线非透明对象
Invalid pixels produced by many non-transparent objects 像素处理阶段were discarded from the beginning (even before TBR architecture).
In this way, the rendering of non-transparent objects does not cause too many unnecessary read and write operations to the buffer, so we can ignore the Overdrawpressure caused by non-transparent objects for the time being.
However 半透明对象, the situation is not optimistic. Translucent objects are turned on 混合and off at the same time 深度写入.
That is to say, there will be no depth culling between translucent objects due to mutual occlusion, and all translucent objects have a high probability of going through the entire process completely.
混合The operation will first read the content of the target buffer, perform a mixed operation with the content of the current buffer, and then write the result to the target buffer. And a large number of 混合operations will generate greater pressure GPUon you 像素填充率.
OverdrawWhat is really unacceptable is not开销, but划不来.
OverdrawThe biggest thing 划不来is that some 看不见pixels are rendered, there are two cases:
- 1. The pixel written first is overwritten later (
非透明物体) - 2. What is written is
ALPHA=0the pixel (透明物体)
Imagine a particle system that uses a
512x512texture. Only a small part of the texture has content in the center, and the rest of the content is transparent. The problems caused by thisOverdraware very worthless.
7.4 Common OverdrawOptimization Methods
hardware architecture
TBROr TBDRthe hardware architecture will advance the depth test to 像素处理the front, and all enabled 深度测试rendering objects can benefit. This works for transparent objects 所有的非透明物体as well .被非透明物体遮挡
Pre-ZPass
Some rendering pipelines, or hardware (mostly for PC platforms), will have built-in Pre-ZPass function. That is, before officially rendering the scene, use one 深度输出Shaderto render all the objects to be written in depth 渲染纹理on one sheet.
Next, when the object is formally drawn, a depth 像素Shadercomparison will be done first, and the pixels that fail the depth comparison will be discarded directly, so as to omit all the following 像素处理and processes.混合像素写入缓冲区
Non-transparent objects are rendered from near to far
Everyone knows that transparent objects are rendered in the order of far and near to ensure the correctness of the mixing effect. Due to the 深度测试existence , there is no need to do this.
However, for optimization Overdraw, many engines will choose to render non-transparent objects from near to far. Because closer objects are more likely to obscure farther objects.
There is also a special rendering is the sky box, because the sky box will occupy the entire screen. If it is rendered first, it is equivalent to full screen Overdraw+1, so usually, our skybox is placed 非透明渲染after and 透明渲染before.
Common rendering order in 3D graphics engine:
非透明2D UI -> 非透明3D对象 -> 天空盒 -> Alpha Test对象 -> Alpha Blend对象 -> 透明2D UI
Trim Image

Cocos CreatorThe engine provides Trimthe image function (only supported Sprite), and when this function is turned on, the completely transparent edge part of the image will be cropped.
This function can reduce many UI Overdraw.
A better way is to suggest not to leave too much unnecessary blank space when drawing art
Use Mesh to make the outline

As shown in the figure, the left side is a normal Spriterendering ( 红色representative 纯透明part), and the right side is to use one Meshto remove 逼近the image content 轮廓. This can greatly reduce Overdrawwaste, thereby improving performance.
Use model UV animation instead of particle effects.
In order to ensure the effect, the particle system usually makes the particles reach a certain number.
But the particles overlap each other, and the particle texture itself will have a lot of pure transparency waste.
For something like a flame in a brazier, the object glows.
If this type can be replaced by UV animation, it can bring a certain Overdrawimprovement.
The above are the common reduction Overdrawmethods, and we don’t have much room for manipulation. in conclusion:
- 1. Minimize translucent objects in the scene as much as possible.
- 2. Try not to have unnecessary white space in the texture used for translucent objects.
- 3. Use Mesh to make outlines to reduce the use of blank areas in the picture.
- 4. If the requirements can be met, use less overlapping rendering methods, such as particles.
7.5 OverdrawViewer Implementation Principle
经典模式The red Overdrawdisplay is very simple:
- 1. Write a special material
- 2. Replace the material of the object to be viewed
The shader of the material is surprisingly simple, every time it is drawn, the red channel +0.1.
vec4 frag () {
  vec4 col = vec4(0.1,0.0,0.0,1.0);
  return CCFragOutput(col);
}
色卡模式The Overdrawdisplay is 红色经典based on the mode, output the result to a sheet RenderTexture, and then use another Shader to sample it.
Since each drawing is +0.1, the value of the red channel is multiplied by 0.1 to calculate how many times it is drawn.
Shader code is as follows:
  vec4 frag_display(){
    vec4 color = texture(mainTexture,v_uv);
    int index = int(floor(color.r * 10.0));

    if(index > 10){
      index = 10;
    }

    vec4 o;
    for(int i = 0; i < COLOR_TABLE_LEN; ++i){
      if(i == index){
        o = colorTable[i];
        break;
      }
    }
    return CCFragOutput(o);
  }
8. Conclusion
Since this article has a lot of content and a large amount of information, if you are very busy, it is recommended to bookmark it first, and then find a suitable time to read it.
For friends who are eager to use it, you can ignore the implementation details and integrate it directly KylinsGraphicsDebuggerinto the project.
For friends who want to learn the details and fully understand, or even implement similar tools by themselves, it is recommended to use related tools first. After a certain understanding, it will be much easier to implement them yourself.
Finally, thank you for studying with Qilinzi in your busy schedule.
Everyone is welcome to add my WeChat friends through the contact information in the official account.
If you think the content of this article is good, please
关注+转发。
Qilinzi will continue to bring more content.
