Article directory
foreword
The notes are organized in: Dark Horse programmer Redis introduction to actual combat tutorial, in-depth dialysis of the underlying principles of redis + redis distributed locks + enterprise solutions + dark horse comments on actual combat projects
Environment build
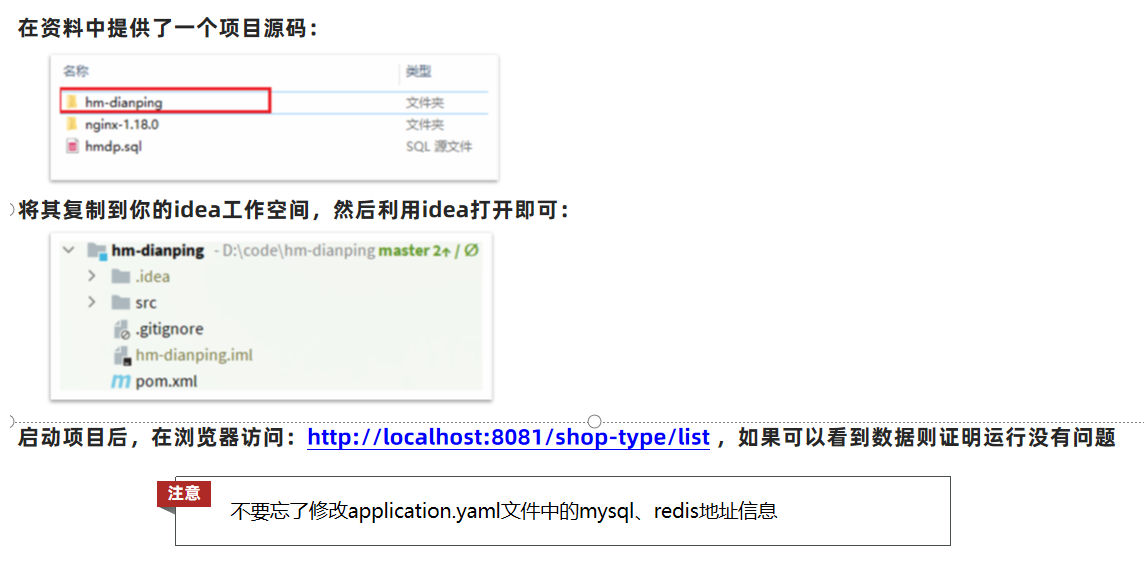
Import dark horse review project
-
import SQL
- Import the [hmdp.sql] file in the data to complete the creation of the database table
-
import backend project
- Use development tools such as idea to import files: [hm-dianping] folder
- Modify the configuration file information and start the test
-
Import front-end engineering
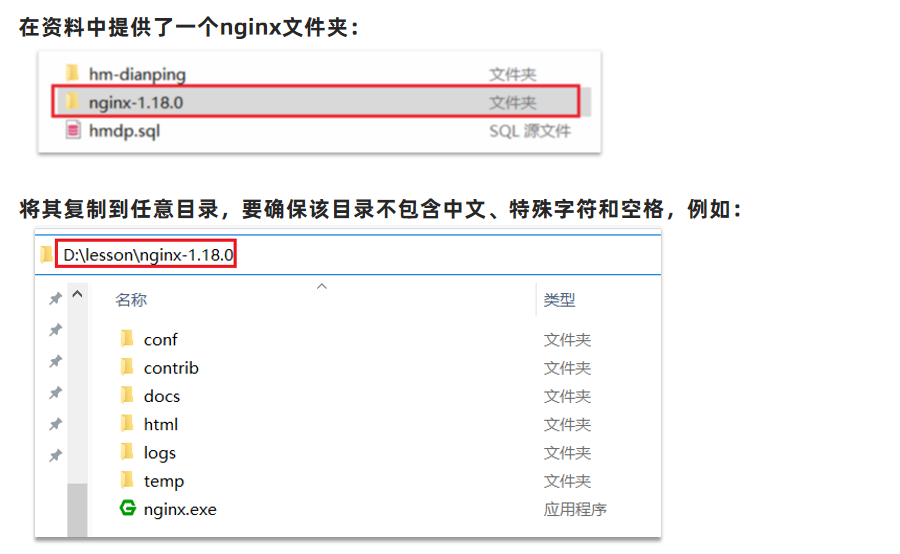
-
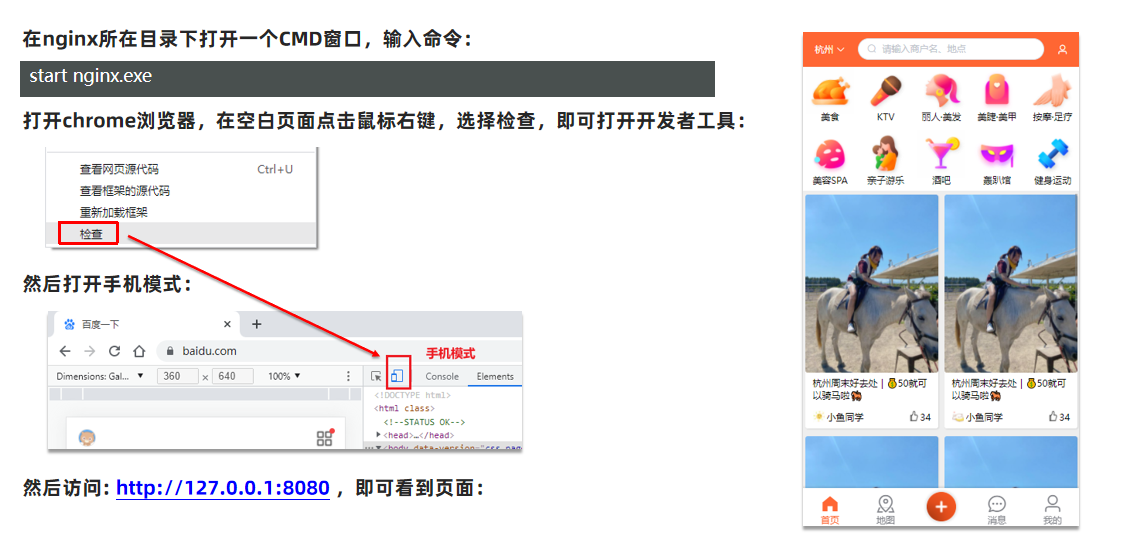
Run the front-end project
Realize the login process based on session
Send the verification code:
After the user submits the mobile phone number, it will check whether the mobile phone number is legal. If it is not legal, the user will be required to re-enter the mobile phone number
If the mobile phone number is legal, the background will generate the corresponding verification code at this time, save the verification code at the same time, and then send the verification code to the user via SMS
SMS verification code login and registration:
The user enters the verification code and mobile phone number, and the background gets the current verification code from the session, and then checks it with the verification code entered by the user. If they are inconsistent, the verification cannot pass. If they are consistent, the background queries the user based on the mobile phone number. , if the user does not exist, create account information for the user and save it to the database. No matter whether it exists or not, the user information will be saved in the session, so that the current login information can be obtained later
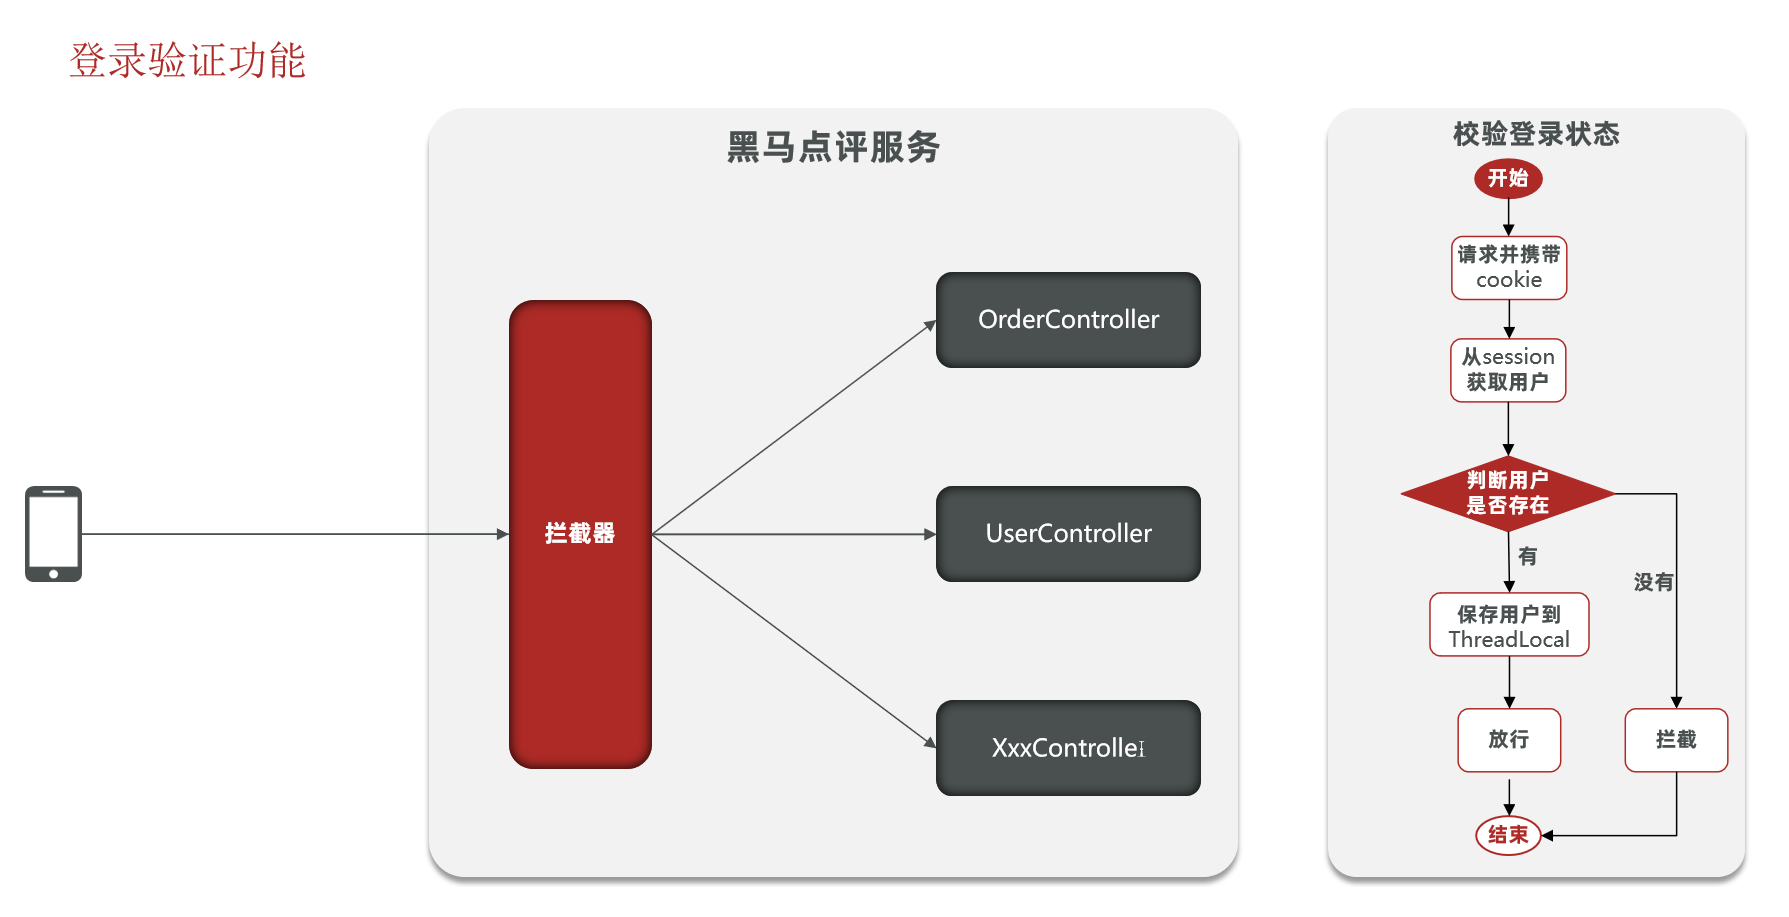
Verify login status:
When the user makes a request, he will carry the JsessionId from the cookie to the background, and the background will get the user information from the session through the JsessionId. If there is no session information, it will be intercepted. If there is session information, the user information will be saved in threadLocal, and let go

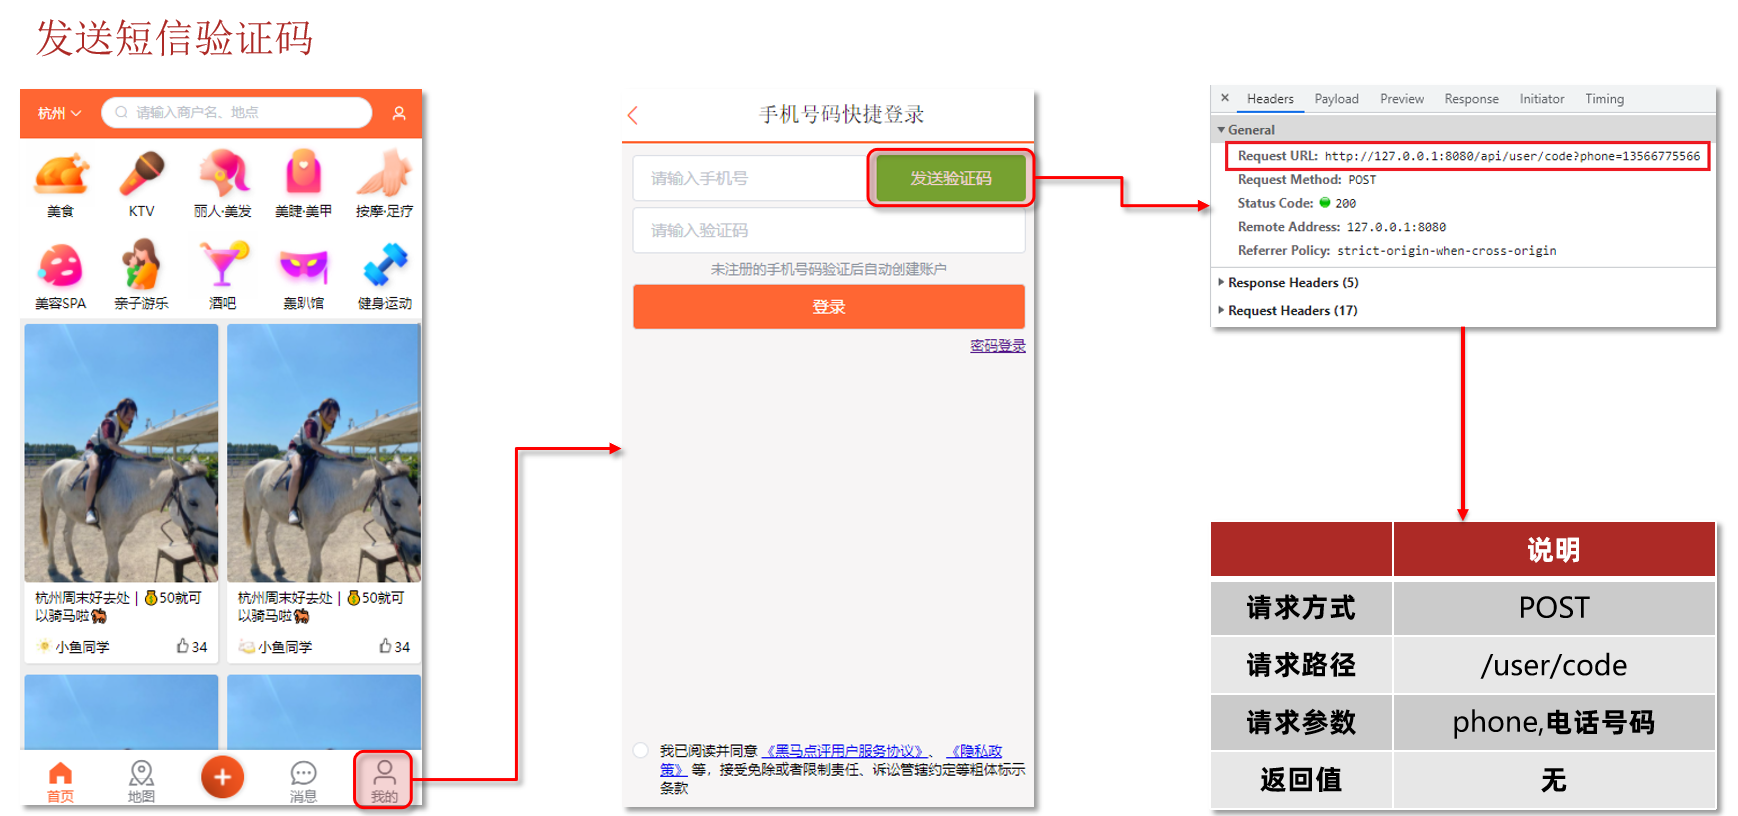
Realize the function of sending SMS verification code
Page flow:
Code
Send SMS verification code
-
UserController
/** * 发送手机验证码 */ @PostMapping("code") public Result sendCode(@RequestParam("phone") String phone, HttpSession session) { // TODO 发送短信验证码并保存验证码 return userService.sendCode(phone,session); } -
IUserService
Result sendCode(String phone, HttpSession session); -
UserServiceImpl
    @Override
    public Result sendCode(String phone, HttpSession session) {


        // 1. 校验手机号
        if (RegexUtils.isPhoneInvalid(phone)){


            // 2. 如果不符合,返回错误信息
            return Result.fail("手机号格式错误!");
        }
        // 3. 符合,生成验证码
        String code = RandomUtil.randomNumbers(6);
        // 4. 保存验证码到 session
        session.setAttribute("code",code);
        //5. 发送验证码
        log.debug("发送短信验证码成功,验证码:{}",code);
        //返回 OK
        return Result.ok();
    }
Log in
-
UserController
/** * 登录功能 * @param loginForm 登录参数,包含手机号、验证码;或者手机号、密码 */ @PostMapping("/login") public Result login(@RequestBody LoginFormDTO loginForm, HttpSession session){ // TODO 实现登录功能 return userService.login(loginForm,session); } -
IUserService
Result login(LoginFormDTO loginForm, HttpSession session); -
UserServiceImpl
    @Override
    public Result login(LoginFormDTO loginForm, HttpSession session) {


        // 1.校验手机号
        String phone = loginForm.getPhone();
        if (RegexUtils.isPhoneInvalid(phone)){


            // 2.如果不符合,返回错误信息
            return Result.fail("手机号格式错误!");
        }
        //3. 校验手机号
        Object cacheCode = session.getAttribute("code");
        String code = loginForm.getCode();
        if (cacheCode == null || !cacheCode.toString().equals(code)){


            // 3.不一致,错误
            return Result.fail("验证码错误!");
        }
        // 一致,根据手机号查询用户
        User user = query().eq("phone", phone).one();
        //5. 判断用户是否存在
        if (user == null){


            //不存在,则创建
            user = createUserWithPhone(phone);
        }
        // 7.保存用户信息到session中
        session.setAttribute("user",user);
        //session.setAttribute("user", BeanUtil.copyProperties(user, UserDTO.class));

        return Result.ok();
    }

    private User createUserWithPhone(String phone) {


        User user = new User();
        user.setPhone(phone);
        user.setNickName(USER_NICK_NAME_PREFIX+RandomUtil.randomString(10));
        save(user);
        return user;
    }
Realize the login interception function
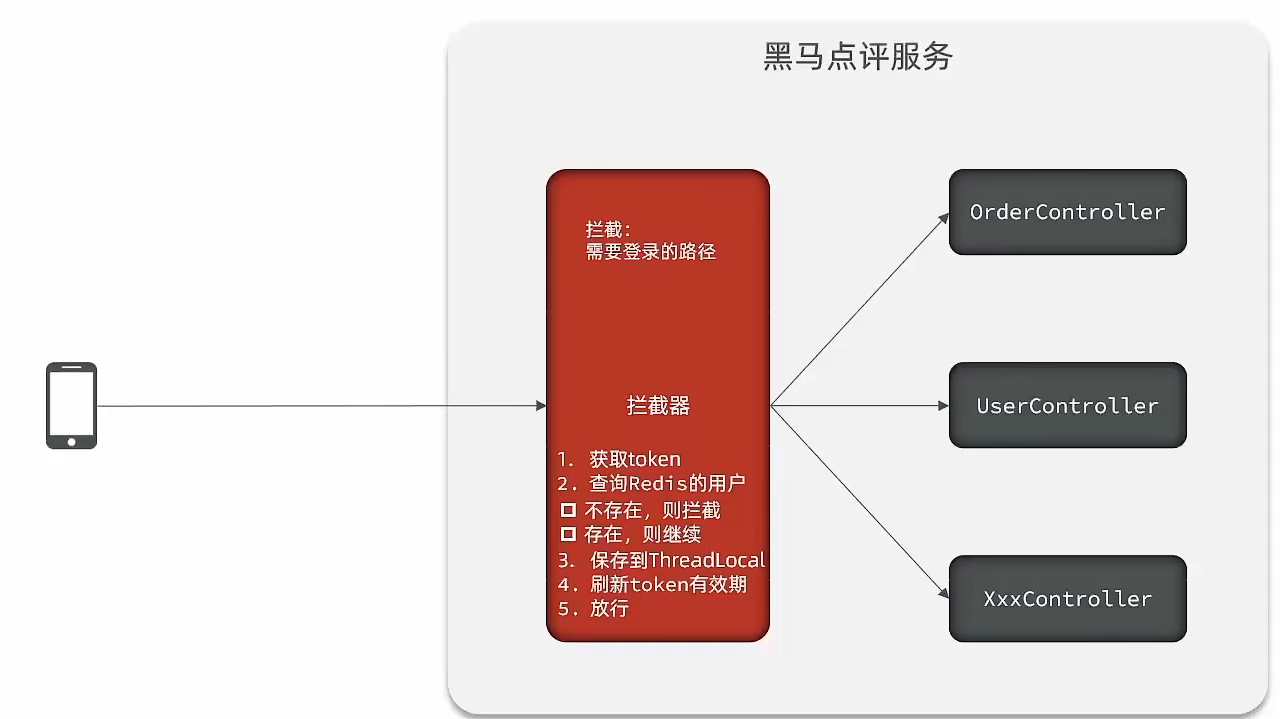
flow chart:
Code
interceptor code
package com.hmdp.utils;

import com.hmdp.dto.UserDTO;
import org.springframework.web.servlet.HandlerInterceptor;

import javax.servlet.http.HttpServletRequest;
import javax.servlet.http.HttpServletResponse;
import javax.servlet.http.HttpSession;

public class LoginInterceptor implements HandlerInterceptor {


    @Override
    public boolean preHandle(HttpServletRequest request, HttpServletResponse response, Object handler) throws Exception {


        // 1. 获取session
        HttpSession session = request.getSession();
        // 2.获取session中的用户
        Object user = session.getAttribute("user");
        // 3.判断用户是否存在
        if (user == null){


            // 4.不存在,拦截,返回401状态码(未授权的意思)
            response.setStatus(401);
        }

        // 5.存在。保存用户信息到 Threadlocal
        UserHolder.saveUser((User)user);
        //UserHolder.saveUser((UserDTO) user);
        // 6.放行
        return true;
    }

    @Override
    public void afterCompletion(HttpServletRequest request, HttpServletResponse response, Object handler, Exception ex) throws Exception {


        UserHolder.removeUser();
    }
}
Let the interceptor take effect
package com.hmdp.config;

import com.hmdp.utils.LoginInterceptor;
import org.springframework.context.annotation.Configuration;
import org.springframework.web.servlet.config.annotation.InterceptorRegistry;
import org.springframework.web.servlet.config.annotation.WebMvcConfigurer;

@Configuration
public class MvcConfig implements WebMvcConfigurer {


    @Override
    public void addInterceptors(InterceptorRegistry registry) {


        //登录拦截器
        registry.addInterceptor(new LoginInterceptor()).excludePathPatterns(
                "/shop/**",
                "/voucher/**",
                "/shop-type/**",
                "/upload/**",
                "/blog/hot",
                "/user/code",
                "/user/login"
        );
    }
}
Hide sensitive user information
We observed through the browser that all the user's information is there at this time, which is extremely unreliable, so we should hide the user's sensitive information before returning the user information. The core idea is to write a UserDto object, this UserDto The object has no sensitive information. Before returning, we convert the User object with user sensitive information into a UserDto object without sensitive information, so we can avoid this embarrassing problem
Modify the login method:
//7.保存用户信息到session中
session.setAttribute("user", BeanUtils.copyProperties(user,UserDTO.class));
Modify the interceptor:
//5.存在,保存用户信息到Threadlocal
UserHolder.saveUser((UserDTO) user);
Modify UserHolder: replace user object with UserDTO
public class UserHolder {


    private static final ThreadLocal<UserDTO> tl = new ThreadLocal<>();

    public static void saveUser(UserDTO user){


        tl.set(user);
    }

    public static UserDTO getUser(){


        return tl.get();
    }

    public static void removeUser(){


        tl.remove();
    }
}
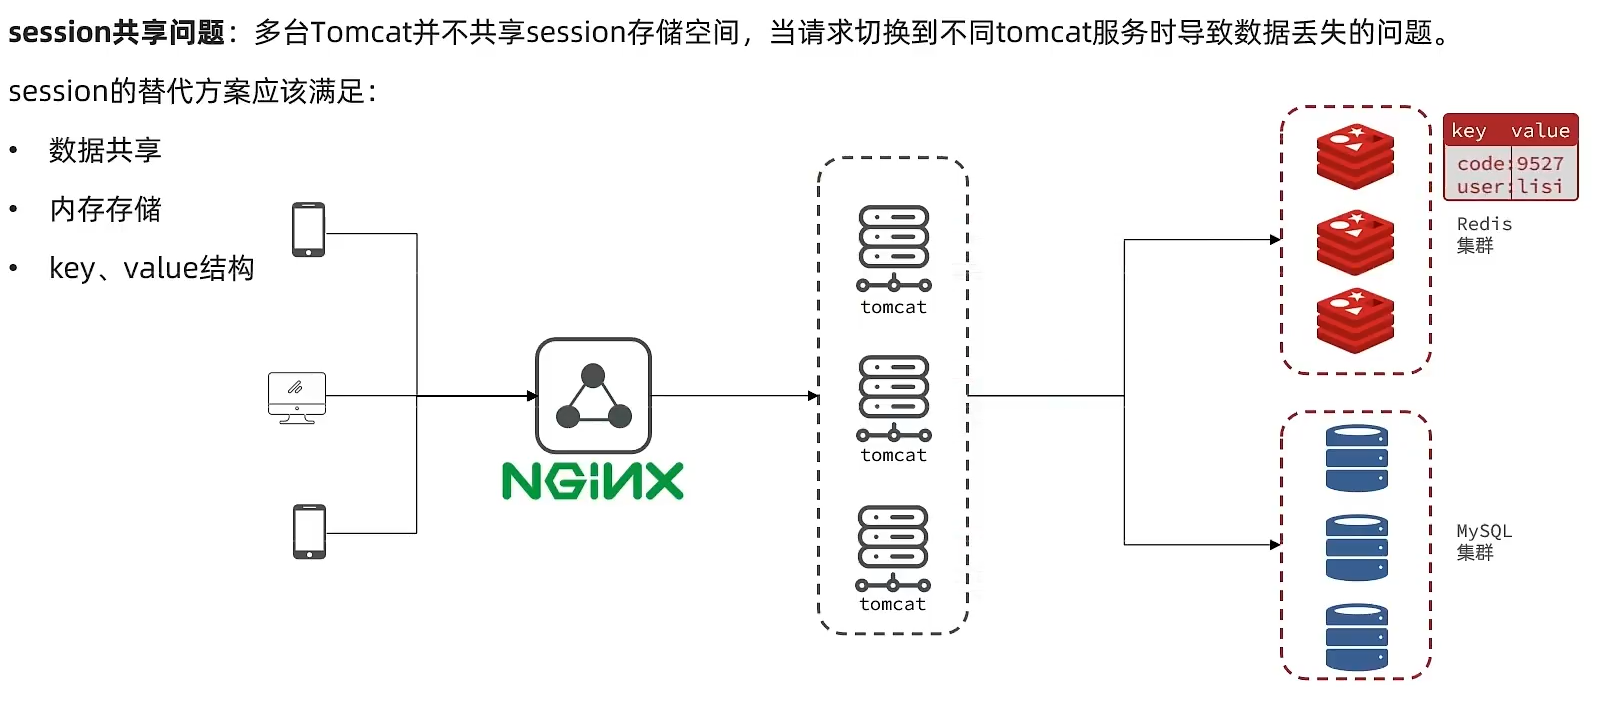
session sharing problem
Idea analysis:
Each tomcat has its own session, assuming that the user visits the first tomcat for the first time and stores his information in the session of the first server, but the second time the user visits the second tomcat , then on the second server, there must be no session stored in the first server, so there will be problems with the entire login interception function at this time, how can we solve this problem? The early solution is session copy, which means that although each tomcat has a different session, whenever the session of any server is modified, it will be synchronized to the session of other Tomcat servers. In this way, the session can be realized shared
But this scheme has two big problems:
-
Each server has a complete session data, and the server is under too much pressure.
-
When the session copies data, there may be a delay
So the solutions we adopted later are all based on redis. We replace the session with redis. The redis data itself is shared, which can avoid the problem of session sharing.
flow chart:
Redis replaces session business process analysis
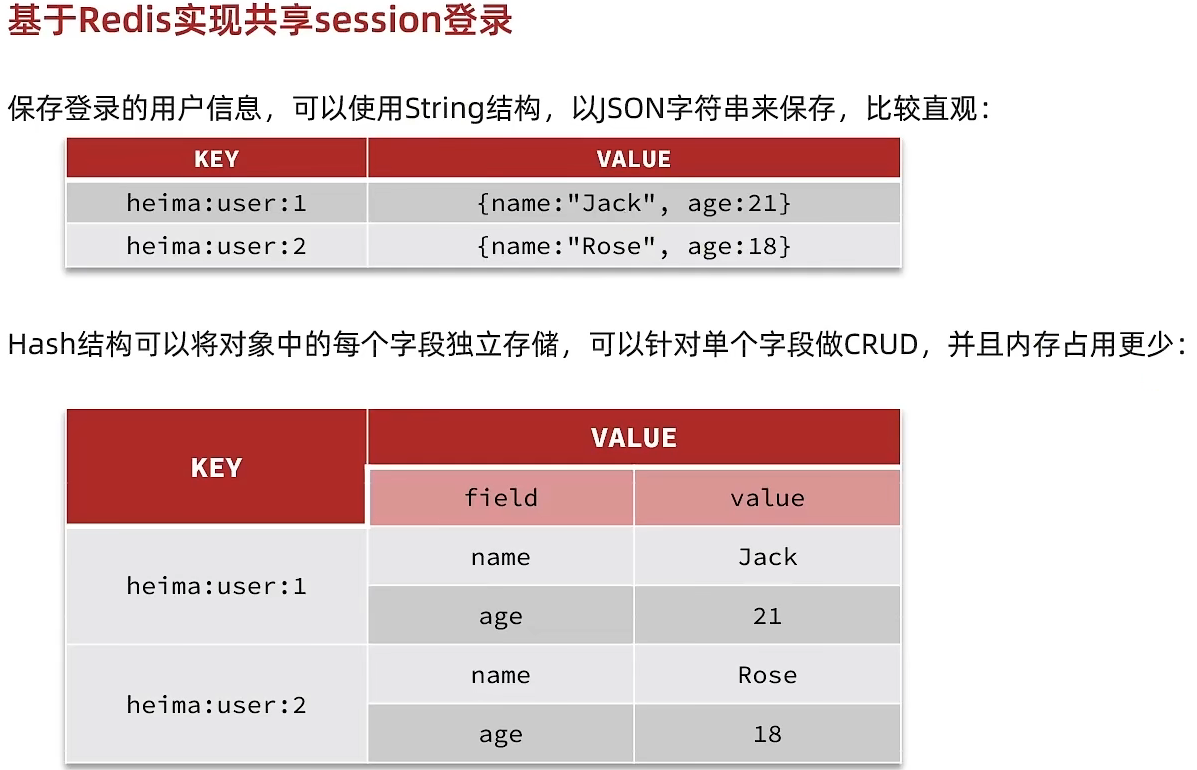
Design key structure
First of all, we have to think about using redis to store data, so which structure should we use? Since the stored data is relatively simple, we can consider using String or hash, as shown in the figure below. If you use String, students should pay attention to its value and take up a little more space. If you use hash, its value Only the data itself will be stored. If you don’t care about memory, you can actually use String.
Graphic:
Design key details
So we can use the String structure, which is a simple key, value key-value pair, but regarding key processing, session has its own session for each user, but the redis key is shared, so we can't use it coded
When designing this key, we said before that we need to meet two points:
-
key must be unique
-
The key should be easy to carry
If we use the data of phone: mobile phone number to store, it is of course possible, but it is not appropriate to store such sensitive data in redis and bring it from the page, so we generate a random string token in the background, and then Let the front end bring this token to complete our overall logic
overall access process
When the registration is complete , the user will log in to check whether the mobile phone number and verification code submitted by the user are consistent. If they are consistent, the user information will be queried according to the mobile phone number. If it does not exist, a new one will be created. Finally, the user data will be saved to redis and generated token as the key of redis
When we verify whether the user is logged in , we will carry the token for access, take out the value corresponding to the token from redis, and judge whether the data exists, if not, intercept it, if it exists, save it in threadLocal, and release it
flow chart:

SMS login based on Redis
Send SMS verification code
Modify the sendCode method in UserServiceImpl:
    @Resource
    private StringRedisTemplate stringRedisTemplate;

    @Override
    public Result sendCode(String phone, HttpSession session) {


        // 1. 校验手机号
        if (RegexUtils.isPhoneInvalid(phone)) {


            // 2. 如果不符合,返回错误信息
            return Result.fail("手机号格式错误!");
        }
        // 3. 符合,生成验证码
        String code = RandomUtil.randomNumbers(6);
//        // 4. 保存验证码到 session
//        session.setAttribute("code",code);
        // 4. 保存验证码到 Redis
        stringRedisTemplate.opsForValue().set(LOGIN_CODE_KEY + phone, code, LOGIN_CODE_TTL, TimeUnit.MINUTES);
        //5. 发送验证码
        log.debug("发送短信验证码成功,验证码:{}", code);
        //返回 OK
        return Result.ok();
    }
Modify the sendCode method in UserServiceImpl:
    @Override
    public Result login(LoginFormDTO loginForm, HttpSession session) {


        // 1.校验手机号
        String phone = loginForm.getPhone();
        if (RegexUtils.isPhoneInvalid(phone)) {


            // 2.如果不符合,返回错误信息
            return Result.fail("手机号格式错误!");
        }
//        // 3. 校验手机号
//        Object cacheCode = session.getAttribute("code");
//        String code = loginForm.getCode();
//        if (cacheCode == null || !cacheCode.toString().equals(code)) {


//            // 3.不一致,错误
//            return Result.fail("验证码错误!");
//        }
        // 3.从Redis获取验证码并校验
        String cacheCode = stringRedisTemplate.opsForValue().get(LOGIN_CODE_KEY + phone);
        String code = loginForm.getCode();
        if (cacheCode == null || !cacheCode.equals(code)) {


            // 不一致,错误
            return Result.fail("验证码错误!");
        }
        // 4.一致,根据手机号查询用户   select * from tb_user where phone = ?
        User user = query().eq("phone", phone).one();
        // 5. 判断用户是否存在
        if (user == null) {


            // 6.不存在,则创建
            user = createUserWithPhone(phone);
        }
//        // 7.保存用户信息到session中
//        session.setAttribute("user", BeanUtil.copyProperties(user, UserDTO.class));

        // 7.保存用户信息到 Redis 中
        // 7.1。随机生成 token 作为登录令牌
        String token = UUID.randomUUID().toString(true);
        // 7.2.将 user 对象 转化为 hashmap 存储
        UserDTO userDTO = BeanUtil.copyProperties(user, UserDTO.class);
        Map<String, Object> userMap = BeanUtil.beanToMap(userDTO);
        // 7.3.存储
        String tokenKey = LOGIN_USER_KEY + token;
        stringRedisTemplate.opsForHash().putAll(tokenKey, userMap);
        // 7.4.设置 token 有效期
        stringRedisTemplate.expire(tokenKey, LOGIN_USER_TTL, TimeUnit.MINUTES);

        // 8.返回token
        return Result.ok(token);
    }
front-end code
-
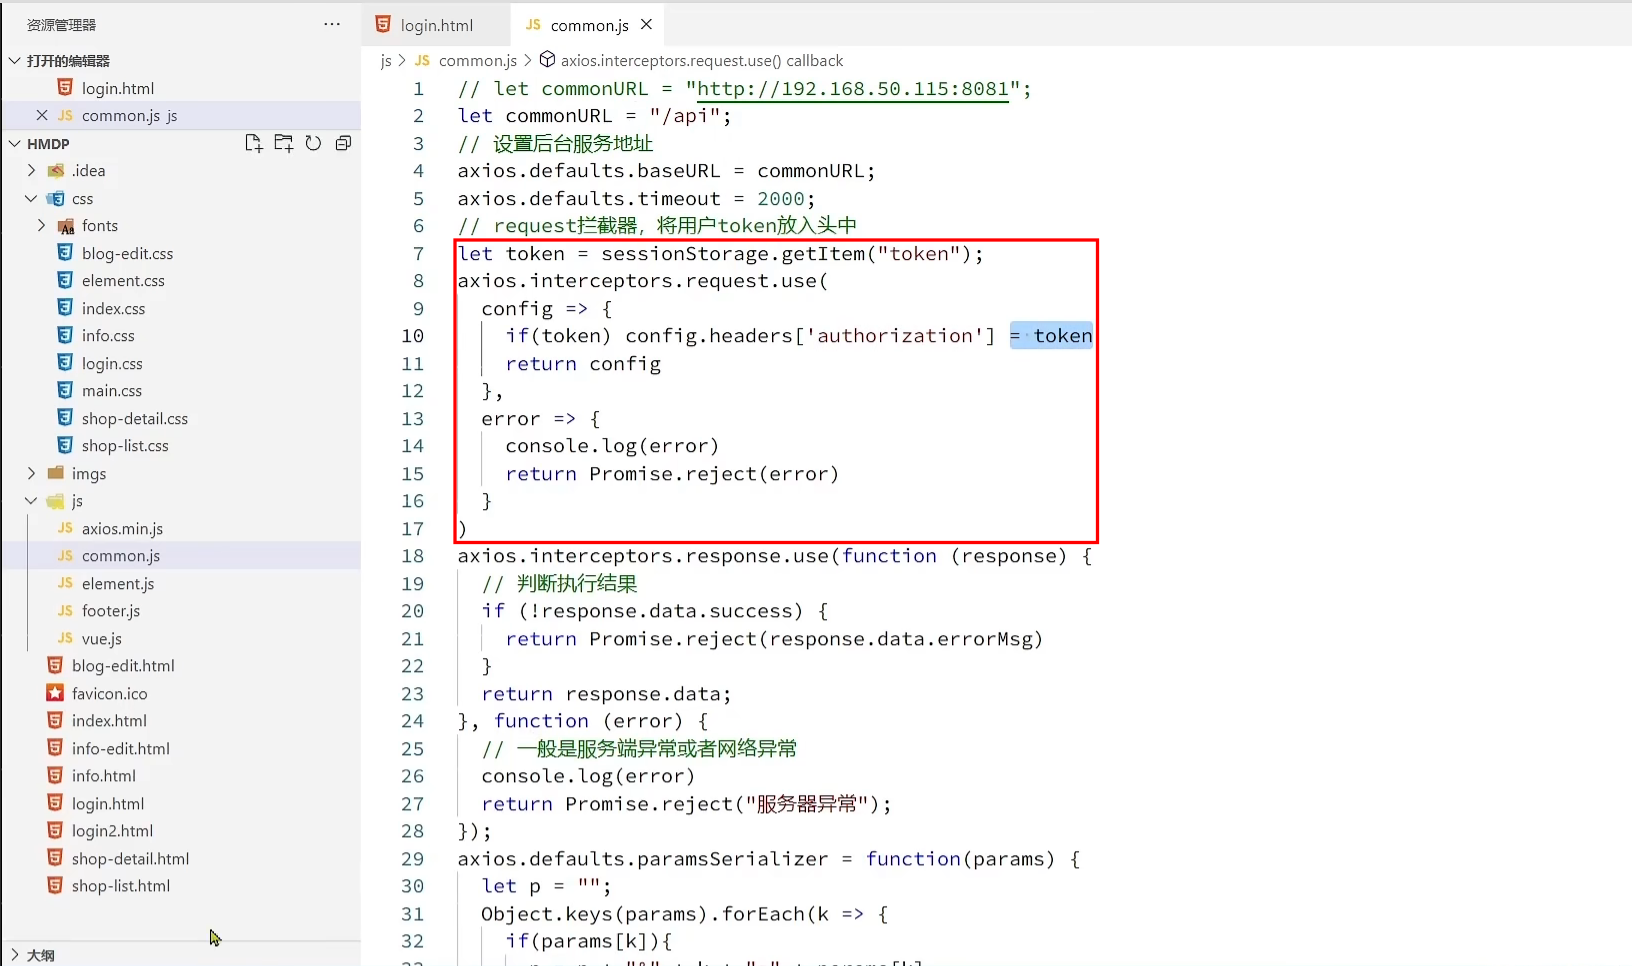
login code
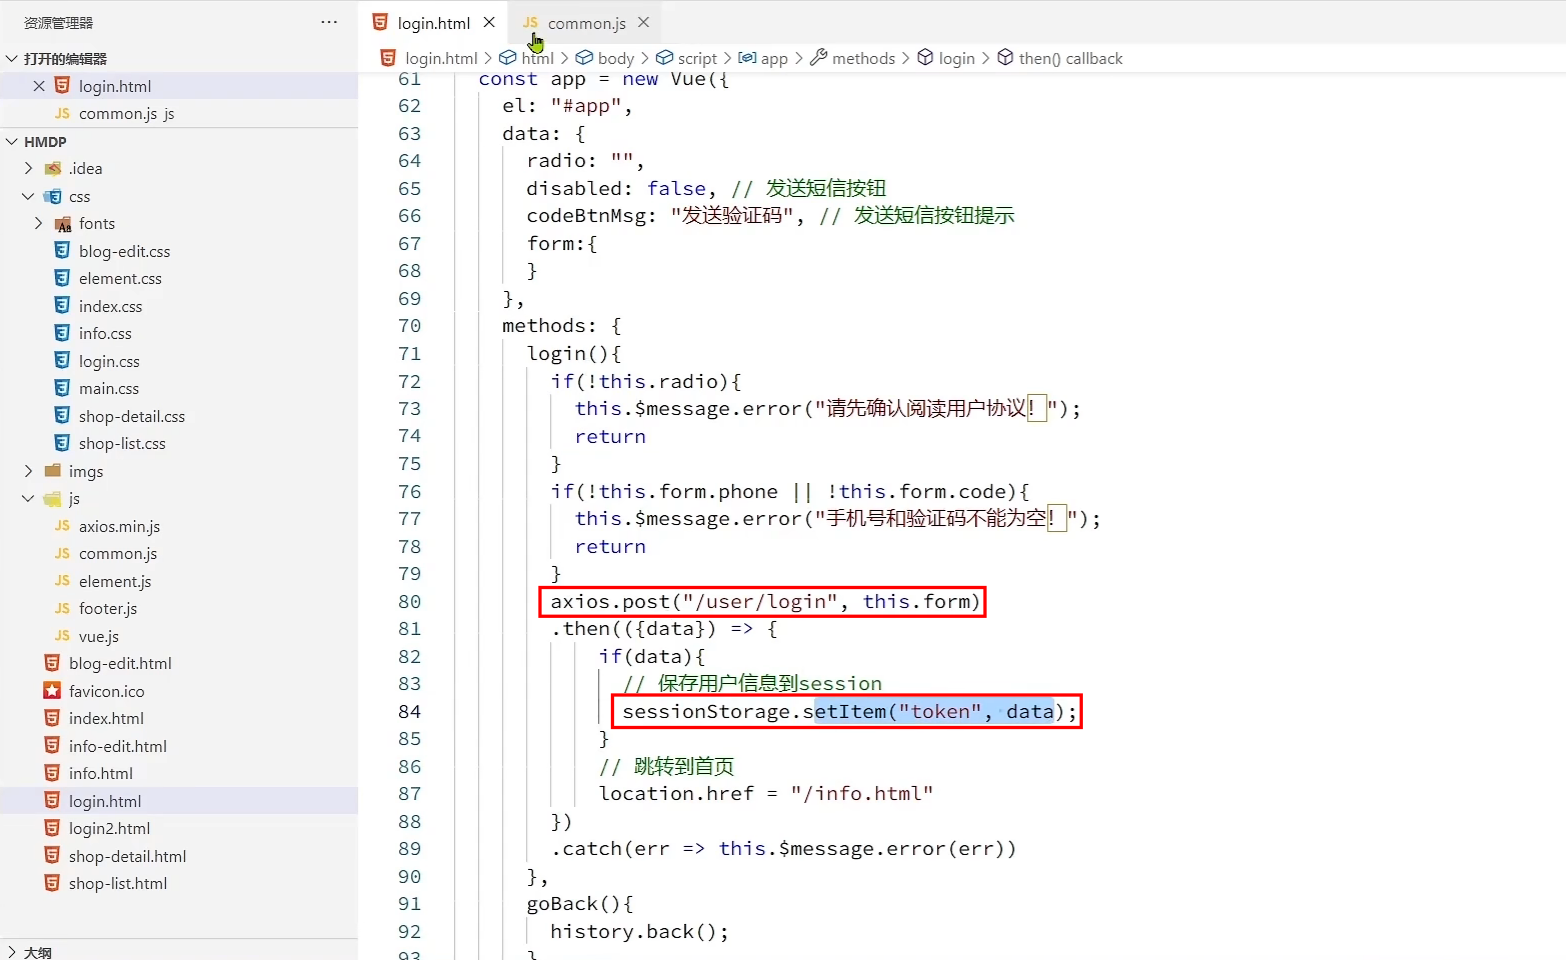
-
The Ajax request carries the authorization request header, that is, carries the token; the server obtains the authorization and gets the token
interceptor modification
Modify the LoginInterceptor:
    private StringRedisTemplate stringRedisTemplate;

    public LoginInterceptor(StringRedisTemplate stringRedisTemplate) {


        this.stringRedisTemplate = stringRedisTemplate;
    }

    @Override
    public boolean preHandle(HttpServletRequest request, HttpServletResponse response, Object handler) throws Exception {


        // 1. 获取请求头中的 token
        String token = request.getHeader("authorization");
        if (StrUtil.isBlank(token)) {


            // 4.l不存在,拦截,返回401状态码(未授权的意思)
            response.setStatus(401);
            return false;
        }
        // 2.基于 token 获取 Redis中的用户
        String key = RedisConstants.LOGIN_USER_KEY + token;
        Map<Object, Object> userMap = stringRedisTemplate.opsForHash().entries(key);

        // 3.判断用户是否存在
        if (userMap.isEmpty()){


            // 4.l不存在,拦截,返回401状态码(未授权的意思)
            response.setStatus(401);
            return false;
        }
        // 5.将查询到的 hash 数据 转为 userDTO 对象
        UserDTO userDTO = BeanUtil.fillBeanWithMap(userMap, new UserDTO(), false);

        // 6.存在。保存用户信息到 Threadlocal
        UserHolder.saveUser(userDTO);

        // 7.刷新 token 有效期
        stringRedisTemplate.expire(key,RedisConstants.LOGIN_USER_TTL, TimeUnit.MINUTES);
        // 8.放行
        return true;
    }
Modify MvcConfig:
package com.hmdp.config;

import com.hmdp.utils.LoginInterceptor;
import org.springframework.context.annotation.Configuration;
import org.springframework.data.redis.core.StringRedisTemplate;
import org.springframework.web.servlet.config.annotation.InterceptorRegistry;
import org.springframework.web.servlet.config.annotation.WebMvcConfigurer;

import javax.annotation.Resource;

@Configuration
public class MvcConfig implements WebMvcConfigurer {


    @Resource
    private StringRedisTemplate stringRedisTemplate;

    @Override
    public void addInterceptors(InterceptorRegistry registry) {


        //登录拦截器
        registry.addInterceptor(new LoginInterceptor(stringRedisTemplate)).excludePathPatterns(
                "/shop/**",
                "/voucher/**",
                "/shop-type/**",
                "/upload/**",
                "/blog/hot",
                "/user/code",
                "/user/login"
        );
    }
}
Start the test:
Error analysis
-
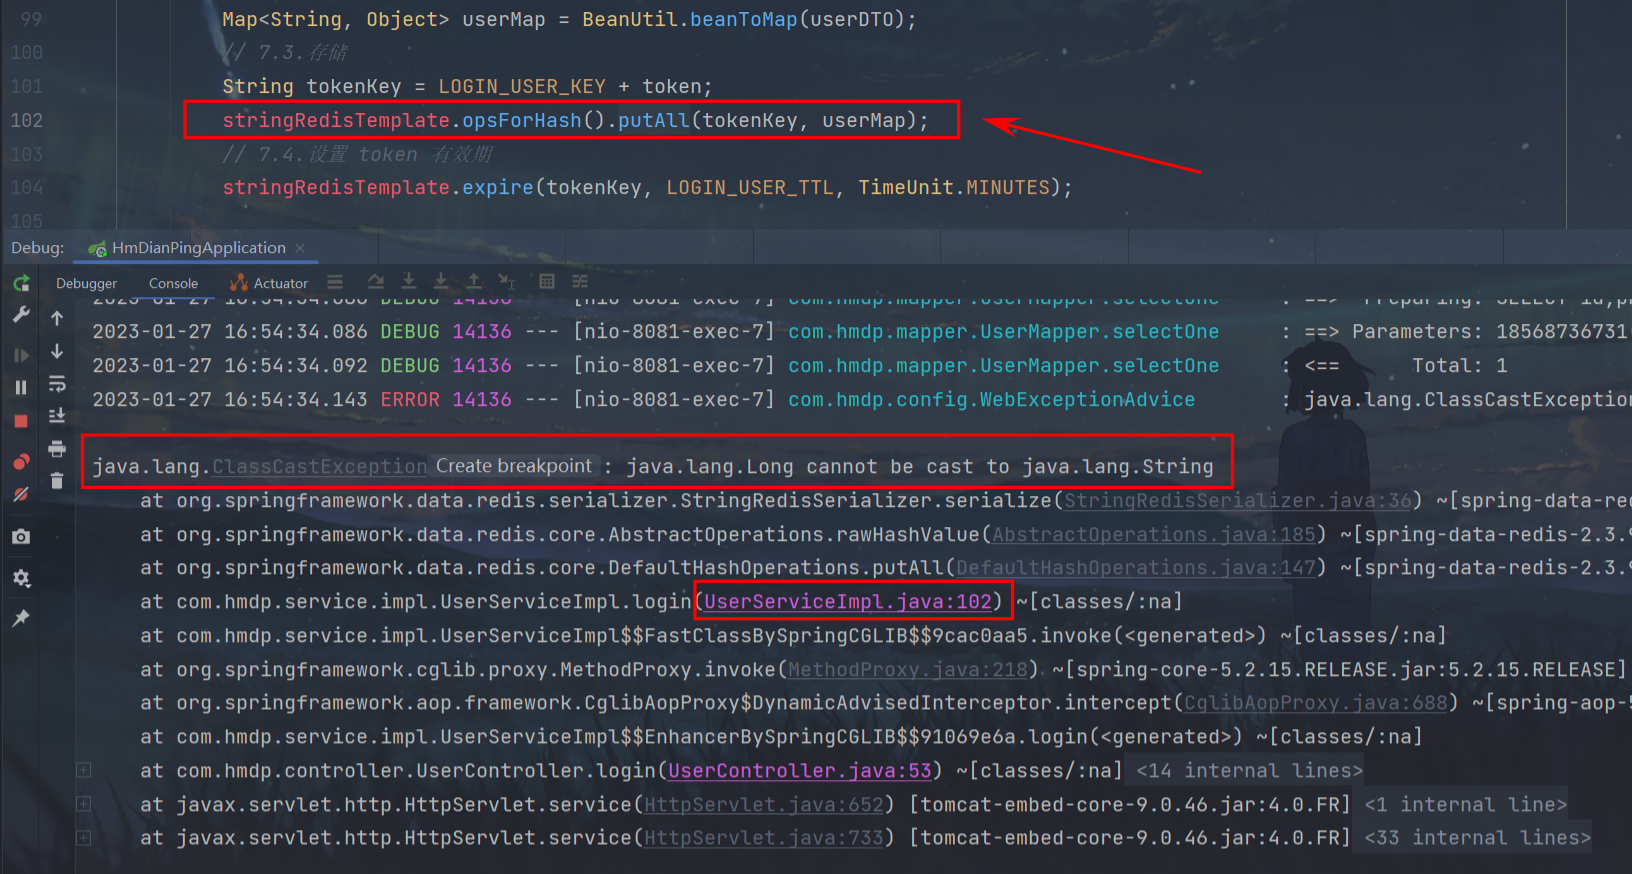
Problem Description:
After entering the mobile phone number and verification code on the front-end page, an error is reported: the server is abnormal
The idea console shows:
java.lang.ClassCastException: java.lang.Long cannot be cast to java.lang.StringProblem line code:
stringRedisTemplate.opsForHash().putAll(tokenKey, userMap); -
error analysis
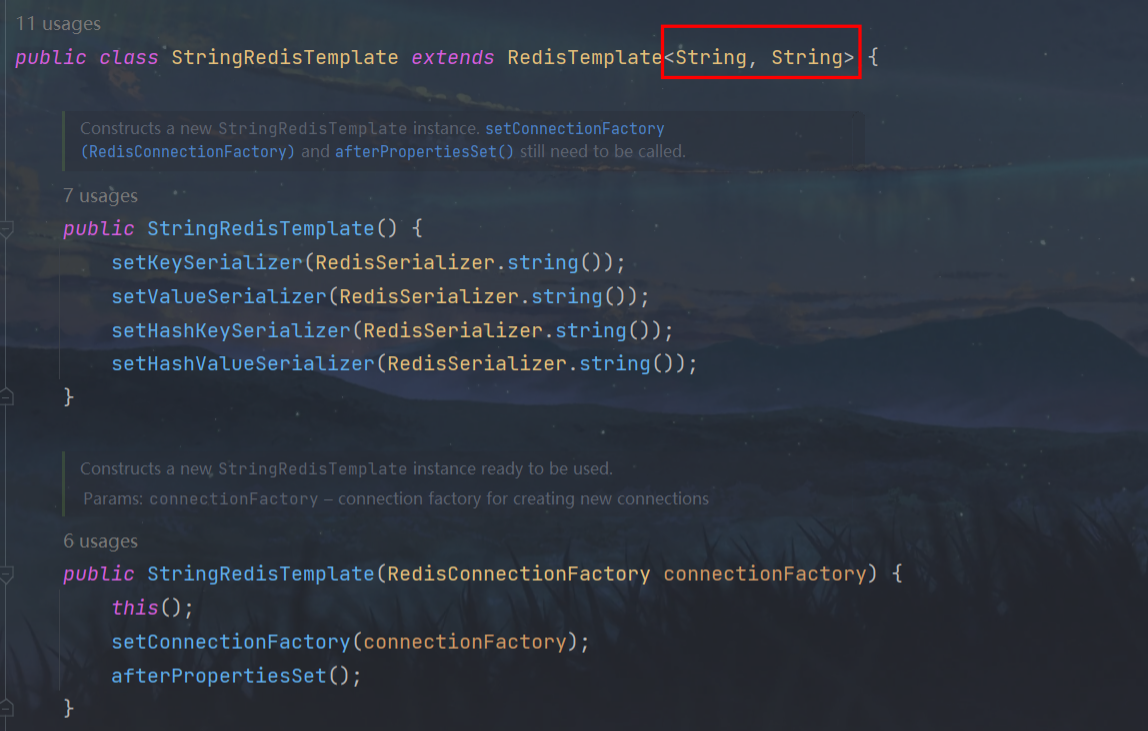
Type conversion exception: Long cannot be converted to String
Reason: The id in the UserDTO class under the dto package is of long type, and StringRedisTemplate requires both key and value to be of string type
-
Solution
-
Stupid way: don’t use tool class, create a new Map by yourself, and then assign values one by one
-
Tool customization:
        // 7.2.将 user 对象 转化为 hashmap 存储
        UserDTO userDTO = BeanUtil.copyProperties(user, UserDTO.class);
        Map<String, Object> userMap = BeanUtil.beanToMap(userDTO,new HashMap<>(),
                CopyOptions.create()
                .setIgnoreNullValue(true)
                .setFieldValueEditor((fieldName,fieldValue)->fieldValue.toString()));
-
-
retest: success
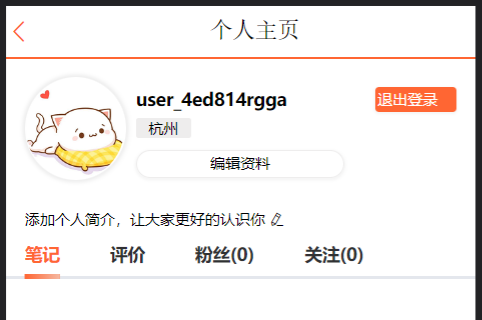
-
The complete code is as follows:
package com.hmdp.service.impl;

import cn.hutool.core.bean.BeanUtil;
import cn.hutool.core.bean.copier.CopyOptions;
import cn.hutool.core.lang.UUID;
import cn.hutool.core.util.RandomUtil;
import com.baomidou.mybatisplus.extension.service.impl.ServiceImpl;
import com.hmdp.dto.LoginFormDTO;
import com.hmdp.dto.Result;
import com.hmdp.dto.UserDTO;
import com.hmdp.entity.User;
import com.hmdp.mapper.UserMapper;
import com.hmdp.service.IUserService;
import com.hmdp.utils.RegexUtils;
import lombok.extern.slf4j.Slf4j;
import org.springframework.data.redis.core.StringRedisTemplate;
import org.springframework.stereotype.Service;
import javax.annotation.Resource;
import javax.servlet.http.HttpSession;
import java.util.HashMap;
import java.util.Map;
import java.util.concurrent.TimeUnit;
import static com.hmdp.utils.RedisConstants.*;
import static com.hmdp.utils.SystemConstants.USER_NICK_NAME_PREFIX;

@Slf4j
@Service
public class UserServiceImpl extends ServiceImpl<UserMapper, User> implements IUserService {


    @Resource
    private StringRedisTemplate stringRedisTemplate;

    @Override
    public Result sendCode(String phone, HttpSession session) {


        // 1. 校验手机号
        if (RegexUtils.isPhoneInvalid(phone)) {


            // 2. 如果不符合,返回错误信息
            return Result.fail("手机号格式错误!");
        }
        // 3. 符合,生成验证码
        String code = RandomUtil.randomNumbers(6);
//        // 4. 保存验证码到 session
//        session.setAttribute("code",code);
        // 4. 保存验证码到 Redis
        stringRedisTemplate.opsForValue().set(LOGIN_CODE_KEY + phone, code, LOGIN_CODE_TTL, TimeUnit.MINUTES);
        //5. 发送验证码
        log.debug("发送短信验证码成功,验证码:{}", code);
        //返回 OK
        return Result.ok();
    }

    @Override
    public Result login(LoginFormDTO loginForm, HttpSession session) {


        // 1.校验手机号
        String phone = loginForm.getPhone();
        if (RegexUtils.isPhoneInvalid(phone)) {


            // 2.如果不符合,返回错误信息
            return Result.fail("手机号格式错误!");
        }
//        // 3. 校验手机号
//        Object cacheCode = session.getAttribute("code");
//        String code = loginForm.getCode();
//        if (cacheCode == null || !cacheCode.toString().equals(code)) {


//            // 3.不一致,错误
//            return Result.fail("验证码错误!");
//        }
        // 3.从Redis获取验证码并校验
        String cacheCode = stringRedisTemplate.opsForValue().get(LOGIN_CODE_KEY + phone);
        String code = loginForm.getCode();
        if (cacheCode == null || !cacheCode.equals(code)) {


            // 不一致,错误
            return Result.fail("验证码错误!");
        }
        // 4.一致,根据手机号查询用户   select * from tb_user where phone = ?
        User user = query().eq("phone", phone).one();
        // 5. 判断用户是否存在
        if (user == null) {


            // 6.不存在,则创建
            user = createUserWithPhone(phone);
        }
//        // 7.保存用户信息到session中
//        session.setAttribute("user", BeanUtil.copyProperties(user, UserDTO.class));

        // 7.保存用户信息到 Redis 中
        // 7.1。随机生成 token 作为登录令牌
        String token = UUID.randomUUID().toString(true);
        // 7.2.将 user 对象 转化为 hashmap 存储
        UserDTO userDTO = BeanUtil.copyProperties(user, UserDTO.class);
        Map<String, Object> userMap = BeanUtil.beanToMap(userDTO,new HashMap<>(),
                CopyOptions.create()
                .setIgnoreNullValue(true)
                .setFieldValueEditor((fieldName,fieldValue)->fieldValue.toString()));
        // 7.3.存储
        String tokenKey = LOGIN_USER_KEY + token;
        stringRedisTemplate.opsForHash().putAll(tokenKey, userMap);
        // 7.4.设置 token 有效期
        stringRedisTemplate.expire(tokenKey, LOGIN_USER_TTL, TimeUnit.MINUTES);

        // 8.返回token
        return Result.ok(token);
    }

    private User createUserWithPhone(String phone) {


        User user = new User();
        user.setPhone(phone);
        user.setNickName(USER_NICK_NAME_PREFIX + RandomUtil.randomString(10));
        save(user);
        return user;
    }
}
Fix status login refresh issue
initial plan
In this solution, he can indeed use the interception of the corresponding path, and at the same time refresh the survival time of the login token token, but now this interceptor only intercepts the path that needs to be intercepted. Suppose the current user visits some paths that do not need to be intercepted. Then this interceptor will not take effect, so the token refresh action will not actually be executed at this time, so there is a problem with this solution
flow chart:
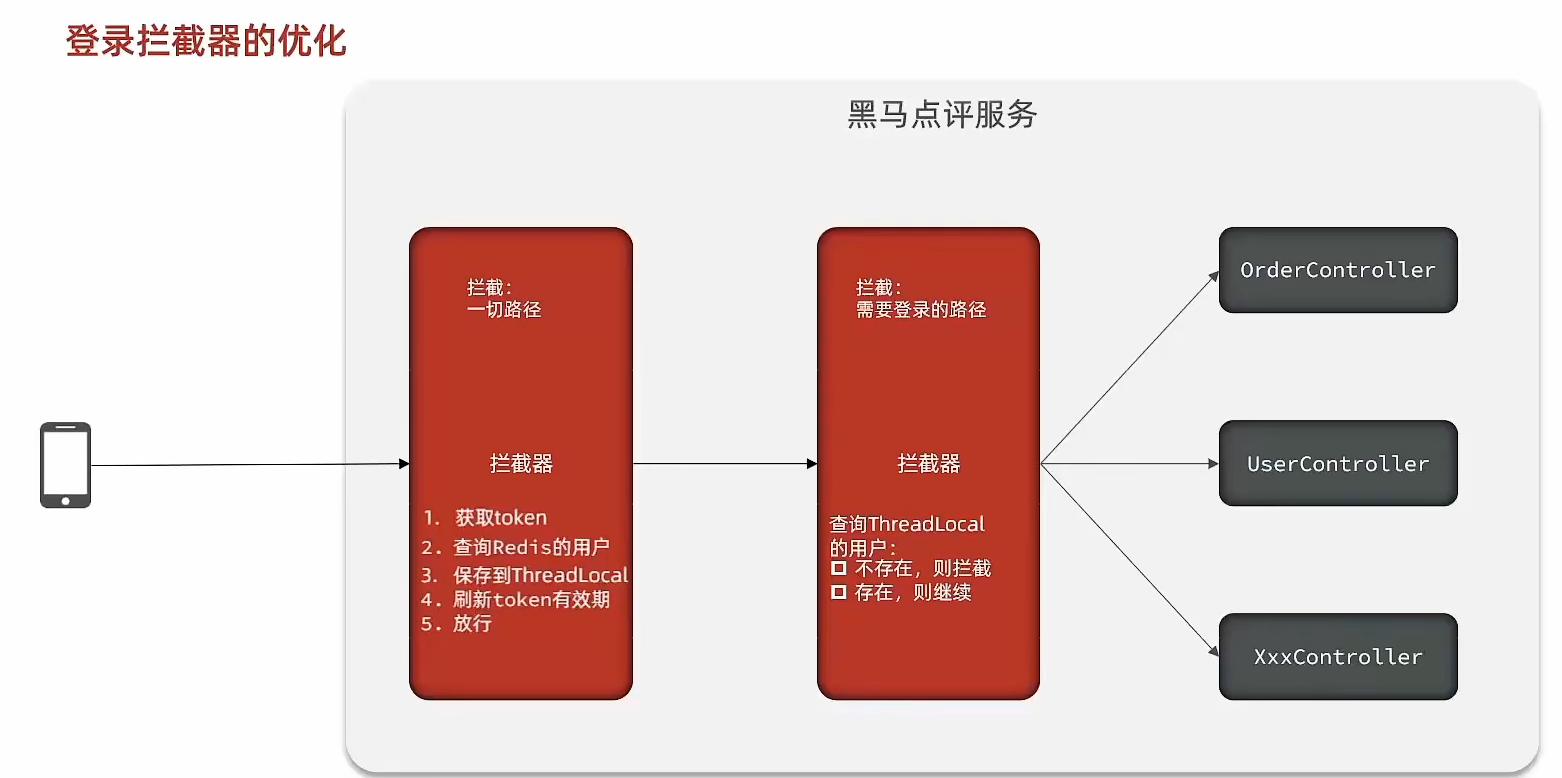
Optimization
Since the previous interceptor cannot take effect on paths that do not need to be intercepted, we can add an interceptor to intercept all paths in the first interceptor, and put what the second interceptor does into the first interception In the interceptor, refresh the token at the same time, because the first interceptor has threadLocal data, so at this time the second interceptor only needs to judge whether the user object in the interceptor exists, and complete the overall refresh function.
flow chart:
Code
Added token refresh interceptor: RefreshTokenInterceptor
package com.hmdp.utils;

import cn.hutool.core.bean.BeanUtil;
import cn.hutool.core.util.StrUtil;
import com.hmdp.dto.UserDTO;
import org.springframework.data.redis.core.StringRedisTemplate;
import org.springframework.web.servlet.HandlerInterceptor;

import javax.servlet.http.HttpServletRequest;
import javax.servlet.http.HttpServletResponse;

import java.util.Map;
import java.util.concurrent.TimeUnit;

import static com.hmdp.utils.RedisConstants.LOGIN_USER_KEY;
import static com.hmdp.utils.RedisConstants.LOGIN_USER_TTL;

public class RefreshTokenInterceptor implements HandlerInterceptor {


    private StringRedisTemplate stringRedisTemplate;

    public RefreshTokenInterceptor(StringRedisTemplate stringRedisTemplate) {


        this.stringRedisTemplate = stringRedisTemplate;
    }

    @Override
    public boolean preHandle(HttpServletRequest request, HttpServletResponse response, Object handler) throws Exception {


        // 1.获取请求头中的 token
        String token = request.getHeader("authorization");
        if (StrUtil.isBlank(token)){


            return true;
        }
        // 2.基于 token 获取 Redis 中的用户
        String key = LOGIN_USER_KEY+token;
        Map<Object, Object> userMap = stringRedisTemplate.opsForHash().entries(key);
        // 3.判断用户是否存在
        if (userMap.isEmpty()){


            return true;
        }
        // 4.将查询到的 hash数据转化为 userDTO
        UserDTO userDTO = BeanUtil.fillBeanWithMap(userMap, new UserDTO(), false);
        // 5.存在,保存用户信息到 ThreadLocal
        UserHolder.saveUser(userDTO);
        // 7.刷新 token有效期
        stringRedisTemplate.expire(key,LOGIN_USER_TTL, TimeUnit.MINUTES);
        // 8.放行
        return true;
    }

    @Override
    public void afterCompletion(HttpServletRequest request, HttpServletResponse response, Object handler, Exception ex) throws Exception {


        // 移除用户
        UserHolder.removeUser();
    }
}
Modify the login interceptor:
package com.hmdp.utils;

import com.hmdp.dto.UserDTO;
import org.springframework.web.servlet.HandlerInterceptor;

import javax.servlet.http.HttpServletRequest;
import javax.servlet.http.HttpServletResponse;


public class LoginInterceptor implements HandlerInterceptor {


    @Override
    public boolean preHandle(HttpServletRequest request, HttpServletResponse response, Object handler) throws Exception {


        // 1.判断是否需要拦截(ThreadLocal中是否有用户)
        UserDTO user = UserHolder.getUser();
        if (user == null){


            // 没有,需要拦截,设置状态码
            response.setStatus(401);
            // 拦截
            return false;
        }
        // 有用户,则放行
        return true;
    }
}
Modify the interceptor configuration class: MvcConfig
package com.hmdp.config;

import com.hmdp.utils.LoginInterceptor;
import com.hmdp.utils.RefreshTokenInterceptor;
import org.springframework.context.annotation.Configuration;
import org.springframework.data.redis.core.StringRedisTemplate;
import org.springframework.web.servlet.config.annotation.InterceptorRegistry;
import org.springframework.web.servlet.config.annotation.WebMvcConfigurer;

import javax.annotation.Resource;

@Configuration
public class MvcConfig implements WebMvcConfigurer {


    @Resource
    private StringRedisTemplate stringRedisTemplate;

    @Override
    public void addInterceptors(InterceptorRegistry registry) {


        //登录拦截器
        registry.addInterceptor(new LoginInterceptor()).excludePathPatterns(
                "/shop/**",
                "/voucher/**",
                "/shop-type/**",
                "/upload/**",
                "/blog/hot",
                "/user/code",
                "/user/login"
        ).order(1);

        // token 刷新拦截器
        registry.addInterceptor(new RefreshTokenInterceptor(stringRedisTemplate)).addPathPatterns("/**").order(0);
    }
}
Startup test: SUCCESSFUL!
Supplementary knowledge
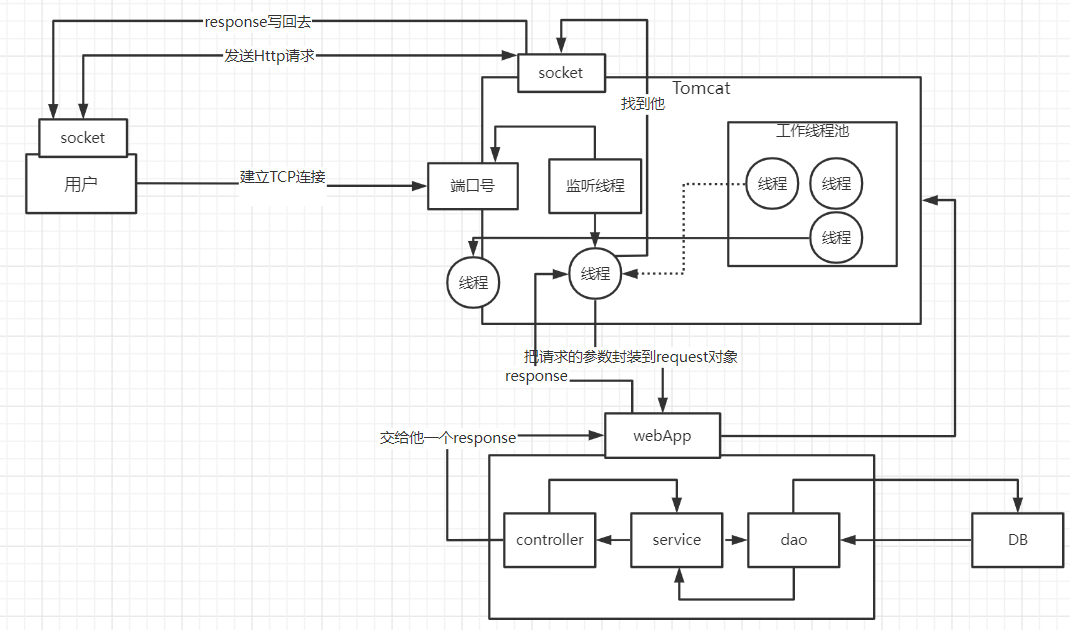
The operating principle of tomcat
When a user initiates a request, it will visit the port registered by us like tomcat. Any program that wants to run needs a thread to monitor the current port number, and tomcat is no exception. When the listening thread knows that the user wants to connect to tomcat , then the socket connection will be created by the listening thread. Sockets appear in pairs. Users pass data to each other through the socket image. When the socket on the tomcat side receives the data, the listening thread will take out a thread from the thread pool of tomcat to execute. User request, after our service is deployed to tomcat, the thread will find the project that the user wants to access, and then use this thread to forward to the controller, service, dao in the project, and access the corresponding DB, after the user completes the request , and return in a unified manner, then find the socket on the tomcat side, write the data back to the socket on the client side, and complete the request and response
Through the above analysis, we can know that each user actually finds a thread in the tomcat thread pool to complete the work, and then recycles after use. Since each request is independent, each user When accessing our project, we can use threadlocal to achieve thread isolation, and each thread operates its own data
Schematic diagram:
About Threadlocal
If you have read the source code of threadLocal, you will find that in threadLocal, both its put method and its get method first obtain the current user's thread, and then take out the thread's member variable map from the thread. As long as the threads are different, the map is different, so thread isolation can be achieved in this way
Summarize
Hutool official documentation: Hutool API documentation
threadlocal tutorial: the most complete ThreadLocal in history
Login and registration function of SMS verification code
-
Build a dark horse review project
-
Session-based SMS login
-
Session sharing problem under the cluster
-
Redis implements shared session
-
Redis realizes session refresh problem
end
Other parts of Dark Horse Comments: Continuously updating!