
outline
1. Background
In actual development, we often have to test while developing. Of course, the test mentioned here is not the unit test of the programmer's own code, but the tester's test after the code is submitted by the same group of programmers;
Or after the front and back ends are separated, the interface is often modified and then redeployed;
These situations will involve frequent package deployment;
General steps for manual packaging:
1. Submit the code
2. Ask the same group if there is any code to submit
3. Pull the code and package it (war package, or jar package)
4. Upload to Linux server
5. Check whether the current program is running
6. Close the current program
7. Start the new jar package
8. Observe the log to see if the startup is successful
9. If a colleague says that he still has code that has not been submitted... Repeat steps 1 to 8 again! ! ! ! ! (one morning gone)
Then, there is a tool that can automatically package and deploy the code after submitting it to git. The answer is yes: Jenkins
Of course, in addition to Jenkins, there are other tools that can automate deployment, such as Hudson, etc.
It's just that Jenkins is relatively more widely used.
2. Jenkins server construction and basic configuration
2.1. Introduction
Jenkins is an open source software project. It is a continuous integration tool developed based on Java. It is used to monitor continuous and repetitive work. It aims to provide an open and easy-to-use software platform to make continuous integration of software possible.
2.2. Implementation Principle of Jenkins Automatic Deployment

2.3. Jenkins deployment environment
Basic environment:
1. Jdk environment, Jenkins is developed in java language, because it needs jdk environment.
2. The git/svn client, because the general code is placed on the git/svn server, we need to pull the code.
3. Maven client, because the general java program is a maven project, it needs to be packaged by maven, of course there are other packaging methods, such as: gradle
The above is the basic environment required for the automatic deployment of the java program jenkins. Please install it in advance. The following will focus on the installation and deployment configuration of Jenkins.
2.4. Jenkins installation
1. Download the installation package jenkins.war;
2. Under the root path of the installation package, run the command java -jar jenkins.war --httpPort=8080, (the same for linux environment and Windows environment);
Supplement: A problem encountered by children's shoes, the feedback said that git automatically triggers an error 403, and adding the following parameters to start can solve the problem
nohup java -jar -Dhudson.security.csrf.GlobalCrumbIssuerConfiguration.DISABLE_CSRF_PROTECTION=true /usr/local/jenkins/jenkins.war --httpPort=8080 &
3. Open the browser and enter the link http://localhost:8080.
4. Fill in the initial password to activate the system

5. Enter the plug-in installation selection
Here it is recommended to choose and install the recommended plug-ins to ensure that the basic commonly used functions can be used.

After selection, enter the plug-in installation page

6. Set the initial user and password

7. Enter the system, the installation is complete

Note, if you still cannot enter the system, you need to wait a moment, or refresh the page, if you still cannot enter, you need to restart the jenkinds server.
2.5. Basic configuration of Jenkins
2.5.1. System initialization configuration
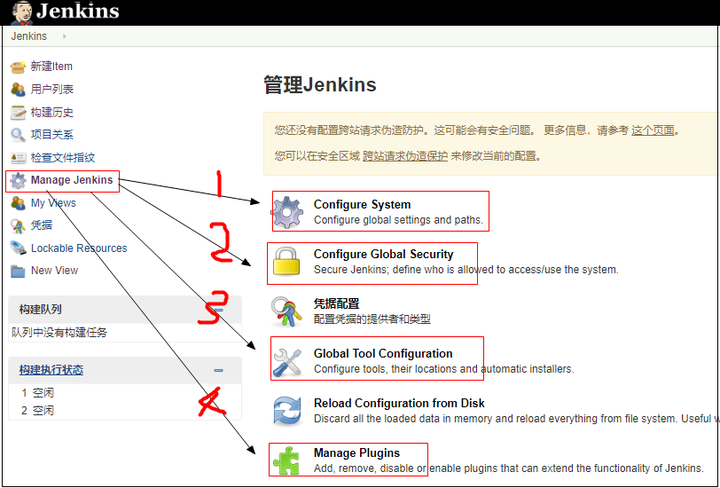
1.Configure System (system settings)
In the system settings, we only need to set the last item, configure the remote server address,
That is, the address information of the server where our code finally runs, just like we used xshell to log in to the Linux server when we manually deployed it before,
Of course, multiple remote Linux servers can be configured here. After the configuration is complete, click Save to prepare for our automatic deployment later. The configuration is as follows

2.Configure Global Security (global security configuration)
a. Configure user-related permissions

b. Configure the access rights of the hook program (notify when the code is updated) to avoid reporting 403 errors
It is checked by default, remove the check here

3.Global Tool Configuration (global tool configuration)
a. Configure maven's global settings path

b. configure jdk

c. configure git

d. Configure the installation path of maven

4. Configure the necessary plug-ins
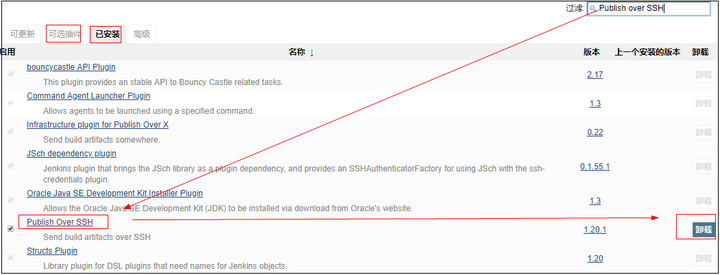
Mainly check whether the following two plug-ins have been installed
Plugin 1: Publish over SSH
Plugin 2: Deploy to container Plugin
Add picture annotations, no more than 140 characters (optional)
So far, we have configured a java program (springBoot+maven+gitHub) for automatic deployment. The basic necessary configuration is almost the same. If you need to configure it later in the configuration process.
3. Jenkins automated deployment (springBoot+maven+gitHub) project
3.1. Create project and configuration on Jenkins server
General steps: General (basic configuration)--"source code management--"build triggers--"build environment--"build--"post-build operations
1. Create a project

2. General (basic configuration)
Only the standard part needs to be filled in, others can be left blank

3. Source code management
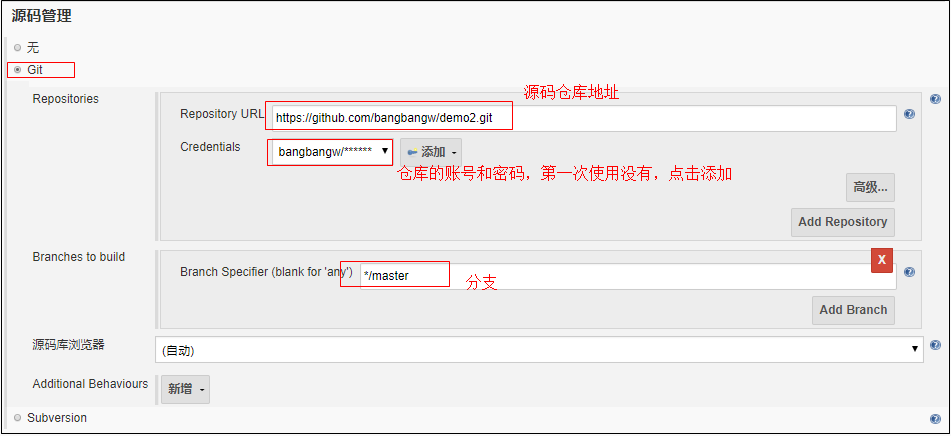
Click the "Add" button in the above figure to add a set of account and password

4. Build triggers

As shown above: the callback address of the current project is:
http://localhost:8080/job/jenkinsSpringBootDemo/build?token=token_demo2
As long as this address is executed (access and change the address on the browser), the project will initiate a build project, that is, pull the code to package and deploy the operation.
In practice, the address is changed by calling back the git server, which will be explained in detail later in the git server configuration.
It is worth noting that if you are learning and testing and using the GitHub service, make sure that your callback address has been mapped to the external network, that is, it can be accessed from the external network
5. Build environment (no configuration required)
6. Build

7. Post-build operations
Post-build operation means, after the jar is packaged, where to send the jar, after sending and starting, etc.
Here you need to configure the path on the server to be deployed in advance, write the script to start and stop the project, and set it as an executable script.
In fact, it is the script we usually manually deploy project operations on Linux

The stop.sh script given in the case is as follows:
1 #!/bin/bash
2 echo "Stop Procedure : demo2-0.0.1-SNAPSHOT.jar"
3 pid=`ps -ef |grep java|grep demo2-0.0.1-SNAPSHOT.jar|awk '{print $2}'`
4 echo 'old Procedure pid:'$pid
5 if [ -n "$pid" ]
6 then
7 kill -9 $pid
8 fi
The start.sh script given in the case is as follows:
1 #!/bin/bash
2 export JAVA_HOME=/usr/java/jdk1.8.0_131
3 echo ${JAVA_HOME}
4 echo 'Start the program : demo2-0.0.1-SNAPSHOT.jar'
5 chmod 777 /home/ldp/app/demo2-0.0.1-SNAPSHOT.jar
6 echo '-------Starting-------'
7 cd /home/ldp/app/
8 nohup ${JAVA_HOME}/bin/java -jar demo2-0.0.1-SNAPSHOT.jar &
9 echo 'start success'
At this point, the Jenkinds server configuration is complete, and then I have to configure the Linux server and Git server.
3.2. Linux server configuration
On the Linux service, upload the two scripts above for starting and stopping

3.3. GitHub server configuration
Configure the callback address mentioned above in the specified project on the GitHub server
Special Note: In order to ensure that the callback address network can be used,
I have put the address: http://localhost:8080/job/jenkinsSpringBootDemo/build?token=token_demo2,
External network mapping through peanut shells: http://zhishidi.imwork.net/job/jenkinsSpringBootDemo/build?token=token_demo2
Therefore, the following configuration is the external network mapping address.

All the configuration is done here, just modify the code, submit it to git, and then visit the program to see if it takes effect.
4. Test
1. Test code

2. Submit the code to git to trigger the build
3. Check on the GitHub server to see if it has been triggered
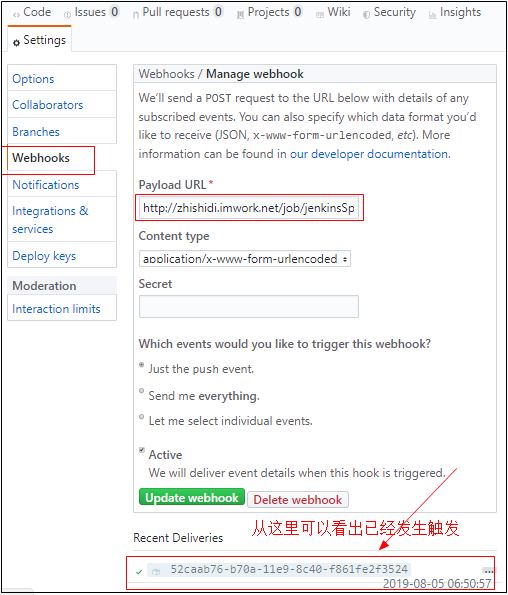
4. Check whether the Jenkins console is building
As can be seen from the figure below, building

5. View the console log of the current build

The description has been started successfully
6. Check the Linux server, whether to upload the code

7. Use the command jps on Linux to check whether it is started

8. Visit on the browser to see if it can be used
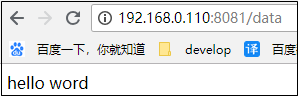
Instructions, it has been started normally and can be used.
9. Confirm again whether it can be deployed automatically
Modify the code, resubmit the code, and cycle through steps 1 to 8 to view.
If the test results are what you expected, then the automated deployment was successful.
5. Summary & Data Download
5.1. Summary
Automated deployment of Jenkins, as a tool, has very powerful functions,
Above we just talked about a main process of Java automated deployment in production.
For other functions, you can refer to the official document: Jenkins User Manual
However, based on the principle that learning is to solve production,
My personal suggestion is that you can learn whatever function of Jenkins you want to use.
There is no need to learn all the functions of Jenkins and use them.
Just like we use word documents, there is no system for him to start using word documents after learning them, but to learn which functions are used!
5.2. Related information
1. The source code address in the case: https://github.com/bangbangw/demo01.git
2. Official document: Jenkins User Manual
The code word is not easy, click like and go!