Requirements:
Realize the login login page to enter the user name and password. If the match fails, a prompt message will be displayed. If the match succeeds, it will jump to the index home page.
Each component in the index page is implemented through nested routing. Clicking on the first-level menu can dynamically display the second-level menu
1. Use vite to build the project
Install and initialize npm init vue@latest
select configuration
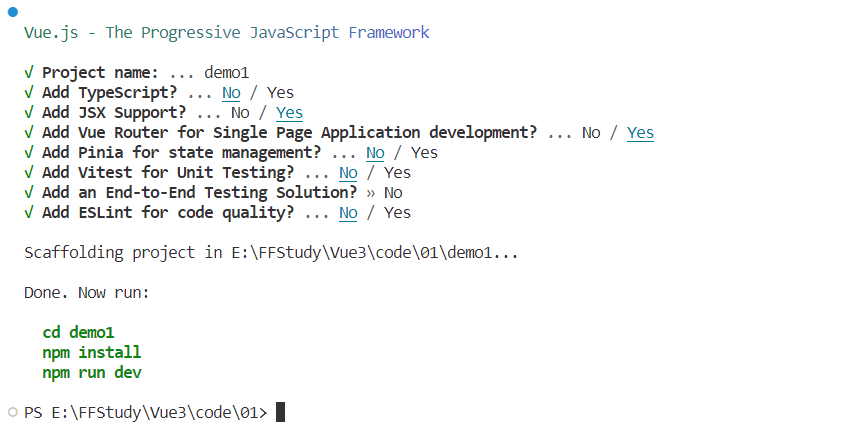
Enter the project directory, install the module npm i, start the project npm run dev
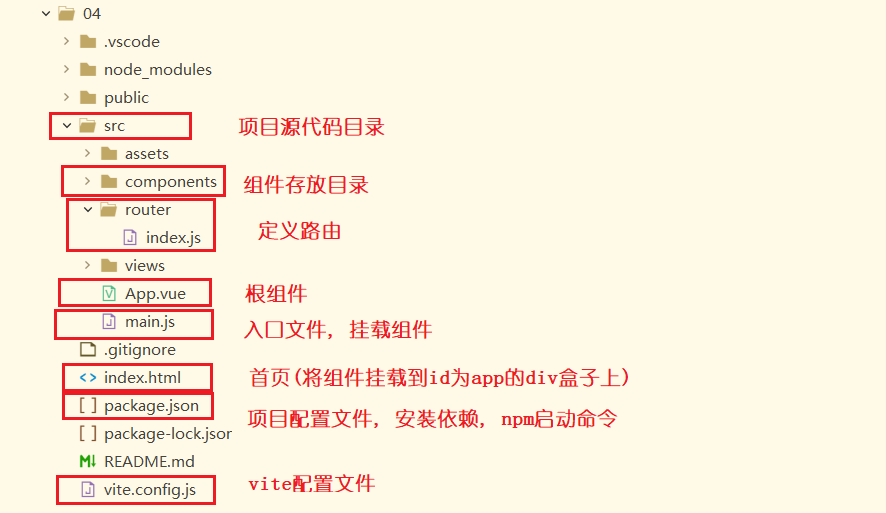
2. Project directory
Delete unnecessary components in the project, clear unnecessary css files (delete styles in src/assets/main.css)
3. Realize the login page jump
(1) Create a login page component src/components/Login.vue and create Index.vue
<template> write login page html
<style> writing style, use display: flex; the box will automatically become an inline block element
data() in <script> { return { save data } }, methods: { write various functions internally}
When entering the user name and password, the input form element requires two-way data binding through v-model, and the modifier .trim can be used to remove the leading and trailing spaces
Responsive data, stored in the data function and return the object through return
Bind the click event to the login button and trigger the login function
Implementation of the login login function:
Obtain the content of the input box and judge whether it is empty
Empty : display a prompt message
Not empty: judge whether the user name and password are correct
Correct : realize page jump, use this.$router.push()/replace()
Incorrect: display a prompt information
<template>
    <div class="login">
        <div class="box">
            <h1>Login</h1>
            <ul>
                <li>
                    <label>
                        <span>用户名</span>:
                        <!-- 1. 动态绑定    .trim去空 -->
                        <input type="text" v-model.trim="uname" placeholder="请输入用户名">
                    </label>
                </li>
                <li>
                    <label>
                        <span>密码</span>:
                       <input type="password" v-model.trim="password" placeholder="请输入密码">
                    </label>
                </li>
                <li class="tips" v-show="isShow">
                    {

    { tips }}
                </li>
                <li>
                    <button @click="login">登 录</button>
                </li>
            </ul>
        </div>
    </div>
</template>
<script>
    export default {
        data() {
            return {
                uname: '',
                password: '',
                tips: '',
                isShow: false, //控制tips是否显示, false默认不显示
            }
        },
        methods: {
            // 登录
            login() {
                // 2 .获取用户名和密码的值, 判断是否存在
                if (this.uname === '' || this.password === '') {
                    // 3. 用户名或密码为空
                    this.isShow = true //显示tips
                    this.tips = '用户名或密码不能为空 ! ! !'
                } else {
                    this.isShow = false
                    //  4. 用户名或密码不为空 , 判断用户名和密码是否正确
                    if (this.uname === 'mm' && this.password === '1111') {
                        // 5. 用户名和密码正确, 跳转页面
                        this.$router.push({
                            path: '/index'
                        })
                    } else {
                        // 6. 用户名或密码不正确
                        this.isShow = true //显示tips
                        this.tips = '用户名或密码错误 ! ! !'
                    }
                }
            }
        }
    }
</script>
<style scoped>
    div.login {
        display: flex;
        height: 100%;
        justify-content: center;
        align-items: center;
    }
    div.login div.box {
        width: 30%;
        height: 40%;
        background-color: #ffede7;
    }
    div.login div.box h1 {
        margin-top: 30px;
        text-align: center;
    }
    div.login div.box ul {
        position: relative;
        text-align: center;
        font-size: 20px;
    }
    div.login div.box ul li {
        margin: 30px auto;
        width: 80%;
    }
    div.login div.box ul li label {
        width: 100%;
    }
    div.login div.box ul li label span {
        display: inline-block;
        margin-right: 5px;
        width: 80px;
        text-align: justify;
        text-align-last: justify;
        text-justify: distribute-all-lines;
    }
    div.login div.box ul li label input {
        width: 65%;
        height: 40px;
        font-size: 18px;
        outline: 0;
        text-indent: 5px;  /* 默认文本值距离左边的距离*/
    }
    div.login div.box ul li button {
        margin-top: 15px;
        padding: 0 35%;
        width: 90%;
        height: 40px;
        text-align: justify;
        text-align-last: justify;
        font-size: 20px;
        border: 0;
        cursor: pointer;
        background-color: #ffe3d5;
    }
    div.login div.box ul li.tips {
        color: deeppink;
        font-size: 16px;
        position: absolute;
        bottom: 20px;
        left: 35px;
    }
</style>
Page effect:

(2) Start the project and go directly to the Login page
启动项目打开页面时, 直接进入Login页面, 尝试了一下两种方式
方式1: 将Login组件作为App.vue的子组件 (有问题)
在App.vue中引入组件
通过components:{}注册组件, 使用大驼峰命名规则
将组件作为标签来使用, 与注册组件名保持一致 <Login></Login>
问题:
(1) 在地址栏中输入任何内容, 都会跳转至登录页面
(2) 在页面进行跳转时, 地址栏中路径变化,但页面无法显示, 依旧为登录页面
[ 无法获取到路由实例 this.$router, 可能是定义路由中history模式没写() ]
原因:
把Login.vue组件作为App.vue中模板的内容, App.vue是项目根组件,作为页面入口, 任何路径都需要从该入口进入
<script>
    import Login from './components/Login.vue'
    export default{
        components:{ Login  }
    }
</script>
<template>
    <div>
         <Login></Login>
    </div>
</template>
<style scoped></style>
方式2: 通过路由实现(解决方式1带来的问题)
定义路由 router/index.js, 创建路由对象, 编写路径与组件的映射关系
import { createRouter, createWebHistory } from 'vue-router'
import Login from '../components/Login.vue'
import Index from '../components/Index.vue'

const router = createRouter({
//history模式中 hash模式在地址栏中前边会有一个/# , 并且未被发送到服务器,不需要在服务器层面上进行任何特殊处理
    history: createWebHistory(import.meta.env.BASE_URL),
    routes: [{
        path: '/login',
        name: 'Login',
        component: Login,
        alias: '/'
    }, {
        path: '/index',
        name: 'Index',
        component: Index,
        children: [{
            path: '/index/grade22',
            name: 'Grade22',
            component: Grade22,
        }, ]   //此处省略一些子路由的定义
    }]
})
export default router
在main.js中使用路由
import router from './router'
app.use(router)
在App.vue中使用路由占位符, 指定显示位置
<template>
    <div>
        <!-- 路由显示的指定区域, 两种标签均可 -->
        <!-- <RouterView></RouterView> -->
        <router-view></router-view>
    </div>
</template>
当输入无效路径时, 显示404页面 ( 创建404组件, 并定义路由 )
$route.params.paths 可获取动态路由参数
$router 指当前活跃的路由实例对象
{
   // 404     将所有匹配到的路径存放在  $route.params.paths 下, 将非法路径的所有部分作为参数
   //   /:paths(.*)*   无效路径打印后 [ "index", "grade19", "aaa" ]   最后的 * 是将每一部分都分割了   //   /:paths(.*)     index/grade19/aaa
   path: '/:paths(.*)*',
   component: NotFount
}
4.实现主页
一级标签使用超链接(<a>), 点击a标签会造成整个页面的刷新, 性能较低
使用<router-link to="">导航路由完成, 改变地址栏路径, 页面不会重新渲染,性能较高
<template>
    <div class="box">
        <div class="index">
            <ul class="title">
                <router-link to="/index/grade22"><li>2022级</li></router-link>
                <router-link to="/index/grade21"><li>2021级</li></router-link>
                <router-link to="/index/grade20"><li>2020级</li></router-link>
                <router-link to="/index/grade19"><li>2019级</li></router-link>
            </ul>
            <router-view></router-view>
        </div>
    </div>
</template>
在router/index.js中定义路由
发现Index组件中的子组件模板基本一样, 故只创建一个组件, 通过参数传递的方式实现
使用嵌套路由实现, 将Grade.vue 组件的内容显示在Index.vue中
routes: [{
            path: '/',
            name: 'Login',
            component: Login,
            alias: '/login'
        },{
            path: '/index',
            name: 'Index',
            component: Index,
            // redirect: 'grade/22',
            children: [{
                path: '/index/grade/:id',
                name: 'Grade',
                component: Grade,
                children: [{
                    path: 'grade/:id/spe',
                    name: 'Specialty',
                    component: Specialty,
                }]
            }, ]
        },{
            // 404     将所有匹配到的路径存放在  $route.params.paths 下, 将非法路径的所有部分作为参数
            //   /:paths(.*)*     无效路径打印后 [ "index", "grade19", "aaa" ]   最后的 * 是将每一部分都分割了
            // /:paths(.*)     index/grade19/aaa
            path: '/:paths(.*)*',
            component: NotFount
        }
    ]
Grade.vue组件中使用命名路由
<template>
<div class="specialty">
<ul>
<router-link to="/index/grade/22/spe"><li>计算机</li></router-link>
<router-link to="/index/grade/21/spe"><li>信管</li></router-link>
<router-link to="/index/grade/20/spe"><li>信计</li></router-link>
<router-link to="/index/grade/19/spe"><li>数学</li></router-link>
</ul>
<router-view ></router-view>
</div>
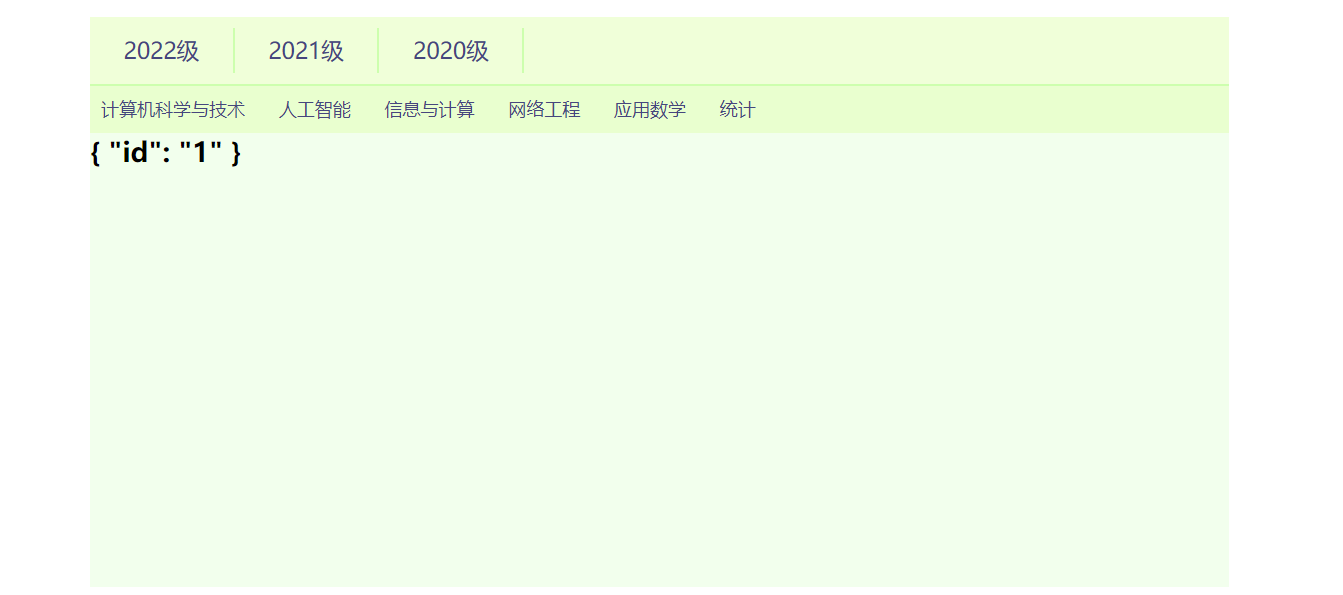
</template>5.实现点击一级菜单, 动态渲染二级菜单
将导航数据存储在Data.js中
在组件中获取参数, 可通过$route.pramas获取, 也可通过 props:[ ]接收参数
根据参数不同, 加载不同的菜单
<template>
    <div class="specialty">
        <ul>
            <router-link v-for="item of list" :to="{ name:'specialty', params:{id} }"><li>{

    { item }}</li></router-link>
        </ul>
        <router-view></router-view>
    </div>
</template>
<script>
    import data from '../Data.js';
    export default {
        data() {
            return {
                list: []
            }
        },
        props: ['id'],
        // 钩子函数
        mounted() {
            const id = this.$route.params.id;
            //做初始化
            this.list = data.filter(item => item.id == id)[0].items;
        },
        updated() {
            const id = this.$route.params.id;
            //更新时也要更新list
            this.list = data.filter(item => item.id == id)[0].items;
        }
    }
</script>
<style scoped>
    div.specialty ul {
        display: flex;
        background-color: #fff;
    }
    div.specialty ul li {
        padding: 10px 20px 10px 10px;
    }
</style>
效果图:
源代码放在这里啦~~~(大家帮忙提提点击量呗^^)